GetNoDown
IoT Deployment Strategist
2
MONTHS
2 2 MONTHS OF SERVICE
LEVEL 1
300 XP
What is SNMP?
Simple Network Management Protocol (SNMP) is a protocol for network management. It is used for collecting information from and configuring, network devices, such as servers, printers, hubs, switches, and routers on an Internet Protocol (IP) network. It usually runs on UDP port 161.
Download from Here
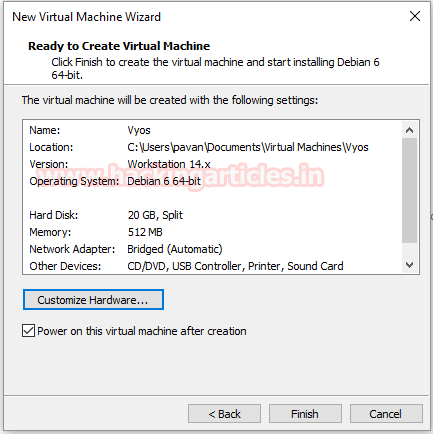
Create a New Virtual Machine using the VMware and change the Network Adapter to Bridged as shown in the given screenshot.
After completing the initial setup in the VMware Boot the Newly created Virtual Machine by clicking on the Power on the Virtual Machine.
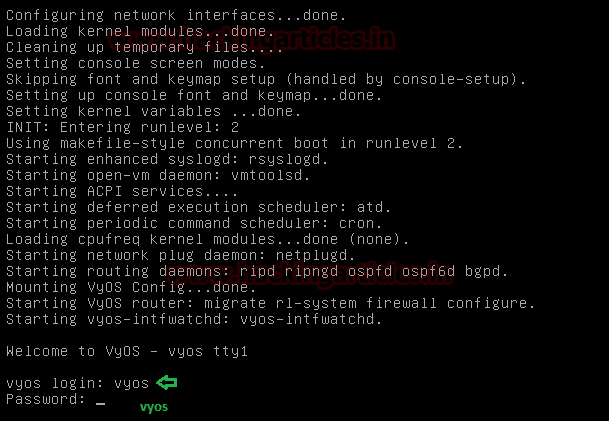
The Default Login Credentials for Vyos are
The Initial Boot of Vyos will be as shown below:
This is a Live Boot of the vyos, so we will install the vyos to use it properly.
We will use the ISO image to install vyos. Type the following command:

Enter “Yes” where it asks to continue.
Next, it will ask about the partition management.
Enter “Auto” where it asks about Partition.

It will detect the drives in the Virtual System and ask you to select the particular drive in which you want to install vyos.
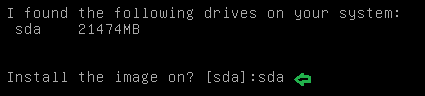
Enter “sda” where it asks about the location for installation.
Next, it will ask about the size for the root partition for the vyos.

You can enter any size from 1000MB to 21474MB. But it is recommended to keep it maximum i.e. 21474MB.
Next, it will ask about the name for the image.

By default, the name is set to the version number that is 1.1.8. You can either give a personalized name or you can leave it default.
Next, it will ask about the location to copy the sda.

It is recommended to keep it default.
After that, it will ask for the password to be kept for the administrator account.
By default, it is kept vyos. But from the security point of view, it is recommended to change it to something complex which is difficult to guess or brute force.

Now it will ask for the drive on which you want to set up GRUB Boot-loader? Again leave it to default to “sda”.

After that, we have completed the vyos setup. Reboot using the command
After reboot, it will ask for login credentials, Enter the credential that you entered during the installation.
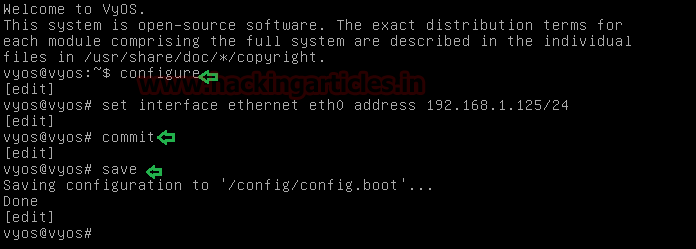
Now we will configure the Network Interface. To do that, we will have to enter the configuration mode.
After entering into configuration mode set up the Network interface
Syntax: set interface ethernet [network interface] address [Static IPv4 Address]
Now Commit and Save the Configuration
After that type “exit” to get out of configuration mode and then reboot the machine using “reboot” command
We are rebooting because the configuration changes come in effect only after a reboot.
You can then view the interface which we configured by using the command
Note: Above command will run in configuration mode.

Start SNMP service
Now we will set up the SNMP service in the Vyos.
For that, we will enter configuration mode using the command
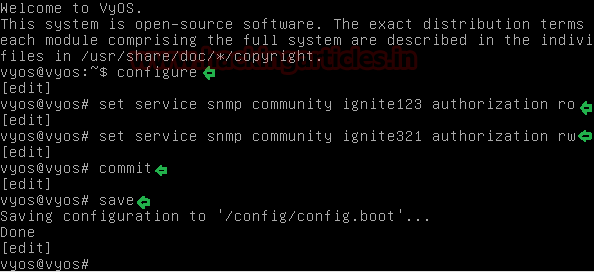
Now to set up the SNMP service we will need to add a community string and give it an authorization. To do that:
Syntax: set service SNMP community [community-string] authorization [auth-mode]
[community-string]: It can be anything but normally it is either public or private. But from a security point of view, it is recommended to keep it that cannot be easily guessed or brute-forced.
[auth-mode]: It is the Authorization Mode. We have two options
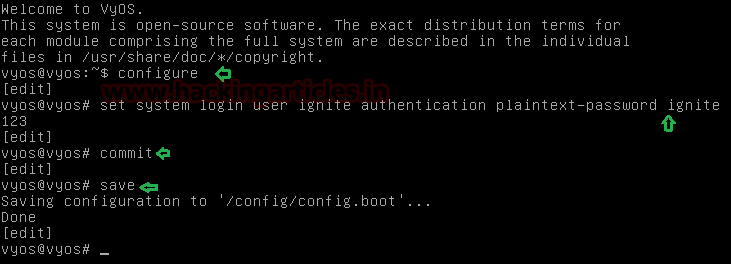
Now let’s set a user for the system.
Firstly Enter the Configuration Mode.
Now to add a user we will use the following command,
Syntax: set system login user [username] authentication plaintext-password [password]
After this commit the configuration and save it. Also, reboot the machine so that changes may take effect.
We have successfully completed the SNMP Lab in Vyos.
SNMP Enumeration using Kali Linux
Now that we have set up the SNMP service let’s pentest it through Kali Linux inbuilt tools one by one, where We can read and extract information using the community string that has the authorization of reading only but to change the information we will have to use the community string with the read and write authorization.
Nmap
Let’s check using nmap in Kali Linux Machine which is running on the same network.
[-sU]: UDP Ports as SNMP service runs on UDP port
[-p]: Specify Port Number; SNMP service runs on port 161 and 162
From given below image you can be observed that it has also shown port 161 is open.

Snmpwalk
snmpwalk is an SNMP application that uses SNMP GETNEXT requests to query a network entity for a tree of information.
Here
[-v]: Specifies what SNMP version to use (1, 2c, 3)
[-c]: Community String
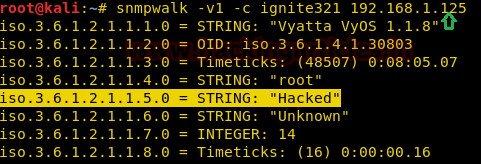
From given below image you can observe all details that are specified for “STRING”

Snmpwalk
We can manipulate these details using the iso id, using another tool snmpset. Here we are renaming the host string from vyos to hacked

Let’s check if the changes we implemented had an effect using snmpwalk
As you can see that we have successfully change the hostname from vyos to hacked.
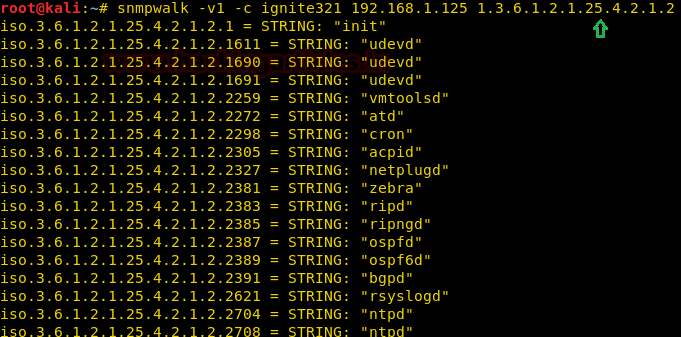
We can extract the number of information using snmpwalk


As the data extracted by SNMP walk is quite large we can extract that into a text file by using the command below
We can use gedit to view the extracted information

SNMP-Check
Like to snmpwalk, SNMP-check allows you to enumerate the SNMP devices and places the output in a very human readable friendly format. It could be useful for penetration testing or systems monitoring.
Here,
[-p]: To specify the port
[-c]: To specify Community String

Braa
Braa is a mass SNMP scanner. The intended usage of such a tool is, of course, making SNMP queries – but unlike snmpwalk from net-snmp, it is able to query dozens or hundreds of hosts simultaneously, and in a single process. Thus, it consumes very few system resources and does the scanning VERY fast.
Braa implements its OWN snmp stack, so it does NOT need any SNMP libraries like net-snmp.
Syntax: braa [Community-string]@[IP of SNMP server]:[iso id]

Metasploit
We can enumerate SNMP using a Metasploit module called snmp_enum.
We have fetched the same result from Metasploit as above.

Author: Pavandeep Singh is a Technical Writer, Researcher and Penetration Tester Contact here
Simple Network Management Protocol (SNMP) is a protocol for network management. It is used for collecting information from and configuring, network devices, such as servers, printers, hubs, switches, and routers on an Internet Protocol (IP) network. It usually runs on UDP port 161.
Download from Here
Create a New Virtual Machine using the VMware and change the Network Adapter to Bridged as shown in the given screenshot.
After completing the initial setup in the VMware Boot the Newly created Virtual Machine by clicking on the Power on the Virtual Machine.
The Default Login Credentials for Vyos are
Code:
Username: vyos
Password: vyos
The Initial Boot of Vyos will be as shown below:
This is a Live Boot of the vyos, so we will install the vyos to use it properly.
We will use the ISO image to install vyos. Type the following command:
Code:
install imageEnter “Yes” where it asks to continue.
Next, it will ask about the partition management.
Enter “Auto” where it asks about Partition.
It will detect the drives in the Virtual System and ask you to select the particular drive in which you want to install vyos.
Enter “sda” where it asks about the location for installation.
Next, it will ask about the size for the root partition for the vyos.
You can enter any size from 1000MB to 21474MB. But it is recommended to keep it maximum i.e. 21474MB.
Next, it will ask about the name for the image.
By default, the name is set to the version number that is 1.1.8. You can either give a personalized name or you can leave it default.
Next, it will ask about the location to copy the sda.
It is recommended to keep it default.
After that, it will ask for the password to be kept for the administrator account.
By default, it is kept vyos. But from the security point of view, it is recommended to change it to something complex which is difficult to guess or brute force.
Now it will ask for the drive on which you want to set up GRUB Boot-loader? Again leave it to default to “sda”.
After that, we have completed the vyos setup. Reboot using the command
Code:
rebootAfter reboot, it will ask for login credentials, Enter the credential that you entered during the installation.
Now we will configure the Network Interface. To do that, we will have to enter the configuration mode.
Code:
configureAfter entering into configuration mode set up the Network interface
Syntax: set interface ethernet [network interface] address [Static IPv4 Address]
Code:
set interface ethernet eth0 address 192.168.1.125/24Now Commit and Save the Configuration
Code:
commit
save
After that type “exit” to get out of configuration mode and then reboot the machine using “reboot” command
We are rebooting because the configuration changes come in effect only after a reboot.
You can then view the interface which we configured by using the command
Code:
show interfacesNote: Above command will run in configuration mode.
Start SNMP service
Now we will set up the SNMP service in the Vyos.
For that, we will enter configuration mode using the command
Code:
configureNow to set up the SNMP service we will need to add a community string and give it an authorization. To do that:
Syntax: set service SNMP community [community-string] authorization [auth-mode]
[community-string]: It can be anything but normally it is either public or private. But from a security point of view, it is recommended to keep it that cannot be easily guessed or brute-forced.
[auth-mode]: It is the Authorization Mode. We have two options
- [ro]: Read Only Authorization (It can only be used to read or extract data, we can change it using this string)
- [rw]: Read Write Authorization (It can be used to change the data using the string)
Code:
set service snmp community ignite123 authorization ro
set service snmp community ignite321 authorization rw
Now let’s set a user for the system.
Firstly Enter the Configuration Mode.
Code:
configureNow to add a user we will use the following command,
Syntax: set system login user [username] authentication plaintext-password [password]
Code:
set system login user ignite authentication plaintext-password ignite123After this commit the configuration and save it. Also, reboot the machine so that changes may take effect.
We have successfully completed the SNMP Lab in Vyos.
SNMP Enumeration using Kali Linux
Now that we have set up the SNMP service let’s pentest it through Kali Linux inbuilt tools one by one, where We can read and extract information using the community string that has the authorization of reading only but to change the information we will have to use the community string with the read and write authorization.
Nmap
Let’s check using nmap in Kali Linux Machine which is running on the same network.
Code:
nmap –sU –p161,162 192.168.1.125[-sU]: UDP Ports as SNMP service runs on UDP port
[-p]: Specify Port Number; SNMP service runs on port 161 and 162
From given below image you can be observed that it has also shown port 161 is open.
Snmpwalk
snmpwalk is an SNMP application that uses SNMP GETNEXT requests to query a network entity for a tree of information.
Code:
snmpwalk -v1 -c ignite321 192.168.1.125Here
[-v]: Specifies what SNMP version to use (1, 2c, 3)
[-c]: Community String
From given below image you can observe all details that are specified for “STRING”
Snmpwalk
We can manipulate these details using the iso id, using another tool snmpset. Here we are renaming the host string from vyos to hacked
Code:
snmpset –v1 –c ignite321 192.168.1.125 iso.3.6.1.2.1.1.5.0.s HackedLet’s check if the changes we implemented had an effect using snmpwalk
Code:
snmpwalk –v1 –c ignite321 192.168.1.125As you can see that we have successfully change the hostname from vyos to hacked.
We can extract the number of information using snmpwalk
Code:
snmpwalk –v1 -c ignite321 192.168.1.125 1.3.6.1.2.1.25.4.2.1.2
Code:
snmpwalk –v1 -c ignite321 192.168.1.125 1.3.6.1.2.1.6.13.1.3
Code:
snmpwalk -v1 –c ignite321 192.168.1.125 1.3.6.1.2.1.25.6.3.1.2As the data extracted by SNMP walk is quite large we can extract that into a text file by using the command below
Code:
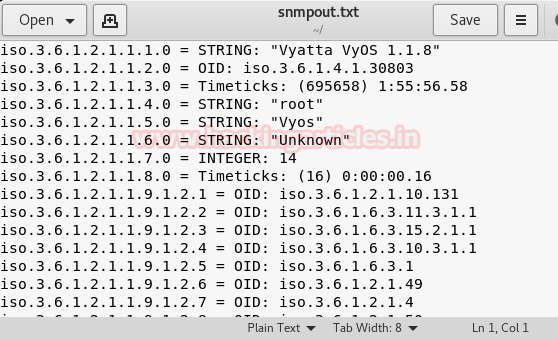
snmpwalk –v1 -c ignite321 192.168.1.125 > snmpout.txtWe can use gedit to view the extracted information
Code:
gedit snmpout.txtSNMP-Check
Like to snmpwalk, SNMP-check allows you to enumerate the SNMP devices and places the output in a very human readable friendly format. It could be useful for penetration testing or systems monitoring.
Code:
snmp-check 192.168.1.125 -p 161 -c ignite123Here,
[-p]: To specify the port
[-c]: To specify Community String
Braa
Braa is a mass SNMP scanner. The intended usage of such a tool is, of course, making SNMP queries – but unlike snmpwalk from net-snmp, it is able to query dozens or hundreds of hosts simultaneously, and in a single process. Thus, it consumes very few system resources and does the scanning VERY fast.
Braa implements its OWN snmp stack, so it does NOT need any SNMP libraries like net-snmp.
Syntax: braa [Community-string]@[IP of SNMP server]:[iso id]
Code:
braa [email protected]:.1.3.6.*Metasploit
We can enumerate SNMP using a Metasploit module called snmp_enum.
Code:
use auxiliary/scanner/snmp/snmp_enum
msf auxiliary(scanner/snmp/snmp_enum) > set rhosts 192.168.1.125
msf auxiliary(scanner/snmp/snmp_enum) > set community ignite123
msf auxiliary(scanner/snmp/snmp_enum) > run
We have fetched the same result from Metasploit as above.
Author: Pavandeep Singh is a Technical Writer, Researcher and Penetration Tester Contact here