cracker16
Couch Co-Op King
2
MONTHS
2 2 MONTHS OF SERVICE
LEVEL 1
300 XP
PHP Insert Image In MySQL
In this article, we are going to discuss PHP Insert Image In MySQL. We are going to create image file upload using PDO in PHP. This will be easy if you read or follow our previous tutorial in PHP Inserting Data To MySQL.
Let’s start with:
Creating our Table
We are going to make our database.
Creating the Form Field - Modal Form
Creating Database Connection
Creating Insert Statement
Source Code for displaying data
Output:
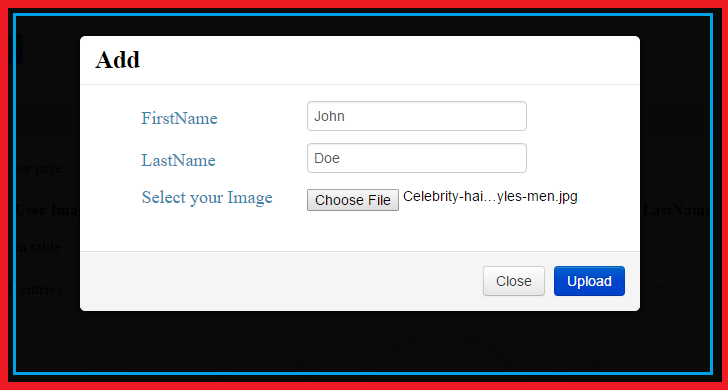
Adding new user.
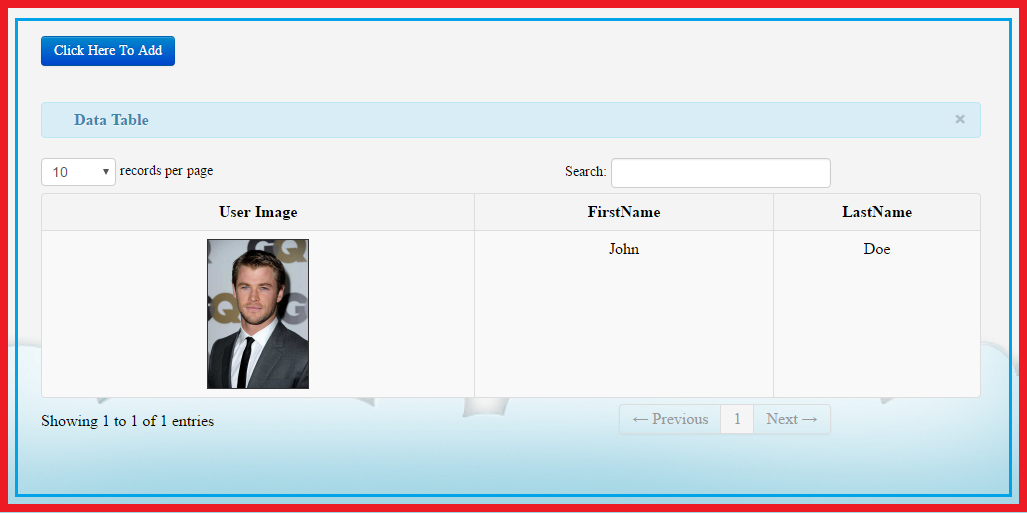
After adding a user.
And, that's all. Kindly click the "Download Code" button for a full source code. Enjoy coding. Thank you very much.
So what can you say about this work? Share your thoughts in the comment section below or email me at [email protected]. Practice Coding. Thank you very much.
Download
In this article, we are going to discuss PHP Insert Image In MySQL. We are going to create image file upload using PDO in PHP. This will be easy if you read or follow our previous tutorial in PHP Inserting Data To MySQL.
Let’s start with:
Creating our Table
We are going to make our database.
- Open the PHPMyAdmin.
- Create a database and name it as "upload_image".
- After creating a database name, then we are going to create our table. And name it as "tbl_image".
- Kindly copy the code below.
- CREATE
TABLE
`tbl_image`
(
- `tbl_image_id`
INT
(
11
)
NOT
NULL
,
- `first_name`
VARCHAR
(
100
)
NOT
NULL
,
- `last_name`
VARCHAR
(
100
)
NOT
NULL
,
- `image_location`
VARCHAR
(
100
)
NOT
NULL
- )
ENGINE=
InnoDB DEFAULT
CHARSET=
latin1;
Creating the Form Field - Modal Form
- <!-- Modal -->
- <div
id
=
"myModal"
class
=
"modal hide fade"
tabindex
=
"-1"
role=
"dialog"
aria-labelledby=
"myModalLabel"
aria-hidden=
"true"
>
- <div
class
=
"modal-header"
>
- <h3
id
=
"myModalLabel"
>
Add</
h3
>
- </
div
>
- <div
class
=
"modal-body"
>
- <form
method
=
"post"
action
=
"upload.php"
enctype
=
"multipart/form-data"
>
- <table
class
=
"table1"
>
- <tr
>
- <td
><label
style
=
"color:#3a87ad; font-size:18px;"
>
FirstName</
label
></
td
>
- <td
width
=
"30"
></
td
>
- <td
><input
type
=
"text"
name
=
"first_name"
placeholder=
"FirstName"
required /
></
td
>
- </
tr
>
- <tr
>
- <td
><label
style
=
"color:#3a87ad; font-size:18px;"
>
LastName</
label
></
td
>
- <td
width
=
"30"
></
td
>
- <td
><input
type
=
"text"
name
=
"last_name"
placeholder=
"LastName"
required /
></
td
>
- </
tr
>
- <tr
>
- <td
><label
style
=
"color:#3a87ad; font-size:18px;"
>
Select your Image</
label
></
td
>
- <td
width
=
"30"
></
td
>
- <td
><input
type
=
"file"
name
=
"image"
></
td
>
- </
tr
>
- </
table
>
- </
div
>
- <div
class
=
"modal-footer"
>
- <button
class
=
"btn"
data-dismiss=
"modal"
aria-hidden=
"true"
>
Close</
button
>
- <button
type
=
"submit"
name
=
"Submit"
class
=
"btn btn-primary"
>
Upload</
button
>
- </
div
>
- </
form
>
- </
div
>
Creating Database Connection
- <?php
- $conn
=
new
PDO(
'mysql:host=localhost; dbname=upload_image'
,
'root'
,
''
)
;
- ?>
Creating Insert Statement
- <?php
- require_once
(
'db.php'
)
;
- if
(
isset
(
$_POST
[
'Submit'
]
)
)
{
- move_uploaded_file
(
$_FILES
[
"image"
]
[
"tmp_name"
]
,
"uploads/"
.
$_FILES
[
"image"
]
[
"name"
]
)
;
- $location
=
$_FILES
[
"image"
]
[
"name"
]
;
- $fname
=
$_POST
[
'first_name'
]
;
- $lname
=
$_POST
[
'last_name'
]
;
- $conn
->
setAttribute
(
PDO::
ATTR_ERRMODE
,
PDO::
ERRMODE_EXCEPTION
)
;
- $sql
=
"INSERT INTO tbl_image (first_name, last_name, image_location)
- VALUES ('$fname
', '$lname
', '$location
')"
;
- $conn
->
exec
(
$sql
)
;
- echo
"<script>alert('Successfully Added!!!'); window.location='index.php'</script>"
;
- }
- ?>
Source Code for displaying data
- <table
cellpadding
=
"0"
cellspacing
=
"0"
border
=
"0"
class
=
"table table-striped table-bordered"
id
=
"example"
>
- <div
class
=
"alert alert-info"
>
- <button
type
=
"button"
class
=
"close"
data-dismiss=
"alert"
>
×
</
button
>
- <strong
><i
class
=
"icon-user icon-large"
></
i
>
Data Table</
strong
>
- </
div
>
- <thead
>
- <tr
>
- <th
style
=
"text-align:center;"
>
User Image</
th
>
- <th
style
=
"text-align:center;"
>
FirstName</
th
>
- <th
style
=
"text-align:center;"
>
LastName</
th
>
- </
tr
>
- </
thead
>
- <tbody
>
- <?php
- require_once(
'db.php'
)
;
- $result =
$conn->
prepare("SELECT * FROM tbl_image ORDER BY tbl_image_id ASC");
- $result->execute();
- for($i=0; $row = $result->fetch(); $i++){
- $id=$row['tbl_image_id'];
- ?>
- <tr
>
- <td
style
=
"text-align:center; margin-top:10px; word-break:break-all; width:450px; line-height:100px;"
>
- <?php if(
$row[
'image_location'
]
!=
""
)
: ?>
- <img
src
=
"uploads/<?php echo $row['image_location']; ?>
" width="100px" height="100px" style="border:1px solid #333333;">
- <?php else: ?>
- <img
src
=
"images/default.png"
width
=
"100px"
height
=
"100px"
style
=
"border:1px solid #333333;"
>
- <?php endif; ?>
- </
td
>
- <td
style
=
"text-align:center; word-break:break-all; width:300px;"
>
<?php echo $row [
'first_name'
]
; ?></
td
>
- <td
style
=
"text-align:center; word-break:break-all; width:200px;"
>
<?php echo $row [
'last_name'
]
; ?></
td
>
- </
tr
>
- <?php }
?>
- </
tbody
>
- </
table
>
Output:
Adding new user.
After adding a user.
And, that's all. Kindly click the "Download Code" button for a full source code. Enjoy coding. Thank you very much.
So what can you say about this work? Share your thoughts in the comment section below or email me at [email protected]. Practice Coding. Thank you very much.
Download
You must upgrade your account or reply in the thread to view hidden text.