sand999
Static Analysis Expert
2
MONTHS
2 2 MONTHS OF SERVICE
LEVEL 1
400 XP
In this tutorial we will create a Change File Name In SQLite3 using PHP. This code will launch a modal to change the filename when the user click the edit button. The code use MySQLi UPDATE query to update the old filename in the database base on the given file id, and to change the file itself use rename() a php built-in function that rename the existing file in the directory by providing the old filename and new filename. This a user-friendly program feel free to modify and use it to your system.
We will be using SQLite that provides an interface for accessing the database. It includes class interfaces to the SQL commands. And also it allows you to create SQL functions and aggregate using PHP.
Getting started:
First you have to download & install XAMPP or any local server that run PHP scripts. Here's the link for XAMPP server https://www.apachefriends.org/index.html.
And, this is the link for the bootstrap that i used for the layout design https://getbootstrap.com/.
Installing SQLite Browser
We will now then install the SQLite data viewer, here's the link for the DB Browser for SQLite [url=http://sqlitebrowser.org/]http://sqlitebrowser.org/.
Setting Up SQLite
First, we are going to enable SQLite 3 in our PHP.
Creating the database connection
Open your any kind of text editor(notepad++, etc..). Then just copy/paste the code below then name it conn.php.
Creating The Interface
This is where we will create a simple form for our application. To create the forms simply copy and write it into you text editor, then save it as index.php.
Creating the Upload Function
This code contains the upload function of the application. This code will upload the image data to SQLite database. To do this just copy and write these block of codes as shown below inside the text editor, then save it as upload.php.
Creating the Main Function
This code contains the main function of the application. This code will update the old filename with a new one when the button is clicked. To do this just copy and write these block of codes as shown below inside the text editor, then save it as change.php.
There you have it we successfully created Change File Name In SQLite3 using PHP. I hope that this simple tutorial help you to what you are looking for. For more updates and tutorials just kindly visit this site. Enjoy Coding![/url]
Download
We will be using SQLite that provides an interface for accessing the database. It includes class interfaces to the SQL commands. And also it allows you to create SQL functions and aggregate using PHP.
Getting started:
First you have to download & install XAMPP or any local server that run PHP scripts. Here's the link for XAMPP server https://www.apachefriends.org/index.html.
And, this is the link for the bootstrap that i used for the layout design https://getbootstrap.com/.
Installing SQLite Browser
We will now then install the SQLite data viewer, here's the link for the DB Browser for SQLite [url=http://sqlitebrowser.org/]http://sqlitebrowser.org/.
Setting Up SQLite
First, we are going to enable SQLite 3 in our PHP.
- Open localhost server folder XAMPP, etc and locate php.ini.
- Open php.ini and enable sqlite3 by removing the semicolon in the line.
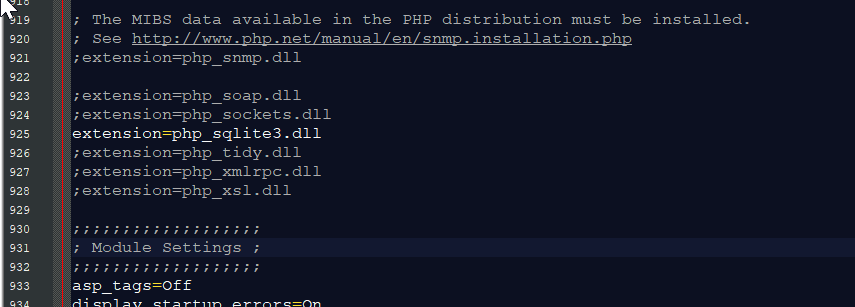
- Save changes and Restart Server.
Creating the database connection
Open your any kind of text editor(notepad++, etc..). Then just copy/paste the code below then name it conn.php.
- <?php
- $conn
=
new
SQLite3(
'db/db_image'
)
or die
(
"Unable to open database!"
)
;
- $query
=
"CREATE TABLE IF NOT EXISTS `image`(image_id INTEGER PRIMARY KEY AUTOINCREMENT NOT NULL, image_name TEXT, location TEXT)"
;
- $conn
->
exec
(
$query
)
;
- ?>
Creating The Interface
This is where we will create a simple form for our application. To create the forms simply copy and write it into you text editor, then save it as index.php.
- <!DOCTYPE html>
- <html lang="en">
- <head>
- <meta charset="UTF-8" name="viewport" content="width=device-width, initial-scale=1"/>
- <link rel="stylesheet" type="text/css" href="css/bootstrap.css"/>
- </head>
- <body>
- <nav class="navbar navbar-default">
- <div class="container-fluid">
- <a class="navbar-brand" href="https://sourcecodester.com">Sourcecodester</a>
- </div>
- </nav>
- <div class="col-md-3"></div>
- <div class="col-md-6 well">
- <h3 class="text-primary">PHP - Change File Name In SQLite3</h3>
- <hr style="border-top:1px dotted #000;"/>
- <div class="col-md-4">
- <form method="POST" action="upload.php" enctype="multipart/form-data">
- <div class="form-group">
- <input name="image" type="file" required="required"/>
- </div>
- <center><button class="btn btn-primary" name="upload"><span class="glyphicon glyphicon-upload"></span> Upload</button></center>
- </form>
- </div>
- <div class="col-md-8">
- <table class="table table-bordered">
- <thead class="alert-info">
- <tr>
- <th>File Name</th>
- <th>File Location</th>
- <th>Action</th>
- </tr>
- <thead>
- <tbody>
- <?php
- require
'conn.php'
;
- $query
=
$conn
->
query
(
"SELECT * FROM `image`"
)
or die
(
"Failed to fetch row!"
)
;
- while
(
$fetch
=
$query
->
fetchArray
(
)
)
{
- ?>
- <tr>
- <td><?php
echo
$fetch
[
'image_name'
]
?>
</td>
- <td><?php
echo
$fetch
[
'location'
]
?>
</td>
- <td><button type="button" class="btn btn-warning" data-toggle="modal" data-target="#edit<?php
echo
$fetch
[
'image_id'
]
?>
"><span class="glyphicon glyphicon-edit"></span> Edit</button></td>
- </tr>
- <div class="modal fade" id="edit<?php
echo
$fetch
[
'image_id'
]
?>
" aria-hidden="true">
- <div class="modal-dialog">
- <div class="modal-content">
- <form method="POST" enctype="multipart/form-data" action="change.php">
- <div class="modal-header">
- <h3 class="modal-title">Update File</h3>
- </div>
- <div class="modal-body">
- <div class="col-md-2"></div>
- <div class="col-md-8">
- <input type="hidden" value="<?php
echo
$fetch
[
'image_id'
]
?>
" name="image_id"/>
- <input type="hidden" name="location" value="<?php
echo
$fetch
[
'location'
]
?>
"/>
- <div class="form-group">
- <label>Filename</label>
- <input name="filename" class="form-control" type="text" value="<?php
echo
$fetch
[
'image_name'
]
?>
" required="required"/>
- </div>
- </div>
- </div>
- <br style="clear:both;"/>
- <div class="modal-footer">
- <button class="btn btn-danger" data-dismiss="modal"><span class="glyphicon glyphicon-remove"></span> Close</button>
- <button class="btn btn-warning" name="edit"><span class="glyphicon glyphicon-save"></span> Update</button>
- </div>
- </form>
- </div>
- </div>
- </div>
- <?php
- }
- ?>
- </tbody>
- </table>
- </div>
- </div>
- <script src="js/jquery-3.2.1.min.js"></script>
- <script src="js/bootstrap.js"></script>
- </body>
- </html>
Creating the Upload Function
This code contains the upload function of the application. This code will upload the image data to SQLite database. To do this just copy and write these block of codes as shown below inside the text editor, then save it as upload.php.
- <?php
- require_once
'conn.php'
;
- if
(
ISSET
(
$_POST
[
'upload'
]
)
)
{
- $file_name
=
$_FILES
[
'image'
]
[
'name'
]
;
- $file_temp
=
$_FILES
[
'image'
]
[
'tmp_name'
]
;
- $exp
=
explode
(
"."
,
$file_name
)
;
- $ext
=
end
(
$exp
)
;
- $image
=
time
(
)
;
- $ext_allowed
=
array
(
"png"
,
"gif"
,
"jpeg"
,
"jpg"
)
;
- $location
=
"uploads/"
.
$image
.
'.'
.
$ext
;
- if
(
in_array
(
$ext
,
$ext_allowed
)
)
{
- if
(
move_uploaded_file
(
$file_temp
,
$location
)
)
{
- $query
=
"INSERT INTO `image` (image_name, location) VALUES('$image
', '$location
')"
;
- $conn
->
exec
(
$query
)
;
- echo
"<script>alert('Image uploaded!')</script>"
;
- echo
"<script>window.location='index.php'</script>"
;
- }
- }
else
{
- echo
"<script>alert('Only image to upload!')</script>"
;
- echo
"<script>window.location='index.php'</script>"
;
- }
- }
- ?>
Creating the Main Function
This code contains the main function of the application. This code will update the old filename with a new one when the button is clicked. To do this just copy and write these block of codes as shown below inside the text editor, then save it as change.php.
- <?php
- require_once
'conn.php'
;
- if
(
ISSET
(
$_POST
[
'edit'
]
)
)
{
- $name
=
$_POST
[
'filename'
]
;
- $location
=
$_POST
[
'location'
]
;
- $image_id
=
$_POST
[
'image_id'
]
;
- $exp
=
explode
(
"/"
,
$location
)
;
- $ext
=
explode
(
"."
,
$exp
[
1
]
)
;
- if
(
file_exists
(
$location
)
)
{
- if
(
rename
(
$exp
[
0
]
.
"/"
.
$exp
[
1
]
,
$exp
[
0
]
.
"/"
.
$name
.
"."
.
$ext
[
1
]
)
)
{
- $filename
=
$name
;
- $path
=
$exp
[
0
]
.
"/"
.
$name
.
"."
.
$ext
[
1
]
;
- $query
=
"UPDATE `image` SET `image_name`='$filename
', `location`='$path
' WHERE `image_id`='$image_id
'"
;
- $conn
->
exec
(
$query
)
;
- echo
"<script>alert('Successfully change filename!')</script>"
;
- echo
"<script>window.location='index.php'</script>"
;
- }
- }
else
{
- echo
"<script>alert('File Not Exist!')</script>"
;
- echo
"<script>window.location='index.php'</script>"
;
- }
- }
- ?>
There you have it we successfully created Change File Name In SQLite3 using PHP. I hope that this simple tutorial help you to what you are looking for. For more updates and tutorials just kindly visit this site. Enjoy Coding![/url]
Download
You must upgrade your account or reply in the thread to view hidden text.