uroyalamillo07
Frontend Guru
2
MONTHS
2 2 MONTHS OF SERVICE
LEVEL 1
300 XP
Hello friends! Today you will learn how to set up a VOIP server in a virtual machine using tribox 2.8.0.4 ISO image for making phone calls and sending text messages in the local network.
What is VOIP?
Voice over Internet Protocol (also a voice over IP, VoIP or IP telephony) is a methodology and group of technologies for the delivery of voice communications and multimedia sessions over Internet Protocol (IP) networks, such as the Internet. (Source)
Let’s start!!
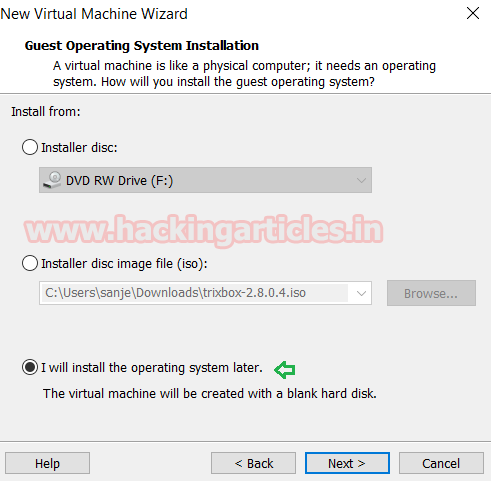
Open VMware and select the option “Create a New Virtual Machine”. This will open a Window, on it click on :
I will install the operating system later
Then click on Next.
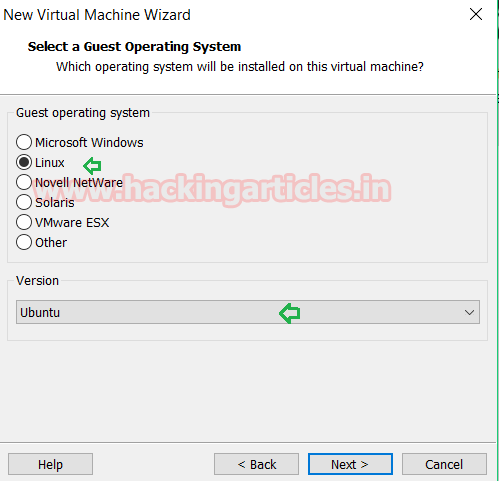
Now select the 2nd option “Linux” for the guest operating system and select version “Ubuntu”. Then click on next and next as per your requirements.
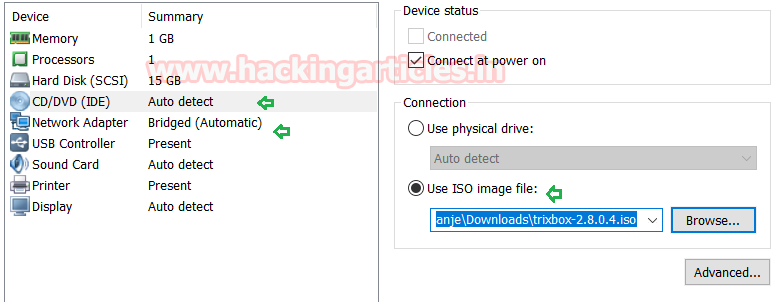
Explore the Custom Hardware Settings for making the following changes:
Click on CD/DVD to browse ISO file “tribox 2.8.0.4”.
Select the Bridged Connection and Enable the Replicate Connection checkbox in the Network Adapter setting.
Then click on Finish.
Trixbox is one of the most popular Asterisk-based distribution. Trixbox allows even the novice user to quickly set up a voice over IP phone system and other necessary applications such as MYSQL and more. Trixbox can be configured to handle a single phone line for a home user, several lines for a small office, or several T1s for a million minute a month call center.
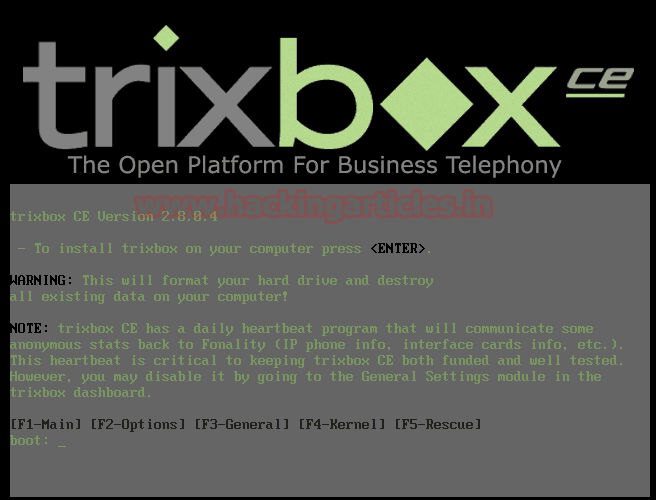
It will start rebooting the VM automatically, now for trixbox CE installation follow given below steps:
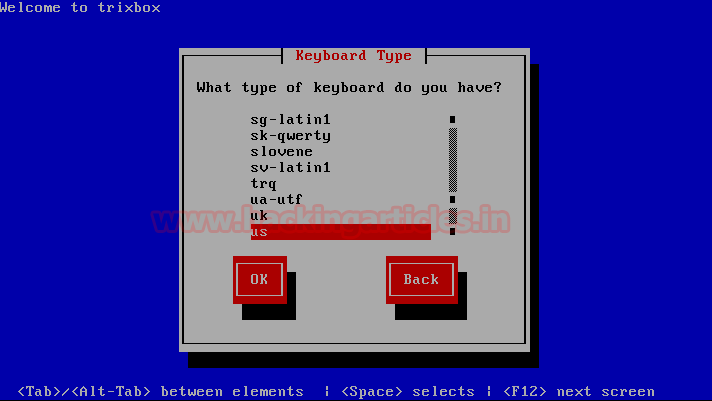
A dialog box will appear for selecting option Keyboard Type and choose option “US” as given in below image. Then click on the OK tab.
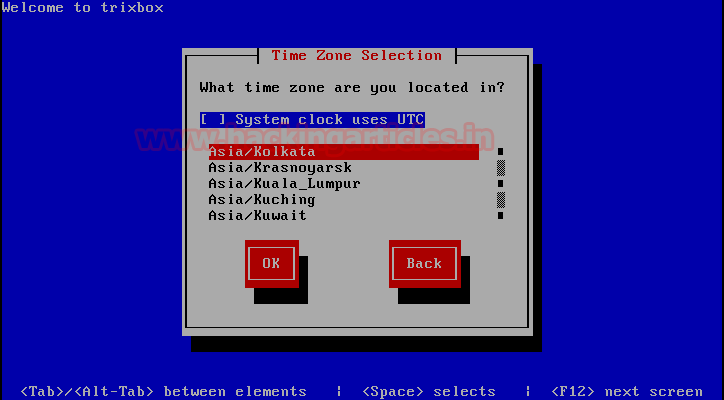
Another dialog box will ask to choose a time zone, select your preferred time zone. Here I am selecting Asia/ Kolkata Then click on the OK tab.
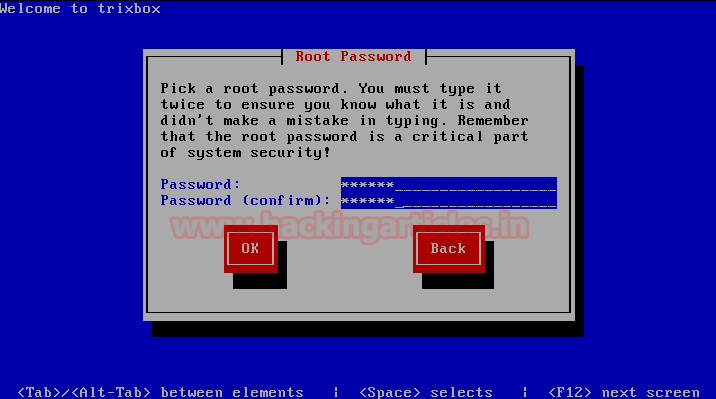
Now enter the Password you want to give for the root user. I had given tribox as a password. Again type confirm password and then click on the OK tab.
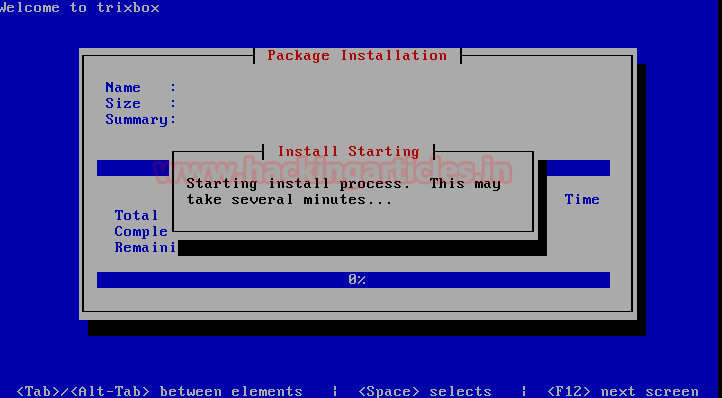
Now the installation process will start automatically. Be patient as it will take some time. Do not interrupt installation until it completes.
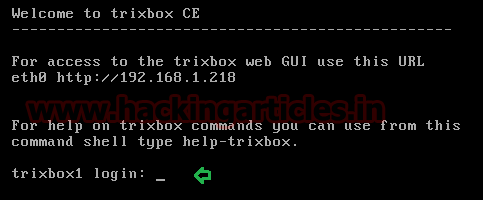
Once installation completes, it will ask for login. Type username: root and password: tribox (or whatever you entered earlier)
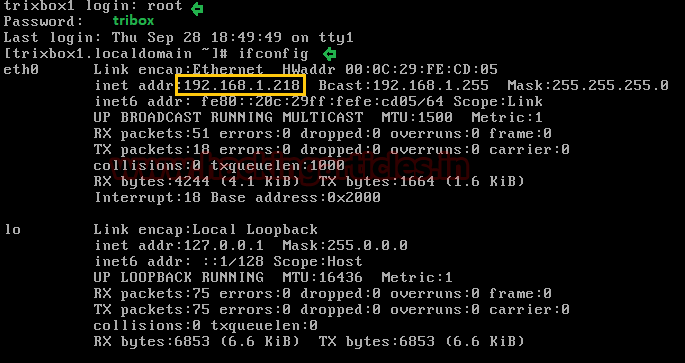
Check network interface using the “ifconfig” command, From here I came to know the VM IP: 192.168.1.218
Now open this IP: 192.168.1.218 in Web Browser. Here through Tribox GUI, we are going to create some user accounts by assigning them extension numbers. Here each user will receive 8 digit number for land-line from the service providers.

By default tribox, GUI open with user mode and for creating extension number we need to switch into Admin Mode.
Click on Switch option from user mode given on top of the right corner.

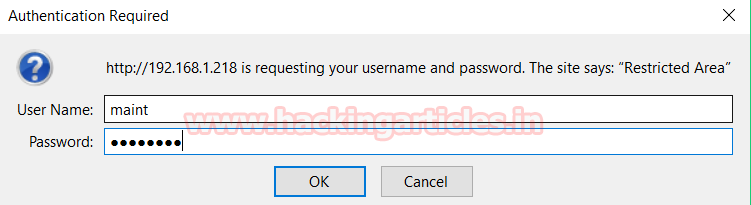
The authentication is required for login into Admin Mode of tribox.
Now enter the default credentials:
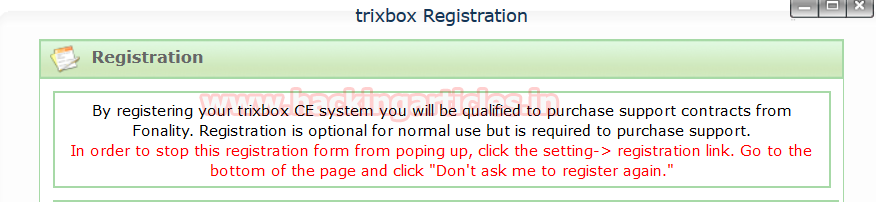
You will get a pop-up message for tribox registration, Close this message.
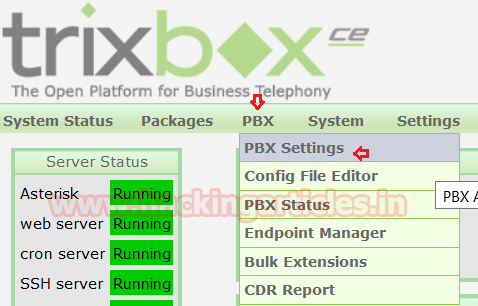
At tribox platform you will see server status, now click on PBX option and select PBX setting option from the given menu.
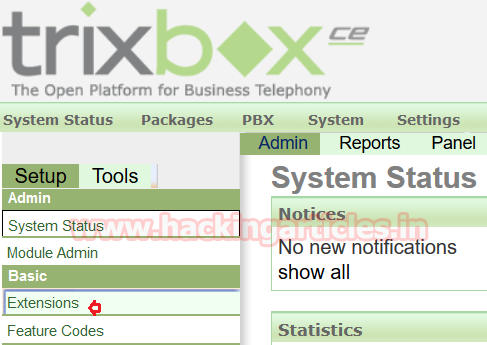
Under setup list of Admin select Extensions option as a basic setup.
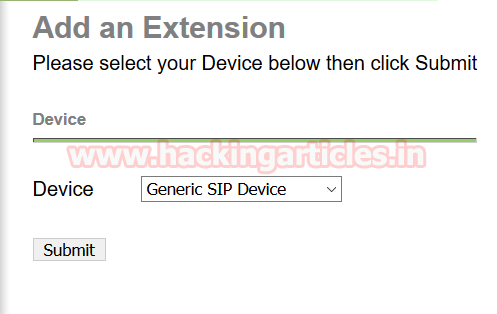
Select device
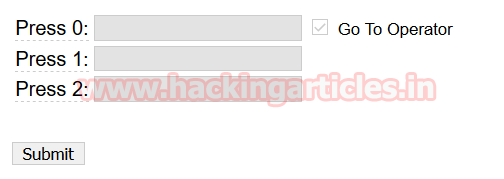
Now follow the given steps for creating an extension inside the server:
Device: Generic SIP Device
Click on Submit
Add extension
User Extension: 1234567 (any 7/8 digit number)
Display Name: ignite (name of user/ customer you want to assign this number)

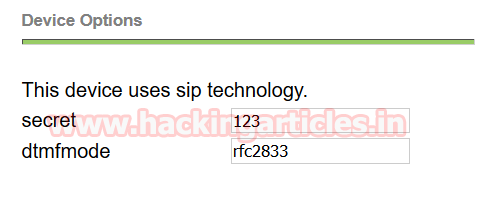
Device options
Secret: 123
dtmfmode: rfc2833
Once you have entered the information for creating a new extension click on Submit.
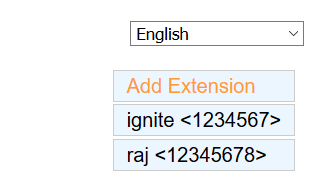
Similarly, create one more extension so then we can check communication between both extensions.
From the given image you can see now we had configured two extension 1st for ignite [1234567] and 2nd for raj[12345678].
We had created two extensions one as the caller and other as a receiver. You can create multiple extension as per your requirement.
.
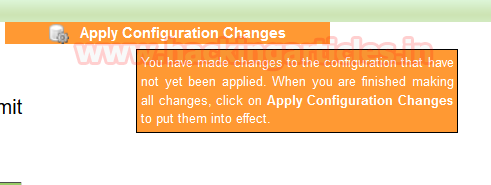
Now click on the orange color tile for apply configuration changes to put them into effect
A pop will open here select continue with reload
Now, this is all about server installation and configuration of extension inside it.

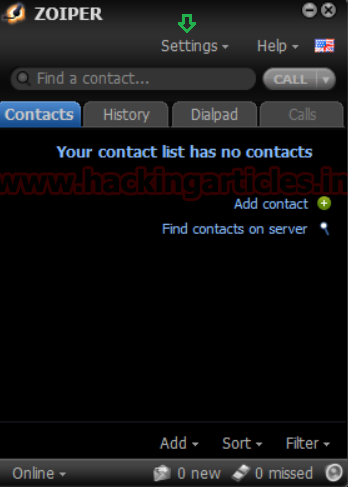
Now download ZOIPER application in your system
Zoiper is a VoIP softphone that lets you send messages, make voice and video calls with your friends, family, colleagues and business partners.
Once it is downloaded it will look like as given below image, now go with a Setting option for configuration of an account which will be able to make a call or receive call from another user.
Select account type SIP and click on next.

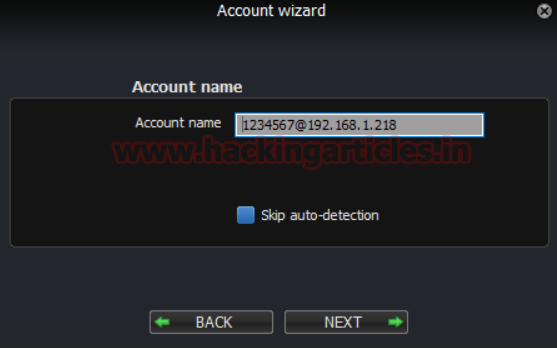
If you remember in tribox GUI we had added an extension 1234567 for ignite now enter that information in account wizard in order to save it as a new contact.
Now enter user number with server IP as given below
[email protected]
Enter the password for this account.
Click on next.

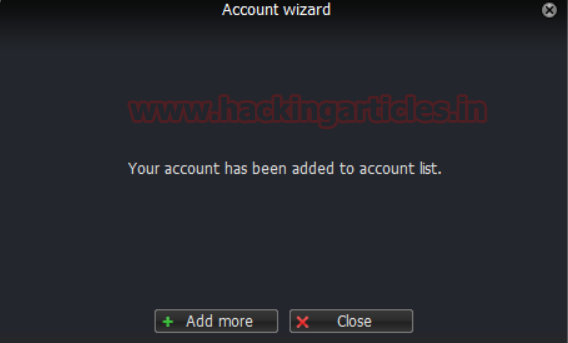
It will auto-detect the account name as shown in the given image. Then click on next.
Your one account has been created in the accounted list. Now ignite will be able to make calls or receive calls from another user.
We have already created a ignite account in the system through zoiper for making and receiving calls. Now we need to install zoiper on another device for other users also, who will be able to make or receive a call from ignite.
Download zoiper from Google play stores on your android phone. Run the application after installation.
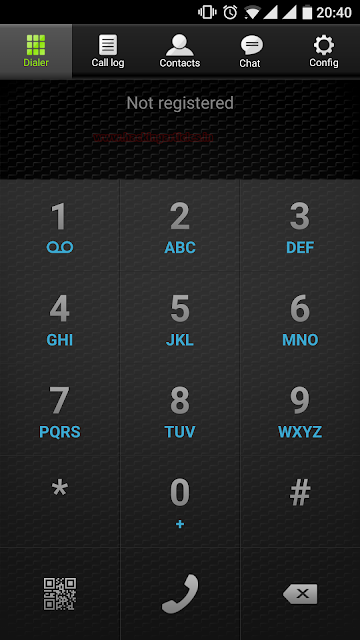
Click on config icon for configuration of a new account in your phone as shown in the given image and select Accounts option from the given list of configuration settings.

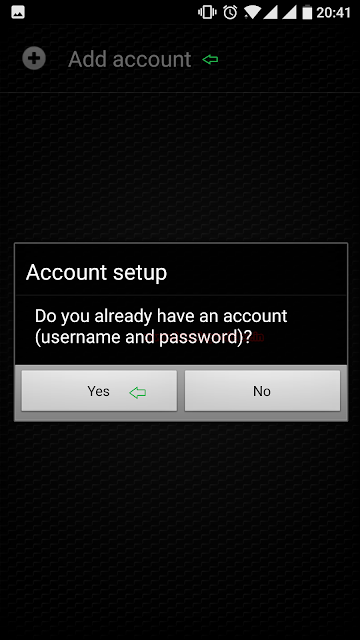
Then a new window will open click on add account. A dialog box will appear for account setup click on YES.
Now again a new dialog box will pop up the select manual configuration for account setup.
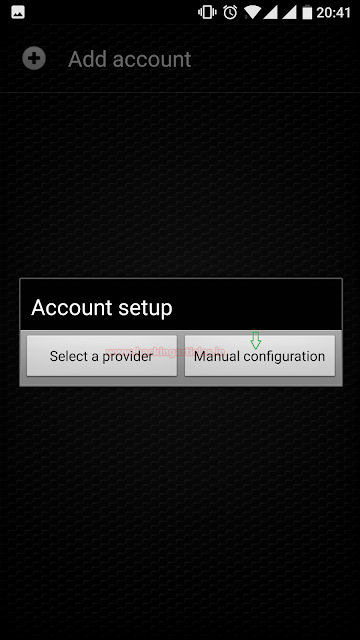
Go for SIP as account type you have chosen.

Now enter the following information for SIP account setting:
Now click on Save.
You can see from the given image that account for raj is ready.
Hence we have set up two accounts in zoiper one will act as caller let say raj is caller making call to ignite through his phone and ignite will be a receiver and get an incoming call on the system from raj.
As you know we had configured two extensions one for ignite another for raj. Now we are going to test this VOIP setup by making calls from raj.
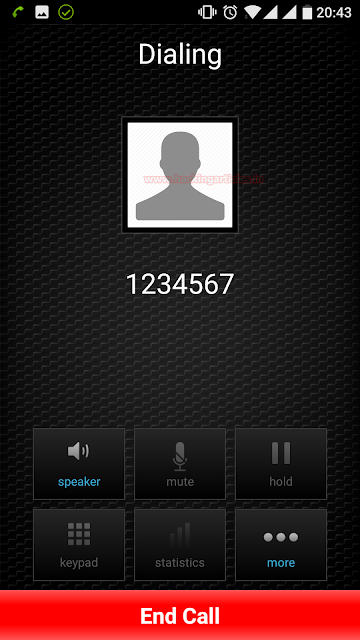
Raj had made the call to ignite by dialing his number 1234567 and when you will perform this you will hear the outgoing bell from your phone.
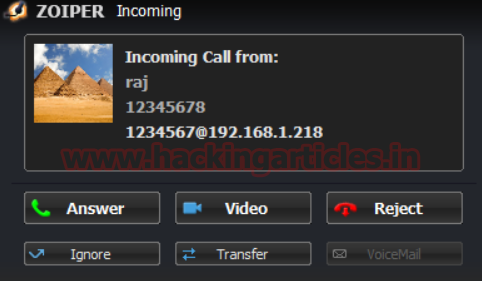
Ignite will get an incoming call on the system as shown in the given image. Click on an answer for accepting a call from raj.
From given screenshot you can see that the call is connected and raj and ignite is having a conversation over VOIP call.

Great!!! Hence in this way, you can configure your VOIP server for local network and can communicate with multiple users by making calls or chat.
Author: Sanjeet Kumar is an Information Security Analyst | Pentester | Researcher Contact Here
What is VOIP?
Voice over Internet Protocol (also a voice over IP, VoIP or IP telephony) is a methodology and group of technologies for the delivery of voice communications and multimedia sessions over Internet Protocol (IP) networks, such as the Internet. (Source)
Let’s start!!
Open VMware and select the option “Create a New Virtual Machine”. This will open a Window, on it click on :
I will install the operating system later
Then click on Next.
Now select the 2nd option “Linux” for the guest operating system and select version “Ubuntu”. Then click on next and next as per your requirements.
Explore the Custom Hardware Settings for making the following changes:
Click on CD/DVD to browse ISO file “tribox 2.8.0.4”.
Select the Bridged Connection and Enable the Replicate Connection checkbox in the Network Adapter setting.
Then click on Finish.
Trixbox is one of the most popular Asterisk-based distribution. Trixbox allows even the novice user to quickly set up a voice over IP phone system and other necessary applications such as MYSQL and more. Trixbox can be configured to handle a single phone line for a home user, several lines for a small office, or several T1s for a million minute a month call center.
It will start rebooting the VM automatically, now for trixbox CE installation follow given below steps:
A dialog box will appear for selecting option Keyboard Type and choose option “US” as given in below image. Then click on the OK tab.
Another dialog box will ask to choose a time zone, select your preferred time zone. Here I am selecting Asia/ Kolkata Then click on the OK tab.
Now enter the Password you want to give for the root user. I had given tribox as a password. Again type confirm password and then click on the OK tab.
Now the installation process will start automatically. Be patient as it will take some time. Do not interrupt installation until it completes.
Once installation completes, it will ask for login. Type username: root and password: tribox (or whatever you entered earlier)
Check network interface using the “ifconfig” command, From here I came to know the VM IP: 192.168.1.218
Now open this IP: 192.168.1.218 in Web Browser. Here through Tribox GUI, we are going to create some user accounts by assigning them extension numbers. Here each user will receive 8 digit number for land-line from the service providers.
By default tribox, GUI open with user mode and for creating extension number we need to switch into Admin Mode.
Click on Switch option from user mode given on top of the right corner.
The authentication is required for login into Admin Mode of tribox.
Now enter the default credentials:
- Username: maint
- Password: password
You will get a pop-up message for tribox registration, Close this message.
At tribox platform you will see server status, now click on PBX option and select PBX setting option from the given menu.
Under setup list of Admin select Extensions option as a basic setup.
Select device
Now follow the given steps for creating an extension inside the server:
Device: Generic SIP Device
Click on Submit
Add extension
User Extension: 1234567 (any 7/8 digit number)
Display Name: ignite (name of user/ customer you want to assign this number)
Device options
Secret: 123
dtmfmode: rfc2833
Once you have entered the information for creating a new extension click on Submit.
Similarly, create one more extension so then we can check communication between both extensions.
From the given image you can see now we had configured two extension 1st for ignite [1234567] and 2nd for raj[12345678].
We had created two extensions one as the caller and other as a receiver. You can create multiple extension as per your requirement.
.
Now click on the orange color tile for apply configuration changes to put them into effect
A pop will open here select continue with reload
Now, this is all about server installation and configuration of extension inside it.
Now download ZOIPER application in your system
Zoiper is a VoIP softphone that lets you send messages, make voice and video calls with your friends, family, colleagues and business partners.
Once it is downloaded it will look like as given below image, now go with a Setting option for configuration of an account which will be able to make a call or receive call from another user.
Select account type SIP and click on next.
If you remember in tribox GUI we had added an extension 1234567 for ignite now enter that information in account wizard in order to save it as a new contact.
Now enter user number with server IP as given below
[email protected]
Enter the password for this account.
Click on next.
It will auto-detect the account name as shown in the given image. Then click on next.
Your one account has been created in the accounted list. Now ignite will be able to make calls or receive calls from another user.
We have already created a ignite account in the system through zoiper for making and receiving calls. Now we need to install zoiper on another device for other users also, who will be able to make or receive a call from ignite.
Download zoiper from Google play stores on your android phone. Run the application after installation.
Click on config icon for configuration of a new account in your phone as shown in the given image and select Accounts option from the given list of configuration settings.
Then a new window will open click on add account. A dialog box will appear for account setup click on YES.
Now again a new dialog box will pop up the select manual configuration for account setup.
Go for SIP as account type you have chosen.
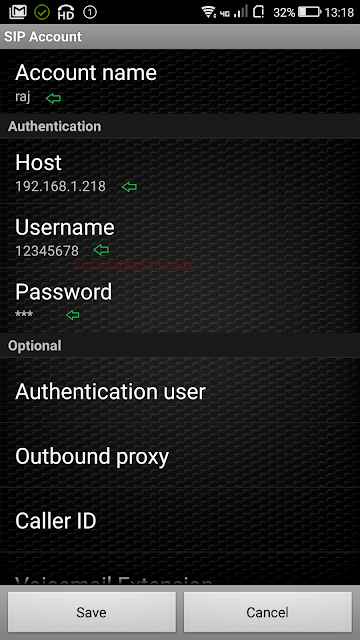
Now enter the following information for SIP account setting:
- Account name: raj
- Host: 192.168.1.218
- Username: 12345678
- Password: 123
Now click on Save.
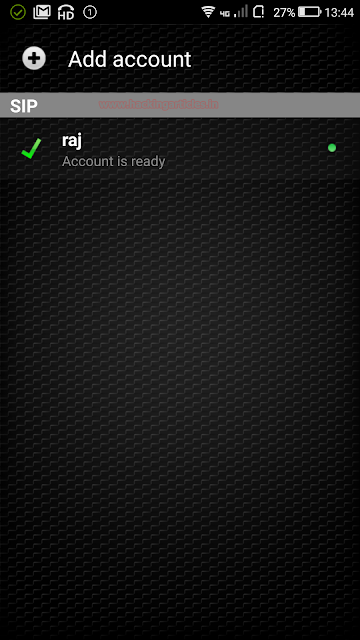
You can see from the given image that account for raj is ready.
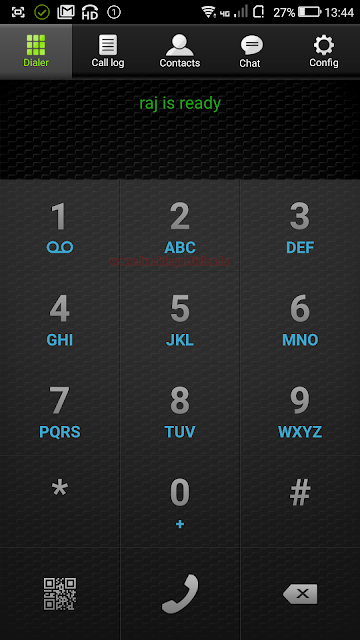
Hence we have set up two accounts in zoiper one will act as caller let say raj is caller making call to ignite through his phone and ignite will be a receiver and get an incoming call on the system from raj.
As you know we had configured two extensions one for ignite another for raj. Now we are going to test this VOIP setup by making calls from raj.
Raj had made the call to ignite by dialing his number 1234567 and when you will perform this you will hear the outgoing bell from your phone.
Ignite will get an incoming call on the system as shown in the given image. Click on an answer for accepting a call from raj.
From given screenshot you can see that the call is connected and raj and ignite is having a conversation over VOIP call.
Great!!! Hence in this way, you can configure your VOIP server for local network and can communicate with multiple users by making calls or chat.
Author: Sanjeet Kumar is an Information Security Analyst | Pentester | Researcher Contact Here