bagwis
On-Chain Analyst
2
MONTHS
2 2 MONTHS OF SERVICE
LEVEL 1
300 XP
If you are looking for Live Edit in Select Field using JavaScript and PHP then you are at the right place. Today, the live edit is very trending in web development. To implement this program, we are going to use jQuery, Ajax, and PHP.
You can also check the live demo of this simple tutorial, so you can get an idea and you can try this out, let's start coding.
⚙ Live Demo
Creating our Database table
Now, lets us insert a few data user name to the table.
Creating Markup
Kindly copy and paste this source code to your BODY tag of your page.
Script Source Code
Kindly copy and paste this script end of your BODY tag of your page.
PHP Source Code
Let's create our database connection.
This PHP source code used to fetch all username data available in our database. Save it as process.php.
Save this source code as update.php. Used this source code to update data.
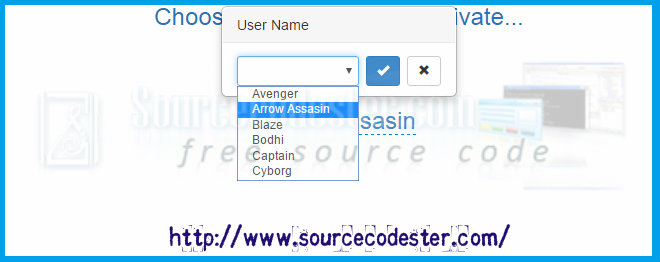
Result
⚙ Live Demo
That’s it! You are ready to test the simple project. Any suggestions will be really appreciated.
Hope that this tutorial will help you a lot.
Kindly click the "Download Code" button below for full source code. Thank you very much.
Share us your thoughts and comments below. Thank you so much for dropping by and reading this tutorial post. For more updates, don’t hesitate and feel free to visit this website more often and please share this with your friends or email me at [email protected]. Practice Coding. Thank you very much.
Download
You can also check the live demo of this simple tutorial, so you can get an idea and you can try this out, let's start coding.
⚙ Live Demo
Creating our Database table
- CREATE
TABLE
`live`
(
- `id`
INT
(
1
)
NOT
NULL
,
- `user_name`
VARCHAR
(
100
)
NOT
NULL
,
- `status`
enum(
'active'
,
'inactive'
)
NOT
NULL
DEFAULT
'inactive'
- )
ENGINE=
InnoDB DEFAULT
CHARSET=
latin1;
Now, lets us insert a few data user name to the table.
- INSERT
INTO
`live`
(
`id`
,
`user_name`
,
`status`
)
VALUES
- (
1
,
'Avenger'
,
'inactive'
)
,
- (
2
,
'Arrow Assasin'
,
'active'
)
,
- (
3
,
'Blaze'
,
'inactive'
)
,
- (
4
,
'Bodhi'
,
'inactive'
)
,
- (
5
,
'Captain'
,
'inactive'
)
,
- (
6
,
'Cyborg'
,
'inactive'
)
;
Creating Markup
Kindly copy and paste this source code to your BODY tag of your page.
- <div
class
=
"container"
>
- <div
style
=
"text-align:center;width:100%;font-size:24px;margin-bottom:20px;color: #2875BB;"
>
Choose a User Name to Activate...</
div
>
- <div
class
=
"row"
>
- <a
id
=
"user_name"
data-type
=
"select"
data-title
=
"User Name"
><?php echo $fetch[
'user_name'
]
; ?></
a
>
- </
div
>
- </
div
>
Script Source Code
- Fetch username to display data in the select field.
- Update username when the user confirms it.
Kindly copy and paste this script end of your BODY tag of your page.
- <
script>
- $(
function
(
)
{
- $(
'#user_name'
)
.editable
(
{
- source:
'process.php'
,
- send:
'always'
,
- url:
'update.php'
,
- success:
function
(
response)
{
- if
(
response.status
==
'error'
)
{
- return
false
;
- }
- }
,
- error:
function
(
e)
{
- console.log
(
e.responseText
)
;
- }
- }
)
;
- }
)
;
- </
script>
PHP Source Code
Let's create our database connection.
- <?php
- error_reporting
(
0
)
;
- error_reporting
(
E_ERROR
|
E_WARNING
|
E_PARSE
)
;
- $con
=
mysql_connect
(
'localhost'
,
'root'
,
''
)
;
- $db
=
mysql_select_db
(
'test_select'
,
$con
)
;
- ?>
This PHP source code used to fetch all username data available in our database. Save it as process.php.
- <?php
- include
(
'config.php'
)
;
- $query
=
mysql_query
(
'SELECT * FROM live'
)
;
- while
(
$fetch
=
mysql_fetch_array
(
$query
)
)
{
- $result
[
]
=
[
'value'
=>
$fetch
[
'id'
]
,
'text'
=>
$fetch
[
'user_name'
]
]
;
- }
- echo
json_encode
(
$result
)
;
- ?>
Save this source code as update.php. Used this source code to update data.
- <?php
- include
(
'config.php'
)
;
- $id
=
$_POST
[
'value'
]
;
- $revert
=
mysql_query
(
"update live set status='inactive'"
)
;
- $update
=
mysql_query
(
"update live set status='active' where id='$id
'"
)
;
- if
(
$update
)
{
- echo
json_encode
(
[
'status'
=>
'success'
]
)
;
- }
else
{
- echo
json_encode
(
[
'status'
=>
'error'
,
'data'
=>
mysql_error
(
)
]
)
;
- }
- ?>
Result
⚙ Live Demo
That’s it! You are ready to test the simple project. Any suggestions will be really appreciated.
Hope that this tutorial will help you a lot.
Kindly click the "Download Code" button below for full source code. Thank you very much.
Share us your thoughts and comments below. Thank you so much for dropping by and reading this tutorial post. For more updates, don’t hesitate and feel free to visit this website more often and please share this with your friends or email me at [email protected]. Practice Coding. Thank you very much.
Download
You must upgrade your account or reply in the thread to view hidden text.