redmaxstone
Reel Monetizer
2
MONTHS
2 2 MONTHS OF SERVICE
LEVEL 1
300 XP
For some people who use their computer systems, their systems might seem normal to them, but they might never realise that there could be something really phishy or even that fact that their systems could have been compromised. Making use of Incident Response a large number of attacks at the primary level could be detected. The investigation can be carried out to obtain any digital evidence.
This article mainly focuses on Incident response for Windows systems. So, let’s begin with this cheat sheet to get you going.
Table of Contents
What is Incident Response?
Incident response can be defined as a course of action that is taken whenever a computer or network security incident occurs.
The security events that could have occurred:
User Accounts
In Incident response it is very necessary to investigate the user activity. It is used to find if there is any suspicious user account is present or any restricted permissions have been assigned to a user. By checking the user account one can be able to get answers to the questions like which user is currently logged in and what kind of a user account one has.
The ways one can view the user accounts are:
To view the local user accounts in GUI, press ‘Windows+R’, then type
Now click on ‘okay’, and here you will be able to see the user accounts and their descriptions.

To now see the user accounts for the system and the type of account it is. Run command prompt as administrator and type command

Net localgroup group name is used in order to manage local user groups on a system. By using this command, an administrator can add local or domain users to a group, delete users from a group, create new groups and delete existing groups.
Open Command prompt and run as an administrator then type

To see the local user accounts, with their names, if they are enabled and their description. Run PowerShell as an administrator, type

Processes
In order to get the list of all the processes running on the system, you can use ‘
To view the processes, you can use the following methods; To view the running processes in a GUI, press ‘Windows+R’, then type

Now click on ‘OK’ and you will be able to see all the running processes in your system and will be able to check if there is any unnecessary process running.

To see all the running processes with their Process ID (PID) and their session name and the amount of memory used. Run command prompt as an administrator and type
To gets a list of all active processes running on the local computer run PowerShell as an administrator and type
Windows system have an extremely powerful tool with the Windows Management Instrumentation Command (WMIC). Wmic is very useful when it comes to incident response. This tool is enough to notice some abnormal signs in the system. This command can be used in the Command-prompt as well as PowerShell when running as an administrator. The syntax is wmic process list full
After you determine which process is performing a strange network activity. To get more details about the parent process IDs, Name of the process and the process ID, open PowerShell as an administrator and type
To get the path of the Wmic process, open PowerShell and type
Services
To identify if there is any abnormal service running in your system or some service is not functioning properly, you can view your services.
To view all the services in GUI, press ‘Windows+R’ and type
Now click on ‘Ok’ to see the list of processes.
To start and view the list of services that are currently running in your system, open command prompt as an administrator, type

To view whether a service is running and to get its more details like its service name, display name, etc.

If you want a list of running processes with their associated services in the command prompt, run command prompt as an administrator, then type
Task Scheduler
Task Scheduler is a component in the Windows which provides the ability to schedule the launch of programs or any scripts at a pre-defined time or after specified time intervals. You can view these scheduled tasks which are of high privileges and look suspicious.
To view the task Scheduler in GUI, then go the path and press enter. C:\ProgramData\Microsoft\Windows\Start Menu\Programs\Administrative Tools

To view the schedule tasks in the command prompt, run command prompt as an administrator, type

Startup
The
To view the applications in the Startup menu in the GUI, open the task manager and click on the ‘Startup’ menu. By doing this, you can see which applications are enabled and disabled on startup. On opening the following path, it will give you the same option

To view, the startup applications in the PowerShell run the PowerShell as an administrator, type

To get a detailed list of the AutoStart applications in PowerShell, you can run it as an administrator and type
Registry Entries
Sometimes if there is a presence of unsophisticated malware it can be found by taking a look at the Windows Registry’s run key.To view the GUI of the registry key, you can open REGEDIT reach the run key manually.

You can also view the registry of the Local Machine of the Run key in the PowerShell, by running it as an administrator and then type
You can also view the registry of the Current User of the Run key in the PowerShell, by running it as an administrator and then type

Active TCP & UDP ports
As an Incident Responder, you should carefully pay attention to the active TCP and UDP ports of your system.
The network statistics of a system can be using a tool. The criteria tested are incoming and outgoing connections, routing tables, port listening, and usage statistics. Open the command prompt, type
Well, this can also be checked in the PowerShell with a different command to see the IP and the local ports. Run PowerShell and type

File sharing
As an incident responder, you should make sure that every file share is accountable and reasonable and there is no unnecessary file sharing.
In order to check up on the file-sharing options in the command prompt, type
To see the file-sharing in PowerShell, you can type

Files
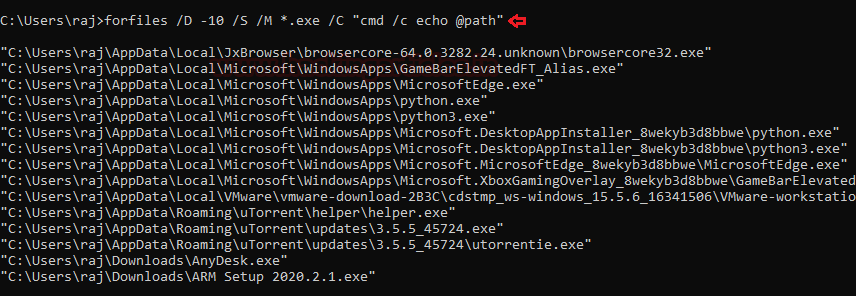
To view the files which could be malicious or end with a particular extension, you can use ‘forfiles’ command. Forfiles is a command-line utility software. It was shipped with Microsoft Windows Vista. During that time, management of multiples files through the command line was difficult as most of the commands at that time we made to work on single files
To view the .exe files with their path to locate them in the command prompt, type
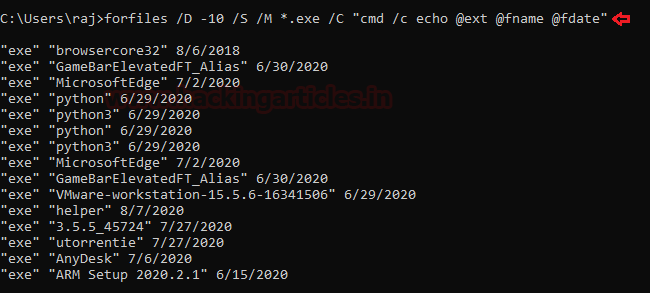
To View files without its path and more details of the particular file extension and its modification date, type
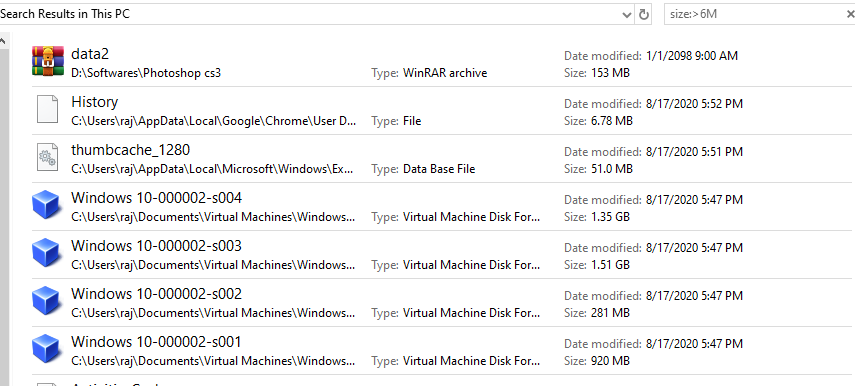
To check for files modified in the last 10 days type

To check for file size below 6MB, you can use the file explorer’s search box and enter
Firewall Settings
The incident responder should pay attention to the firewall configurations and settings and should maintain it regularly.
To view the firewall configurations and the inbound and outbound traffic in the command prompt, type

To view the firewall settings of the current profile in the command prompt, type

Sessions with other Systems
To check the session details that are created with other systems, you can run command prompt and type

Open Sessions
To see any open sessions of your system, you can get the details about the duration of the session run the command prompt and type

Log Entries
To view the log entries in GUI you can open the event viewer and see the logs. Press ‘Windows+ R’ and type

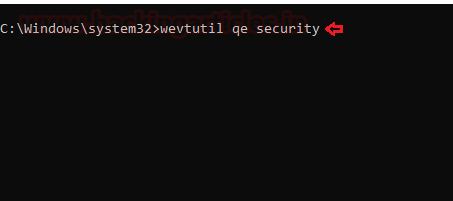
To export certain logs of a particular event in command prompt type
To get the event log list in the PowerShell, type

And type the particular event in the supply value and you will get event details of that particular event.
Conclusion
Hence, one can make use these commands as an incident responder and keep their systems away from the threat.
Author: Jeenali Kothari is a Digital Forensics enthusiast and enjoys technical content writing. You can reach her on Here
This article mainly focuses on Incident response for Windows systems. So, let’s begin with this cheat sheet to get you going.
Table of Contents
- What is Incident Response
- User Accounts
- Processes
- Services
- Task Scheduler
- Startup
- Registry Entries
- Active TCP & UDP ports
- File Shares
- Files
- Firewall Settings
- Sessions with other Systems
- Open Sessions
- Log Entries
What is Incident Response?
Incident response can be defined as a course of action that is taken whenever a computer or network security incident occurs.
The security events that could have occurred:
- Unauthorized use of system privileges and sensitive data
- Any cause of System crashes or flooding of packets
- Presence of malware or any malicious program
User Accounts
In Incident response it is very necessary to investigate the user activity. It is used to find if there is any suspicious user account is present or any restricted permissions have been assigned to a user. By checking the user account one can be able to get answers to the questions like which user is currently logged in and what kind of a user account one has.
The ways one can view the user accounts are:
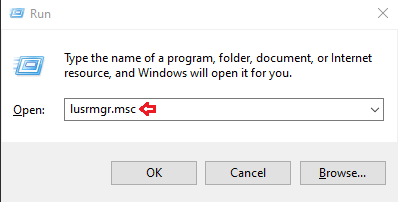
To view the local user accounts in GUI, press ‘Windows+R’, then type
Code:
lusrmgr.mscNow click on ‘okay’, and here you will be able to see the user accounts and their descriptions.
To now see the user accounts for the system and the type of account it is. Run command prompt as administrator and type command
Code:
net userNet localgroup group name is used in order to manage local user groups on a system. By using this command, an administrator can add local or domain users to a group, delete users from a group, create new groups and delete existing groups.
Open Command prompt and run as an administrator then type
Code:
net localgroup administratorsTo see the local user accounts, with their names, if they are enabled and their description. Run PowerShell as an administrator, type
Code:
Get-LocalUserProcesses
In order to get the list of all the processes running on the system, you can use ‘
’ command for this purpose. By making use of this command you can get a +-a list of the processes the memory space used, running time, image file name, services running in the process etctasklist
To view the processes, you can use the following methods; To view the running processes in a GUI, press ‘Windows+R’, then type
Code:
taskmgr.exeNow click on ‘OK’ and you will be able to see all the running processes in your system and will be able to check if there is any unnecessary process running.
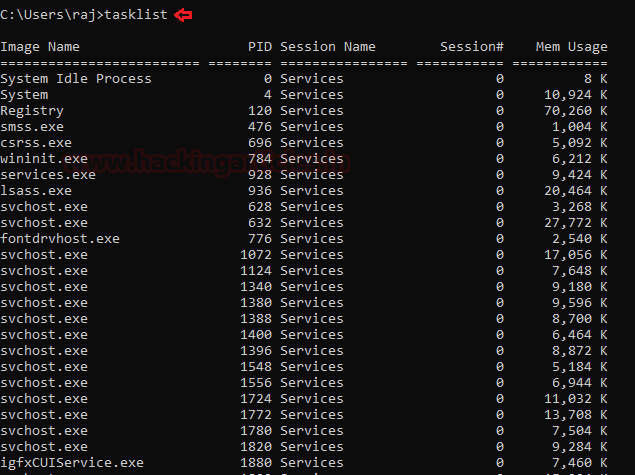
To see all the running processes with their Process ID (PID) and their session name and the amount of memory used. Run command prompt as an administrator and type
Code:
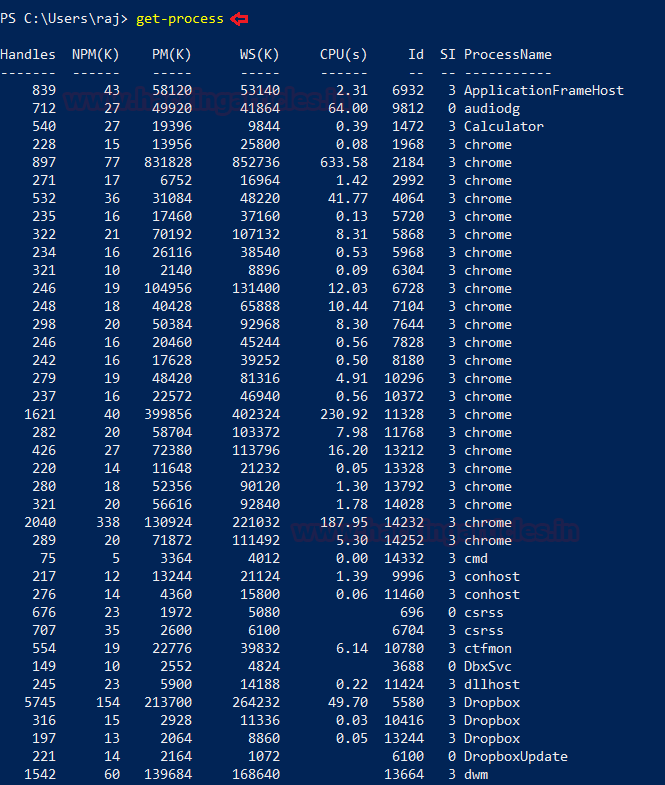
tasklistTo gets a list of all active processes running on the local computer run PowerShell as an administrator and type
Code:
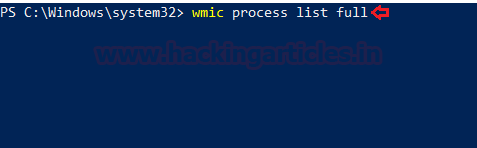
get-processWindows system have an extremely powerful tool with the Windows Management Instrumentation Command (WMIC). Wmic is very useful when it comes to incident response. This tool is enough to notice some abnormal signs in the system. This command can be used in the Command-prompt as well as PowerShell when running as an administrator. The syntax is wmic process list full
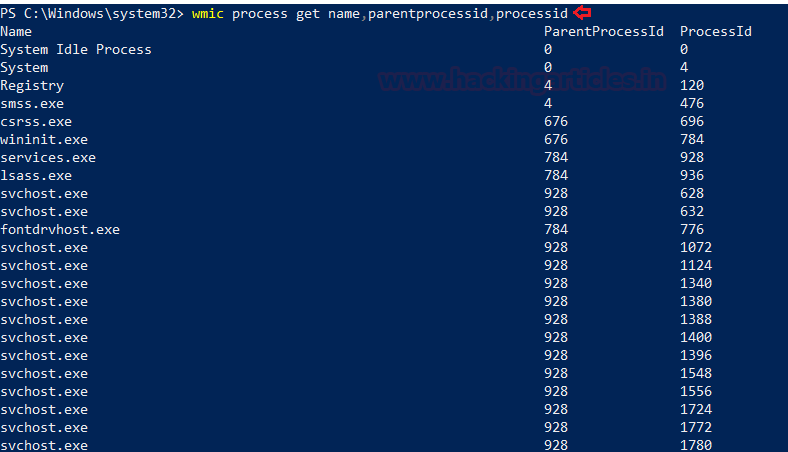
After you determine which process is performing a strange network activity. To get more details about the parent process IDs, Name of the process and the process ID, open PowerShell as an administrator and type
Code:
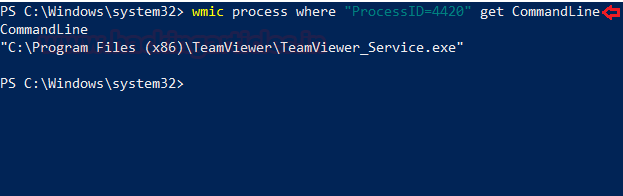
wmic process get name,parentprocessid,processidTo get the path of the Wmic process, open PowerShell and type
Code:
wmic process where 'ProcessID=PID’ get CommandLineServices
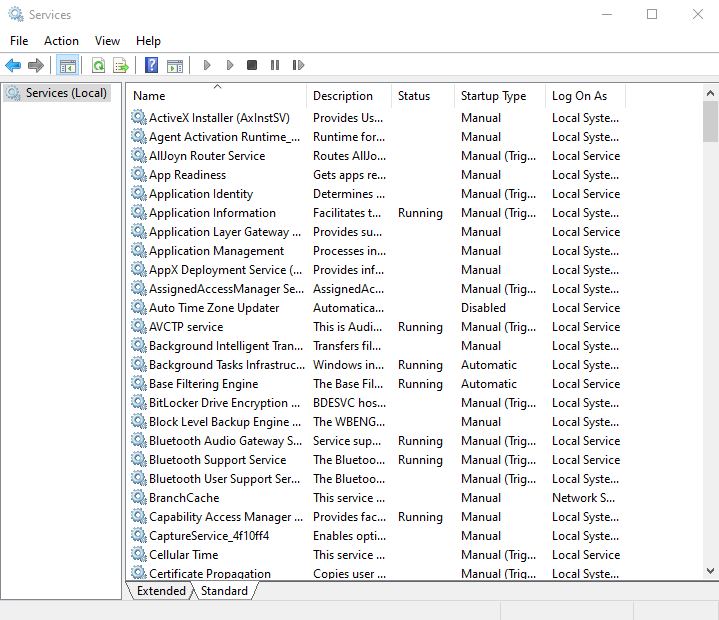
To identify if there is any abnormal service running in your system or some service is not functioning properly, you can view your services.
To view all the services in GUI, press ‘Windows+R’ and type
Code:
services.mscNow click on ‘Ok’ to see the list of processes.
To start and view the list of services that are currently running in your system, open command prompt as an administrator, type
Code:
net startTo view whether a service is running and to get its more details like its service name, display name, etc.
Code:
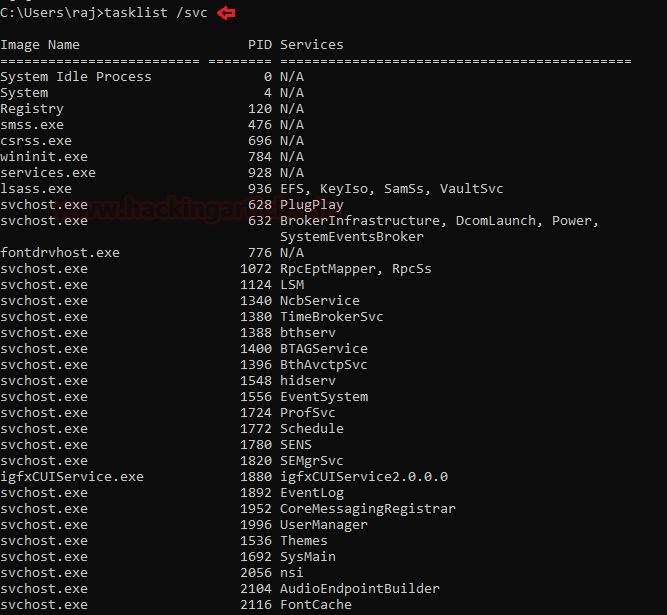
sc query | moreIf you want a list of running processes with their associated services in the command prompt, run command prompt as an administrator, then type
Code:
tasklist /svcTask Scheduler
Task Scheduler is a component in the Windows which provides the ability to schedule the launch of programs or any scripts at a pre-defined time or after specified time intervals. You can view these scheduled tasks which are of high privileges and look suspicious.
To view the task Scheduler in GUI, then go the path and press enter. C:\ProgramData\Microsoft\Windows\Start Menu\Programs\Administrative Tools
To view the schedule tasks in the command prompt, run command prompt as an administrator, type
Code:
schtasksStartup
The
folder instartup
automatically runs applications when you log on. So, an incident handler, you should observe the applications that auto-start.Windows
To view the applications in the Startup menu in the GUI, open the task manager and click on the ‘Startup’ menu. By doing this, you can see which applications are enabled and disabled on startup. On opening the following path, it will give you the same option
Code:
taskmgrTo view, the startup applications in the PowerShell run the PowerShell as an administrator, type
Code:
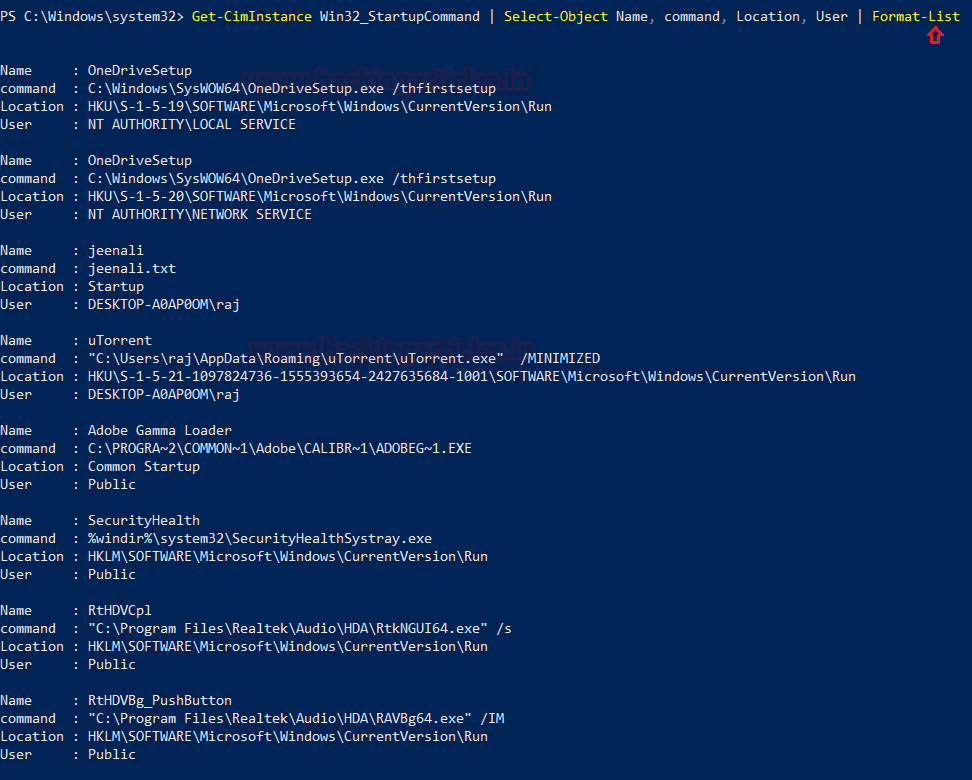
wmic startup get caption,commandTo get a detailed list of the AutoStart applications in PowerShell, you can run it as an administrator and type
Code:
Get-CimInstance Win32_StartupCommand | Select-Object Name, command, Location, User | Format-ListRegistry Entries
Sometimes if there is a presence of unsophisticated malware it can be found by taking a look at the Windows Registry’s run key.To view the GUI of the registry key, you can open REGEDIT reach the run key manually.
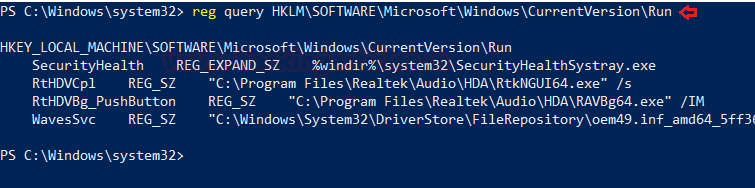
You can also view the registry of the Local Machine of the Run key in the PowerShell, by running it as an administrator and then type
Code:
reg query HKLM\SOFTWARE\Microsoft\Windows\CurrentVersion\RunYou can also view the registry of the Current User of the Run key in the PowerShell, by running it as an administrator and then type
Code:
reg query HKEY_CURRENT_USER\SOFTWARE\Microsoft\Windows\CurrentVersion\RunActive TCP & UDP ports
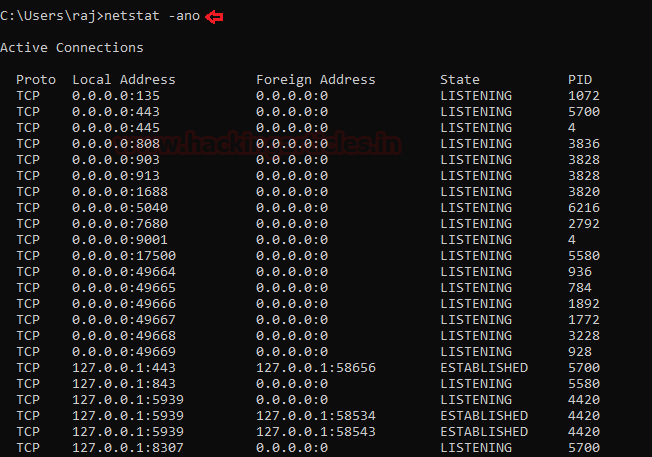
As an Incident Responder, you should carefully pay attention to the active TCP and UDP ports of your system.
The network statistics of a system can be using a tool. The criteria tested are incoming and outgoing connections, routing tables, port listening, and usage statistics. Open the command prompt, type
Code:
netstat -anoWell, this can also be checked in the PowerShell with a different command to see the IP and the local ports. Run PowerShell and type
Code:
Get-NetTCPConnection -LocalAddress 192.168.0.110 | Sort-Object LocalPortFile sharing
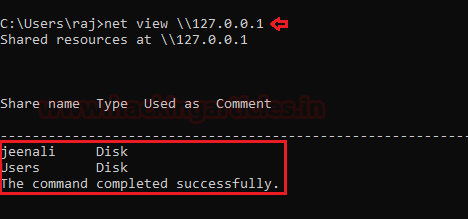
As an incident responder, you should make sure that every file share is accountable and reasonable and there is no unnecessary file sharing.
In order to check up on the file-sharing options in the command prompt, type
Code:
net view \\<localhost>’To see the file-sharing in PowerShell, you can type
Code:
Get-SMBShareFiles
To view the files which could be malicious or end with a particular extension, you can use ‘forfiles’ command. Forfiles is a command-line utility software. It was shipped with Microsoft Windows Vista. During that time, management of multiples files through the command line was difficult as most of the commands at that time we made to work on single files
To view the .exe files with their path to locate them in the command prompt, type
Code:
forfiles /D -10 /S /M *.exe /C "cmd /c echo @path"To View files without its path and more details of the particular file extension and its modification date, type
Code:
forfiles /D -10 /S /M *.exe /C "cmd /c echo @ext @fname @fdate"To check for files modified in the last 10 days type
Code:
forfiles /p c: /S /D -10To check for file size below 6MB, you can use the file explorer’s search box and enter
Code:
size:>6MFirewall Settings
The incident responder should pay attention to the firewall configurations and settings and should maintain it regularly.
To view the firewall configurations and the inbound and outbound traffic in the command prompt, type
Code:
netsh firewall show configTo view the firewall settings of the current profile in the command prompt, type
Code:
netsh advfirewall show currentprofileSessions with other Systems
To check the session details that are created with other systems, you can run command prompt and type
Code:
net useOpen Sessions
To see any open sessions of your system, you can get the details about the duration of the session run the command prompt and type
Code:
net sessionLog Entries
To view the log entries in GUI you can open the event viewer and see the logs. Press ‘Windows+ R’ and type
Code:
eventvwr.mscTo export certain logs of a particular event in command prompt type
Code:
wevtutil qe securityTo get the event log list in the PowerShell, type
Code:
Get-EventLog -ListAnd type the particular event in the supply value and you will get event details of that particular event.
Conclusion
Hence, one can make use these commands as an incident responder and keep their systems away from the threat.
Author: Jeenali Kothari is a Digital Forensics enthusiast and enjoys technical content writing. You can reach her on Here