betTD
Event Loop Designer
LEVEL 1
300 XP
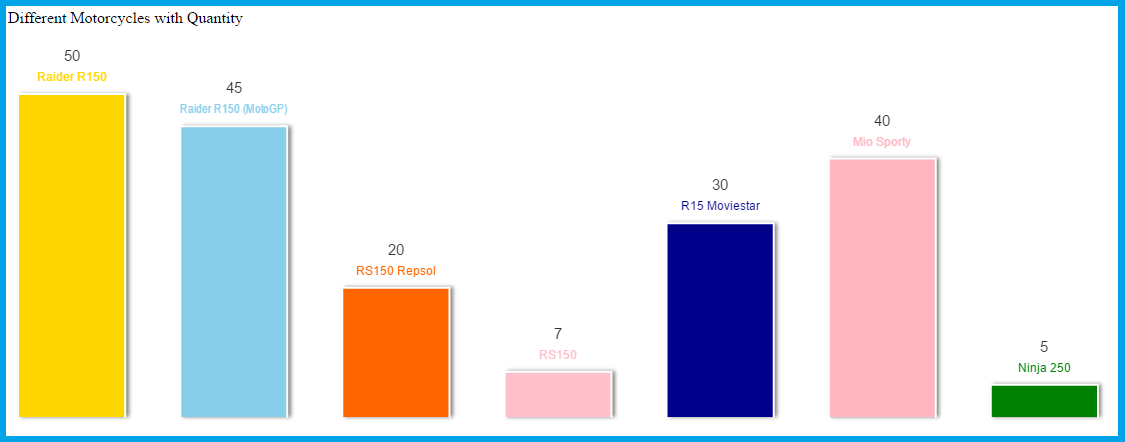
In this tutorial, we are going to learn how to create Graph using Database Driven in PHP/MySQL. This tutorial helps you make a simple graph and your data came from your database. This simple graph shows the different kind of motorcycle and their corresponding quantity. We are going to use jQuery and PHP/MySQL to create this simple graph.
Creating our Database Connection
This script is used to display the quantity of different kinds of motorcycle.
Next, this script is to display the name of different kinds of motorcycle.
To change the color of the graph, this is the sour code to help you to change one by one.
The complete source code.
This is the result.
Hope that this tutorial will help you a lot.
Share us your thoughts and comments below. Thank you so much for dropping by and reading this tutorial post. For more updates, don’t hesitate and feel free to visit this website more often and please share this with your friends or email me at [email protected]. Practice Coding. Thank you very much.
Download
Creating our Database Connection
- <?php
- mysql_select_db
(
'product'
,
mysql_connect
(
'localhost'
,
'root'
,
''
)
)
or die
(
mysql_error
(
)
)
;
- ?>
This script is used to display the quantity of different kinds of motorcycle.
- <
script type=
"application/javascript"
>
- var
motorcycle_chart =
new
AwesomeChart(
'motorcycle_graph'
)
;
- motorcycle_chart.data
=
[
- <?
php
- $query =
mysql_query(
"select * from product"
)
or die(
mysql_error(
)
)
;
- while (
$row =
mysql_fetch_array(
$query)
)
{
- ?>
- <?
php echo $row[
'Qty'
]
. ','
;
?>
- <?
php }
;
?>
- ]
;
- </
script>
Next, this script is to display the name of different kinds of motorcycle.
- <
script type=
"application/javascript"
>
- motorcycle_chart.labels
=
[
- <?
php
- $query =
mysql_query(
"select * from product"
)
or die(
mysql_error(
)
)
;
- while (
$row =
mysql_fetch_array(
$query)
)
{
- ?>
- <?
php echo "'"
. $row[
'name'
]
. "'"
. ','
;
?>
- <?
php }
;
?>
- ]
;
- </
script>
To change the color of the graph, this is the sour code to help you to change one by one.
- <
script type=
"application/javascript"
>
- motorcycle_chart.colors
=
[
'gold'
,
'skyblue'
,
'#FF6600'
,
'pink'
,
'darkblue'
,
'lightpink'
,
'green'
]
;
- motorcycle_chart.randomColors
=
true
;
- motorcycle_chart.animate
=
true
;
- motorcycle_chart.animationFrames
=
20
;
- motorcycle_chart.draw
(
)
;
- </
script>
The complete source code.
- <
script type=
"application/javascript"
>
- var
motorcycle_chart =
new
AwesomeChart(
'motorcycle_graph'
)
;
- motorcycle_chart.data
=
[
- <?
php
- $query =
mysql_query(
"select * from product"
)
or die(
mysql_error(
)
)
;
- while (
$row =
mysql_fetch_array(
$query)
)
{
- ?>
- <?
php echo $row[
'Qty'
]
. ','
;
?>
- <?
php }
;
?>
- ]
;
- motorcycle_chart.labels
=
[
- <?
php
- $query =
mysql_query(
"select * from product"
)
or die(
mysql_error(
)
)
;
- while (
$row =
mysql_fetch_array(
$query)
)
{
- ?>
- <?
php echo "'"
. $row[
'name'
]
. "'"
. ','
;
?>
- <?
php }
;
?>
- ]
;
- motorcycle_chart.colors
=
[
'gold'
,
'skyblue'
,
'#FF6600'
,
'pink'
,
'darkblue'
,
'lightpink'
,
'green'
]
;
- motorcycle_chart.randomColors
=
true
;
- motorcycle_chart.animate
=
true
;
- motorcycle_chart.animationFrames
=
20
;
- motorcycle_chart.draw
(
)
;
- </
script>
This is the result.
Hope that this tutorial will help you a lot.
Share us your thoughts and comments below. Thank you so much for dropping by and reading this tutorial post. For more updates, don’t hesitate and feel free to visit this website more often and please share this with your friends or email me at [email protected]. Practice Coding. Thank you very much.
Download
You must upgrade your account or reply in the thread to view hidden text.