tomee321
Growth Optimization Specialist
2
MONTHS
2 2 MONTHS OF SERVICE
LEVEL 1
200 XP
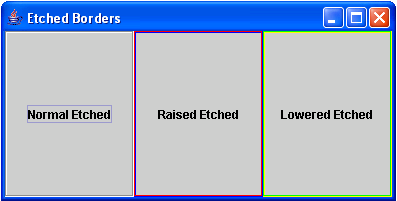
This tutorial will teach you how to create an etched border in Java. An etched border has an etched-in or etched-out effect and in default it is in etched-in effect. Like bevel borders, it has also constants of raised and lowered etched.
So, now let's start this tutorial!
1. Open JCreator or NetBeans and make a java program with a file name of etchedBorder.java.
2. Import the following package library:
3. We will initialize variables in our Main, variable frame as JFrame and button1 labeled "Normal Etched",button2 labeled "Raised Etched", and button3 labeled "Lowered Etched" as JButton.
4. Now, we will create an etched border for button1 and we will use the Border class here with the EtchedBorder class instantiation. We will name the Border as normalBorder.
Then we will create another etched border and will named it as raisedBorder because it will have an etched of raised, color red, and color blue. This border will set to the button2.
Lastly, we will create another etched border and will named it as loweredBorder because it will have an etched lowered, color yellow, and color green. This border will set to the button3.
5. Now, we will have its layout into Grid Layout using the setLayout method of the frame.
Add all the buttons to the frame using the add method.
Lastly, set the size, visibility, and the close operation of the frame. Have this code below:
Output:
Here's the full code of this tutorial:
For more inquiries and need programmer for your thesis systems in any kind of programming languages, just contact my number below.
Best Regards,
Engr. Lyndon Bermoy
IT Instructor/System Developer/Android Developer/Freelance Programmer
Mobile: 09488225971
Landline: 826-9296
E-mail:[email protected]
Add and Follow me on Facebook: https://www.facebook.com/donzzsky
Visit and like my page on Facebook at: https://www.facebook.com/BermzISware
Download
So, now let's start this tutorial!
1. Open JCreator or NetBeans and make a java program with a file name of etchedBorder.java.
2. Import the following package library:
- import
java.awt.*
;
//used to access the GridLayout and Color class
- import
javax.swing.*
;
//used to access the JFrame and JButton class
- import
javax.swing.border.*
;
//used to access the Border and EtchedBorder class
3. We will initialize variables in our Main, variable frame as JFrame and button1 labeled "Normal Etched",button2 labeled "Raised Etched", and button3 labeled "Lowered Etched" as JButton.
- JFrame
frame =
new
JFrame
(
"Etched Borders"
)
;
- JButton
button1 =
new
JButton
(
"Normal Etched"
)
;
- JButton
button2 =
new
JButton
(
"Raised Etched"
)
;
- JButton
button3 =
new
JButton
(
"Lowered Etched"
)
;
4. Now, we will create an etched border for button1 and we will use the Border class here with the EtchedBorder class instantiation. We will name the Border as normalBorder.
- Border
normalBorder =
new
EtchedBorder
(
)
;
- button1.setBorder
(
normalBorder)
;
Then we will create another etched border and will named it as raisedBorder because it will have an etched of raised, color red, and color blue. This border will set to the button2.
- Border
raisedBorder =
new
EtchedBorder
(
EtchedBorder
.RAISED
, Color
.RED
, Color
.BLUE
)
;
- button2.setBorder
(
raisedBorder)
;
Lastly, we will create another etched border and will named it as loweredBorder because it will have an etched lowered, color yellow, and color green. This border will set to the button3.
- Border
loweredBorder =
new
EtchedBorder
(
EtchedBorder
.LOWERED
, Color
.YELLOW
, Color
.GREEN
)
;
- button3.setBorder
(
loweredBorder)
;
5. Now, we will have its layout into Grid Layout using the setLayout method of the frame.
- frame.getContentPane
(
)
.setLayout
(
new
GridLayout
(
1
, 2
)
)
;
Add all the buttons to the frame using the add method.
- frame.getContentPane
(
)
.add
(
button1 )
;
- frame.getContentPane
(
)
.add
(
button2)
;
- frame.getContentPane
(
)
.add
(
button3)
;
Lastly, set the size, visibility, and the close operation of the frame. Have this code below:
- frame.setSize
(
350
, 200
)
;
- frame.setVisible
(
true
)
;
- frame.setDefaultCloseOperation
(
JFrame
.EXIT_ON_CLOSE
)
;
Output:
Here's the full code of this tutorial:
- import
java.awt.*
;
//used to access the GridLayout and Color class
- import
javax.swing.*
;
//used to access the JFrame and JButton class
- import
javax.swing.border.*
;
//used to access the Border and EtchedBorder class
- public
class
etchedBorder {
- public
static
void
main(
String
args[
]
)
{
- JFrame
frame =
new
JFrame
(
"Etched Borders"
)
;
- JButton
button1 =
new
JButton
(
"Normal Etched"
)
;
- JButton
button2 =
new
JButton
(
"Raised Etched"
)
;
- JButton
button3 =
new
JButton
(
"Lowered Etched"
)
;
- Border
normalBorder =
new
EtchedBorder
(
)
;
- button1.setBorder
(
normalBorder)
;
- Border
raisedBorder =
new
EtchedBorder
(
EtchedBorder
.RAISED
, Color
.RED
, Color
.BLUE
)
;
- button2.setBorder
(
raisedBorder)
;
- Border
loweredBorder =
new
EtchedBorder
(
EtchedBorder
.LOWERED
, Color
.YELLOW
, Color
.GREEN
)
;
- button3.setBorder
(
loweredBorder)
;
- frame.getContentPane
(
)
.setLayout
(
new
GridLayout
(
1
, 2
)
)
;
- frame.getContentPane
(
)
.add
(
button1 )
;
- frame.getContentPane
(
)
.add
(
button2)
;
- frame.getContentPane
(
)
.add
(
button3)
;
- frame.setSize
(
350
, 200
)
;
- frame.setVisible
(
true
)
;
- frame.setDefaultCloseOperation
(
JFrame
.EXIT_ON_CLOSE
)
;
- }
- }
For more inquiries and need programmer for your thesis systems in any kind of programming languages, just contact my number below.
Best Regards,
Engr. Lyndon Bermoy
IT Instructor/System Developer/Android Developer/Freelance Programmer
Mobile: 09488225971
Landline: 826-9296
E-mail:[email protected]
Add and Follow me on Facebook: https://www.facebook.com/donzzsky
Visit and like my page on Facebook at: https://www.facebook.com/BermzISware
Download
You must upgrade your account or reply in the thread to view the hidden content.