sacariaselpajaro
One-Liner Genius
2
MONTHS
2 2 MONTHS OF SERVICE
LEVEL 1
400 XP
In this article, we are going to crack the EnuBox: Mattermost Boot to Root Challenge and present a detailed walkthrough. The machine depicted in this Walkthrough is hosted on Vulnhub. Credit for making this machine goes to Avraham Cohen. Download this lab by clicking here.
Penetration Testing Methodology
Walkthrough
Network Scanning
We downloaded, imported and ran the virtual machine (.ova file) on the VMWare Workstation, the machine will automatically be assigned an IP address from the network DHCP. To begin we will find the IP address of our target machine, for that use the following command as it helps to see all the IP’s in an internal network:
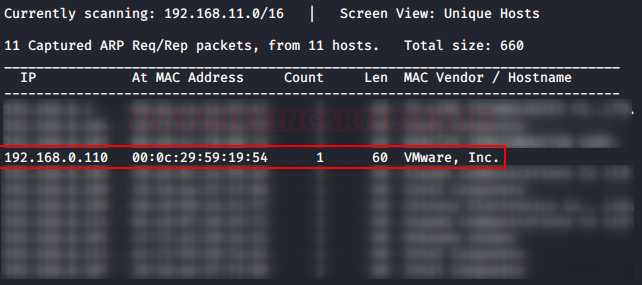
We found the target’s IP Address 192.168.1.8. The next step is to scan the target machine by using the Nmap tool. This is to find the open ports and services on the target machine and will help us to proceed further
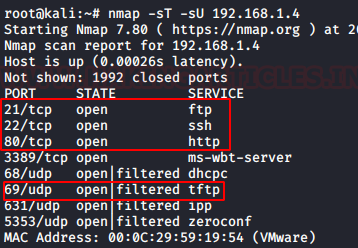
Here, we performed a nmap scan with TCP and UDP parameters. After the scan, we saw that port 22,80, 3389, 68, 69, 631, 5353. From the scan we have the FTP (21) service, SSH (22) Service, HTTP (80), DHCPC (68) service, TFTP (69) service, and some other services. This was the lay of the land. Now let’s get to enumeration.
Enumeration
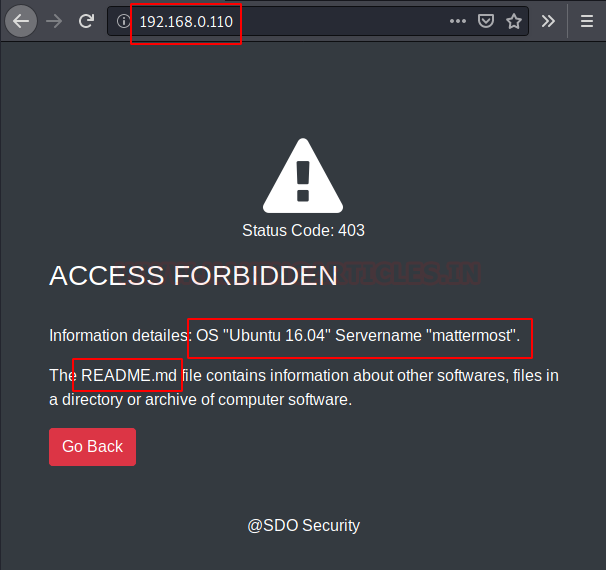
We started from port 80 and tried to browse the webpage on our browser. We have the classic Access Forbidden Banner. Although this is a custom error page but some sensitive information disclosure is active here. We see that through the error, there is the Server OS Version Disclosure. We also have the name of a probably sensitive file named README.md. Let’s take a note these might be useful down the lane.
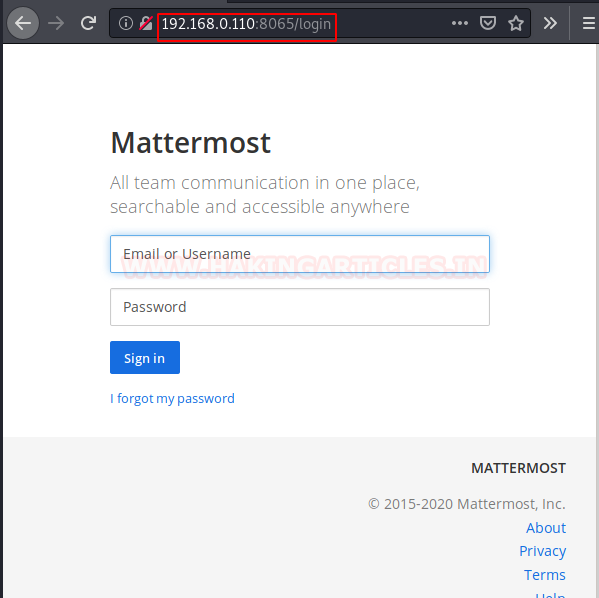
Now moving on, we also got another page hosted on the port 8065. Let’s take a look at that. We see that we have a login panel. So, this is probably our way in to the CMS.
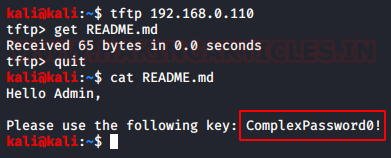
From the Nmap scan we see that we have the TFTP service running on the Target Machine. Let’s take a look onto that. As Anonymous Login was enabled, no credentials were asked. In the earlier stage we know that there is a sensitive file named “README.md”. We tried to download this file from this TFTP Server. Our download was successful. After downloading the file, we read the file contents to find the Username and Password.
We went back to the Login Panel that we found earlier and entered the following credentials.
Username: admin
Password: ComplexPassword0!

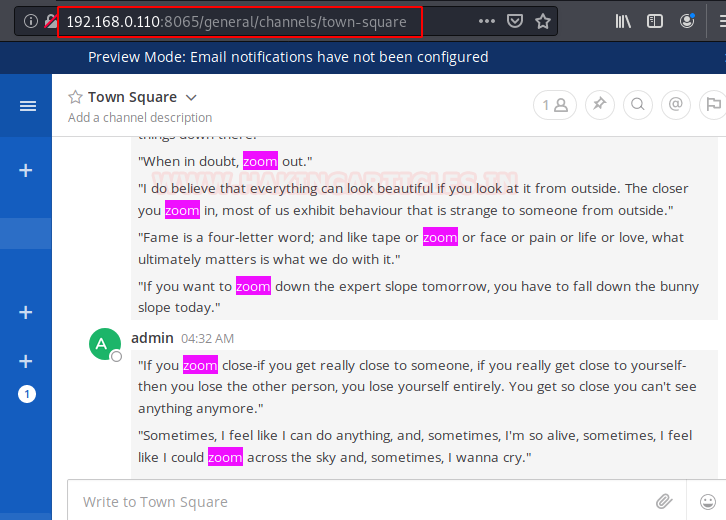
After logging in the application, we see that there are bunch of posts on the main page. On reading those posts we see that there was different version of the word “zoom” word used. It was quite peculiar the way it was used. Like “Let’s zoom”, “Zoom me”. It was very similar to the terminology that we commonly use with the word “text/chat”. Like “Let’s Text”, “Text me”. This gave us some idea that this was some kind of messaging module. Now from the look of the CMS, it was clear that the CMS uses the plugin methods to add or remove functionalities. So we set on the mission to find the plugin by the name “zoom”.
To edit some plugins, we move to the panel with the Username on the left side. We click on the Menu button; it gave us the dropdown menu. Among a bunch of other options, we have the “System Console” Option. It’s worth checking out.

Now we have the System Console, we found of bunch of option, but my search was focused on finding the Plugins panel. Here under the System Console Panel we have the Plugin Option in the System Console Panel. In the plugin panel we have the Zoom Plugin.

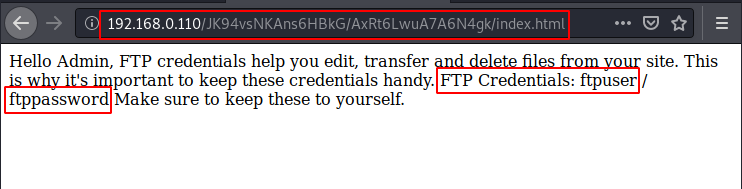
Clicking on the Zoom Plugin button which will open a plugin config page. The plugin was disabled by default. As we are the admin, so we have the authority for to enable to the plugin. After enabling, we see that we have ourselves an URL for the plugin. As it says localhost because the application is configured server-side. We change the localhost to the IP Address of the Machine.

After making appropriate changes in the URL, we browse that link to see that we have a message. It says that FTP credentials help the admin, edit and manage the files. This gives us the FTP Credentials:
Username: ftpuser
Password: ftppassword
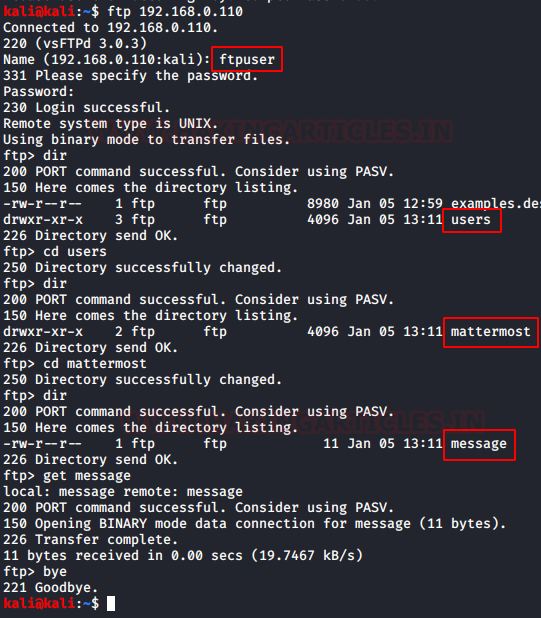
Let’s login in the machine using these FTP Credentials. We use the dir command to list all the files inside the machine. We do some enumeration to find a file named message.
Exploitation
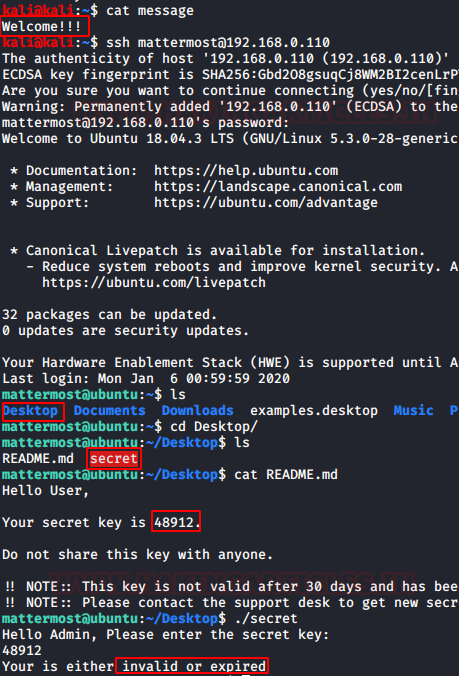
Let’s take a look at the message file from the FTP server. It says “Welcome!!”.
After thinking and tinkering with the application we figured out that the password for the SSH user is the text that was inside the message file. We SSHed in to the machine using the following credentials. After successful login, we start enumeration process by listing the directories. We see that we have a README.md file and a binary named secret. We view the README file to find that the there is a secret key which is used to traverse further. We ran the secret binary, it asked for the secret key. We entered the key which we found inside the README file. But we are shown an error that the key is expired.
Username: mattermost
Password: Welcome!!
Post Exploitation
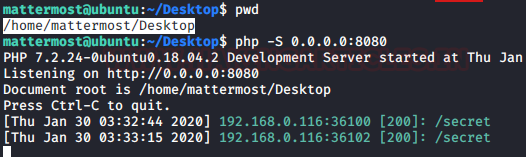
We thought we have to reverse engineer the secret script to get ourselves a key. To do that we download the file to our system using the PHP server script.
After hosting the file on the server, we download it onto out attacker machine using the wget command.

Privilege Escalation
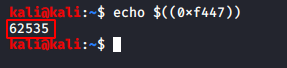
Now we used the Ghidra to Decompile the code and see the value of the variable that is compared the value of the secret key. We see that whatever the value we enter for the secret key is compared to 0xf447. Now all we need is to find the decimal equivalent of the number.

We used the echo command to convert the value we found inside the secret binary into a decimal value. We have the value of the secret key: “62535”
Now that we have the value of the secret key, we went back to our SSH Session and ran the secret binary. We entered the value and the shell gets elevated to root privileges.
Reading the Flag
We enumerated the Desktop of the root user and found a text file named local.txt. Upon opening we see that it is the final flag of this machine.

This concludes the lab. A huge shout out to the lab author for creating this lab. From the look of it, the lab must have taken some effort and time. I would like to thank the author for investing his/her resources for my learning.
Author: Pavandeep Singh is a Technical Writer, Researcher and Penetration Tester. Can be Contacted on Twitter and LinkedIn
Penetration Testing Methodology
- Network Scanning
- Netdiscover Scan
- Nmap Scan
- Enumeration
- Browsing HTTP Service
- Enumerating TFTP Service
- Enumerating Zoom Plugin in CMS
- Enumerating FTP Service
- Exploitation
- Connection via SSH
- Enumerating secret binary
- Post Exploitation
- Downloading the secret binary
- Privilege Escalation
- Decompiling using Ghidra
- Extracting the secret key
- Getting the root session
- Reading Root Flag
Walkthrough
Network Scanning
We downloaded, imported and ran the virtual machine (.ova file) on the VMWare Workstation, the machine will automatically be assigned an IP address from the network DHCP. To begin we will find the IP address of our target machine, for that use the following command as it helps to see all the IP’s in an internal network:
Code:
netdiscoverWe found the target’s IP Address 192.168.1.8. The next step is to scan the target machine by using the Nmap tool. This is to find the open ports and services on the target machine and will help us to proceed further
Code:
nmap -sT -sU -A 192.168.0.110Here, we performed a nmap scan with TCP and UDP parameters. After the scan, we saw that port 22,80, 3389, 68, 69, 631, 5353. From the scan we have the FTP (21) service, SSH (22) Service, HTTP (80), DHCPC (68) service, TFTP (69) service, and some other services. This was the lay of the land. Now let’s get to enumeration.
Enumeration
We started from port 80 and tried to browse the webpage on our browser. We have the classic Access Forbidden Banner. Although this is a custom error page but some sensitive information disclosure is active here. We see that through the error, there is the Server OS Version Disclosure. We also have the name of a probably sensitive file named README.md. Let’s take a note these might be useful down the lane.
Code:
http://192.168.0.110Now moving on, we also got another page hosted on the port 8065. Let’s take a look at that. We see that we have a login panel. So, this is probably our way in to the CMS.
Code:
http://192.168.0.110:8065/loginFrom the Nmap scan we see that we have the TFTP service running on the Target Machine. Let’s take a look onto that. As Anonymous Login was enabled, no credentials were asked. In the earlier stage we know that there is a sensitive file named “README.md”. We tried to download this file from this TFTP Server. Our download was successful. After downloading the file, we read the file contents to find the Username and Password.
Code:
tftp 192.168.0.110
get README.md
quit
cat README.md
We went back to the Login Panel that we found earlier and entered the following credentials.
Username: admin
Password: ComplexPassword0!
After logging in the application, we see that there are bunch of posts on the main page. On reading those posts we see that there was different version of the word “zoom” word used. It was quite peculiar the way it was used. Like “Let’s zoom”, “Zoom me”. It was very similar to the terminology that we commonly use with the word “text/chat”. Like “Let’s Text”, “Text me”. This gave us some idea that this was some kind of messaging module. Now from the look of the CMS, it was clear that the CMS uses the plugin methods to add or remove functionalities. So we set on the mission to find the plugin by the name “zoom”.
To edit some plugins, we move to the panel with the Username on the left side. We click on the Menu button; it gave us the dropdown menu. Among a bunch of other options, we have the “System Console” Option. It’s worth checking out.
Now we have the System Console, we found of bunch of option, but my search was focused on finding the Plugins panel. Here under the System Console Panel we have the Plugin Option in the System Console Panel. In the plugin panel we have the Zoom Plugin.
Clicking on the Zoom Plugin button which will open a plugin config page. The plugin was disabled by default. As we are the admin, so we have the authority for to enable to the plugin. After enabling, we see that we have ourselves an URL for the plugin. As it says localhost because the application is configured server-side. We change the localhost to the IP Address of the Machine.
After making appropriate changes in the URL, we browse that link to see that we have a message. It says that FTP credentials help the admin, edit and manage the files. This gives us the FTP Credentials:
Username: ftpuser
Password: ftppassword
Let’s login in the machine using these FTP Credentials. We use the dir command to list all the files inside the machine. We do some enumeration to find a file named message.
Code:
ftp 192.168.0.110
ftpuser
ftppassword
dir
cd users
dir
cd mattermost
dir
get message
bye
Exploitation
Let’s take a look at the message file from the FTP server. It says “Welcome!!”.
After thinking and tinkering with the application we figured out that the password for the SSH user is the text that was inside the message file. We SSHed in to the machine using the following credentials. After successful login, we start enumeration process by listing the directories. We see that we have a README.md file and a binary named secret. We view the README file to find that the there is a secret key which is used to traverse further. We ran the secret binary, it asked for the secret key. We entered the key which we found inside the README file. But we are shown an error that the key is expired.
Username: mattermost
Password: Welcome!!
Code:
cat message
ssh [email protected]
ls
cd Desktop/
ls
cat README.md
./secret
Post Exploitation
We thought we have to reverse engineer the secret script to get ourselves a key. To do that we download the file to our system using the PHP server script.
Code:
pwd
php -S 0.0.0.0:8080
After hosting the file on the server, we download it onto out attacker machine using the wget command.
Code:
wget http://192.168.0.110:8080/secret
ls
Privilege Escalation
Now we used the Ghidra to Decompile the code and see the value of the variable that is compared the value of the secret key. We see that whatever the value we enter for the secret key is compared to 0xf447. Now all we need is to find the decimal equivalent of the number.
We used the echo command to convert the value we found inside the secret binary into a decimal value. We have the value of the secret key: “62535”
Code:
echo $((0xf447))Now that we have the value of the secret key, we went back to our SSH Session and ran the secret binary. We entered the value and the shell gets elevated to root privileges.
Reading the Flag
We enumerated the Desktop of the root user and found a text file named local.txt. Upon opening we see that it is the final flag of this machine.
Code:
./secret
62535
whoami
cd /root/Desktop
cat local.txt
This concludes the lab. A huge shout out to the lab author for creating this lab. From the look of it, the lab must have taken some effort and time. I would like to thank the author for investing his/her resources for my learning.
Author: Pavandeep Singh is a Technical Writer, Researcher and Penetration Tester. Can be Contacted on Twitter and LinkedIn