bll97569
Email Campaign Revenue Specialist
2
MONTHS
2 2 MONTHS OF SERVICE
LEVEL 1
100 XP
In this tutorial, I'm going to show you how to create a simple like/unlike using AJAX/JQuery. The purpose of using ajax/jquery is that you won't need to reload the page after liking/unliking. This tutorial won't give you a good design but will give you idea on the topic.
Creating our Database
First, we're going to create our database. This will store our sample data.
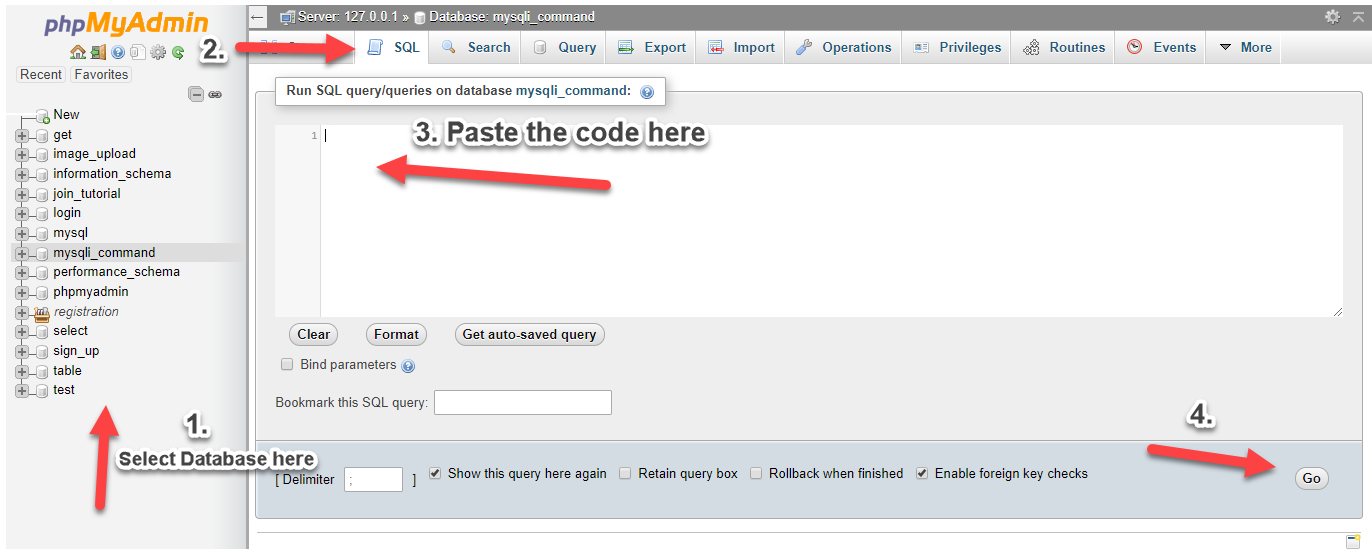
1. Open phpMyAdmin.
2. Click databases, create a database and name it as "like".
3. After creating a database, click the SQL and paste the below code. See image below for detailed instruction.
Inserting our Sample Data
Next Step is to insert our sample data into our database.
1.Click "like" database that we have created earlier.
2.Click SQL and paste the below code.
Creating our Connection
Next step is to create a database connection and save it as "conn.php". This file will serve as our bridge between our form and our database. To create the file, open your HTML code editor and paste the code below after the tag.
Creating our Login Page
Next, we create our login page to determine our user that we are going to use in liking/unliking. Use the sample users that we have inserted in logging into the system. We name this as "index.php".
Creating our Login Code
Next step is to create our login code that will check the user login input. We name this as "login.php".
Creating our Login Success Page
Next, we create our goto page if login is successful. This will be the page that our sample post will be posted for us to like. We name this as "home.php".
Creating our Like Code
Next, we create our like code. This will be the code that will process the uses click on our like button. We name this as "like.php".
Creating our Show Like Code
Next step is to create our show-like code. This code will show the number of likes in the post. We name this as "show_like.php".
Creating our Logout Code
Lastly, we create our logout code. We name this as "logout.php".
Download
Creating our Database
First, we're going to create our database. This will store our sample data.
1. Open phpMyAdmin.
2. Click databases, create a database and name it as "like".
3. After creating a database, click the SQL and paste the below code. See image below for detailed instruction.
- CREATE
TABLE
`like`
(
- `likeid`
INT
(
11
)
NOT
NULL
AUTO_INCREMENT
,
- `postid`
INT
(
11
)
NOT
NULL
,
- `userid`
INT
(
11
)
NOT
NULL
,
- PRIMARY
KEY
(
`likeid`
)
- )
ENGINE=
InnoDB DEFAULT
CHARSET=
latin1;
- CREATE
TABLE
`post`
(
- `postid`
INT
(
11
)
NOT
NULL
AUTO_INCREMENT
,
- `post_text`
VARCHAR
(
200
)
NOT
NULL
,
- `post_date`
datetime NOT
NULL
,
- PRIMARY
KEY
(
`postid`
)
- )
ENGINE=
InnoDB DEFAULT
CHARSET=
latin1;
- CREATE
TABLE
`user`
(
- `userid`
INT
(
11
)
NOT
NULL
AUTO_INCREMENT
,
- `username`
VARCHAR
(
30
)
NOT
NULL
,
- `password`
VARCHAR
(
30
)
NOT
NULL
,
- `your_name`
VARCHAR
(
60
)
NOT
NULL
,
- PRIMARY
KEY
(
`userid`
)
- )
ENGINE=
InnoDB DEFAULT
CHARSET=
latin1;
Inserting our Sample Data
Next Step is to insert our sample data into our database.
1.Click "like" database that we have created earlier.
2.Click SQL and paste the below code.
- INSERT
INTO
`post`
(
`post_text`
,
`post_date`
)
VALUES
- (
'I got it'
,
'2017-08-02 08:00:00'
)
,
- (
'Eureka'
,
'2017-09-23 08:00:00'
)
,
- (
'Awesome'
,
'2017-09-04 08:00:00'
)
,
- (
'Wow'
,
'2017-09-21 00:00:00'
)
;
- INSERT
INTO
`user`
(
`username`
,
`password`
,
`your_name`
)
VALUES
- (
'neovic'
,
'devierte'
,
'neovic devierte'
)
,
- (
'lee'
,
'ann'
,
'lee ann'
)
;
Creating our Connection
Next step is to create a database connection and save it as "conn.php". This file will serve as our bridge between our form and our database. To create the file, open your HTML code editor and paste the code below after the tag.
- <?php
- //MySQLi Procedural
- $conn
=
mysqli_connect
(
"localhost"
,
"root"
,
""
,
"like"
)
;
- if
(
!
$conn
)
{
- die
(
"Connection failed: "
.
mysqli_connect_error
(
)
)
;
- }
- ?>
Creating our Login Page
Next, we create our login page to determine our user that we are going to use in liking/unliking. Use the sample users that we have inserted in logging into the system. We name this as "index.php".
- <!DOCTYPE html>
- <html>
- <head>
- <title>FB Like using PHP/MySQLi, Ajax/JQuery</title>
- </head>
- <body>
- <h2>Login Here</h2>
- <form method="POST" action="login.php">
- Username: <input type="text" name="username">
- Password: <input type="password" name="password"> <br><br>
- <input type="submit" value="Login">
- </form><br>
- <?php
- session_start
(
)
;
- if
(
isset
(
$_SESSION
[
'message'
]
)
)
{
- echo
$_SESSION
[
'message'
]
;
- unset
(
$_SESSION
[
'message'
]
)
;
- }
- ?>
- </body>
- </html>
Creating our Login Code
Next step is to create our login code that will check the user login input. We name this as "login.php".
- <?php
- session_start
(
)
;
- include
(
'conn.php'
)
;
- $username
=
$_POST
[
'username'
]
;
- $password
=
$_POST
[
'password'
]
;
- $query
=
mysqli_query
(
$conn
,
"select * from `user` where username='$username
' and password='$password
'"
)
;
- if
(
mysqli_num_rows
(
$query
)
<
1
)
{
- $_SESSION
[
'message'
]
=
"Login Error. Please Try Again"
;
- header
(
'location:index.php'
)
;
- }
- else
{
- $row
=
mysqli_fetch_array
(
$query
)
;
- $_SESSION
[
'userid'
]
=
$row
[
'userid'
]
;
- header
(
'location:home.php'
)
;
- }
- ?>
Creating our Login Success Page
Next, we create our goto page if login is successful. This will be the page that our sample post will be posted for us to like. We name this as "home.php".
- <?php
- include
(
'conn.php'
)
;
- session_start
(
)
;
- if
(
!
isset
(
$_SESSION
[
'userid'
]
)
||
(
trim
(
$_SESSION
[
'userid'
]
)
==
''
)
)
{
- header
(
'location:index.php'
)
;
- exit
(
)
;
- }
- $uquery
=
mysqli_query
(
$conn
,
"select * from `user` where userid='"
.
$_SESSION
[
'userid'
]
.
"'"
)
;
- $urow
=
mysqli_fetch_assoc
(
$uquery
)
;
- ?>
- <!DOCTYPE html>
- <html>
- <head>
- <title>Simple FB Like using PHP/MySQLi, Ajax/JQuery</title>
- </head>
- <body>
- <div>
- <h2>Welcome, <?php
echo
$urow
[
'your_name'
]
;
?>
<a href="logout.php">Logout</a></h2>
- <h2>Timeline</h2>
- <?php
- $query
=
mysqli_query
(
$conn
,
"select * from `post`"
)
;
- while
(
$row
=
mysqli_fetch_array
(
$query
)
)
{
- ?>
- <div>
- Date: <?php
echo
date
(
'M-d-Y h:i A'
,
strtotime
(
$row
[
'post_date'
]
)
)
;
?>
<br>
- Post: <?php
echo
$row
[
'post_text'
]
;
?>
<br>
- <div>
- <?php
- $query1
=
mysqli_query
(
$conn
,
"select * from `like` where postid='"
.
$row
[
'postid'
]
.
"' and userid='"
.
$_SESSION
[
'userid'
]
.
"'"
)
;
- if
(
mysqli_num_rows
(
$query1
)
>
0
)
{
- ?>
- <button value="<?php
echo
$row
[
'postid'
]
;
?>
" class="unlike">Unlike</button>
- <?php
- }
- else
{
- ?>
- <button value="<?php
echo
$row
[
'postid'
]
;
?>
" class="like">Like</button>
- <?php
- }
- ?>
- <span id="show_like<?php
echo
$row
[
'postid'
]
;
?>
">
- <?php
- $query3
=
mysqli_query
(
$conn
,
"select * from `like` where postid='"
.
$row
[
'postid'
]
.
"'"
)
;
- echo
mysqli_num_rows
(
$query3
)
;
- ?>
- </span>
- </div>
- </div><br>
- <?php
- }
- ?>
- </div>
- <script src = "jquery-3.1.1.js"></script>
- <script type = "text/javascript">
- $(document).ready(function(){
- $(document).on('click', '.like', function(){
- var id=$(this).val();
- var $this = $(this);
- $this.toggleClass('like');
- if($this.hasClass('like')){
- $this.text('Like');
- } else {
- $this.text('Unlike');
- $this.addClass("unlike");
- }
- $.ajax({
- type: "POST",
- url: "like.php",
- data: {
- id: id,
- like: 1,
- },
- success: function(){
- showLike(id);
- }
- });
- });
- $(document).on('click', '.unlike', function(){
- var id=$(this).val();
- var $this = $(this);
- $this.toggleClass('unlike');
- if($this.hasClass('unlike')){
- $this.text('Unlike');
- } else {
- $this.text('Like');
- $this.addClass("like");
- }
- $.ajax({
- type: "POST",
- url: "like.php",
- data: {
- id: id,
- like: 1,
- },
- success: function(){
- showLike(id);
- }
- });
- });
- });
- function showLike(id){
- $.ajax({
- url: 'show_like.php',
- type: 'POST',
- async: false,
- data:{
- id: id,
- showlike: 1
- },
- success: function(response){
- $('#show_like'+id).html(response);
- }
- });
- }
- </script>
- </body>
- </html>
Creating our Like Code
Next, we create our like code. This will be the code that will process the uses click on our like button. We name this as "like.php".
- <?php
- include
(
'conn.php'
)
;
- session_start
(
)
;
- if
(
isset
(
$_POST
[
'like'
]
)
)
{
- $id
=
$_POST
[
'id'
]
;
- $query
=
mysqli_query
(
$conn
,
"select * from `like` where postid='$id
' and userid='"
.
$_SESSION
[
'userid'
]
.
"'"
)
or die
(
mysqli_error
(
)
)
;
- if
(
mysqli_num_rows
(
$query
)
>
0
)
{
- mysqli_query
(
$conn
,
"delete from `like` where userid='"
.
$_SESSION
[
'userid'
]
.
"' and postid='$id
'"
)
;
- }
- else
{
- mysqli_query
(
$conn
,
"insert into `like` (userid,postid) values ('"
.
$_SESSION
[
'userid'
]
.
"', '$id
')"
)
;
- }
- }
- ?>
Creating our Show Like Code
Next step is to create our show-like code. This code will show the number of likes in the post. We name this as "show_like.php".
- <?php
- session_start
(
)
;
- include
(
'conn.php'
)
;
- if
(
isset
(
$_POST
[
'showlike'
]
)
)
{
- $id
=
$_POST
[
'id'
]
;
- $query2
=
mysqli_query
(
$conn
,
"select * from `like` where postid='$id
'"
)
;
- echo
mysqli_num_rows
(
$query2
)
;
- }
- ?>
Creating our Logout Code
Lastly, we create our logout code. We name this as "logout.php".
- <?php
- session_start
(
)
;
- session_destroy
(
)
;
- header
(
'location:index.php'
)
;
- ?>
Download
You must upgrade your account or reply in the thread to view the hidden content.