XxDat-WayxX
Clown Prince
2
MONTHS
2 2 MONTHS OF SERVICE
LEVEL 1
200 XP
Today, I will teach you how to open a file, save a file, select a color and font of the corresponding text in the RichTextBox in Visual Basic 2008. With this, you can save the file, open the file that you have created and you can change the color and the font of the text in the RichTextBox.
Let’s Begin:
1.Open Visual Studio.
2.Create a new Project.
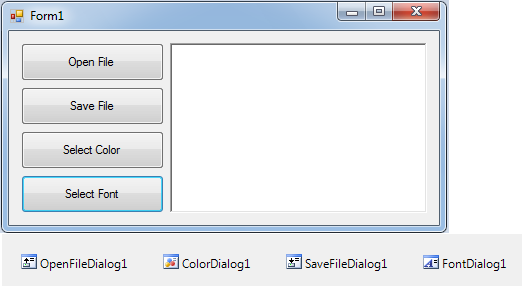
3.Set the Form just like this.
Go to the code view and do this following code for the “Open File” Button. This method serves to open the .txt file and the content will appear in the RichTextBox.
This code is for the “Save File” Button. This method serves to save the text that you have created in the RichTextBox.
After that, do this following code for changing the color of the text in the RichTextBox.
Lastly, do this following code for changing the font of the text in the RichTetBox.
Download
Let’s Begin:
1.Open Visual Studio.
2.Create a new Project.
3.Set the Form just like this.
Go to the code view and do this following code for the “Open File” Button. This method serves to open the .txt file and the content will appear in the RichTextBox.
- Private
Sub
Button1_Click(
ByVal
sender As
System.
Object
, ByVal
e As
System.
EventArgs
)
Handles
Button1.
Click
- Try
- With
OpenFileDialog1
- 'CHECK THE SELECTED FILE IF IT EXIST OTHERWISE THE DIALOG BOX WILL DISPLAY A WARNING.
- .
CheckFileExists
=
True
- 'CHECK THE SELECTED PATH IF IT EXIST OTHERWISE THE DIALOG BOX WILL DISPLAY A WARNING.
- .
CheckPathExists
=
True
- 'GET AND SET THE DEFAULT EXTENSION
- .
DefaultExt
=
"txt"
- 'RETURN THE FILE LINKED TO THE LNK FILE
- .
DereferenceLinks
=
True
- 'SET THE FILE NAME TO EMPTY
- .
FileName
=
""
- 'FILTERING THE FILES
- .
Filter
=
"Text files (*.txt)|*.txt|All files|*.*"
- 'SET THIS FOR ONE FILE SELECTION ONLY.
- .
Multiselect
=
False
- 'SET THIS TO PUT THE CURRENT FOLDER BACK TO WHERE IT HAS STARTED.
- .
RestoreDirectory
=
True
- 'SET THE TITLE OF THE DIALOG BOX.
- .
Title
=
"Select a file to open"
- 'ACCEPT ONLY THE VALID WIN32 FILE NAMES.
- .
ValidateNames
=
True
- If
.
ShowDialog
=
Windows.
Forms
.
DialogResult
.
OK
Then
- Try
- RichTextBox1.
Text
=
My.
Computer
.
FileSystem
.
ReadAllText
(
.
FileName
)
- Catch
fileException As
Exception
- Throw
fileException
- End
Try
- End
If
- End
With
- Catch
ex As
Exception
- MsgBox
(
ex.
Message
, MsgBoxStyle.
Exclamation
, Me
.
Text
)
- End
Try
- End
Sub
This code is for the “Save File” Button. This method serves to save the text that you have created in the RichTextBox.
- Private
Sub
Button2_Click(
ByVal
sender As
System.
Object
, ByVal
e As
System.
EventArgs
)
Handles
Button2.
Click
- Try
- With
SaveFileDialog1
- 'IF THE USER NEGLECTS THE FILE ETENSION THEN, ADD THE DEFUALT EXTENSION.
- .
AddExtension
=
True
- 'CHECK IF THE OUTPUT PATH ACTUALLY EXISTS
- 'BEFORE CREATING A NEW FILE AND BEFORE OVERWRITING.
- 'THE FOLLOWING VALUES ARE IN ITS DEFUALT FORM.
- .
CheckPathExists
=
True
- .
CreatePrompt
=
False
- .
OverwritePrompt
=
True
- .
ValidateNames
=
True
- 'GET AND SET THE DEFAULT EXTENSION
- .
DefaultExt
=
"txt"
- 'FILLTERING THE FILES THAT YOU HAVE SAVED.
- .
Filter
=
"Text files (*.txt)|*.txt|"
&
"All files|*.*"
- .
FilterIndex
=
1
- If
.
ShowDialog
(
)
=
Windows.
Forms
.
DialogResult
.
OK
Then
- My.
Computer
.
FileSystem
.
WriteAllText
(
.
FileName
, RichTextBox1.
Text
, False
)
- End
If
- End
With
- Catch
ex As
Exception
- MsgBox
(
ex.
Message
, MsgBoxStyle.
Exclamation
, Me
.
Text
)
- End
Try
- End
Sub
After that, do this following code for changing the color of the text in the RichTextBox.
- Private
Sub
Button3_Click(
ByVal
sender As
System.
Object
, ByVal
e As
System.
EventArgs
)
Handles
Button3.
Click
- 'SET THE RED, GREEN, AND BLUE IN THE CUSTOM COLORS SELECTION
- Static
Custom_Colors(
)
As
Integer
=
{
RGB(
255
, 0
, 0
)
, RGB(
0
, 255
, 0
)
, RGB(
0
, 0
, 255
)
}
- Try
- With
ColorDialog1
- 'SET THE COLORS THAT YOU HAVE SELECTED TO MATCH
- 'THE CURRENTLY COLORS THAT WAS USED IN THE RICHTEXTBOX.
- .
Color
=
RichTextBox1.
ForeColor
- 'SET THE ARRAY VARIABLE THAT YOU HAVE SUPPLIED
- 'AND FILL IT TO THE CUSTOM COLORS ON THE DIALOG BOX.
- .
CustomColors
=
Custom_Colors
- 'IT ALLOWS YOU TO CREATE CUSTOM COLORS.
- .
AllowFullOpen
=
True
- 'THE BASIC COLORS WILL DISPLAY.
- .
AnyColor
=
True
- 'THE DIALOG BOX WILL DISPLAY WITH THE CUSTOM COLOR SETTINGS, SIDE OPEN, AS WELL.
- .
FullOpen
=
False
- 'SOLID COLORS ARE ALLOWED.
- .
SolidColorOnly
=
True
- If
.
ShowDialog
(
)
=
Windows.
Forms
.
DialogResult
.
OK
Then
- RichTextBox1.
ForeColor
=
.
Color
- 'STORE THE CUSTOM COLORS FOR FUTURE USE.
- Custom_Colors =
.
CustomColors
- End
If
- 'RESET ALL THE COLORS IN THE DIALOG BOX.
- ColorDialog1.
Reset
(
)
- End
With
- Catch
ex As
Exception
- MsgBox
(
ex.
Message
, MsgBoxStyle.
Exclamation
, Me
.
Text
)
- End
Try
- End
Sub
Lastly, do this following code for changing the font of the text in the RichTetBox.
- Private
Sub
Button4_Click(
ByVal
sender As
System.
Object
, ByVal
e As
System.
EventArgs
)
Handles
Button4.
Click
- Try
- With
FontDialog1
- 'SET THE DIALOG BOX TO MATCH THE FONT THAT YOU USED IN THE RICHTEXTBOX.
- .
Font
=
RichTextBox1.
Font
- 'SET THE DEFAULT COLOR.
- .
Color
=
RichTextBox1.
ForeColor
- 'THE CHOICES OF THE COLORS WILL APPEAR.
- .
ShowColor
=
True
- 'THE APPLY BUTTON APPEARS ON THE DIALOG BOX
- .
ShowApply
=
True
- 'SET THE EFFECTS TO BE SELECTED.
- .
ShowEffects
=
True
- 'DON'T ALLOW SIMULATION, VECTOR FONTS OR VERTICAL FONTS.
- ' THEN, LET THE USER CHANGE THE CHARACTER SET.
- .
AllowScriptChange
=
True
- .
AllowSimulations
=
False
- .
AllowVectorFonts
=
False
- .
AllowVerticalFonts
=
False
- 'SET THE FIXED AND PROPORTIONAL FONTS.
- .
FixedPitchOnly
=
False
- 'ALLOW ONLY FONTS THAT EXIST.
- .
FontMustExist
=
True
- 'SET THE MAXIMUM SIZE SELECTABLE FONT SIZE
- .
MaxSize
=
48
- 'SET THE MINIMUM SIZE SELECTABLE FONT SIZE
- .
MinSize
=
8
- 'SET UP THE REQUESTED FONTS.
- If
.
ShowDialog
=
Windows.
Forms
.
DialogResult
.
OK
Then
- RichTextBox1.
Font
=
.
Font
- End
If
- End
With
- Catch
ex As
Exception
- MsgBox
(
ex.
Message
, MsgBoxStyle.
Exclamation
, Me
.
Text
)
- End
Try
- End
Sub
Download
You must upgrade your account or reply in the thread to view hidden text.