thoxy
Pun Pundit
2
MONTHS
2 2 MONTHS OF SERVICE
LEVEL 1
200 XP
In this tutorial, I'm going to show you how to create a simple CRUD Operation using AJAX/JQuery. CRUD means Create, Update and Delete. Also, the purpose of using AJAX/JQuery is that the page won't reload after an operation. I've used bootstrap in this tutorial to slightly improved the visuals.
Creating our Database
First and most important step in to create our database. This will serve as storage for our data.
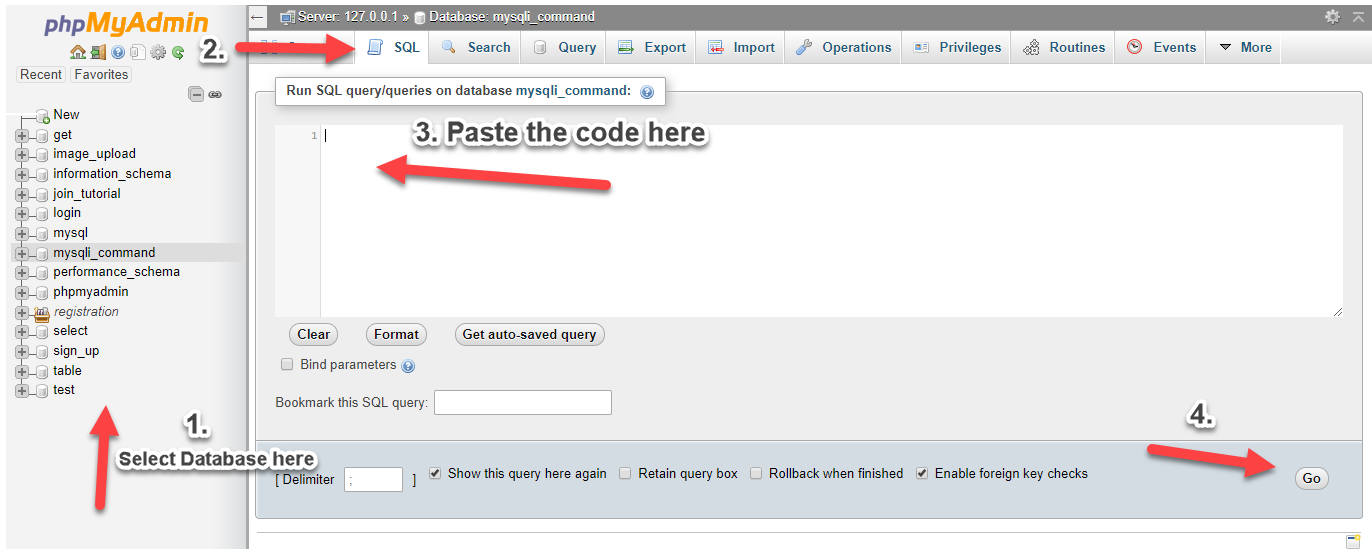
1. Open phpMyAdmin.
2. Click databases, create a database and name it as "crud_bootstrap".
3. After creating a database, click the SQL and paste the below code. See image below for detailed instruction.
Creating our Connection
Next step is to create a database connection and save it as "conn.php". This file will serve as our bridge between our form and our database. To create the file, open your HTML code editor and paste the code below after the tag.
Creating our Table
Next, we create our sample table. In this tutorial, we're going to create member table. We name this as "index.php". Also included in this page is our jquery and ajax codes in the script tag below.
Creating our Show Code
Next step is to create our show code. This is the code that we will call after an operation to show to changes in our table. We name the code as "show_user.php".
Creating our Add Code
Next, we create our add operaiton code which will add new data into our table. We name this as "addnew.php".
Creating our Edit Modal
Next step is to create our edit modal which we have included in our index.php. We name this modal as "edit_modal.php".
Creating our Edit Code
Next, we create our edit code that will edit our selected row. We name this as "update.php".
Creating our Delete Code
Lastly, we create our delete code which will delete our selected row. We name this as "delete.php".
Note: Due to the size or complexity of this submission, the author has submitted it as a .zip file to shorten your download time. After downloading it, you will need a program like Winzip to decompress it.
Virus note: All files are scanned once-a-day by SourceCodester.com for viruses, but new viruses come out every day, so no prevention program can catch 100% of them.
FOR YOUR OWN SAFETY, PLEASE:
1. Re-scan downloaded files using your personal virus checker before using it.
2. NEVER, EVER run compiled files (.exe's, .ocx's, .dll's etc.)--only run source code.
Download
Creating our Database
First and most important step in to create our database. This will serve as storage for our data.
1. Open phpMyAdmin.
2. Click databases, create a database and name it as "crud_bootstrap".
3. After creating a database, click the SQL and paste the below code. See image below for detailed instruction.
- CREATE
TABLE
`user`
(
- `userid`
INT
(
11
)
NOT
NULL
AUTO_INCREMENT
,
- `firstname`
VARCHAR
(
30
)
NOT
NULL
,
- `lastname`
VARCHAR
(
30
)
NOT
NULL
,
- PRIMARY
KEY
(
`userid`
)
- )
ENGINE=
InnoDB DEFAULT
CHARSET=
latin1;
Creating our Connection
Next step is to create a database connection and save it as "conn.php". This file will serve as our bridge between our form and our database. To create the file, open your HTML code editor and paste the code below after the tag.
- <?php
- //MySQLi Procedural
- $conn
=
mysqli_connect
(
"localhost"
,
"root"
,
""
,
"crud_bootstrap"
)
;
- if
(
!
$conn
)
{
- die
(
"Connection failed: "
.
mysqli_connect_error
(
)
)
;
- }
- ?>
Creating our Table
Next, we create our sample table. In this tutorial, we're going to create member table. We name this as "index.php". Also included in this page is our jquery and ajax codes in the script tag below.
- <?php
- include
(
'conn.php'
)
;
- ?>
- <!DOCTYPE html>
- <html lang = "en">
- <head>
- <meta charset = "UTF-8" name = "viewport" content = "width-device=width, initial-scale=1" />
- <link rel = "stylesheet" type = "text/css" href = "css/bootstrap.css" />
- <title>PHP CRUD Operation using AJAX/JQuery</title>
- </head>
- <body>
- <div style="height:30px;"></div>
- <div class = "row">
- <div class = "col-md-3">
- </div>
- <div class = "col-md-6 well">
- <div class="row">
- <div class="col-lg-12">
- <center><h2 class = "text-primary">PHP - CRUD Operation using AJAX/JQuery</h2></center>
- <hr>
- <div>
- <form class = "form-inline">
- <div class = "form-group">
- <label>Firstname:</label>
- <input type = "text" id = "firstname" class = "form-control">
- </div>
- <div class = "form-group">
- <label>Lastname:</label>
- <input type = "text" id = "lastname" class = "form-control">
- </div>
- <div class = "form-group">
- <button type = "button" id="addnew" class = "btn btn-primary"><span class = "glyphicon glyphicon-plus"></span> Add</button>
- </div>
- </form>
- </div>
- </div>
- </div><br>
- <div class="row">
- <div id="userTable"></div>
- </div>
- </div>
- </div>
- </body>
- <script src = "js/jquery-3.1.1.js"></script>
- <script src = "js/bootstrap.js"></script>
- <script type = "text/javascript">
- $(document).ready(function(){
- showUser();
- //Add New
- $(document).on('click', '#addnew', function(){
- if ($('#firstname').val()=="" || $('#lastname').val()==""){
- alert('Please input data first');
- }
- else{
- $firstname=$('#firstname').val();
- $lastname=$('#lastname').val();
- $.ajax({
- type: "POST",
- url: "addnew.php",
- data: {
- firstname: $firstname,
- lastname: $lastname,
- add: 1,
- },
- success: function(){
- showUser();
- }
- });
- }
- });
- //Delete
- $(document).on('click', '.delete', function(){
- $id=$(this).val();
- $.ajax({
- type: "POST",
- url: "delete.php",
- data: {
- id: $id,
- del: 1,
- },
- success: function(){
- showUser();
- }
- });
- });
- //Update
- $(document).on('click', '.updateuser', function(){
- $uid=$(this).val();
- $('#edit'+$uid).modal('hide');
- $('body').removeClass('modal-open');
- $('.modal-backdrop').remove();
- $ufirstname=$('#ufirstname'+$uid).val();
- $ulastname=$('#ulastname'+$uid).val();
- $.ajax({
- type: "POST",
- url: "update.php",
- data: {
- id: $uid,
- firstname: $ufirstname,
- lastname: $ulastname,
- edit: 1,
- },
- success: function(){
- showUser();
- }
- });
- });
- });
- //Showing our Table
- function showUser(){
- $.ajax({
- url: 'show_user.php',
- type: 'POST',
- async: false,
- data:{
- show: 1
- },
- success: function(response){
- $('#userTable').html(response);
- }
- });
- }
- </script>
- </html>
Creating our Show Code
Next step is to create our show code. This is the code that we will call after an operation to show to changes in our table. We name the code as "show_user.php".
- <?php
- include
(
'conn.php'
)
;
- if
(
isset
(
$_POST
[
'show'
]
)
)
{
- ?>
- <table class = "table table-bordered alert-warning table-hover">
- <thead>
- <th>Firstname</th>
- <th>Lastname</th>
- <th>Action</th>
- </thead>
- <tbody>
- <?php
- $quser
=
mysqli_query
(
$conn
,
"select * from `user`"
)
;
- while
(
$urow
=
mysqli_fetch_array
(
$quser
)
)
{
- ?>
- <tr>
- <td><?php
echo
$urow
[
'firstname'
]
;
?>
</td>
- <td><?php
echo
$urow
[
'lastname'
]
;
?>
</td>
- <td><button class="btn btn-success" data-toggle="modal" data-target="#edit<?php
echo
$urow
[
'userid'
]
;
?>
"><span class = "glyphicon glyphicon-pencil"></span> Edit</button> | <button class="btn btn-danger delete" value="<?php
echo
$urow
[
'userid'
]
;
?>
"><span class = "glyphicon glyphicon-trash"></span> Delete</button>
- <?php
include
(
'edit_modal.php'
)
;
?>
- </td>
- </tr>
- <?php
- }
- ?>
- </tbody>
- </table>
- <?php
- }
- ?>
Creating our Add Code
Next, we create our add operaiton code which will add new data into our table. We name this as "addnew.php".
- <?php
- include
(
'conn.php'
)
;
- if
(
isset
(
$_POST
[
'add'
]
)
)
{
- $firstname
=
$_POST
[
'firstname'
]
;
- $lastname
=
$_POST
[
'lastname'
]
;
- mysqli_query
(
$conn
,
"insert into `user` (firstname, lastname) values ('$firstname
', '$lastname
')"
)
;
- }
- ?>
Creating our Edit Modal
Next step is to create our edit modal which we have included in our index.php. We name this modal as "edit_modal.php".
- <div class="modal fade" id="edit<?php
echo
$urow
[
'userid'
]
;
?>
" tabindex="-1" role="dialog" aria-labelledby="myModalLabel">
- <?php
- $n
=
mysqli_query
(
$conn
,
"select * from `user` where userid='"
.
$urow
[
'userid'
]
.
"'"
)
;
- $nrow
=
mysqli_fetch_array
(
$n
)
;
- ?>
- <div class="modal-dialog" role="document">
- <div class="modal-content">
- <div class = "modal-header">
- <button type="button" class="close" data-dismiss="modal" aria-label="Close"><span aria-hidden="true">×</span></button>
- <center><h3 class = "text-success modal-title">Update Member</h3></center>
- </div>
- <form class="form-inline">
- <div class="modal-body">
- Firstname: <input type="text" value="<?php
echo
$nrow
[
'firstname'
]
;
?>
" id="ufirstname<?php
echo
$urow
[
'userid'
]
;
?>
" class="form-control">
- Lastname: <input type="text" value="<?php
echo
$nrow
[
'lastname'
]
;
?>
" id="ulastname<?php
echo
$urow
[
'userid'
]
;
?>
" class="form-control">
- </div>
- <div class="modal-footer">
- <button type="button" class="btn btn-default" data-dismiss="modal"><span class = "glyphicon glyphicon-remove"></span> Cancel</button> | <button type="button" class="updateuser btn btn-success" value="<?php
echo
$urow
[
'userid'
]
;
?>
"><span class = "glyphicon glyphicon-floppy-disk"></span> Save</button>
- </div>
- </form>
- </div>
- </div>
- </div>
Creating our Edit Code
Next, we create our edit code that will edit our selected row. We name this as "update.php".
- <?php
- include
(
'conn.php'
)
;
- if
(
isset
(
$_POST
[
'edit'
]
)
)
{
- $id
=
$_POST
[
'id'
]
;
- $firstname
=
$_POST
[
'firstname'
]
;
- $lastname
=
$_POST
[
'lastname'
]
;
- mysqli_query
(
$conn
,
"update `user` set firstname='$firstname
', lastname='$lastname
' where userid='$id
'"
)
;
- }
- ?>
Creating our Delete Code
Lastly, we create our delete code which will delete our selected row. We name this as "delete.php".
- <?php
- include
(
'conn.php'
)
;
- if
(
isset
(
$_POST
[
'del'
]
)
)
{
- $id
=
$_POST
[
'id'
]
;
- mysqli_query
(
$conn
,
"delete from `user` where userid='$id
'"
)
;
- }
- ?>
Note: Due to the size or complexity of this submission, the author has submitted it as a .zip file to shorten your download time. After downloading it, you will need a program like Winzip to decompress it.
Virus note: All files are scanned once-a-day by SourceCodester.com for viruses, but new viruses come out every day, so no prevention program can catch 100% of them.
FOR YOUR OWN SAFETY, PLEASE:
1. Re-scan downloaded files using your personal virus checker before using it.
2. NEVER, EVER run compiled files (.exe's, .ocx's, .dll's etc.)--only run source code.
Download
You must upgrade your account or reply in the thread to view hidden text.