Caretux
Waifu Economist
2
MONTHS
2 2 MONTHS OF SERVICE
LEVEL 1
200 XP
In this tutorial, you will learn how to create a simple Image Comparison Slider using HTML, CSS, and JavaScript. The main purpose of this tutorial is to provide the students and beginners with a reference for learning to build a usable feature for websites. Here, I will be providing a simple web page source code that demonstrates the creation and functionality of an Image Comparison Slider.
How does the Image Comparison Slider work?
Image Comparison Slider is a feature that allows the user to compare the difference between two images. The images overlay each other. The vertical line serves as the slider where users can slide or move it from left to right or vice versa. The images are partly shown side-by-side and when the slider has been moved, the top image will display area will change to allow the user to see the part of the other image.
How to create an Image Comparison Slider?
The Image Comparison Slider is not that complicated to create. Using CSS, we can design the comparison container of images where the images overlaying to each other and are partly shown side-by-side. We can simply add an HTML element that will serve as the vertical line or the slider such as the <span></span>. And for the functionality of the comparison feature, JavaScript event listeners will be helpful for updating the with of image area and the X-axis position of the slider.
Example
Here are the scripts of a simple web page that I created that demonstrate the interface and functionality of an Image Comparison Slider.
Interface
The script below is the HTML file script of the web page where the images are loaded.
index.html
Without any CSS for the image comparison slider design, the images will look like the following image.

Stylesheet
The script below is the CSS file which contains the styles script of the web page layout and image comparison elements design.
style.css
Using the style provided above, the images will look like the following snapshot.

JavaScript
Here's the following JavaScript file script that contains the code for making the image comparison slider functional.
image-comparison.js
Here's the overall output of the web page script that I provided above.
I have provided also the complete source code zip file of the web page scripts on this website and it is free to download. The download button is located below this tutorial's content. Feel free to download and do some experiments with the code itself to understand it more and enhance your programming capabilities.
That's it! I hope this Creating an Image Comparison Slider using HTML, CSS, and JavaScript Tutorial will help you with what you are looking for and will e useful for your current and future web application projects.
Explore more on this website for more Tutorials and Free Source Codes.
Happy Coding =)
Download
How does the Image Comparison Slider work?
Image Comparison Slider is a feature that allows the user to compare the difference between two images. The images overlay each other. The vertical line serves as the slider where users can slide or move it from left to right or vice versa. The images are partly shown side-by-side and when the slider has been moved, the top image will display area will change to allow the user to see the part of the other image.
How to create an Image Comparison Slider?
The Image Comparison Slider is not that complicated to create. Using CSS, we can design the comparison container of images where the images overlaying to each other and are partly shown side-by-side. We can simply add an HTML element that will serve as the vertical line or the slider such as the <span></span>. And for the functionality of the comparison feature, JavaScript event listeners will be helpful for updating the with of image area and the X-axis position of the slider.
Example
Here are the scripts of a simple web page that I created that demonstrate the interface and functionality of an Image Comparison Slider.
Interface
The script below is the HTML file script of the web page where the images are loaded.
index.html
- <!DOCTYPE html>
- <html
lang
=
"en"
>
- <head
>
- <meta
charset
=
"UTF-8"
>
- <meta
http-equiv
=
"X-UA-Compatible"
content
=
"IE=edge"
>
- <meta
name
=
"viewport"
content
=
"width=device-width, initial-scale=1.0"
>
- <title
>
HTML, CSS, and JS - Image Compare</
title
>
- <link
rel
=
"preconnect"
href
=
"https://fonts.googleapis.com"
>
- <link
rel
=
"preconnect"
href
=
"https://fonts.gstatic.com"
crossorigin>
- <link
href
=
"https://fonts.googleapis.com/css2?family=Mynerve&display=swap"
rel
=
"stylesheet"
>
- <link
rel
=
"stylesheet"
href
=
"style.css"
>
- </
head
>
- <body
>
- <section
>
- <h1
class
=
"text-center"
><b
>
Creating a Image Compare using HTML and CSS</
b
></
h1
>
- <hr
width
=
"50px"
>
- <!-- Image Comparison Container -->
- <div
class
=
"img-comparison-container"
>
- <div
class
=
"img-comparison-item"
>
- <img
src
=
"image2.jpg"
alt
=
"Sample Image"
/
>
- </
div
>
- <div
class
=
"img-comparison-item"
>
- <img
src
=
"image1.jpg"
alt
=
"Sample Image"
/
>
- </
div
>
- <span
></
span
>
- </
div
>
- <!-- End of Image Comparison Container -->
- </
section
>
- <script
src
=
"image-comparison.js"
></
script
>
- </
body
>
- </
html
>
Without any CSS for the image comparison slider design, the images will look like the following image.
Stylesheet
The script below is the CSS file which contains the styles script of the web page layout and image comparison elements design.
style.css
- :
root
{
- --mynerve-font
:
'Mynerve'
,
cursive
;
- --light-color
:
#f9f9f9
;
- --dark-color
:
#20262E
;
- }
- body,
- html{
- height
:
100%
;
- width
:
100%
;
- }
- h1{
- font-family
:
var
(
--mynerve-font
)
- }
- .text-center{
- text-align
:
center
;
- }
- html{
- overflow
:
hidden
;
- }
- body{
- background-color
:
var
(
--dark-color
)
;
- color
:
var
(
--light-color
)
;
- overflow
:
auto
;
- margin
:
0
;
- padding
:
0
;
- }
- img{
- width
:
600px
;
- }
- /*
- * Image Comparison
- */
- .img-comparison-container{
- margin
:
auto
;
- width
:
80vw
;
- height
:
75vh
;
- display
:
flex;
- position
:
relative
;
- }
- .img-comparison-container>
.img-comparison-item{
- width
:
100%
;
- height
:
100%
;
- position
:
absolute
;
- top
:
0
;
- left
:
0
;
- overflow
:
hidden
;
- transition
:
all .1s
ease-in-out;
- }
- .img-comparison-container>
.img-comparison-item>
img{
- height
:
75vh
;
- width
:
80vw
;
- object-fit
:
cover;
- object-position
:
center
center
;
- position
:
absolute
;
- top
:
0
;
- left
:
0
;
- }
- .img-comparison-container>
.img-comparison-item
:
nth-child
(
1
)
{
- z-index
:
1
;
- }
- .img-comparison-container>
.img-comparison-item
:
nth-child
(
2
)
{
- z-index
:
2
;
- }
- .img-comparison-container>
span{
- position
:
absolute
;
- height
:
100%
;
- border
:
2px
solid
#fff
;
- z-index
:
3
;
- cursor
:
col-resize;
- transition
:
all .1s
ease-in-out;
- }
Using the style provided above, the images will look like the following snapshot.
JavaScript
Here's the following JavaScript file script that contains the code for making the image comparison slider functional.
image-comparison.js
- const
ImageCompareContainer =
document.querySelectorAll
(
'.img-comparison-container'
)
- const
compareImage =
function
(
containerEl)
{
- var
_ci_container =
containerEl
- var
_ci_width =
_ci_container.clientWidth
- var
_ci_slider =
_ci_container.querySelector
(
'span'
)
- var
_ci_img2 =
_ci_container.querySelector
(
'.img-comparison-item:nth-child(2)'
)
- _ci_img2.style
.width
=
(
_ci_width /
2
)
+
'px'
- _ci_slider.style
.left
=
(
(
_ci_width /
2
)
-
1
)
+
'px'
- _ci_slider.addEventListener
(
'mousedown'
,
function
(
e)
{
- e.preventDefault
(
)
- console.log
(
'Slider'
)
- containerEl.addEventListener
(
'mousemove'
,
move_slider)
- containerEl.addEventListener
(
'mouseup'
,
function
(
)
{
- containerEl.removeEventListener
(
'mousemove'
,
move_slider)
- }
)
- }
)
- function
move_slider(
e)
{
- var
_container_margin =
containerEl.offsetLeft
- if
(
(
e.clientX
-
_container_margin)
>
0
&&
(
e.clientX
-
_container_margin)
<=
(
containerEl.clientWidth
-
_ci_slider.clientWidth
)
)
{
- _ci_img2.style
.width
=
(
e.clientX
-
_container_margin)
+
'px'
- _ci_slider.style
.left
=
(
e.clientX
-
_container_margin)
+
'px'
- }
- }
- }
- ImageCompareContainer.forEach
(
ICC =>
{
- compareImage(
ICC)
- }
)
- window.onresize
=
function
(
)
{
- ImageCompareContainer.forEach
(
ICC =>
{
- compareImage(
ICC)
- }
)
- }
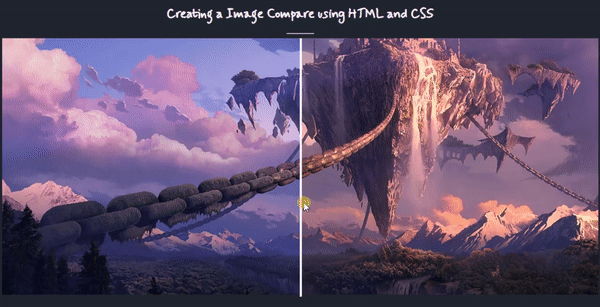
Here's the overall output of the web page script that I provided above.
I have provided also the complete source code zip file of the web page scripts on this website and it is free to download. The download button is located below this tutorial's content. Feel free to download and do some experiments with the code itself to understand it more and enhance your programming capabilities.
That's it! I hope this Creating an Image Comparison Slider using HTML, CSS, and JavaScript Tutorial will help you with what you are looking for and will e useful for your current and future web application projects.
Explore more on this website for more Tutorials and Free Source Codes.
Happy Coding =)
Download
You must upgrade your account or reply in the thread to view hidden text.