yuhuya
Automation Guru
Divine
LEVEL 1
300 XP
In this article, we are focusing on the transient directory using Kali Linux tool Dibuster and trying to find hidden files and directories within a web server.
Table of Content
What is DirBuster
DirBuster is an application within the Kali arsenal that is designed to brute force web and application servers. The tool can brute force directories and files. The application lets users take advantage of multi-thread functionality to get things moving faster. In this article, we will give you an overview of the tool and its basic functions.
Default Mode
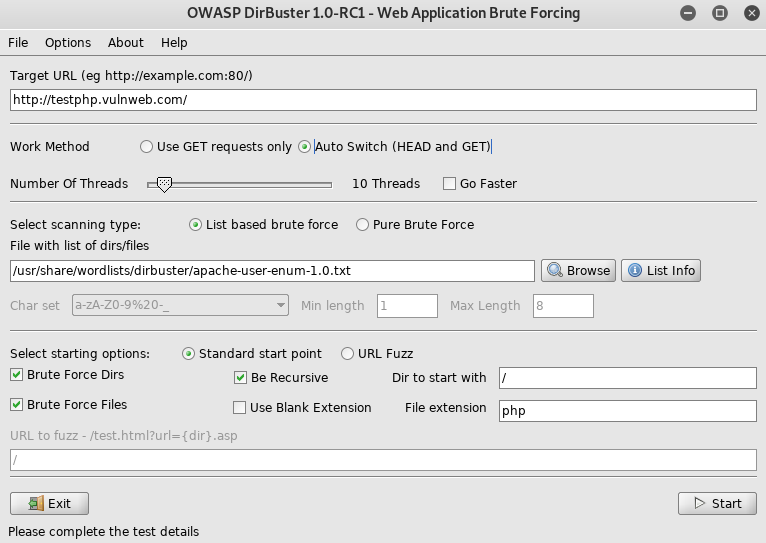
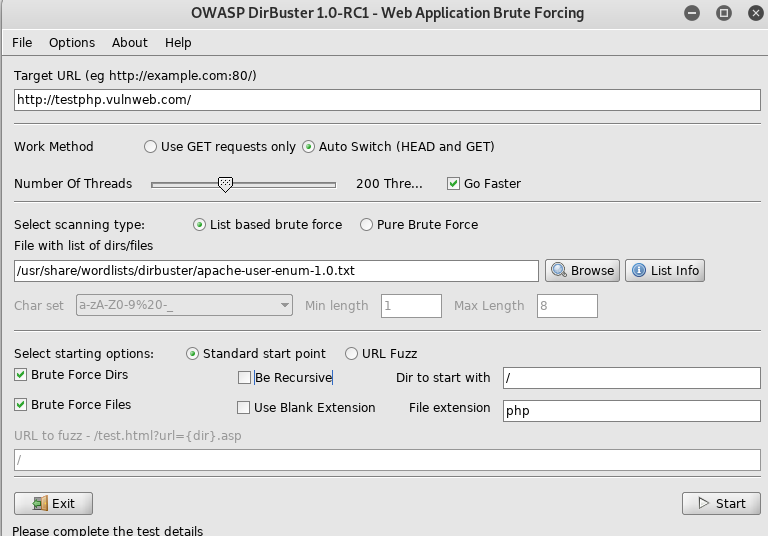
We start DirBuster and only input http://testphp.vulnweb.com/ in the target URL field. Leave the rest of the options as they are. DirBuster will now auto switch between HEAD and GET requests to perform a list based brute force attack.
Let’s hit Start. DirBuster gets to work and starts brute forcing and we see various files and directories popping up in the result window.

GET Request Method
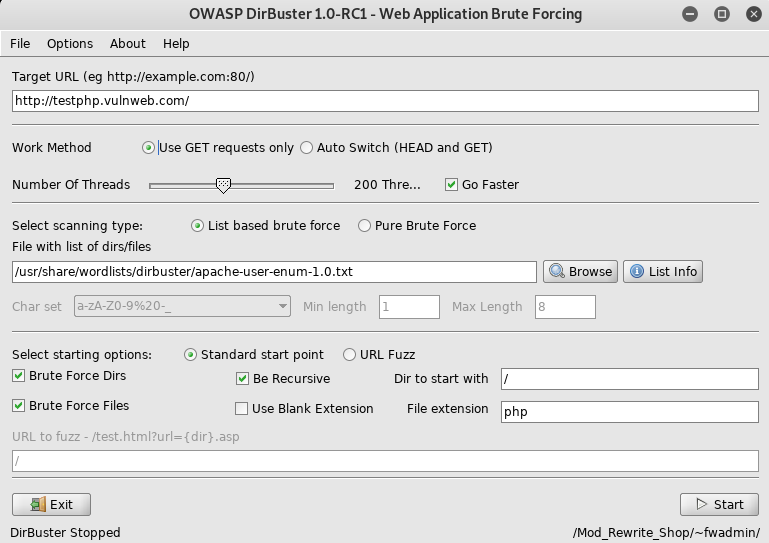
We will now set DirBuster to only use the GET request method. To make things go a little faster, the thread count is set to 200 and the “Go Faster” checkbox is checked.
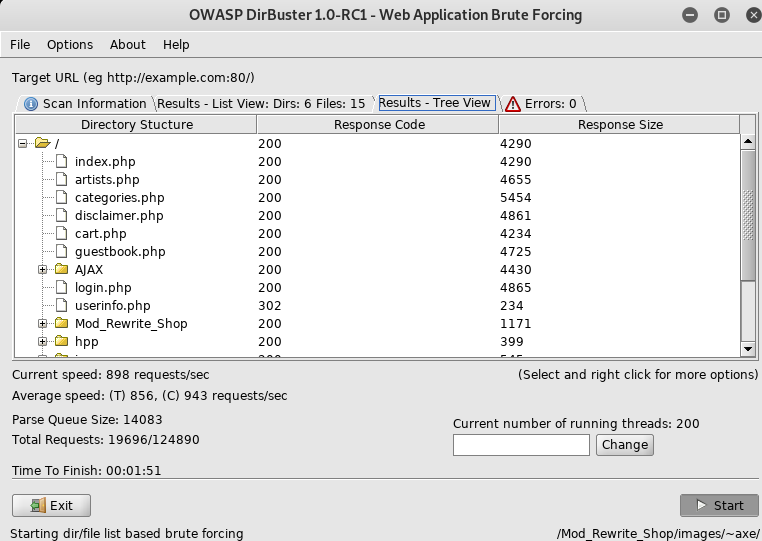
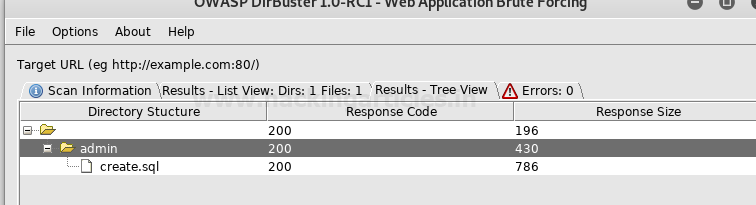
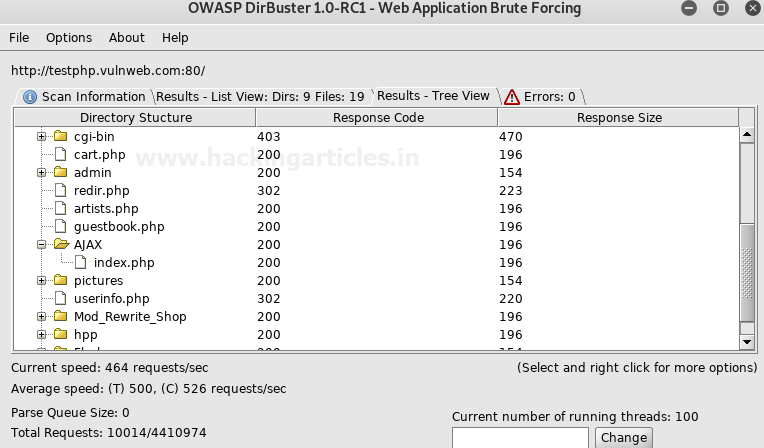
In the Results – Tree View we can see findings.
Pure Brute Force (Numeric)
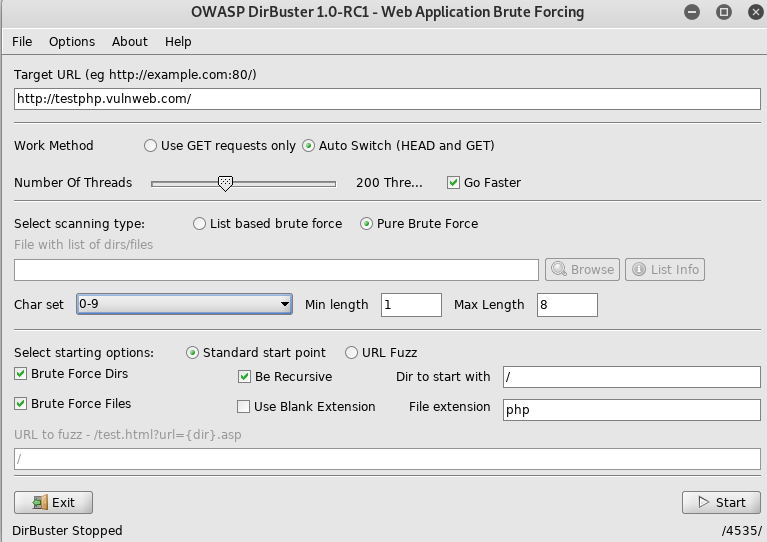
DirBuo performs step allows a lot of control over the attack process, in this set we will be using only numerals to perform a pure brute force attack. This is done by selecting “Pure Brute Force” in the scanning type option and selecting “0-9” in the charset drop-down menu. By default, the minimum and maximum character limit are set.
In the Results – Tree View we can see findings.

Single Sweep (Non-recursive)
We will now perform a single sweep brute force where the dictionary words are used only once. To achieve this, we will unselect the “Be Recursive” checkbox.
In the Results – ListView we can see findings.

Targeted Start
Further exploring the control options provided by DirBuster, we will set it up to start looking from the “admin” directory. In the “Dir to start with” field, type “/admin” and hit start.

In the Results – Tree View we can see findings.
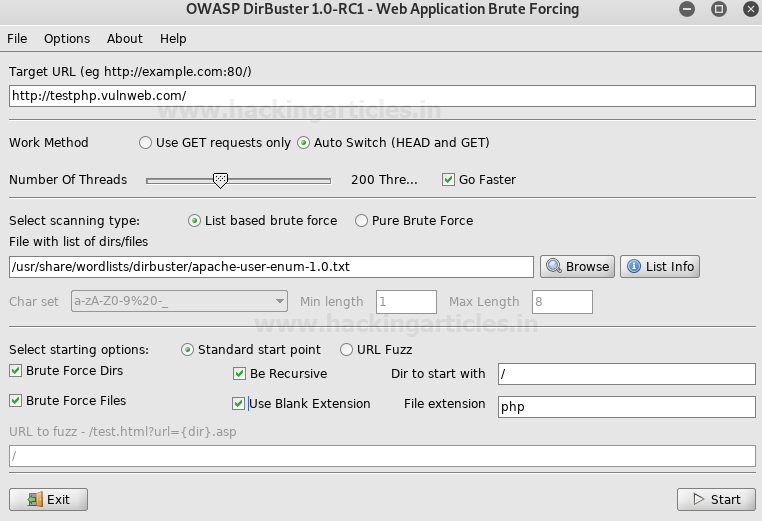
Blank Extensions
DirBuster can also look into directories with a blank extension, this could potentially uncover data that might be otherwise left untouched. All we do is check the “Use Blank Extension” checkbox.
We can see the processing happen and DirBuster testing to find directories with blank extensions.

Search by File Type (.txt)
We will be setting the file extension type to .txt, by doing so, DirBuster will look specifically for files with a .txt extension. Type “.txt” in the File extension field and hit start.

We can see the processing happen and DirBuster testing to find directories with a .txt extension.

Changing the DIR List
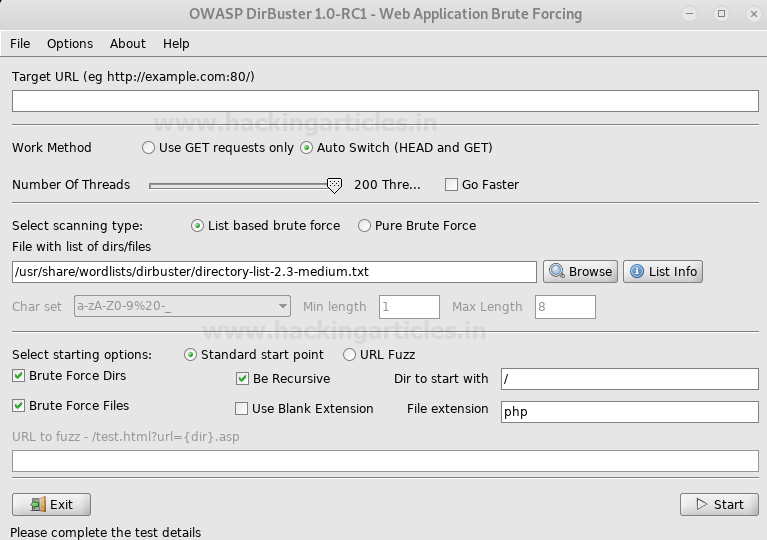
We will now be changing the directory list in DirBuster. Options > Advanced Options > DirBuster Options > Dir list to use. Here is where we can browse and change the list to “directory-list-2.3-medium.txt”, found at /usr/share/dirbuster/wordlists/ in Kali.

We can see the word list is now set.
Following Redirects
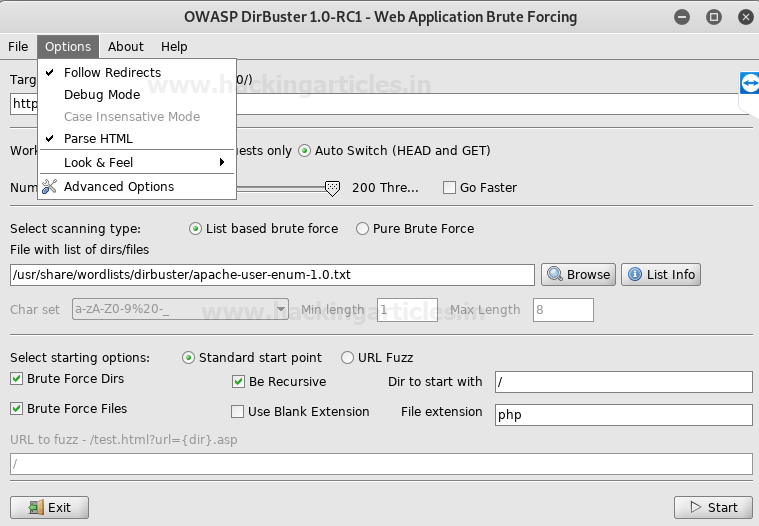
DirBuster by default is not set to follow redirects during the attack, but we can enable this option under Options > Follow Redirects.
We can see the results in the scan information as the test progresses.

Results in the Tree View.
Attack through Proxy
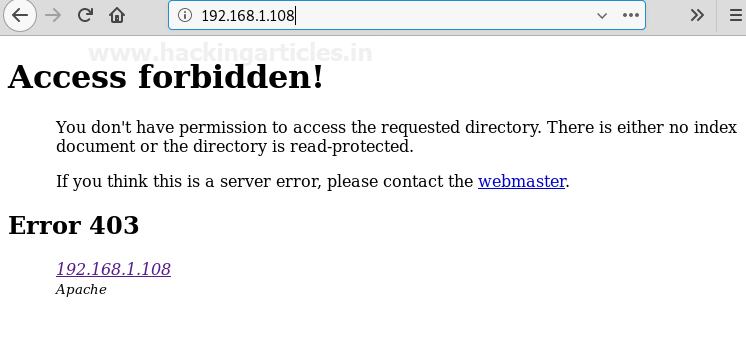
DirBuster can also attack using a proxy. In this scenario, we try to open a webpage at 192.168.1.108 but are denied access.
We set the IP in DirBuster as the attack target.
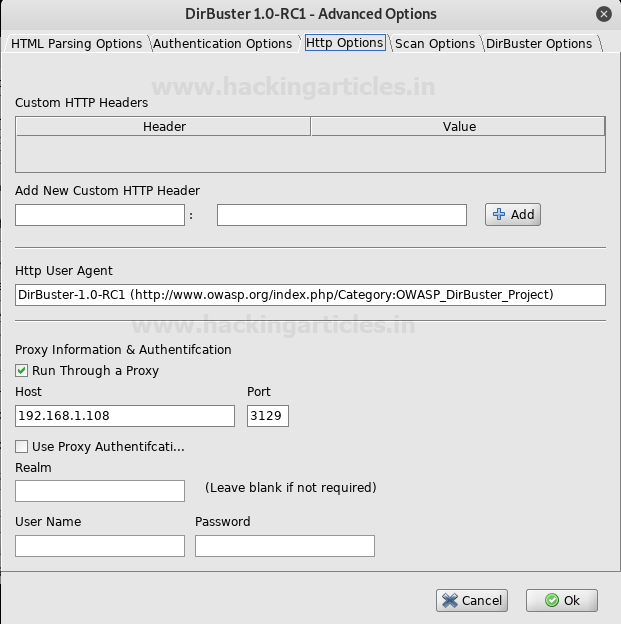
Before we start the attack, we set up the proxy option under Options > Advance Options > Http Options. Here we check the “Run through a proxy” checkbox, input the IP 192.168.1.108 in the Host field and set the port to 3129.
We can see the test showing results.

Adding File Extensions
Some file extensions are not set to be searched for in DirBuster, mostly image formats. We can add these to be searched for by navigating to Options > Advanced Options > HTML Parsing Options.

We will delete jpeg in this instance and click OK.

In the File Extension filed we will type in “jpeg” to explicitly tell DirBuster to look for .jpeg format files.

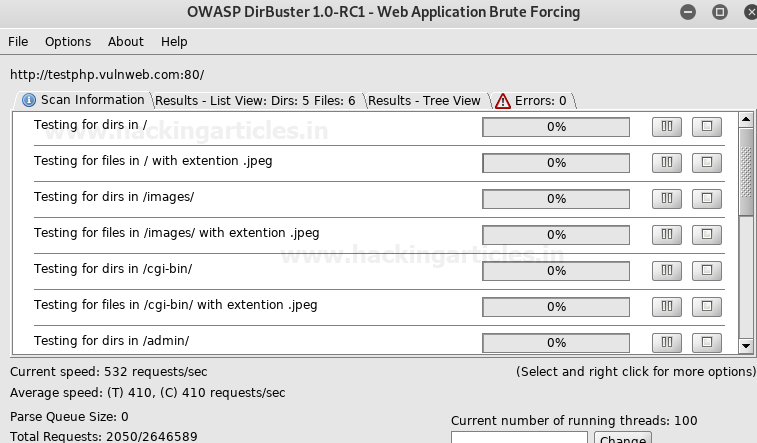
We can see in the testing process, DirBuster is looking for and finding jpeg files.
Evading Detective Measures
Exceeding the warranted requests per second during an attack is a sure shot way to get flagged by any kind of detective measures put into place. DirBuster lets us control the requests per second to bypass this defense. Options > Advanced Options > Scan Options is where we can enable this setting.

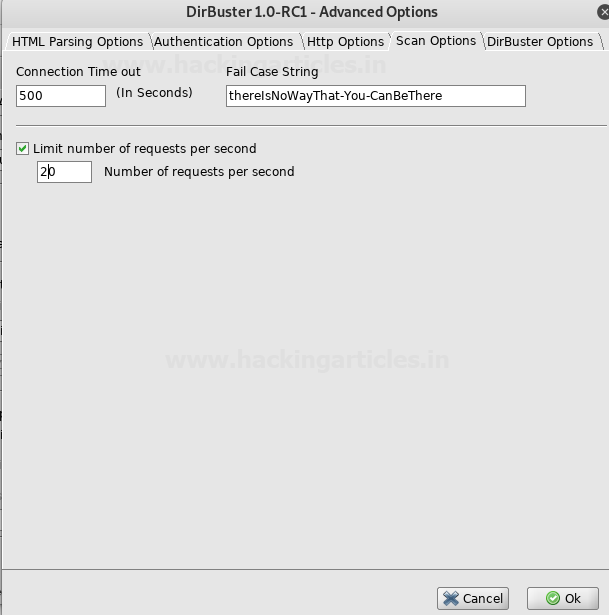
We are setting Connection Time Out to 500, checking the Limit number of requests per second and setting that field to 20.
Once the test initiated, we will see the results. The scan was stopped to show the initial findings.
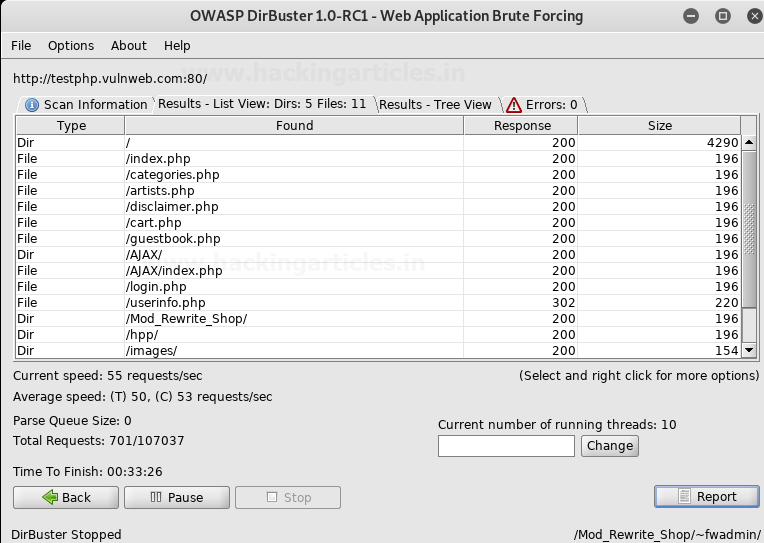
Once the scan is complete the actual findings can be seen.

We hope you enjoy using this tool. It is a great tool that’s a must in a pentester’s arsenal.
Stay tuned for more articles on the latest and greatest in hacking.
Author: Shubham Sharma is a Cybersecurity enthusiast and Researcher in the field of WebApp Penetration testing. Contact here
Table of Content
- What is DirBuster
- Default Mode
- GET Request Method
- Pure Brute Force (Numeric)
- Single Sweep (Non-recursive)
- Targeted Start
- Blank Extensions
- Search by File Type (.txt)
- Changing the DIR List
- Following Redirects
- Attack Through Proxy
- Adding File Extensions
- Evading Detective Measures (Requests Per Second)
What is DirBuster
DirBuster is an application within the Kali arsenal that is designed to brute force web and application servers. The tool can brute force directories and files. The application lets users take advantage of multi-thread functionality to get things moving faster. In this article, we will give you an overview of the tool and its basic functions.
Default Mode
We start DirBuster and only input http://testphp.vulnweb.com/ in the target URL field. Leave the rest of the options as they are. DirBuster will now auto switch between HEAD and GET requests to perform a list based brute force attack.
Let’s hit Start. DirBuster gets to work and starts brute forcing and we see various files and directories popping up in the result window.
GET Request Method
We will now set DirBuster to only use the GET request method. To make things go a little faster, the thread count is set to 200 and the “Go Faster” checkbox is checked.
In the Results – Tree View we can see findings.
Pure Brute Force (Numeric)
DirBuo performs step allows a lot of control over the attack process, in this set we will be using only numerals to perform a pure brute force attack. This is done by selecting “Pure Brute Force” in the scanning type option and selecting “0-9” in the charset drop-down menu. By default, the minimum and maximum character limit are set.
In the Results – Tree View we can see findings.
Single Sweep (Non-recursive)
We will now perform a single sweep brute force where the dictionary words are used only once. To achieve this, we will unselect the “Be Recursive” checkbox.
In the Results – ListView we can see findings.
Targeted Start
Further exploring the control options provided by DirBuster, we will set it up to start looking from the “admin” directory. In the “Dir to start with” field, type “/admin” and hit start.
In the Results – Tree View we can see findings.
Blank Extensions
DirBuster can also look into directories with a blank extension, this could potentially uncover data that might be otherwise left untouched. All we do is check the “Use Blank Extension” checkbox.
We can see the processing happen and DirBuster testing to find directories with blank extensions.
Search by File Type (.txt)
We will be setting the file extension type to .txt, by doing so, DirBuster will look specifically for files with a .txt extension. Type “.txt” in the File extension field and hit start.
We can see the processing happen and DirBuster testing to find directories with a .txt extension.
Changing the DIR List
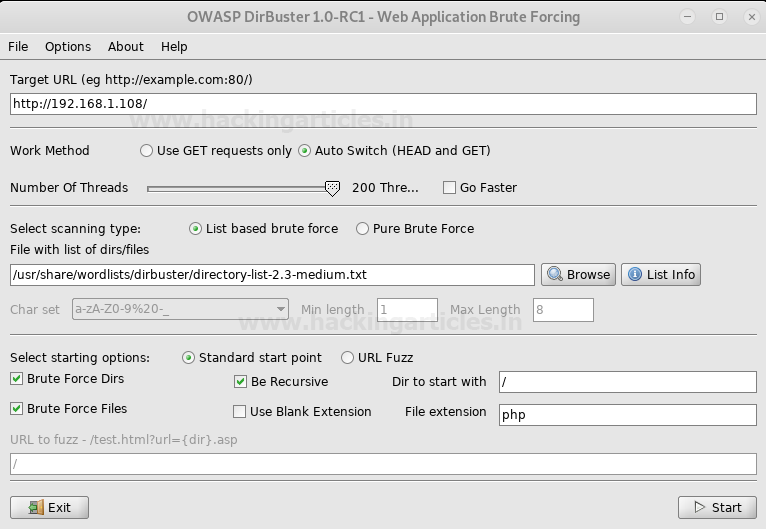
We will now be changing the directory list in DirBuster. Options > Advanced Options > DirBuster Options > Dir list to use. Here is where we can browse and change the list to “directory-list-2.3-medium.txt”, found at /usr/share/dirbuster/wordlists/ in Kali.
We can see the word list is now set.
Following Redirects
DirBuster by default is not set to follow redirects during the attack, but we can enable this option under Options > Follow Redirects.
We can see the results in the scan information as the test progresses.
Results in the Tree View.
Attack through Proxy
DirBuster can also attack using a proxy. In this scenario, we try to open a webpage at 192.168.1.108 but are denied access.
We set the IP in DirBuster as the attack target.
Before we start the attack, we set up the proxy option under Options > Advance Options > Http Options. Here we check the “Run through a proxy” checkbox, input the IP 192.168.1.108 in the Host field and set the port to 3129.
We can see the test showing results.
Adding File Extensions
Some file extensions are not set to be searched for in DirBuster, mostly image formats. We can add these to be searched for by navigating to Options > Advanced Options > HTML Parsing Options.
We will delete jpeg in this instance and click OK.
In the File Extension filed we will type in “jpeg” to explicitly tell DirBuster to look for .jpeg format files.
We can see in the testing process, DirBuster is looking for and finding jpeg files.
Evading Detective Measures
Exceeding the warranted requests per second during an attack is a sure shot way to get flagged by any kind of detective measures put into place. DirBuster lets us control the requests per second to bypass this defense. Options > Advanced Options > Scan Options is where we can enable this setting.
We are setting Connection Time Out to 500, checking the Limit number of requests per second and setting that field to 20.
Once the test initiated, we will see the results. The scan was stopped to show the initial findings.
Once the scan is complete the actual findings can be seen.
We hope you enjoy using this tool. It is a great tool that’s a must in a pentester’s arsenal.
Stay tuned for more articles on the latest and greatest in hacking.
Author: Shubham Sharma is a Cybersecurity enthusiast and Researcher in the field of WebApp Penetration testing. Contact here