Kametsu
Play-to-Earn Innovator
LEVEL 1
200 XP
Installing CodeIgniter
If you don't have CodeIgniter installed yet, you can use this link to download the latest version of CodeIgniter which is 3.1.7 that I've used in this tutorial.
After downloading, extract the file in the folder of your server. Since I'm using XAMPP as my localhost server, I've put the folder in htdocs folder of my XAMPP.
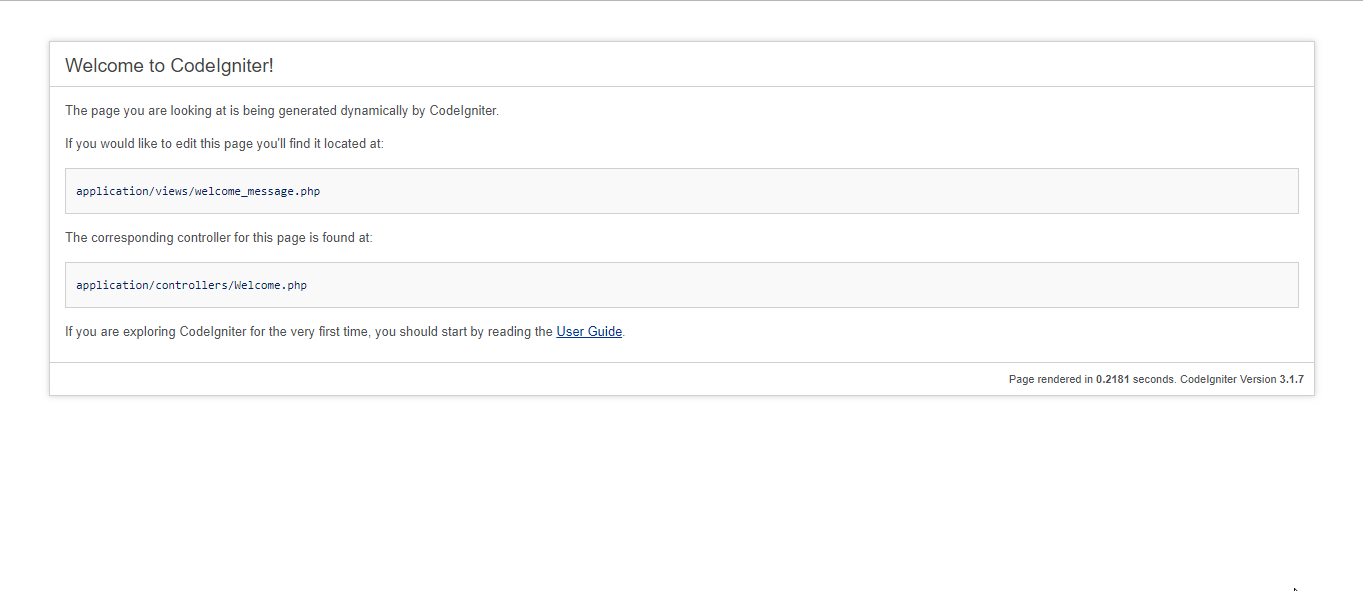
Then, you can test whether you have successfully installed codeigniter by typing your app name in your browser. In my case, I named my app as codeigniter_fileupload so I'm using the below code.
Creating our Database
First we are going to create our database for this tutorial.
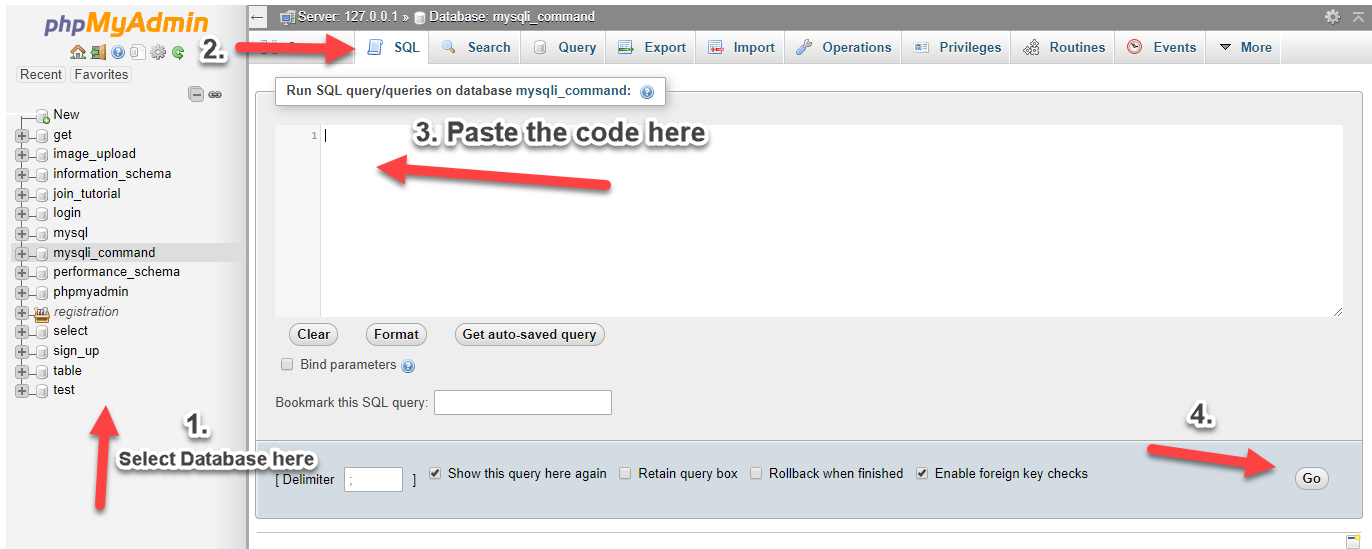
1. Open your phpMyAdmin.
2. Create a new database named codeigniter.
3. Click the database that we created, click SQL tab then paste the below code or import the included .sql file in the downloadable of this source code located in db folder.
Connecting our App to MySQL
Next, we're going to connect our codeigniter application to the database that we created earlier.
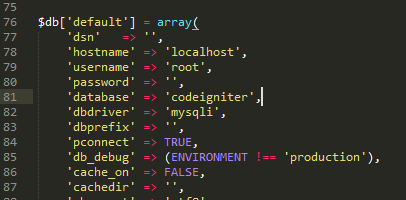
1. In your codeigniter app folder, open database.php located in application/config folder.
2. Update database.php with your credential the same as what I did in the image below.
database is where we define the database that we created earlier.
Configuring our Base URL
Next, we configure our base url to tell codeigniter that this is the URL of our site/application. We're gonna be using this a lot that's why we need to configure this.
1. In your codeigniter app folder, open config.php located in application/config folder.
2. Find and edit the ff line:
where codeigniter_fileupload is the name of your app folder.
Creating our Model
Next, we create the model for our app. Take note that the first letter of your model name should be in CAPITAL letter and the name of the model should be the same as the file name to avoid confusion.
Create a file named Files_model.php in application/models folder of our app and put the ff codes.
Creating our Controller
Next step is to create our controller. Controllers follow the same naming convention as models.
Create a file named Upload.php in application/controllers folder of our app and put the ff codes.
Creating our Default Route
Next, we are going to set our default route so that whenever we haven't set up a controller to use, this default controller will be used instead.
Open routes.php located in application/config folder and set the default route to our user controller. Note: While we name controllers using CAPITAL letter in this first letter, we refer to them in SMALL letter.
Creating our View
Lastly, we create the views of our app. Take note that I've use Bootstrap in the views. You may download bootstrap using this link.
Create the ff file inside application/views folder.
file_upload.php
That ends the explanation for this tutorial. Happy Coding :)
Download
If you don't have CodeIgniter installed yet, you can use this link to download the latest version of CodeIgniter which is 3.1.7 that I've used in this tutorial.
After downloading, extract the file in the folder of your server. Since I'm using XAMPP as my localhost server, I've put the folder in htdocs folder of my XAMPP.
Then, you can test whether you have successfully installed codeigniter by typing your app name in your browser. In my case, I named my app as codeigniter_fileupload so I'm using the below code.
- localhost/codeigniter_fileupload
Creating our Database
First we are going to create our database for this tutorial.
1. Open your phpMyAdmin.
2. Create a new database named codeigniter.
3. Click the database that we created, click SQL tab then paste the below code or import the included .sql file in the downloadable of this source code located in db folder.
- CREATE
TABLE
`files`
(
- `id`
int
(
11
)
NOT
NULL
AUTO_INCREMENT
,
- `filename`
varchar
(
150
)
NOT
NULL
,
- `description`
text
NOT
NULL
,
- PRIMARY KEY
(
`id`
)
- )
ENGINE
=
InnoDB
DEFAULT
CHARSET
=
latin1;
Connecting our App to MySQL
Next, we're going to connect our codeigniter application to the database that we created earlier.
1. In your codeigniter app folder, open database.php located in application/config folder.
2. Update database.php with your credential the same as what I did in the image below.
database is where we define the database that we created earlier.
Configuring our Base URL
Next, we configure our base url to tell codeigniter that this is the URL of our site/application. We're gonna be using this a lot that's why we need to configure this.
1. In your codeigniter app folder, open config.php located in application/config folder.
2. Find and edit the ff line:
- $config['base_url'] = 'http://localhost/codeigniter_fileupload/';
where codeigniter_fileupload is the name of your app folder.
Creating our Model
Next, we create the model for our app. Take note that the first letter of your model name should be in CAPITAL letter and the name of the model should be the same as the file name to avoid confusion.
Create a file named Files_model.php in application/models folder of our app and put the ff codes.
- <?php
- class
Files_model extends
CI_Model {
- function
__construct(
)
{
- parent::
__construct(
)
;
- $this
->
load
->
database
(
)
;
- }
- public
function
getAllFiles(
)
{
- $query
=
$this
->
db
->
get
(
'files'
)
;
- return
$query
->
result
(
)
;
- }
- public
function
insertfile(
$file
)
{
- return
$this
->
db
->
insert
(
'files'
,
$file
)
;
- }
- }
- ?>
Creating our Controller
Next step is to create our controller. Controllers follow the same naming convention as models.
Create a file named Upload.php in application/controllers folder of our app and put the ff codes.
- <?php
- defined
(
'BASEPATH'
)
OR exit
(
'No direct script access allowed'
)
;
- class
Upload extends
CI_Controller {
- function
__construct(
)
{
- parent::
__construct(
)
;
- //load our helper
- $this
->
load
->
helper
(
'url'
)
;
- //load our model
- $this
->
load
->
model
(
'files_model'
)
;
- }
- public
function
index(
)
{
- //load session library to use flashdata
- $this
->
load
->
library
(
'session'
)
;
- //fetch all files i the database
- $data
[
'files'
]
=
$this
->
files_model
->
getAllFiles
(
)
;
- $this
->
load
->
view
(
'file_upload'
,
$data
)
;
- }
- public
function
insert(
)
{
- //load session library to use flashdata
- $this
->
load
->
library
(
'session'
)
;
- //Check if file is not empty
- if
(
!
empty
(
$_FILES
[
'upload'
]
[
'name'
]
)
)
{
- $config
[
'upload_path'
]
=
'upload/'
;
- //restrict uploads to this mime types
- $config
[
'allowed_types'
]
=
'jpg|jpeg|png|gif'
;
- $config
[
'file_name'
]
=
$_FILES
[
'upload'
]
[
'name'
]
;
- //Load upload library and initialize configuration
- $this
->
load
->
library
(
'upload'
,
$config
)
;
- $this
->
upload
->
initialize
(
$config
)
;
- if
(
$this
->
upload
->
do_upload
(
'upload'
)
)
{
- $uploadData
=
$this
->
upload
->
data
(
)
;
- $filename
=
$uploadData
[
'file_name'
]
;
- //set file data to insert to database
- $file
[
'description'
]
=
$this
->
input
->
post
(
'description'
)
;
- $file
[
'filename'
]
=
$filename
;
- $query
=
$this
->
files_model
->
insertfile
(
$file
)
;
- if
(
$query
)
{
- header
(
'location:'
.
base_url(
)
.
$this
->
index
(
)
)
;
- $this
->
session
->
set_flashdata
(
'success'
,
'File uploaded successfully'
)
;
- }
- else
{
- header
(
'location:'
.
base_url(
)
.
$this
->
index
(
)
)
;
- $this
->
session
->
set_flashdata
(
'error'
,
'File uploaded but not inserted to database'
)
;
- }
- }
else
{
- header
(
'location:'
.
base_url(
)
.
$this
->
index
(
)
)
;
- $this
->
session
->
set_flashdata
(
'error'
,
'Cannot upload file.'
)
;
- }
- }
else
{
- header
(
'location:'
.
base_url(
)
.
$this
->
index
(
)
)
;
- $this
->
session
->
set_flashdata
(
'error'
,
'Cannot upload empty file.'
)
;
- }
- }
- }
Creating our Default Route
Next, we are going to set our default route so that whenever we haven't set up a controller to use, this default controller will be used instead.
Open routes.php located in application/config folder and set the default route to our user controller. Note: While we name controllers using CAPITAL letter in this first letter, we refer to them in SMALL letter.
- $route['default_controller'] = 'upload';
Creating our View
Lastly, we create the views of our app. Take note that I've use Bootstrap in the views. You may download bootstrap using this link.
Create the ff file inside application/views folder.
file_upload.php
- <!DOCTYPE html>
- <html>
- <head>
- <meta charset="utf-8">
- <title>CodeIgniter File Upload</title>
- <link rel="stylesheet" type="text/css" href="<?php
echo
base_url(
)
;
?>
bootstrap/css/bootstrap.min.css">
- </head>
- <body>
- <div class="container">
- <h1 class="page-header text-center">CodeIgniter File Upload with Flashdata</h1>
- <div class="row">
- <div class="col-sm-4">
- <h3>File Upload Form</h3>
- <form method="POST" action="<?php
echo
base_url(
)
;
?>
index.php/upload/insert" enctype="multipart/form-data">
- <div class="form-group">
- <label>Description:</label>
- <input type="text" name="description" class="form-control" required>
- </div>
- <div class="form-group">
- <label>File:</label>
- <input type="file" name="upload" required>
- </div>
- <button type="submit" class="btn btn-primary">Save</button>
- </form>
- <?php
- if
(
$this
->
session
->
flashdata
(
'success'
)
)
{
- ?>
- <div class="alert alert-success text-center" style="margin-top:20px;">
- <?php
echo
$this
->
session
->
flashdata
(
'success'
)
;
?>
- </div>
- <?php
- }
- if
(
$this
->
session
->
flashdata
(
'error'
)
)
{
- ?>
- <div class="alert alert-danger text-center" style="margin-top:20px;">
- <?php
echo
$this
->
session
->
flashdata
(
'error'
)
;
?>
- </div>
- <?php
- }
- ?>
- </div>
- <div class="col-sm-8">
- <table class="table table-bordered table-striped">
- <thead>
- <tr>
- <th>ID</th>
- <th>Filename</th>
- <th>Description</th>
- </tr>
- </thead>
- <tbody>
- <?php
- foreach
(
$files
as
$file
)
{
- ?>
- <tr>
- <td><?php
echo
$file
->
id
;
?>
</td>
- <td><?php
echo
$file
->
filename
;
?>
</td>
- <td><?php
echo
$file
->
description
;
?>
</td>
- </tr>
- <?php
- }
- ?>
- </tbody>
- </table>
- </div>
- </div>
- </div>
- </body>
- </html>
That ends the explanation for this tutorial. Happy Coding :)
Download
You must upgrade your account or reply in the thread to view hidden text.