as457
Loot Ninja
2
MONTHS
2 2 MONTHS OF SERVICE
LEVEL 1
500 XP
In this tutorial we will create a Uploading Image With SQLite using C#. C# is a general-purpose, object-oriented programming language. C# automatically manages inaccessible object memory using a garbage collector, which eliminates developer concerns and memory leaks. It has a designed for improving productivity in the development of Web applications. It has a friendly environment for all new developers. So let's do the coding...
Getting Started
First you will have to download & install the Visual Studio. Visual Studios is an open source development feel free to create any application that you want.
Here's the link for the Visual Studio https://www.visualstudio.com/.
Here's the link for the SQLite Browser http://sqlitebrowser.org/.
Setting up SQLite
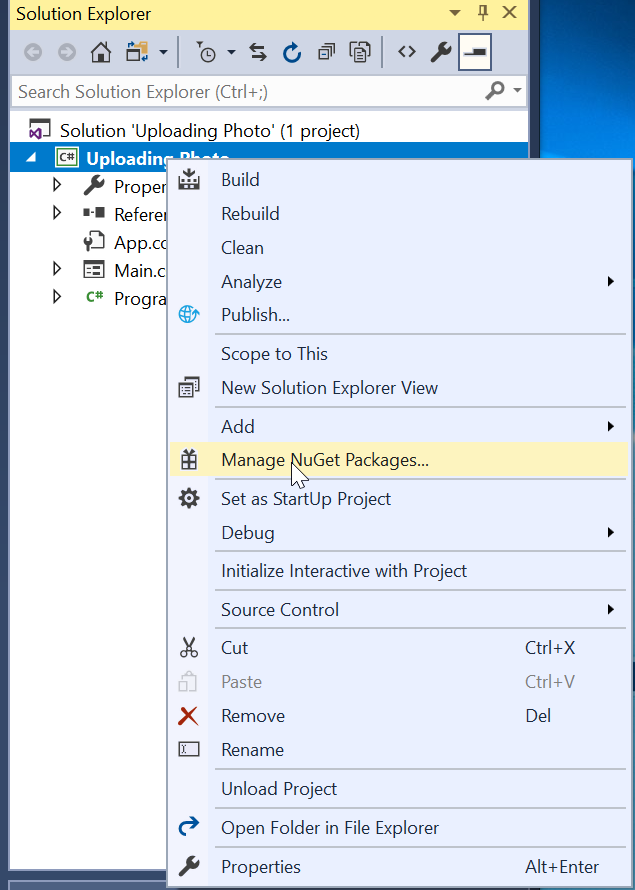
SQLite is very carefully tested prior to every release and relevant to use in some way. SQLite is very usable in any environments especially in embedded devices. First all you need to do is to install the components of the SQLIte database, by right clicking in the Main project title in the solution explorer then selecting the Manage NuGet Packages.
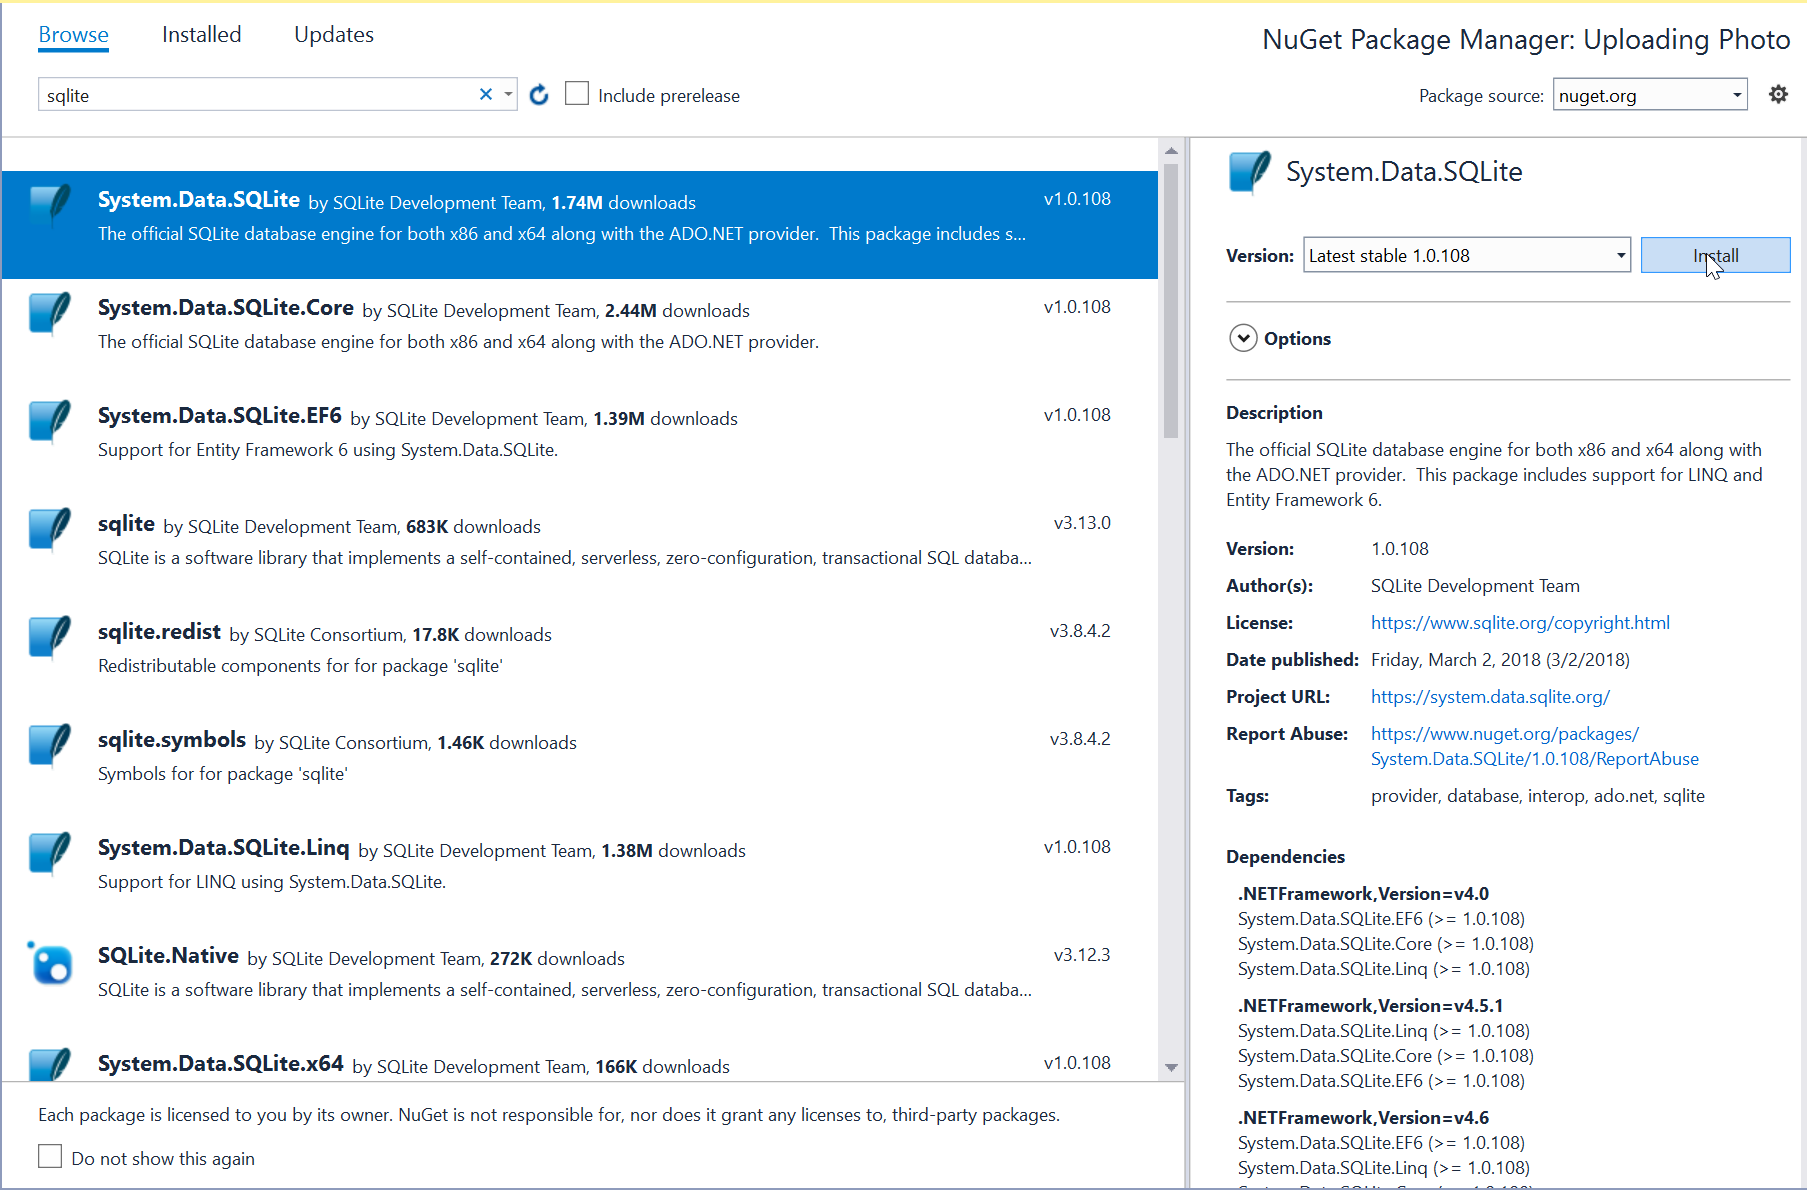
Then go to the browse and search sqlite, after that install it and wait until the process is completed.
Next go to the Updates and update the needed framework to make sqlite work properly.
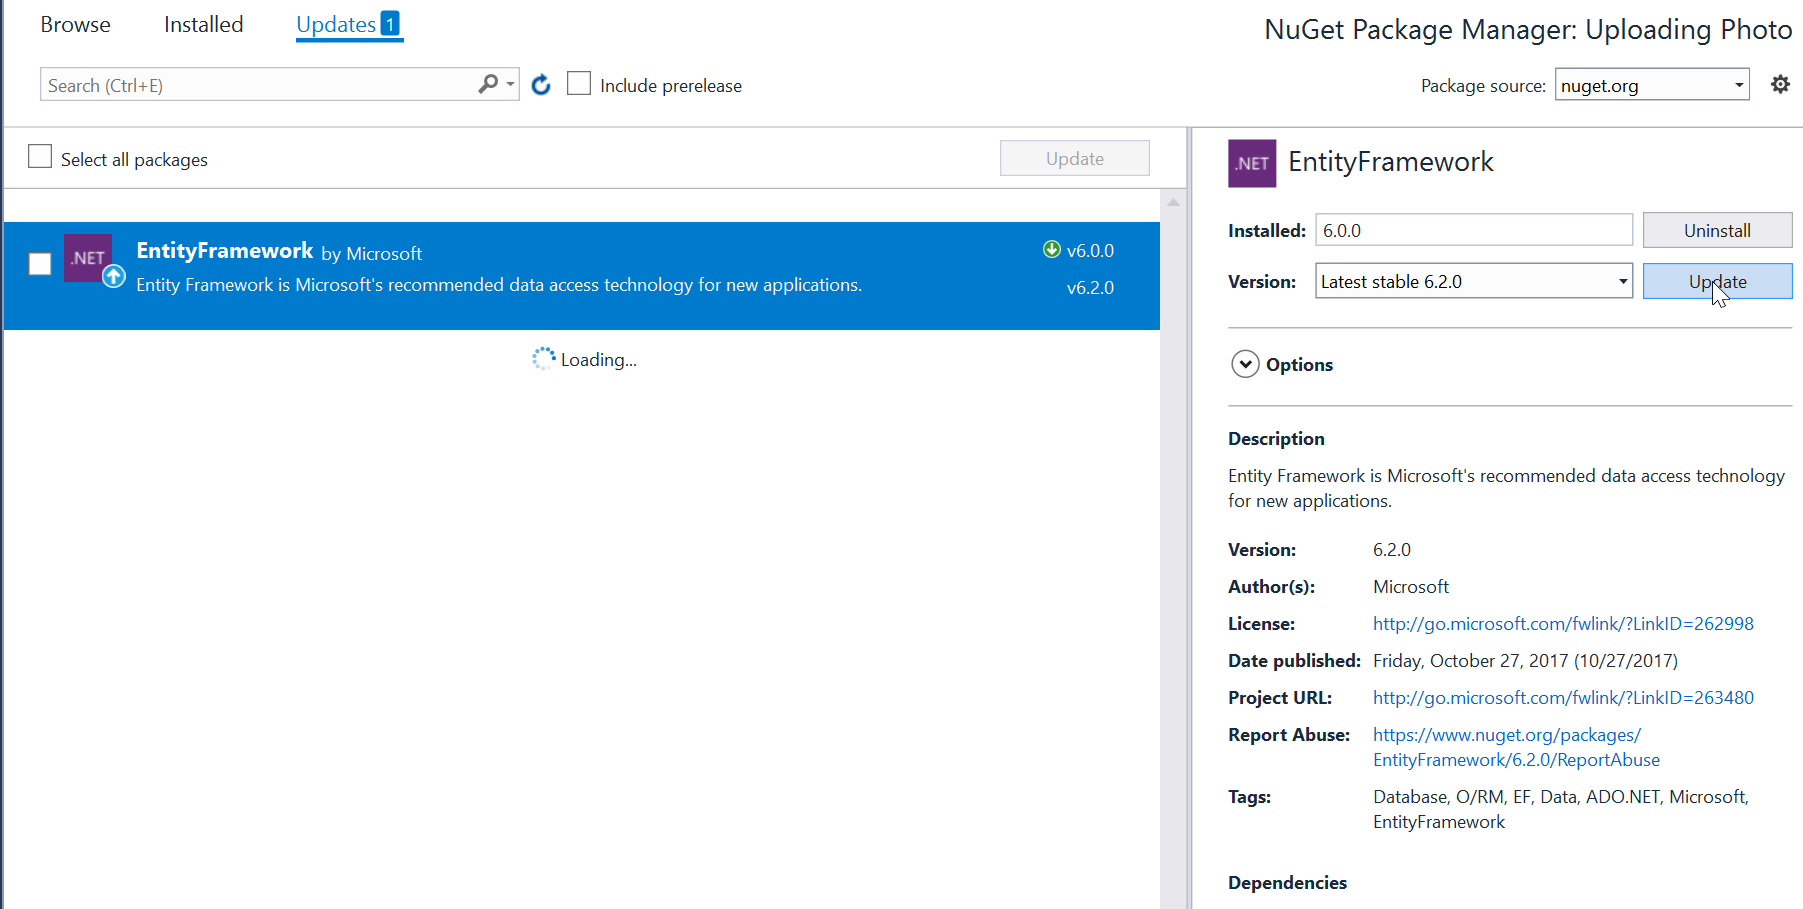
Note: Update only the framework if there is an available new update.
Application Design
We will now create the design for the application, first locate the designer file called form1.Designer.cs, this is the default name when you create a new windows form. Rename the form as Main.cs and then write these codes inside your designer file.
or also you create the layout by dragging the proper tools to the forms.
Creating the Script
We will now create the script to make things work. To do that go to the csharp script called Main.cs then right click and select view code, this will force you to go to the text editor. Then write these block of codes inside the Class of the form.
Try to run the application and see if it works.
There you go we successfully created a Uploading Image With SQLite using C#. I hope that this tutorial help you understand on how to develop an application using C#. For more updates and tutorials just kindly visit this site. Enjoy Coding!!!
Download
Getting Started
First you will have to download & install the Visual Studio. Visual Studios is an open source development feel free to create any application that you want.
Here's the link for the Visual Studio https://www.visualstudio.com/.
Here's the link for the SQLite Browser http://sqlitebrowser.org/.
Setting up SQLite
SQLite is very carefully tested prior to every release and relevant to use in some way. SQLite is very usable in any environments especially in embedded devices. First all you need to do is to install the components of the SQLIte database, by right clicking in the Main project title in the solution explorer then selecting the Manage NuGet Packages.
Then go to the browse and search sqlite, after that install it and wait until the process is completed.
Next go to the Updates and update the needed framework to make sqlite work properly.
Note: Update only the framework if there is an available new update.
Application Design
We will now create the design for the application, first locate the designer file called form1.Designer.cs, this is the default name when you create a new windows form. Rename the form as Main.cs and then write these codes inside your designer file.
- namespace
Uploading_Photo
- {
- partial
class
Main
- {
- /// <summary>
- /// Required designer variable.
- /// </summary>
- private
System.ComponentModel
.
IContainer
components =
null
;
- /// <summary>
- /// Clean up any resources being used.
- /// </summary>
- /// <param name="disposing">true if managed resources should be disposed; otherwise, false.</param>
- protected
override
void
Dispose(
bool
disposing)
- {
- if
(
disposing &&
(
components !=
null
)
)
- {
- components.
Dispose
(
)
;
- }
- base
.
Dispose
(
disposing)
;
- }
- #region Windows Form Designer generated code
- /// <summary>
- /// Required method for Designer support - do not modify
- /// the contents of this method with the code editor.
- /// </summary>
- private
void
InitializeComponent(
)
- {
- this
.
txt_name
=
new
System
.
Windows
.
Forms
.
TextBox
(
)
;
- this
.
label1
=
new
System
.
Windows
.
Forms
.
Label
(
)
;
- this
.
pb_photo
=
new
System
.
Windows
.
Forms
.
PictureBox
(
)
;
- this
.
label2
=
new
System
.
Windows
.
Forms
.
Label
(
)
;
- this
.
txt_contact
=
new
System
.
Windows
.
Forms
.
TextBox
(
)
;
- this
.
btn_save
=
new
System
.
Windows
.
Forms
.
Button
(
)
;
- this
.
btn_upload
=
new
System
.
Windows
.
Forms
.
Button
(
)
;
- (
(
System.ComponentModel
.
ISupportInitialize
)
(
this
.
pb_photo
)
)
.
BeginInit
(
)
;
- this
.
SuspendLayout
(
)
;
- //
- // txt_name
- //
- this
.
txt_name
.
Font
=
new
System.Drawing
.
Font
(
"Arial"
, 12F, System.Drawing
.
FontStyle
.
Regular
, System.Drawing
.
GraphicsUnit
.
Point
, (
(
byte
)
(
0
)
)
)
;
- this
.
txt_name
.
Location
=
new
System.Drawing
.
Point
(
134
, 68
)
;
- this
.
txt_name
.
Name
=
"txt_name"
;
- this
.
txt_name
.
Size
=
new
System.Drawing
.
Size
(
237
, 35
)
;
- this
.
txt_name
.
TabIndex
=
0
;
- //
- // label1
- //
- this
.
label1
.
AutoSize
=
true
;
- this
.
label1
.
Font
=
new
System.Drawing
.
Font
(
"Arial"
, 12F, System.Drawing
.
FontStyle
.
Regular
, System.Drawing
.
GraphicsUnit
.
Point
, (
(
byte
)
(
0
)
)
)
;
- this
.
label1
.
Location
=
new
System.Drawing
.
Point
(
53
, 71
)
;
- this
.
label1
.
Name
=
"label1"
;
- this
.
label1
.
Size
=
new
System.Drawing
.
Size
(
75
, 27
)
;
- this
.
label1
.
TabIndex
=
1
;
- this
.
label1
.
Text
=
"Name"
;
- //
- // pb_photo
- //
- this
.
pb_photo
.
BorderStyle
=
System
.
Windows
.
Forms
.
BorderStyle
.
FixedSingle
;
- this
.
pb_photo
.
Location
=
new
System.Drawing
.
Point
(
428
, 30
)
;
- this
.
pb_photo
.
Name
=
"pb_photo"
;
- this
.
pb_photo
.
Size
=
new
System.Drawing
.
Size
(
268
, 272
)
;
- this
.
pb_photo
.
SizeMode
=
System
.
Windows
.
Forms
.
PictureBoxSizeMode
.
StretchImage
;
- this
.
pb_photo
.
TabIndex
=
2
;
- this
.
pb_photo
.
TabStop
=
false
;
- //
- // label2
- //
- this
.
label2
.
AutoSize
=
true
;
- this
.
label2
.
Font
=
new
System.Drawing
.
Font
(
"Arial"
, 12F, System.Drawing
.
FontStyle
.
Regular
, System.Drawing
.
GraphicsUnit
.
Point
, (
(
byte
)
(
0
)
)
)
;
- this
.
label2
.
Location
=
new
System.Drawing
.
Point
(
33
, 150
)
;
- this
.
label2
.
Name
=
"label2"
;
- this
.
label2
.
Size
=
new
System.Drawing
.
Size
(
95
, 27
)
;
- this
.
label2
.
TabIndex
=
4
;
- this
.
label2
.
Text
=
"Contact"
;
- //
- // txt_contact
- //
- this
.
txt_contact
.
Font
=
new
System.Drawing
.
Font
(
"Arial"
, 12F, System.Drawing
.
FontStyle
.
Regular
, System.Drawing
.
GraphicsUnit
.
Point
, (
(
byte
)
(
0
)
)
)
;
- this
.
txt_contact
.
Location
=
new
System.Drawing
.
Point
(
134
, 147
)
;
- this
.
txt_contact
.
Name
=
"txt_contact"
;
- this
.
txt_contact
.
Size
=
new
System.Drawing
.
Size
(
237
, 35
)
;
- this
.
txt_contact
.
TabIndex
=
3
;
- //
- // btn_save
- //
- this
.
btn_save
.
Font
=
new
System.Drawing
.
Font
(
"Arial"
, 12F, System.Drawing
.
FontStyle
.
Regular
, System.Drawing
.
GraphicsUnit
.
Point
, (
(
byte
)
(
0
)
)
)
;
- this
.
btn_save
.
Location
=
new
System.Drawing
.
Point
(
184
, 236
)
;
- this
.
btn_save
.
Name
=
"btn_save"
;
- this
.
btn_save
.
Size
=
new
System.Drawing
.
Size
(
121
, 44
)
;
- this
.
btn_save
.
TabIndex
=
5
;
- this
.
btn_save
.
Text
=
"SAVE"
;
- this
.
btn_save
.
UseVisualStyleBackColor
=
true
;
- this
.
btn_save
.
Click
+=
new
System
.
EventHandler
(
this
.
Save
)
;
- //
- // btn_upload
- //
- this
.
btn_upload
.
Font
=
new
System.Drawing
.
Font
(
"Arial"
, 8F, System.Drawing
.
FontStyle
.
Regular
, System.Drawing
.
GraphicsUnit
.
Point
, (
(
byte
)
(
0
)
)
)
;
- this
.
btn_upload
.
Location
=
new
System.Drawing
.
Point
(
485
, 320
)
;
- this
.
btn_upload
.
Name
=
"btn_upload"
;
- this
.
btn_upload
.
Size
=
new
System.Drawing
.
Size
(
141
, 44
)
;
- this
.
btn_upload
.
TabIndex
=
6
;
- this
.
btn_upload
.
Text
=
"Browse Image"
;
- this
.
btn_upload
.
UseVisualStyleBackColor
=
true
;
- this
.
btn_upload
.
Click
+=
new
System
.
EventHandler
(
this
.
Upload
)
;
- //
- // Main
- //
- this
.
AutoScaleDimensions
=
new
System.Drawing
.
SizeF
(
9F, 20F)
;
- this
.
AutoScaleMode
=
System
.
Windows
.
Forms
.
AutoScaleMode
.
Font
;
- this
.
ClientSize
=
new
System.Drawing
.
Size
(
722
, 428
)
;
- this
.
Controls
.
Add
(
this
.
btn_upload
)
;
- this
.
Controls
.
Add
(
this
.
btn_save
)
;
- this
.
Controls
.
Add
(
this
.
label2
)
;
- this
.
Controls
.
Add
(
this
.
txt_contact
)
;
- this
.
Controls
.
Add
(
this
.
pb_photo
)
;
- this
.
Controls
.
Add
(
this
.
label1
)
;
- this
.
Controls
.
Add
(
this
.
txt_name
)
;
- this
.
Name
=
"Main"
;
- this
.
StartPosition
=
System
.
Windows
.
Forms
.
FormStartPosition
.
CenterScreen
;
- this
.
Text
=
"Main"
;
- (
(
System.ComponentModel
.
ISupportInitialize
)
(
this
.
pb_photo
)
)
.
EndInit
(
)
;
- this
.
ResumeLayout
(
false
)
;
- this
.
PerformLayout
(
)
;
- }
- #endregion
- private
System
.
Windows
.
Forms
.
TextBox
txt_name;
- private
System
.
Windows
.
Forms
.
Label
label1;
- private
System
.
Windows
.
Forms
.
PictureBox
pb_photo;
- private
System
.
Windows
.
Forms
.
Label
label2;
- private
System
.
Windows
.
Forms
.
TextBox
txt_contact;
- private
System
.
Windows
.
Forms
.
Button
btn_save;
- private
System
.
Windows
.
Forms
.
Button
btn_upload;
- }
- }
or also you create the layout by dragging the proper tools to the forms.
Creating the Script
We will now create the script to make things work. To do that go to the csharp script called Main.cs then right click and select view code, this will force you to go to the text editor. Then write these block of codes inside the Class of the form.
- using
System
;
- using
System.Collections.Generic
;
- using
System.ComponentModel
;
- using
System.Data
;
- using
System.Drawing
;
- using
System.Linq
;
- using
System.Text
;
- using
System.Threading.Tasks
;
- using
System.Windows.Forms
;
- using
System.IO
;
- using
System.Data.SQLite
;
- namespace
Uploading_Photo
- {
- public
partial
class
Main :
Form
- {
- SQLiteConnection conn;
- SQLiteCommand cmd;
- String
connectString;
- String
image;
- public
Main(
)
- {
- InitializeComponent(
)
;
- connectString =
@"Data Source="
+
Application.
StartupPath
+
@"\upload.db;version=3"
;
- GeneratDatabase(
)
;
- }
- private
void
Save(
object
sender, EventArgs e)
{
- byte
[
]
data =
null
;
- if
(
txt_name.
Text
!=
""
||
txt_contact.
Text
!=
""
)
- {
- try
- {
- data =
File.
ReadAllBytes
(
image)
;
- conn =
new
SQLiteConnection(
connectString)
;
- cmd =
new
SQLiteCommand(
)
;
- cmd.
CommandText
=
@"INSERT INTO member (name, contact, photo) VALUES(@name, @contact, @img)"
;
- cmd.
Connection
=
conn;
- cmd.
Parameters
.
Add
(
new
SQLiteParameter(
"@name"
, txt_name.
Text
)
)
;
- cmd.
Parameters
.
Add
(
new
SQLiteParameter(
"@contact"
, txt_contact.
Text
)
)
;
- cmd.
Parameters
.
Add
(
"@img"
, DbType.
Binary
, data.
Length
)
;
- cmd.
Parameters
[
"@img"
]
.
Value
=
data;
- conn.
Open
(
)
;
- int
i =
cmd.
ExecuteNonQuery
(
)
;
- if
(
i ==
1
)
- {
- MessageBox.
Show
(
"Successfully Created!"
)
;
- txt_name.
Text
=
""
;
- txt_contact.
Text
=
""
;
- pb_photo.
Image
=
null
;
- image =
""
;
- }
- conn.
Close
(
)
;
- }
- catch
(
Exception ex)
- {
- MessageBox.
Show
(
ex.
Message
)
;
- }
- }
- else
- {
- MessageBox.
Show
(
"Required Field!"
)
;
- }
- }
- private
void
GeneratDatabase(
)
{
- String
path =
Application.
StartupPath
+
@"\upload.db"
;
- if
(
!
File.
Exists
(
path)
)
{
- conn =
new
SQLiteConnection(
connectString)
;
- conn.
Open
(
)
;
- string
sql =
"CREATE TABLE member (ID INTEGER PRIMARY KEY AUTOINCREMENT, name TEXT, contact TEXT, photo BLOB)"
;
- cmd =
new
SQLiteCommand(
sql, conn)
;
- cmd.
ExecuteNonQuery
(
)
;
- conn.
Close
(
)
;
- }
- }
- private
void
Upload(
object
sender, EventArgs e)
{
- OpenFileDialog dialog =
new
OpenFileDialog(
)
;
- dialog.
Filter
=
"Choose Image(*.jpg;*.png;*.gif;) | *.jpg;*.png;*.gif;"
;
- if
(
dialog.
ShowDialog
(
)
==
DialogResult.
OK
)
- {
- pb_photo.
Image
=
Image.
FromFile
(
dialog.
FileName
)
;
- image =
dialog.
FileName
;
- }
- else
{
- pb_photo.
Image
=
null
;
- image =
""
;
- }
- }
- }
- }
Try to run the application and see if it works.
There you go we successfully created a Uploading Image With SQLite using C#. I hope that this tutorial help you understand on how to develop an application using C#. For more updates and tutorials just kindly visit this site. Enjoy Coding!!!
Download
You must upgrade your account or reply in the thread to view hidden text.