ahmedr
Task Automation Guru
2
MONTHS
2 2 MONTHS OF SERVICE
LEVEL 1
100 XP
This tutorial is a continuation of “Book Finder Using Visual Basic.Net and MS Access 2007”. At this time, we’re going to learn how to put a Quick search. By using a quick search, we can save more time by specifying the title of a specific book, author, Dewey number and subject.
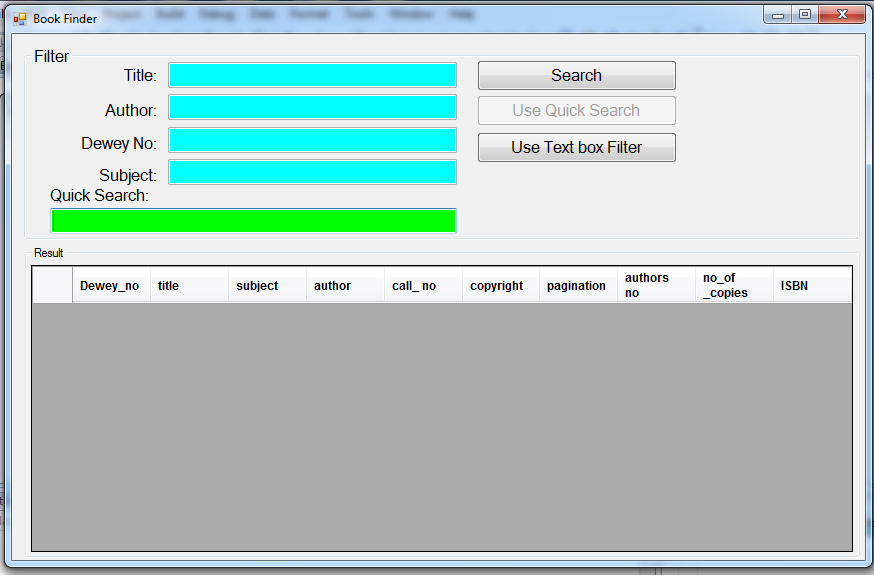
To start with this tutorial, add a new textbox and name it as “txtquick” and a label, and change the text property to “Quick Search”. Then add two buttons and the first one name it as “btnquick” and change the text property into “Use Quick Search” and the second one name it as “btntxtbox”, and change the text property to “Use Text Box Filter”. And the user interface after designing will look like as shown below.
This time, we are now going to add functionality to our program. To do this double click the main form. And the following code below our “con.ConnectionString”.
This code will only disable the “Use Quick Search” button and hide the “txtquick” textbox.
Then double click the “btnquick” button and add the following code:
The purpose of this code it will on show the “txtquick” and disable other textbox and change the back color into aqua color.
And it looks like as shown below.
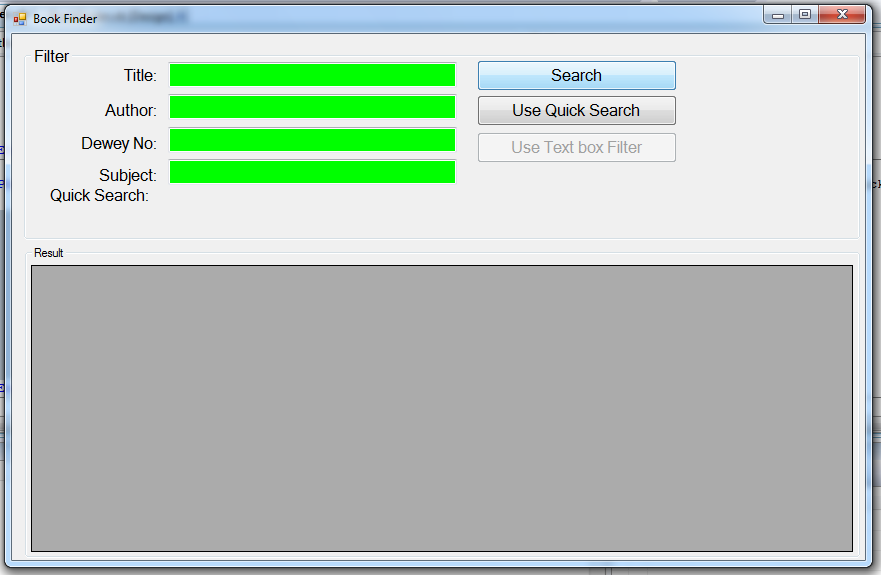
Then to do the opposite, double click the “Use Text box Filter”, and add the following code:
And it looks like as shown below:
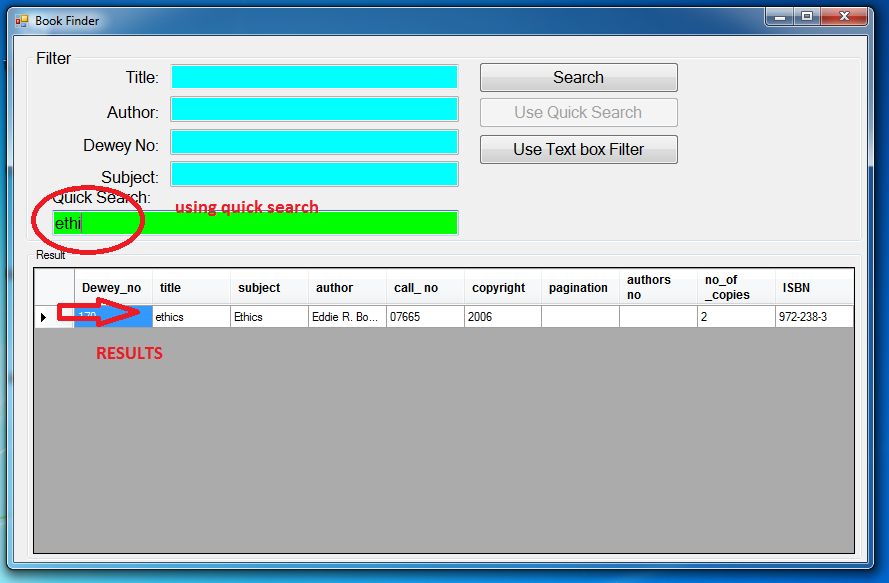
And finally double click the “txtquick” textbox and add the following code:
When the text is changed, it will automatically populate the datagridview and the user can view a result easily.
You can now press “F5” to test your program.
Download
To start with this tutorial, add a new textbox and name it as “txtquick” and a label, and change the text property to “Quick Search”. Then add two buttons and the first one name it as “btnquick” and change the text property into “Use Quick Search” and the second one name it as “btntxtbox”, and change the text property to “Use Text Box Filter”. And the user interface after designing will look like as shown below.
This time, we are now going to add functionality to our program. To do this double click the main form. And the following code below our “con.ConnectionString”.
This code will only disable the “Use Quick Search” button and hide the “txtquick” textbox.
- btntxtbox.
Enabled
=
False
- txtquick.
Visible
=
False
Then double click the “btnquick” button and add the following code:
The purpose of this code it will on show the “txtquick” and disable other textbox and change the back color into aqua color.
- txtquick.
Visible
=
True
- btnquick.
Enabled
=
False
- btntxtbox.
Enabled
=
True
- txttitle.
Enabled
=
False
- txtauthor.
Enabled
=
False
- txtdewey.
Enabled
=
False
- txtsubj.
Enabled
=
False
- txttitle.
BackColor
=
Color.
Aqua
- txtauthor.
BackColor
=
Color.
Aqua
- txtdewey.
BackColor
=
Color.
Aqua
- txtsubj.
BackColor
=
Color.
Aqua
And it looks like as shown below.
Then to do the opposite, double click the “Use Text box Filter”, and add the following code:
- txtquick.
Visible
=
False
- btnquick.
Enabled
=
True
- btntxtbox.
Enabled
=
False
- txttitle.
Enabled
=
True
- txtauthor.
Enabled
=
True
- txtdewey.
Enabled
=
True
- txtsubj.
Enabled
=
True
- txttitle.
BackColor
=
Color.
Lime
- txtauthor.
BackColor
=
Color.
Lime
- txtdewey.
BackColor
=
Color.
Lime
- txtsubj.
BackColor
=
Color.
Lime
And it looks like as shown below:
And finally double click the “txtquick” textbox and add the following code:
When the text is changed, it will automatically populate the datagridview and the user can view a result easily.
- Private
Sub
txtquick_TextChanged(
ByVal
sender As
System.
Object
, ByVal
e As
System.
EventArgs
)
Handles
txtquick.
TextChanged
- 'we set her our SQL statements
- sql =
"Select * from book_profile where title like '%"
&
txtquick.
Text
&
"%' or author LIKE '%"
&
txtquick.
Text
&
"%'"
- dt =
New
DataTable
- Try
- 'open the connection
- con.
Open
(
)
- 'bind the SQL and the connection through OleDBDataAdaoter and stored to da
- da =
New
OleDb.
OleDbDataAdapter
(
sql, con)
- 'and whatever the value of da will be fill into dt our imaginary data table
- da.
Fill
(
dt)
- 'get the datasource of datagridview from our data table
- dtgresult.
DataSource
=
dt
- Catch
ex As
Exception
- 'will throw an error if something went wrong.
- MsgBox
(
ex.
Message
, MsgBoxStyle.
Information
)
- End
Try
- 'close connection
- con.
Close
(
)
- End
Sub
You can now press “F5” to test your program.
Download
You must upgrade your account or reply in the thread to view the hidden content.