PetaPaka123
Next-Gen Tech Pioneer
2
MONTHS
2 2 MONTHS OF SERVICE
LEVEL 1
200 XP
Getting Started
I've used CDN for Bootstrap and Angular JS so you need internet connection for them to work.
Creating our Database
First, we are going to create our database.
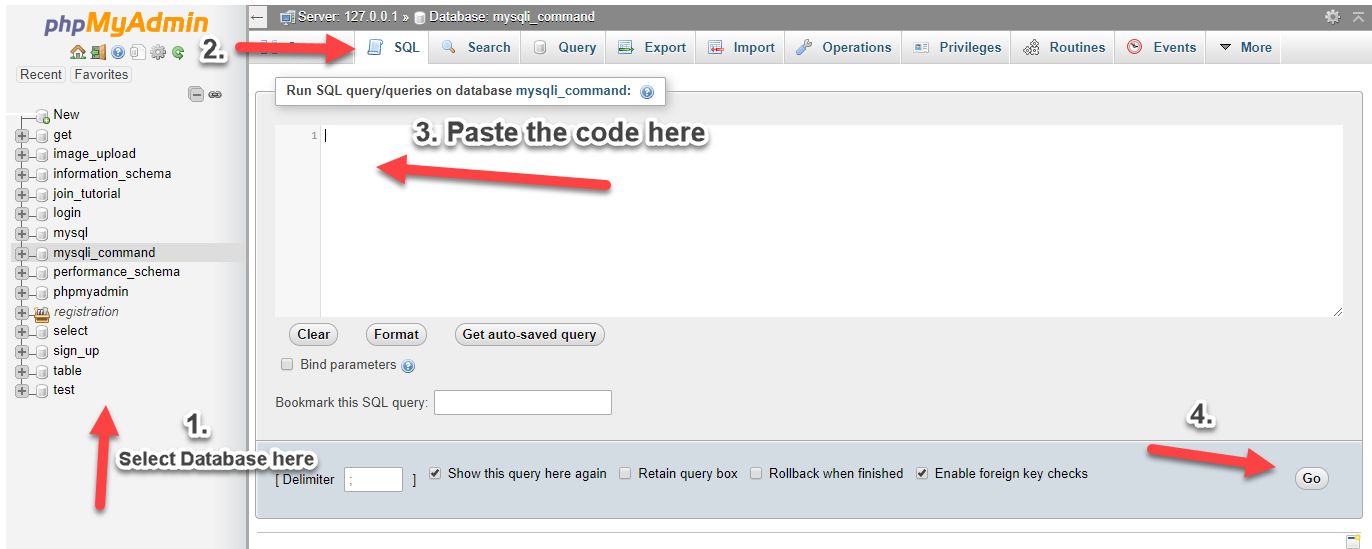
1. Open phpMyAdmin.
2. Click databases, create a database and name it as angular.
3. After creating a database, click the SQL and paste the below codes. See image below for detailed instruction.
Creating our Output Folder
Next, we're going to create a folder which will contain our uploaded files.
In the root directory of our project, create a new folder and name it as upload.
index.php
Next, we're going to create our index which contains our upload form
and displays our uploaded files, in the case of this tutorial, uploaded images.
angular.js
This is contains our Angular JS code in fetching data from database and uploading data into our database.
fetch.php
This is our PHP code in fetching the uploaded files in our database.
upload.php
Lastly, this contains our PHP code in uploading files into our database.
That ends this tutorial. Happy Coding :)
Download
I've used CDN for Bootstrap and Angular JS so you need internet connection for them to work.
Creating our Database
First, we are going to create our database.
1. Open phpMyAdmin.
2. Click databases, create a database and name it as angular.
3. After creating a database, click the SQL and paste the below codes. See image below for detailed instruction.
- CREATE
TABLE
`upload`
(
- `imageid`
int
(
11
)
NOT
NULL
AUTO_INCREMENT
,
- `filename`
varchar
(
200
)
NOT
NULL
,
- PRIMARY KEY
(
`imageid`
)
- )
ENGINE
=
InnoDB
DEFAULT
CHARSET
=
latin1;
Creating our Output Folder
Next, we're going to create a folder which will contain our uploaded files.
In the root directory of our project, create a new folder and name it as upload.
index.php
Next, we're going to create our index which contains our upload form
and displays our uploaded files, in the case of this tutorial, uploaded images.
- <!DOCTYPE html>
- <html
>
- <head
>
- <title
>
AngularJS Upload with PHP/MySQLi</
title
>
- <meta
charset
=
"utf-8"
>
- <link
href
=
"https://maxcdn.bootstrapcdn.com/bootstrap/3.3.7/css/bootstrap.min.css"
rel
=
"stylesheet"
>
- <script
src
=
"http://ajax.googleapis.com/ajax/libs/angularjs/1.4.8/angular.min.js"
></
script
>
- </
head
>
- <body
ng-app=
"app"
ng-controller=
"uploader"
ng-init=
"fetch()"
>
- <div
class
=
"container"
>
- <h1
class
=
"page-header text-center"
>
AngularJS Upload with PHP/MySQLi</
h1
>
- <div
class
=
"row"
>
- <div
class
=
"col-md-3"
>
- <h3
class
=
"text-center"
>
Upload File</
h3
>
- <hr
>
- <label
>
File:</
label
>
- <input
type
=
"file"
file-input=
"files"
>
- <hr
>
- <button
class
=
"btn btn-primary"
ng-click=
"upload()"
><span
class
=
"glyphicon glyphicon-download-alt"
></
span
>
Upload</
button
>
- <div
ng-show=
"error"
class
=
"alert alert-danger text-center"
style
=
"margin-top:30px;"
>
- <button
type
=
"button"
class
=
"close"
ng-click=
"clearMessage()"
><span
aria-hidden=
"true"
>
×
</
span
></
button
>
- <span
class
=
"glyphicon glyphicon-remove"
></
span
>
{{ errorMessage }}
- </
div
>
- <div
ng-show=
"success"
class
=
"alert alert-success text-center"
style
=
"margin-top:30px;"
>
- <button
type
=
"button"
class
=
"close"
ng-click=
"clearMessage()"
><span
aria-hidden=
"true"
>
×
</
span
></
button
>
- <span
class
=
"glyphicon glyphicon-check"
></
span
>
{{ successMessage }}
- </
div
>
- </
div
>
- <div
class
=
"col-md-9"
>
- <div
class
=
"col-md-4"
ng-repeat=
"image in images"
>
- <img
ng-src
=
"upload/{{ image.filename }}"
width
=
"100%"
height
=
"250px"
class
=
"thumbnail"
>
- </
div
>
- </
div
>
- </
div
>
- </
div
>
- <script
src
=
"angular.js"
></
script
>
- </
body
>
- </
html
>
angular.js
This is contains our Angular JS code in fetching data from database and uploading data into our database.
- var
app =
angular.module
(
'app'
,
[
]
)
;
- app.directive
(
'fileInput'
,
function
(
$parse)
{
- return
{
- restrict:
'A'
,
- link:
function
(
$scope,
element,
attrs)
{
- element.on
(
'change'
,
function
(
e)
{
- var
files =
e.target
.files
;
- $parse(
attrs.fileInput
)
.assign
(
$scope,
element[
0
]
.files
)
;
- $scope.$apply(
)
;
- }
)
;
- }
- }
- }
)
;
- app.controller
(
'uploader'
,
function
(
$scope,
$http)
{
- $scope.error
=
false
;
- $scope.errorMessage
=
""
;
- $scope.success
=
false
;
- $scope.successMessage
=
""
;
- $scope.upload
=
function
(
)
{
- var
uploadForm =
new
FormData(
)
;
- angular.forEach
(
$scope.files
,
function
(
file)
{
- uploadForm.append
(
'file'
,
file)
;
- }
)
;
- $http.post
(
'upload.php'
,
uploadForm,
{
- transformRequest:
angular.identity
,
- headers:
{
'Content-Type'
:
undefined
,
'Process-Data'
:
false
}
- }
)
.success
(
function
(
response)
{
- if
(
response.error
)
{
- $scope.error
=
true
;
- $scope.errorMessage
=
response.message
;
- }
- else
{
- $scope.success
=
true
;
- $scope.successMessage
=
response.message
;
- $scope.fetch
(
)
;
- }
- }
)
- }
,
- $scope.fetch
=
function
(
)
{
- $http.get
(
'fetch.php'
)
- .success
(
function
(
data)
{
- $scope.images
=
data;
- }
)
;
- }
- $scope.clearMessage
=
function
(
)
{
- $scope.error
=
false
;
- $scope.errorMessage
=
""
;
- $scope.success
=
false
;
- $scope.successMessage
=
""
;
- }
- }
)
;
fetch.php
This is our PHP code in fetching the uploaded files in our database.
- <?php
- $conn
=
new
mysqli(
'localhost'
,
'root'
,
''
,
'angular'
)
;
- $output
=
array
(
)
;
- $sql
=
"SELECT * FROM upload"
;
- $query
=
$conn
->
query
(
$sql
)
;
- while
(
$row
=
$query
->
fetch_array
(
)
)
{
- $output
[
]
=
$row
;
- }
- echo
json_encode
(
$output
)
;
- ?>
upload.php
Lastly, this contains our PHP code in uploading files into our database.
- <?php
- $conn
=
new
mysqli(
'localhost'
,
'root'
,
''
,
'angular'
)
;
- $out
=
array
(
'error'
=>
false
)
;
- if
(
!
empty
(
$_FILES
)
)
{
- $newFilename
=
time
(
)
.
"_"
.
$_FILES
[
'file'
]
[
'name'
]
;
- $path
=
'upload/'
.
$newFilename
;
- if
(
move_uploaded_file
(
$_FILES
[
'file'
]
[
'tmp_name'
]
,
$path
)
)
{
- $sql
=
"INSERT INTO upload (filename) VALUES ('$newFilename
')"
;
- $query
=
$conn
->
query
(
$sql
)
;
- if
(
$query
)
{
- $out
[
'message'
]
=
'File Uploaded Successfully'
;
- }
- else
{
- $out
[
'error'
]
=
true
;
- $out
[
'message'
]
=
'File Uploaded but not Saved'
;
- }
- }
- }
- else
{
- $out
[
'error'
]
=
true
;
- $out
[
'message'
]
=
'Upload Failed. File empty!'
;
- }
- echo
json_encode
(
$out
)
;
- ?>
That ends this tutorial. Happy Coding :)
Download
You must upgrade your account or reply in the thread to view hidden text.