LunaticX
Keyboard Warrior
2
MONTHS
2 2 MONTHS OF SERVICE
LEVEL 1
200 XP
In this tutorial, we will create an Excel Application.
Excel is a spreadsheet application developed by Microsoft. Excel features calculation, graphing tools, pivot tables, and a macro programming language. Thus, excel is really important in offices for making reports, request letter, and for some miscellaneous applications.
This tutorial uses Microsoft.
Office
.
Interop
.
Excel
in our Windows Form Application.
Let's start with creating a Windows Form Application for this tutorial by following the following steps in Microsoft Visual Studio: Go to File, click New, and choose Windows Form Application.
Finally, select OK, then it creates your project and displays following Form1.
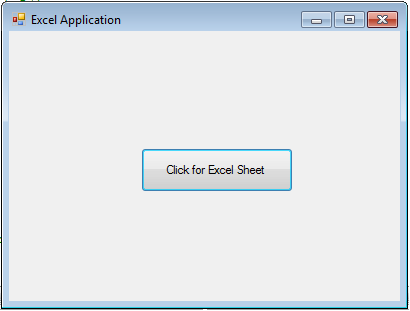
Insert a Button control named Button1 in the form.
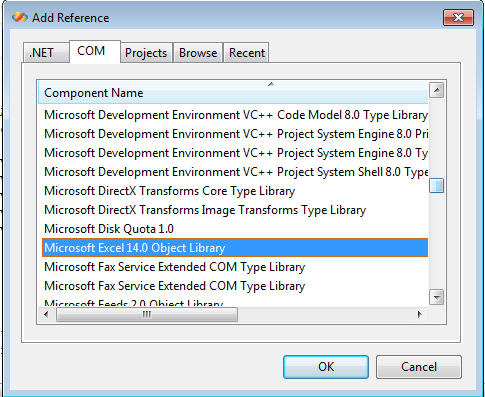
Add a reference to Microsoft Excel Object Library to your project. To do this follow the image below. Note: this is really an important library to add an excel file.

On the COM tab, locate Microsoft Excel Object Library and then click Select Microsoft Excel 14.0 Object Library. Then Click OK. Follow this image below.
Your design must be look like this:
Double click the code window and choose the Click event of Button1 and write the following code below.
Then run the application and click Button1. The excel will display based on the code on your Button1. It will look like this:
Then click Save, to save the Excel File.
Download the source code below and try it! :)
For more inquiries and need programmer for your thesis systems in any kind of programming languages, just contact my number below.
Best Regards,
Engr. Lyndon R. Bermoy
IT Instructor/System Developer/Android Developer
Mobile: 09079373999
Telephone: 826-9296
E-mail:[email protected]
Visit and like my page on Facebook at: Bermz ISware Solutions
Subscribe at my YouTube Channel at: SerBermz
Download
Excel is a spreadsheet application developed by Microsoft. Excel features calculation, graphing tools, pivot tables, and a macro programming language. Thus, excel is really important in offices for making reports, request letter, and for some miscellaneous applications.
This tutorial uses Microsoft.
Office
.
Interop
.
Excel
in our Windows Form Application.
Let's start with creating a Windows Form Application for this tutorial by following the following steps in Microsoft Visual Studio: Go to File, click New, and choose Windows Form Application.
Finally, select OK, then it creates your project and displays following Form1.
Insert a Button control named Button1 in the form.
Add a reference to Microsoft Excel Object Library to your project. To do this follow the image below. Note: this is really an important library to add an excel file.
On the COM tab, locate Microsoft Excel Object Library and then click Select Microsoft Excel 14.0 Object Library. Then Click OK. Follow this image below.
Your design must be look like this:
Double click the code window and choose the Click event of Button1 and write the following code below.
- Imports
Microsoft.
Office
.
Interop
.
Excel
- Public
Class
Form1
- Private
Sub
Button1_Click(
ByVal
sender As
Object
, ByVal
e As
EventArgs)
Handles
Button1.
Click
- Dim
appXL As
Application
- Dim
wbXl As
Workbook
- Dim
shXL As
Worksheet
- Dim
raXL As
Range
- ' Start Excel and get Application object.
- appXL =
CreateObject
(
"Excel.Application"
)
- appXL.
Visible
=
True
- ' Add a new workbook.
- wbXl =
appXL.
Workbooks
.
Add
- shXL =
wbXl.
ActiveSheet
- ' Add table headers going cell by cell.
- shXL.
Cells
(
1
, 1
)
.
Value
=
"First Name"
- shXL.
Cells
(
1
, 2
)
.
Value
=
"Last Name"
- shXL.
Cells
(
1
, 3
)
.
Value
=
"Full Name"
- shXL.
Cells
(
1
, 4
)
.
Value
=
"Specialization"
- ' Format A1:D1 as bold, vertical alignment = center.
- With
shXL.
Range
(
"A1"
, "D1"
)
- .
Font
.
Bold
=
True
- .
VerticalAlignment
=
XlVAlign.
xlVAlignCenter
- End
With
- ' Create an array to set multiple values at once.
- Dim
students(
5
, 2
)
As
String
- students(
0
, 0
)
=
"Lyndon"
- students(
0
, 1
)
=
"Bermoy"
- students(
1
, 0
)
=
"Novee"
- students(
1
, 1
)
=
"Dumanig"
- students(
2
, 0
)
=
"Aga"
- students(
2
, 1
)
=
"Bermoy"
- students(
3
, 0
)
=
"Don"
- students(
3
, 1
)
=
"Bermzkiee"
- students(
4
, 0
)
=
"Sourcecodester"
- students(
4
, 1
)
=
"TheBest"
- ' Fill A2:B6 with an array of values (First and Last Names).
- shXL.
Range
(
"A2"
, "B6"
)
.
Value
=
students
- ' Fill C2:C6 with a relative formula (=A2 & " " & B2).
- raXL =
shXL.
Range
(
"C2"
, "C6"
)
- raXL.
Formula
=
"=A2 & "
" "
" & B2"
- ' Fill D2:D6 values.
- With
shXL
- .
Cells
(
2
, 4
)
.
Value
=
"Programming"
- .
Cells
(
3
, 4
)
.
Value
=
"Mechatronics"
- .
Cells
(
4
, 4
)
.
Value
=
"Robotics"
- .
Cells
(
5
, 4
)
.
Value
=
"Mathmematics"
- .
Cells
(
6
, 4
)
.
Value
=
"Best Website"
- End
With
- ' AutoFit columns A:D.
- raXL =
shXL.
Range
(
"A1"
, "D1"
)
- raXL.
EntireColumn
.
AutoFit
(
)
- ' Make sure Excel is visible and give the user control
- ' of Excel's lifetime.
- appXL.
Visible
=
True
- appXL.
UserControl
=
True
- ' Release object references.
- raXL =
Nothing
- shXL =
Nothing
- wbXl =
Nothing
- appXL.
Quit
(
)
- appXL =
Nothing
- Exit
Sub
- Err_Handler:
- MsgBox
(
Err.
Description
, vbCritical, "Error: "
&
Err.
Number
)
- End
Sub
- End
Class
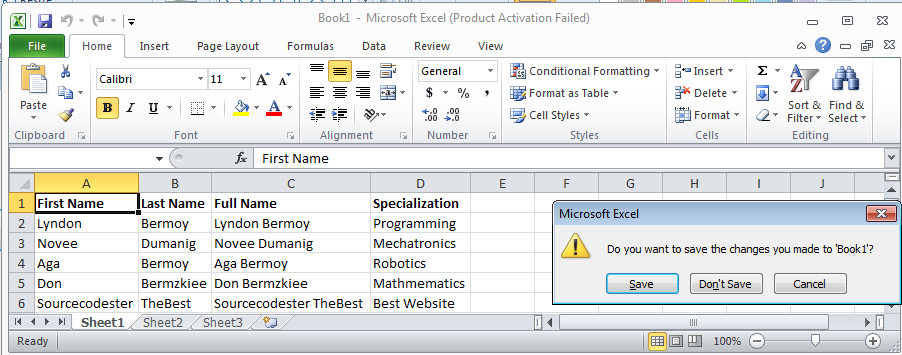
Then run the application and click Button1. The excel will display based on the code on your Button1. It will look like this:
Then click Save, to save the Excel File.
Download the source code below and try it! :)
For more inquiries and need programmer for your thesis systems in any kind of programming languages, just contact my number below.
Best Regards,
Engr. Lyndon R. Bermoy
IT Instructor/System Developer/Android Developer
Mobile: 09079373999
Telephone: 826-9296
E-mail:[email protected]
Visit and like my page on Facebook at: Bermz ISware Solutions
Subscribe at my YouTube Channel at: SerBermz
Download
You must upgrade your account or reply in the thread to view hidden text.