snarfalarfigus
Data Source Auditor
2
MONTHS
2 2 MONTHS OF SERVICE
LEVEL 1
100 XP
In this tutorial we will create a Simple CRUD Using Ajax. A web framework is a set of components that helps you to develop websites faster and easier. Django makes developers life convenient and productive framework to all. So let's now do the coding...
Getting Started
First you will have to download & install the Python IDLE's, here's the link for the Integrated Development And Learning Environment for Python https://www.python.org/downloads/.
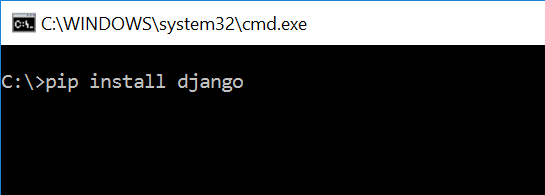
After Python IDLE's is installed, open the command prompt then type "pip install Django", and hit enter.
Creating the App
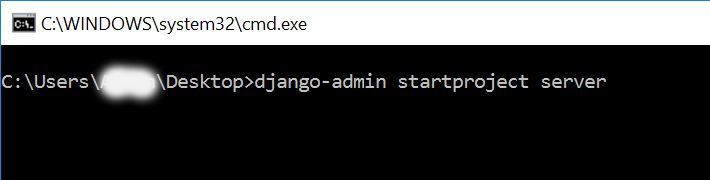
After django is set we will now create the web app. While your in the command prompt cd to the directory you want to save the app, then type "django-admin startproject server" and hit enter. A new folder will be created on the directory named 'server'.
Running The Server
After creating the project, cd to the newly created directory, then type "manage.py runserver" and hit enter to start the server running. The "manage.py" is a command of django-admin that utilize the administrative tasks of python web framework.
Here is the image of python web server:
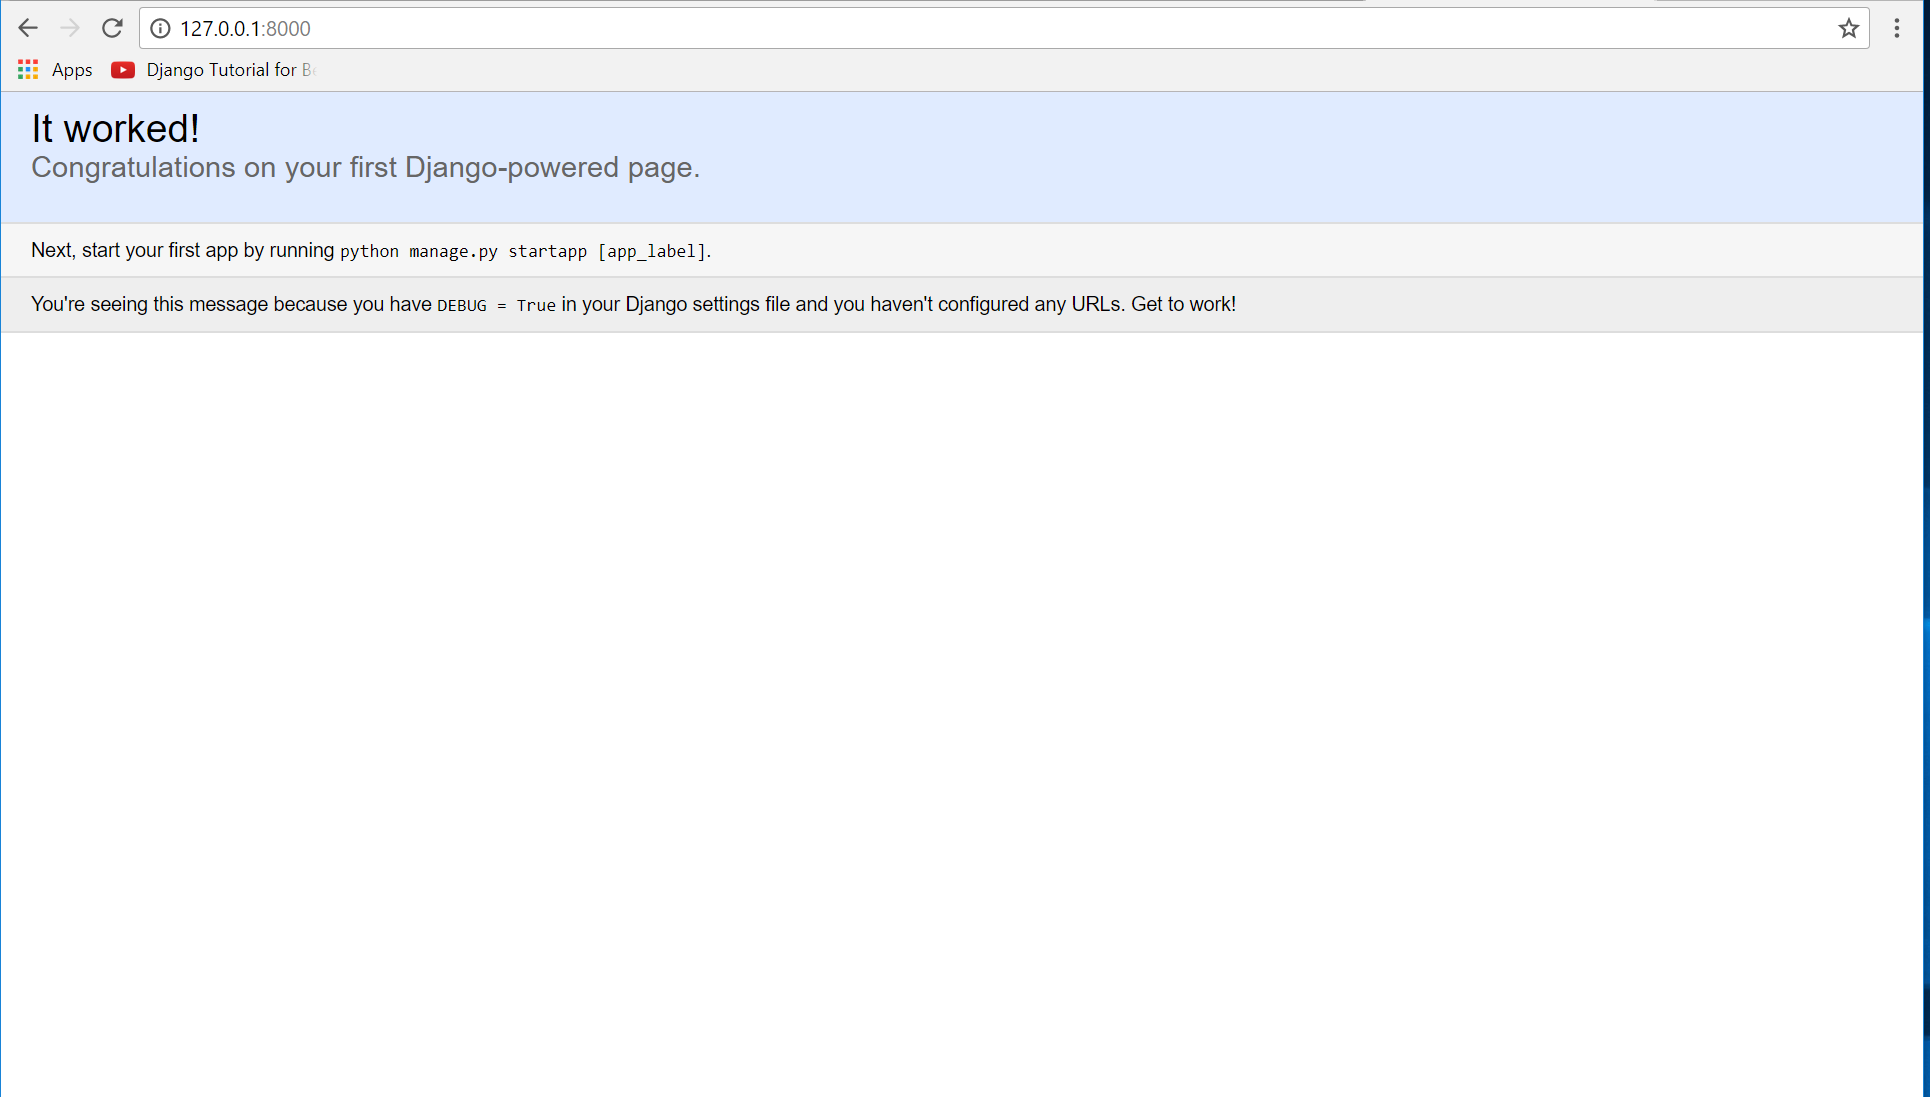
Note: Type '127.0.0.1:8000' in the url browser to view the server. When there is code changes in the server just (ctrl + C) to command prompt to stop the server from running, then start again to avoid errors
Creating The Website
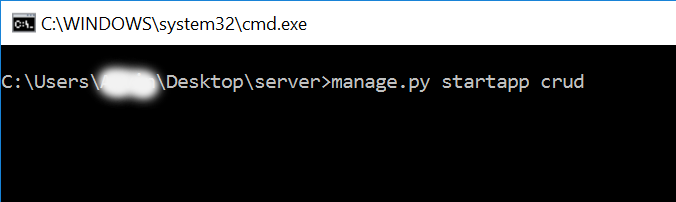
This time will now create the web app to display the web. First locate the directory of the app via command prompt cd, then type "manage.py startapp crud" and hit enter. A new directory will be created named "crud".
Setting up The URL
This time will now create a url address to connect the app to the server. First go to server directory, then open urls.py via Python IDLE's or any text editor. Then import "include" module beside the url module and then import additional module to make a redirect url to your site "from . import views". After that copy/paste the code below inside the urlpatterns.
It will be look like this:
Then after that create a views that will catch the redirect url. To do that create a file "views.py" inside the server directory then copy/paste the code below.
Creating The Path For The Pages
Now that we are all set we will now create a path for the web pages. All you have to do first is to go to crud directory, then copy/paste the code below and save it as 'urls.py' The file name must be urls.py or else there will be an error in the code.
Creating A Static
This time we will create a directory that store an external file. First go to the crud directory then create a directory called "static", after that create a sub directory called "crud". You'll notice that it is the same as your main app directory name to assure the absolute link. This is where you import the css, js, etc directory.
For the bootstrap framework you get it from here http://getbootstrap.com/.
To get the jQuery framework download it here https://jquery.com/.
Creating The Views
The views contains the interface of the website. This is where you assign the html code for rendering it to django framework and contains a methods that call a specific functions. To do that open the views.py, the copy/paste the code below.
Creating The Models
Now that we're done with the views we will then create a models. Models is module that will store the database information to django. To do that locate and go to crud directory, then open the "models.py" after that copy/paste the code.
Registering The App To The Server
Now that we created the interface we will now then register the app to the server. To do that go to the server directory, then open "settings.py" via Python IDLE's or any text editor. Then copy/paste this script inside the INSTALLED_APP variables 'crud'.
It will be like this:
Creating The Ajax Script
Now then we will create the ajax script that we will be implementing in Django. First thing to do is simply go to crud directory then go to 'static/crud' select "js" and create a file called "script.js", and after that copy/paste the code below.
Creating The Mark up Language
Now we will create the html interface for the django framework. First go to crud directory, then create a directory called "templates" and create a sub directory on it called crud.
base.html
Save it as "base.html" inside the crud directory "sub directory of templates".
index.html
Save it as "index.html" inside the crud directory "sub directory of templates".
result.html
Save it as "result.html" inside the crud directory "sub directory of templates".
edit.html
Save it as "edit.html" inside the crud directory "sub directory of templates".
Migrating The App To The Server
Now that we're done in setting up all the necessary needed, we will now then make a migration and migrate the app to the server. To do that open the command prompt then cd to the "server" directory, then type "manage.py makemigrations" and hit enter. After that type again "manage.py migrate" then hit enter.

There you have it we successfully created a Simple CRUD using Ajax. I hope that this simple tutorial help you for what you are looking for. For more updates and tutorials just kindly visit this site. Enjoy Coding!!!
Download
Getting Started
First you will have to download & install the Python IDLE's, here's the link for the Integrated Development And Learning Environment for Python https://www.python.org/downloads/.
After Python IDLE's is installed, open the command prompt then type "pip install Django", and hit enter.
Creating the App
After django is set we will now create the web app. While your in the command prompt cd to the directory you want to save the app, then type "django-admin startproject server" and hit enter. A new folder will be created on the directory named 'server'.
Running The Server
After creating the project, cd to the newly created directory, then type "manage.py runserver" and hit enter to start the server running. The "manage.py" is a command of django-admin that utilize the administrative tasks of python web framework.
Here is the image of python web server:
Note: Type '127.0.0.1:8000' in the url browser to view the server. When there is code changes in the server just (ctrl + C) to command prompt to stop the server from running, then start again to avoid errors
Creating The Website
This time will now create the web app to display the web. First locate the directory of the app via command prompt cd, then type "manage.py startapp crud" and hit enter. A new directory will be created named "crud".
Setting up The URL
This time will now create a url address to connect the app to the server. First go to server directory, then open urls.py via Python IDLE's or any text editor. Then import "include" module beside the url module and then import additional module to make a redirect url to your site "from . import views". After that copy/paste the code below inside the urlpatterns.
- url(
r'^$'
,
views.index_redirect
,
name=
'index_redirect'
)
,
- url(
r'^crud/'
,
include(
'crud.urls'
)
)
,
It will be look like this:
- from
django.conf
.urls
import
url,
include
- from
django.contrib
import
admin
- from
. import
views
- urlpatterns =
[
- url(
r'^$'
,
views.index_redirect
,
name=
'index_redirect'
)
,
- url(
r'^crud/'
,
include(
'crud.urls'
)
)
,
- url(
r'^admin/'
,
admin.site
.urls
)
,
- ]
Then after that create a views that will catch the redirect url. To do that create a file "views.py" inside the server directory then copy/paste the code below.
- from
django.shortcuts
import
redirect
- def
index_redirect(
request)
:
- return
redirect(
'/crud/'
)
Creating The Path For The Pages
Now that we are all set we will now create a path for the web pages. All you have to do first is to go to crud directory, then copy/paste the code below and save it as 'urls.py' The file name must be urls.py or else there will be an error in the code.
- from
django.conf
.urls
import
url
- from
. import
views
- urlpatterns =
[
- url(
r'^$'
,
views.index
,
name=
'index'
)
,
- url(
r'^create$'
,
views.create
,
name=
'create'
)
,
- url(
r'^read$'
,
views.read
,
name=
'read'
)
,
- url(
r'^edit/(?P<id>\d
+)$'
,
views.edit
,
name=
'edit'
)
,
- url(
r'^edit/update/(?P<id>\d
+)$'
,
views.update
,
name=
'update'
)
,
- url(
r'^delete/(?P<id>\d
+)$'
,
views.delete
,
name=
'delete'
)
,
- ]
Creating A Static
This time we will create a directory that store an external file. First go to the crud directory then create a directory called "static", after that create a sub directory called "crud". You'll notice that it is the same as your main app directory name to assure the absolute link. This is where you import the css, js, etc directory.
For the bootstrap framework you get it from here http://getbootstrap.com/.
To get the jQuery framework download it here https://jquery.com/.
Creating The Views
The views contains the interface of the website. This is where you assign the html code for rendering it to django framework and contains a methods that call a specific functions. To do that open the views.py, the copy/paste the code below.
- from
django.shortcuts
import
render,
redirect
- from
.models
import
Member
- # Create your views here.
- def
index(
request)
:
- return
render(
request,
'crud/index.html'
)
- def
create(
request)
:
- member =
Member(
firstname=
request.POST
[
'firstname'
]
,
lastname=
request.POST
[
'lastname'
]
)
- member.save
(
)
- return
redirect(
'/'
)
- def
read(
request)
:
- members =
Member.objects
.all
(
)
- context =
{
'members'
: members}
- return
render(
request,
'crud/result.html'
,
context)
- def
edit(
request,
id
)
:
- members =
Member.objects
.get
(
id
=
id
)
- context =
{
'member'
: members}
- return
render(
request,
'crud/edit.html'
,
context)
- def
update(
request,
id
)
:
- member =
Member.objects
.get
(
id
=
id
)
- member.firstname
=
request.POST
[
'firstname'
]
- member.lastname
=
request.POST
[
'lastname'
]
- member.save
(
)
- return
redirect(
'/crud/'
)
- def
delete(
request,
id
)
:
- member =
Member.objects
.get
(
id
=
id
)
- member.delete
(
)
- return
redirect(
'/crud/'
)
Creating The Models
Now that we're done with the views we will then create a models. Models is module that will store the database information to django. To do that locate and go to crud directory, then open the "models.py" after that copy/paste the code.
- from
django.db
import
models
- # Create your models here.
- class
Member(
models.Model
)
:
- firstname =
models.CharField
(
max_length=
40
)
- lastname =
models.CharField
(
max_length=
40
)
- def
__str__
(
self
)
:
- return
self
.firstname
+ " "
+ self
.lastname
Registering The App To The Server
Now that we created the interface we will now then register the app to the server. To do that go to the server directory, then open "settings.py" via Python IDLE's or any text editor. Then copy/paste this script inside the INSTALLED_APP variables 'crud'.
It will be like this:
- INSTALLED_APPS =
[
- 'crud'
,
- 'django.contrib.admin'
,
- 'django.contrib.auth'
,
- 'django.contrib.contenttypes'
,
- 'django.contrib.sessions'
,
- 'django.contrib.messages'
,
- 'django.contrib.staticfiles'
,
- ]
Creating The Ajax Script
Now then we will create the ajax script that we will be implementing in Django. First thing to do is simply go to crud directory then go to 'static/crud' select "js" and create a file called "script.js", and after that copy/paste the code below.
- $(
document)
.ready
(
function
(
)
{
- if
(
$(
'#result'
)
!=
null
)
{
- Read(
)
;
- }
- $(
'#create'
)
.on
(
'click'
,
function
(
)
{
- $firstname =
$(
'#firstname'
)
.val
(
)
;
- $lastname =
$(
'#lastname'
)
.val
(
)
;
- if
(
$firstname ==
""
||
$lastname ==
""
)
{
- alert(
"Please complete the required field"
)
;
- }
else
{
- $.ajax
(
{
- url:
'create'
,
- type:
'POST'
,
- data:
{
- firstname:
$firstname,
- lastname:
$lastname,
- csrfmiddlewaretoken:
$(
'input[name=csrfmiddlewaretoken]'
)
.val
(
)
- }
,
- success:
function
(
)
{
- Read(
)
;
- $(
'#firstname'
)
.val
(
''
)
;
- $(
'#lastname'
)
.val
(
''
)
;
- }
- }
)
;
- }
- }
)
;
- $(
document)
.on
(
'click'
,
'.edit'
,
function
(
)
{
- $id =
$(
this
)
.attr
(
'name'
)
;
- window.location
=
"edit/"
+
$id;
- }
)
;
- $(
'#update'
)
.on
(
'click'
,
function
(
)
{
- $firstname =
$(
'#firstname'
)
.val
(
)
;
- $lastname =
$(
'#lastname'
)
.val
(
)
;
- if
(
$firstname ==
""
||
$lastname ==
""
)
{
- alert(
"Please complete the required field"
)
;
- }
else
{
- $id =
$(
'#member_id'
)
.val
(
)
;
- $.ajax
(
{
- url:
'update/'
+
$id,
- type:
'POST'
,
- data:
{
- firstname:
$firstname,
- lastname:
$lastname,
- csrfmiddlewaretoken:
$(
'input[name=csrfmiddlewaretoken]'
)
.val
(
)
- }
,
- success:
function
(
)
{
- window.location
=
'/'
;
- alert(
'Updated!'
)
;
- }
- }
)
;
- }
- }
)
;
- $(
document)
.on
(
'click'
,
'.delete'
,
function
(
)
{
- $id =
$(
this
)
.attr
(
'name'
)
;
- $.ajax
(
{
- url:
'delete/'
+
$id,
- type:
'POST'
,
- data:
{
- csrfmiddlewaretoken:
$(
'input[name=csrfmiddlewaretoken]'
)
.val
(
)
- }
,
- success:
function
(
)
{
- Read(
)
;
- alert(
"Deleted!"
)
;
- }
- }
)
;
- }
)
;
- }
)
;
- function
Read(
)
{
- $.ajax
(
{
- url:
'read'
,
- type:
'POST'
,
- async:
false
,
- data:
{
- res:
1
,
- csrfmiddlewaretoken:
$(
'input[name=csrfmiddlewaretoken]'
)
.val
(
)
- }
,
- success:
function
(
response)
{
- $(
'#result'
)
.html
(
response)
;
- }
- }
)
;
- }
Creating The Mark up Language
Now we will create the html interface for the django framework. First go to crud directory, then create a directory called "templates" and create a sub directory on it called crud.
base.html
- <!DOCTYPE html>
- <html
lang
=
"en"
>
- <head
>
- {% load static %}
- <link
rel
=
"stylesheet"
type
=
"text/css"
href
=
"{% static 'crud/css/bootstrap.css' %}"
/
>
- <meta
charset
=
"UTF-8"
name
=
"viewport"
content
=
"width=device-width"
/
>
- </
head
>
- <body
>
- <nav class
=
"navbar navbar-default"
>
- <div
class
=
"container-fluid"
>
- <a
class
=
"navbar-brand"
href
=
"https://sourcecodester.com"
>
Sourcecodester</
a
>
- </
div
>
- </
nav>
- <div
class
=
"col-md-3"
></
div
>
- <div
class
=
"col-md-6 well"
>
- <h3
class
=
"text-primary"
>
Python - Django Simple CRUD With Ajax</
h3
>
- <hr
style
=
"border-top:1px dotted #ccc;"
/
>
- {% block body %}
- {% endblock %}
- </
div
>
- </
body
>
- <script
src
=
"{% static 'crud/js/jquery-3.2.1.js'%}"
></
script
>
- <script
src
=
"{% static 'crud/js/script.js' %}"
></
script
>
- </
html
>
Save it as "base.html" inside the crud directory "sub directory of templates".
index.html
- {% extends 'crud/base.html' %}
- {% block body %}
- <form
class
=
"form-inline"
>
- {% csrf_token %}
- <div
class
=
"form-group"
>
- <label
>
Firstname</
label
>
- <input
type
=
"text"
id
=
"firstname"
class
=
"form-control"
style
=
"width:30%;"
required=
"required"
/
>
- <label
>
Lastname</
label
>
- <input
type
=
"text"
id
=
"lastname"
class
=
"form-control"
style
=
"width:30%;"
required=
"required"
/
>
- <button
type
=
"button"
id
=
"create"
class
=
"btn btn-sm btn-primary"
>
Create</
button
>
- </
div
>
- </
form
>
- <br
/
>
- <div
id
=
"result"
>
- </
div
>
- {% endblock %}
Save it as "index.html" inside the crud directory "sub directory of templates".
result.html
- <table
class
=
"table table-bordered"
>
- <thead
class
=
"alert-success"
>
- <tr
>
- <th
>
Firstname</
th
>
- <th
>
Lastname</
th
>
- <th
>
Action</
th
>
- </
tr
>
- </
thead
>
- <tbody
>
- {% for member in members %}
- <tr
>
- <td
>
{{ member.firstname }}</
td
>
- <td
>
{{ member.lastname }}</
td
>
- <td
><center
><a
class
=
"btn btn-sm btn-warning edit"
name
=
"{{ member.id }}"
>
Edit</
a
>
<a
class
=
"btn btn-sm btn-danger delete"
name
=
"{{ member.id }}"
>
Delete</
a
></
center
></
td
>
- </
tr
>
- {% endfor %}
- </
tbody
>
- </
table
>
Save it as "result.html" inside the crud directory "sub directory of templates".
edit.html
- {% extends 'crud/base.html' %}
- {% block body %}
- <form
>
- {% csrf_token %}
- <input
type
=
"hidden"
id
=
"member_id"
value
=
"{{ member.id }}"
/
>
- <div
class
=
"form-group"
>
- <label
>
Firstname</
label
>
- <input
type
=
"text"
id
=
"firstname"
value
=
"{{ member.firstname }}"
required=
"required"
/
>
- </
div
>
- <div
class
=
"form-group"
>
- <label
>
Lastname</
label
>
- <input
type
=
"text"
id
=
"lastname"
value
=
"{{ member.lastname }}"
required=
"required"
/
>
- </
div
>
- <div
class
=
"form-group"
>
- <button
type
=
"button"
id
=
"update"
class
=
"btn btn-sm btn-warning"
>
Update</
button
>
- </
div
>
- </
form
>
- {% endblock %}
Save it as "edit.html" inside the crud directory "sub directory of templates".
Migrating The App To The Server
Now that we're done in setting up all the necessary needed, we will now then make a migration and migrate the app to the server. To do that open the command prompt then cd to the "server" directory, then type "manage.py makemigrations" and hit enter. After that type again "manage.py migrate" then hit enter.
There you have it we successfully created a Simple CRUD using Ajax. I hope that this simple tutorial help you for what you are looking for. For more updates and tutorials just kindly visit this site. Enjoy Coding!!!
Download
You must upgrade your account or reply in the thread to view the hidden content.