bunty1925
Long-Tail Keyword Pro
Divine
LEVEL 1
400 XP
In this tutorial, I’m going to discuss how to use the Twitter Bootstrap to create a table and populate this table with records from MySQL database using PHP. Using Bootstrap framework, you can save more time when working with different browsers and or devices. And Bootstrap contains HTML and CSS based design templates that you can use this to improve the quality of your web application.
First you need to download Twitter Bootstrap framework.
Then we’ll create a folder named "bootstraptable" and extract the bootstrap framework, then copy and paste the "css" folder and its content, same with the "fonts" folder. And finally, we will put the "bootstraptable" folder inside "htdocs" folder.
Next, we'll create "list.php" file and add the following code:
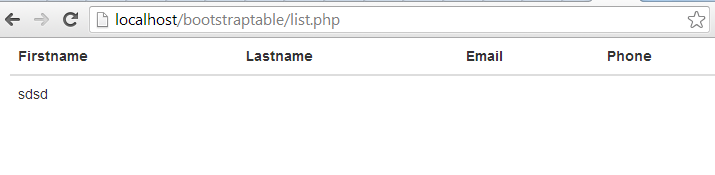
In this code, we just added a link to our "bootstrap.css" and this is located inside "css" folder. And we are presenting a tabular table here. Since we’re creating a table, the hierarchy should be like this:
.
And in our case, we are using class="table".
And it looks like as shown below.
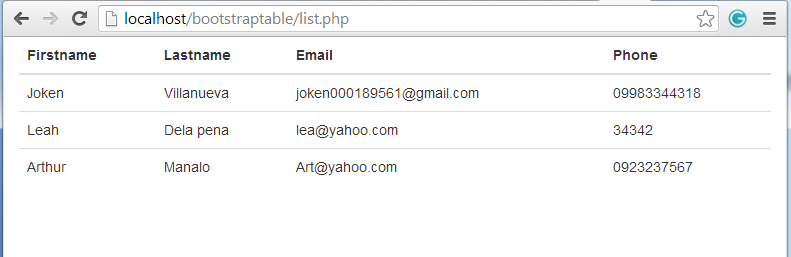
Next, we’re going to populate our table with a record from MySQL database. In the table below
, add the following code.
And the out output should look like as shown below.
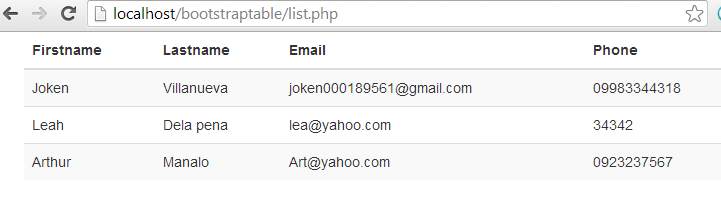
This time, we’re going to use a "zebra-stripped" CSS class defined in the associated bootstrap css file.
Now let's modify our code. Instead of using the table class we change it into a table-striped class. And our code now will be same as shown below.
Then the output should look like as shown below.
That's it for now folks, thanks for reading.
If you want to see more of my works, new Source Code or Application and Tutorials Just click here.
Download
First you need to download Twitter Bootstrap framework.
Then we’ll create a folder named "bootstraptable" and extract the bootstrap framework, then copy and paste the "css" folder and its content, same with the "fonts" folder. And finally, we will put the "bootstraptable" folder inside "htdocs" folder.
Next, we'll create "list.php" file and add the following code:
In this code, we just added a link to our "bootstrap.css" and this is located inside "css" folder. And we are presenting a tabular table here. Since we’re creating a table, the hierarchy should be like this:
.
And in our case, we are using class="table".
- <!
DOCTYPE html>
- <
html>
- <
head>
- <
meta charset=
"utf-8"
>
- <
meta content=
"width=device-width, initial-scale=1.0"
name=
"viewport"
>
- <
meta content=
""
name=
"description"
>
- <
meta content=
""
name=
"author"
>
- <
link
href=
""
rel=
"shortcut icon"
>
- <
title>
List
of Student</
title><!--
Bootstrap core CSS -->
- <
link
href=
"css/bootstrap.css"
rel=
"stylesheet"
>
- </
head>
- <
body>
- <
div class
=
"container"
>
- <
table class
=
"table"
>
- <
thead>
- <
tr>
- <
th>
Firstname</
th>
- <
th>
Lastname</
th>
- <
th>
Email</
th>
- <
th>
Phone</
th>
- </
tr>
- </
thead>
- <
tbody>
- <
tr>
- <
td>
sdsd</
td>
- </
tr>
- </
tbody>
- <
tbody></
tbody>
- </
table>
- </
div><!--
/
container -->
- </
body>
- </
html>
And it looks like as shown below.
Next, we’re going to populate our table with a record from MySQL database. In the table below
, add the following code.
- <?php
- //set up mysql connection
- mysql_connect
(
"localhost"
,
"root"
,
""
)
or die
(
mysql_error
(
)
)
;
- //select database
- mysql_select_db
(
"studentdb"
)
or die
(
mysql_error
(
)
)
;
- // Retrieve all the data from the "tblstudent" table
- $result
=
mysql_query
(
"SELECT * FROM tblstudent"
)
or die
(
mysql_error
(
)
)
;
- // store the record of the "tblstudent" table into $row
- while
(
$row
=
mysql_fetch_array
(
$result
)
)
{
- // Print out the contents of the entry
- echo
'<tr>'
;
- echo
'<td>'
.
$row
[
'firstname'
]
.
'</td>'
;
- echo
'<td>'
.
$row
[
'lastname'
]
.
'</td>'
;
- echo
'<td>'
.
$row
[
'email'
]
.
'</td>'
;
- echo
'<td>'
.
$row
[
'phone'
]
.
'</td>'
;
- }
- ?>
And the out output should look like as shown below.
This time, we’re going to use a "zebra-stripped" CSS class defined in the associated bootstrap css file.
Now let's modify our code. Instead of using the table class we change it into a table-striped class. And our code now will be same as shown below.
- <!DOCTYPE html>
- <html lang="en">
- <head>
- <meta charset="utf-8">
- <meta content="width=device-width, initial-scale=1.0" name="viewport">
- <meta content="" name="description">
- <meta content="" name="author">
- <link href="" rel="shortcut icon">
- <title>List of Student</title><!-- Bootstrap core CSS -->
- <link href="css/bootstrap.css" rel="stylesheet">
- </head>
- <body>
- <div class="container">
- <table class="table table-striped">
- <thead>
- <tr>
- <th>Firstname</th>
- <th>Lastname</th>
- <th>Email</th>
- <th>Phone</th>
- </tr>
- </thead>
- <tbody>
- <?php
- //set up mysql connection
- mysql_connect
(
"localhost"
,
"root"
,
""
)
or die
(
mysql_error
(
)
)
;
- //select database
- mysql_select_db
(
"studentdb"
)
or die
(
mysql_error
(
)
)
;
- // Retrieve all the data from the "tblstudent" table
- $result
=
mysql_query
(
"SELECT * FROM tblstudent"
)
or die
(
mysql_error
(
)
)
;
- // store the record of the "tblstudent" table into $row
- while
(
$row
=
mysql_fetch_array
(
$result
)
)
{
- // Print out the contents of the entry
- echo
'<tr>'
;
- echo
'<td>'
.
$row
[
'firstname'
]
.
'</td>'
;
- echo
'<td>'
.
$row
[
'lastname'
]
.
'</td>'
;
- echo
'<td>'
.
$row
[
'email'
]
.
'</td>'
;
- echo
'<td>'
.
$row
[
'phone'
]
.
'</td>'
;
- }
- ?>
- </tbody>
- <tbody></tbody>
- </table>
- </div><!-- /container -->
- </body>
- </html>
Then the output should look like as shown below.
That's it for now folks, thanks for reading.
If you want to see more of my works, new Source Code or Application and Tutorials Just click here.
Download
You must upgrade your account or reply in the thread to view hidden text.