XBqaPRLSVgv82Hi5
Content Funnel Builder
2
MONTHS
2 2 MONTHS OF SERVICE
LEVEL 1
200 XP
In this tutorial we will create a Update Data Through Modal Dialog Using PHP/MySQLi. PHP is a server-side scripting language designed primarily for web development. It is a lean and consistent way to access databases. This means developers can write portable code much easier. It is mostly used by a newly coders for its user-friendly environment.
So Let's do the coding...
Getting Started:
First, you have to download & install XAMPP or any local server that run PHP scripts. Here's the link for XAMPP server https://www.apachefriends.org/index.html.
And this is the link for the jquery that i used in this tutorial https://jquery.com/.
Lastly, this is the link for the bootstrap that i used for the layout design https://getbootstrap.com/.
Creating Database
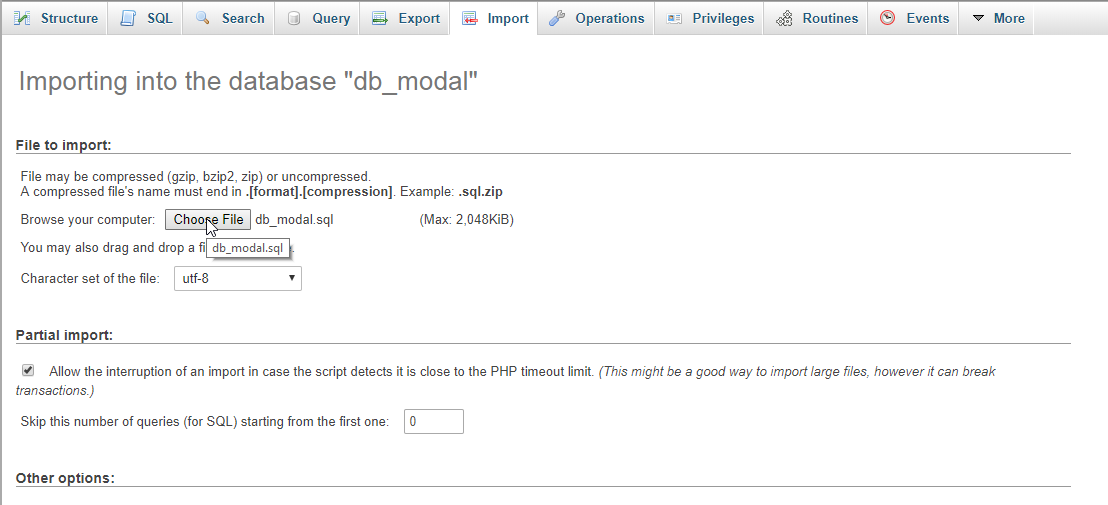
Open your database web server then create a database name in it db_modal, after that click Import then locate the database file inside the folder of the application then click ok.
You can also create a new table for "users" programatically using the code below. Paste the code in the SQL page of PHPMyAdmin.
Creating the database connection
Open your any kind of text editor(notepad++, etc..). Then just copy/paste the code below then name it "conn.php".
Creating The Interface
This is where we will create a simple form for our application. To create the forms simply copy and write it into you text editor, then save it as index.php.
Creating PHP Query
This code contains the PHP query of the application. This code will store the data input to the database server. To do that just copy and write this block of codes inside the text editor, then save it as save_user.php.
Creating the Main Function
This code contains the main function of the application. This code will update the user data through the bootstrap modal. To do this just copy and write these blocks of codes as shown below inside the text editor and save it as shown below.
update_user.php
update_query.php
There you have it we successfully created Update Data Through Modal Dialog Using MySQLi. I hope that this simple tutorial helps you to what you are looking for. For more updates and tutorials just kindly visit this site.
Enjoy Coding!
Download
So Let's do the coding...
Getting Started:
First, you have to download & install XAMPP or any local server that run PHP scripts. Here's the link for XAMPP server https://www.apachefriends.org/index.html.
And this is the link for the jquery that i used in this tutorial https://jquery.com/.
Lastly, this is the link for the bootstrap that i used for the layout design https://getbootstrap.com/.
Creating Database
Open your database web server then create a database name in it db_modal, after that click Import then locate the database file inside the folder of the application then click ok.
You can also create a new table for "users" programatically using the code below. Paste the code in the SQL page of PHPMyAdmin.
- CREATE
TABLE
`user`
(
- `user_
id`
int
(
11
)
NOT
NULL
Primary KEY
AUTO_INCREMENT
,
- `firstname`
varchar
(
50
)
NOT
NULL
,
- `lastname`
varchar
(
50
)
NOT
NULL
,
- `address`
varchar
(
100
)
NOT
NULL
- )
ENGINE
=
InnoDB
DEFAULT
CHARSET
=
latin1;
Creating the database connection
Open your any kind of text editor(notepad++, etc..). Then just copy/paste the code below then name it "conn.php".
- <?php
- $conn
=
mysqli_connect
(
"localhost"
,
"root"
,
""
,
"db_modal"
)
;
- if
(
!
$conn
)
{
- die
(
"Error: Failed to connect to database!"
)
;
- }
- ?>
Creating The Interface
This is where we will create a simple form for our application. To create the forms simply copy and write it into you text editor, then save it as index.php.
- <!DOCTYPE html>
- <html lang="en">
- <head>
- <meta charset="UTF-8" name="viewport" content="width-device-width, initial-scale=1"/>
- <link rel="stylesheet" type="text/css" href="css/bootstrap.css"/>
- </head>
- <body>
- <nav class="navbar navbar-default">
- <div class="container-fluid">
- <a class="navbar-brand" href="https://sourcecodester.com">Sourcecodester</a>
- </div>
- </nav>
- <div class="col-md-3"></div>
- <div class="col-md-6 well">
- <h3 class="text-primary">PHP - Update Data Through Modal Dialog Using MySQLi</h3>
- <hr style="border-top:1px dotted #ccc;"/>
- <button type="button" class="btn btn-success" data-toggle="modal" data-target="#form_modal"><span class="glyphicon glyphicon-plus"></span> Add user</button>
- <br /><br />
- <table class="table table-bordered">
- <thead class="alert-success">
- <tr>
- <th>Firstname</th>
- <th>Lastname</th>
- <th>Address</th>
- <th>Action</th>
- </tr>
- </thead>
- <tbody style="background-color:#fff;">
- <?php
- require
'conn.php'
;
- $query
=
mysqli_query
(
$conn
,
"SELECT * FROM `user`"
)
or die
(
mysqli_error
(
)
)
;
- while
(
$fetch
=
mysqli_fetch_array
(
$query
)
)
{
- ?>
- <tr>
- <td><?php
echo
$fetch
[
'firstname'
]
?>
</td>
- <td><?php
echo
$fetch
[
'lastname'
]
?>
</td>
- <td><?php
echo
$fetch
[
'address'
]
?>
</td>
- <td><button class="btn btn-warning" data-toggle="modal" type="button" data-target="#update_modal<?php
echo
$fetch
[
'user_id'
]
?>
"><span class="glyphicon glyphicon-edit"></span> Edit</button></td>
- </tr>
- <?php
- include
'update_user.php'
;
- }
- ?>
- </tbody>
- </table>
- </div>
- <div class="modal fade" id="form_modal" aria-hidden="true">
- <div class="modal-dialog">
- <div class="modal-content">
- <form method="POST" action="save_user.php">
- <div class="modal-header">
- <h3 class="modal-title">Add User</h3>
- </div>
- <div class="modal-body">
- <div class="col-md-2"></div>
- <div class="col-md-8">
- <div class="form-group">
- <label>Firstname</label>
- <input type="text" name="firstname" class="form-control" required="required"/>
- </div>
- <div class="form-group">
- <label>Lastname</label>
- <input type="text" name="lastname" class="form-control" required="required" />
- </div>
- <div class="form-group">
- <label>Address</label>
- <input type="text" name="address" class="form-control" required="required"/>
- </div>
- </div>
- </div>
- <div style="clear:both;"></div>
- <div class="modal-footer">
- <button name="save" class="btn btn-primary"><span class="glyphicon glyphicon-save"></span> Save</button>
- <button class="btn btn-danger" type="button" data-dismiss="modal"><span class="glyphicon glyphicon-remove"></span> Close</button>
- </div>
- </div>
- </form>
- </div>
- </div>
- </div>
- <script src="js/jquery-3.2.1.min.js"></script>
- <script src="js/bootstrap.js"></script>
- </body>
- </html>
Creating PHP Query
This code contains the PHP query of the application. This code will store the data input to the database server. To do that just copy and write this block of codes inside the text editor, then save it as save_user.php.
- <?php
- require_once
'conn.php'
;
- if
(
ISSET
(
$_POST
[
'save'
]
)
)
{
- $firstname
=
$_POST
[
'firstname'
]
;
- $lastname
=
$_POST
[
'lastname'
]
;
- $address
=
$_POST
[
'address'
]
;
- mysqli_query
(
$conn
,
"INSERT INTO `user` VALUES('', '$firstname
', '$lastname
', '$address
')"
)
or die
(
mysqli_error
(
)
)
;
- header
(
"location: index.php"
)
;
- }
- ?>
Creating the Main Function
This code contains the main function of the application. This code will update the user data through the bootstrap modal. To do this just copy and write these blocks of codes as shown below inside the text editor and save it as shown below.
update_user.php
- <div class="modal fade" id="update_modal<?php
echo
$fetch
[
'user_id'
]
?>
" aria-hidden="true">
- <div class="modal-dialog">
- <div class="modal-content">
- <form method="POST" action="update_query.php">
- <div class="modal-header">
- <h3 class="modal-title">Update User</h3>
- </div>
- <div class="modal-body">
- <div class="col-md-2"></div>
- <div class="col-md-8">
- <div class="form-group">
- <label>Firstname</label>
- <input type="hidden" name="user_id" value="<?php
echo
$fetch
[
'user_id'
]
?>
"/>
- <input type="text" name="firstname" value="<?php
echo
$fetch
[
'firstname'
]
?>
" class="form-control" required="required"/>
- </div>
- <div class="form-group">
- <label>Lastname</label>
- <input type="text" name="lastname" value="<?php
echo
$fetch
[
'lastname'
]
?>
" class="form-control" required="required" />
- </div>
- <div class="form-group">
- <label>Address</label>
- <input type="text" name="address" value="<?php
echo
$fetch
[
'address'
]
?>
" class="form-control" required="required"/>
- </div>
- </div>
- </div>
- <div style="clear:both;"></div>
- <div class="modal-footer">
- <button name="update" class="btn btn-warning"><span class="glyphicon glyphicon-edit"></span> Update</button>
- <button class="btn btn-danger" type="button" data-dismiss="modal"><span class="glyphicon glyphicon-remove"></span> Close</button>
- </div>
- </div>
- </form>
- </div>
- </div>
- </div>
update_query.php
- <?php
- require_once
'conn.php'
;
- if
(
ISSET
(
$_POST
[
'update'
]
)
)
{
- $user_id
=
$_POST
[
'user_id'
]
;
- $firstname
=
$_POST
[
'firstname'
]
;
- $lastname
=
$_POST
[
'lastname'
]
;
- $address
=
$_POST
[
'address'
]
;
- mysqli_query
(
$conn
,
"UPDATE `user` SET `firstname` = '$firstname
', `lastname` = '$lastname
', `address` = '$address
' WHERE `user_id` = '$user_id
'"
)
or die
(
mysqli_error
(
)
)
;
- header
(
"location: index.php"
)
;
- }
- ?>
There you have it we successfully created Update Data Through Modal Dialog Using MySQLi. I hope that this simple tutorial helps you to what you are looking for. For more updates and tutorials just kindly visit this site.
Enjoy Coding!
Download
You must upgrade your account or reply in the thread to view the hidden content.