mawwximus94
Shoujo Dreamer
LEVEL 1
300 XP
This tutorial will show you how to create a simple image uploader using PHP/MySQLi. This tutorial does not include a good design but will give you an idea of how to upload images using PHP/MySQLi. Our goal in this tutorial is to create an Image Upload function into our simple Web App and Display the images after saving them into the database. The input that we will be using is an input file that only accepts any types of images.
Getting Starte
Please download and install the ff software if not yet installed in your desktop or laptop.
Creating our Database
First, we're going to create a database that will store the location of our image.
Creating our Connection
Next, we create a database connection and save it as conn.php
. This file will serve as our bridge between our form and our database.
Creating our Output Folder
Next step is to create a folder that will store our uploaded images and name it as upload
.
Creating our Form
Next step is to create our form and save it as index.php
. This is also the place where we can see our uploaded images. To create the form, open your HTML code editor and paste the code below after the tag.
Writing our Upload Script
Lastly, we create a script that will save our uploaded images and name it as upload.php
.
DEMO
That's it! Now test your work if it is working as it is. If not, try to repeat the tutorial from the start or you may download the working source code that I uploaded with this tutorial. Feel free to download, test, and differentiate it with your work so you will know which part you have missed.
That's the end of this tutorial. I hope this tutorial helps you with what you are looking for and I hope this helps you to learn something useful for your future projects.
Happy Coding :)
Download
Getting Starte
Please download and install the ff software if not yet installed in your desktop or laptop.
- XAMPP
- Any text editor such as (Sublime Text 3 and Notepad++)
Creating our Database
First, we're going to create a database that will store the location of our image.
- Open PHPMyAdmin.
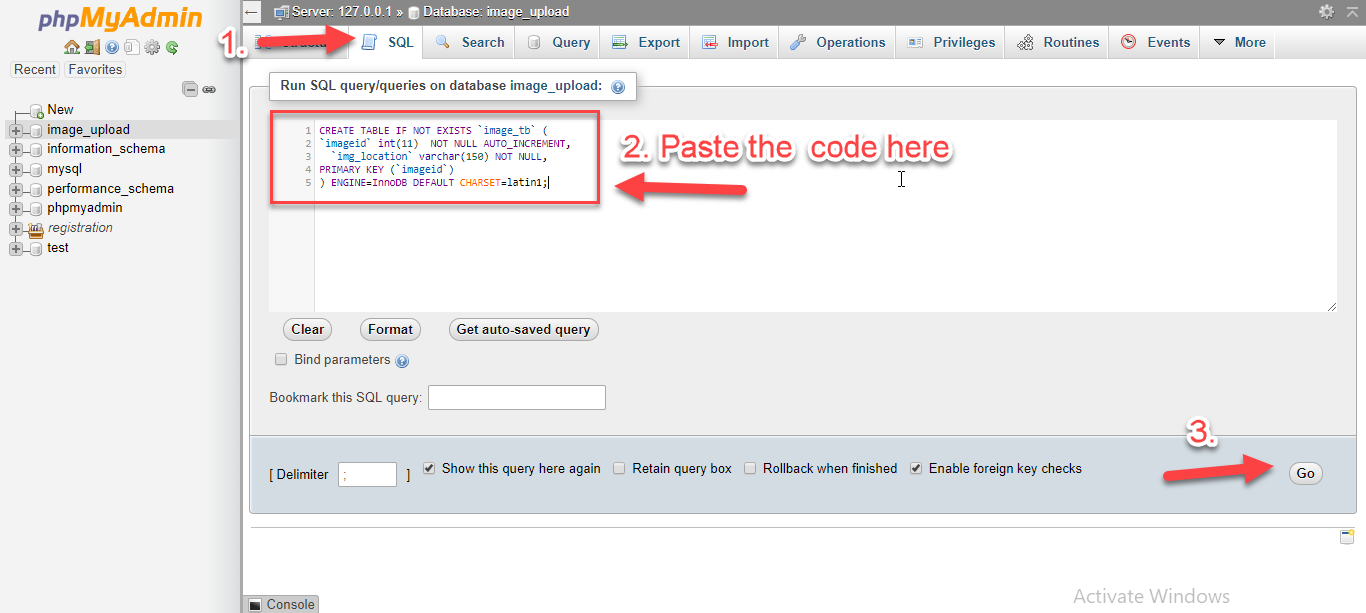
- Click databases, create a database and name it as image_upload.
- After creating a database, click the SQL and paste the below code. See image below for detailed instruction.
- CREATE
TABLE
[url=http://dev.mysql.com/doc/refman/%35%2E%31/en/control-flow-functions.html]IF
NOT
EXISTS
[/url] `image_
tb`
(
- `imageid`
int
(
11
)
NOT
NULL
AUTO_INCREMENT
,
- `img_
location`
varchar
(
150
)
NOT
NULL
,
- PRIMARY KEY
(
`imageid`
)
- )
ENGINE
=
InnoDB
DEFAULT
CHARSET
=
latin1;
Creating our Connection
Next, we create a database connection and save it as conn.php
. This file will serve as our bridge between our form and our database.
- <?php
- $con
=
mysqli_connect
(
"localhost"
,
"root"
,
""
,
"image_upload"
)
;
- // Check connection
- if
(
mysqli_connect_errno
(
)
)
- {
- echo
"Failed to connect to MySQL: "
.
mysqli_connect_error
(
)
;
- }
- ?>
Creating our Output Folder
Next step is to create a folder that will store our uploaded images and name it as upload
.
Creating our Form
Next step is to create our form and save it as index.php
. This is also the place where we can see our uploaded images. To create the form, open your HTML code editor and paste the code below after the tag.
- <!DOCTYPE html>
- <html lang="en">
- <head>
- <meta charset="UTF-8">
- <title>Easy and Simple Image Upload</title>
- <style>
- .container{
- display: flex;
- width:calc(100%);
- flex-wrap: wrap;
- }
- .container img{
- width: calc(18%);
- height: 15vw;
- object-fit: contain;
- background: gray;
- border: 1px solid black;
- margin: 5px;
- }
- </style>
- </head>
- <body>
- <h2><strong>Uploaded Images:</strong></h2>
- <div class="container">
- <br>
- <?php
- include
(
'conn.php'
)
;
- $query
=
mysqli_query
(
$con
,
"select * from image_tb"
)
;
- if
(
mysqli_num_rows
(
$query
)
>
0
)
{
- while
(
$row
=
mysqli_fetch_array
(
$query
)
)
{
- ?>
- <img src="<?php
echo
$row
[
'img_location'
]
;
?>
">
- <?php
- }
- }
else
{
- echo
"<p><strong>No Images uploaded yet.</strong></p>"
;
- }
- ?>
- </div>
- <div>
- <form method="POST" action="upload.php" enctype="multipart/form-data">
- <label>Image:</label><input type="file" name="image" accept="image/*">
- <button type="submit">Upload</button>
- </form>
- </div>
- </body>
- </html>
Writing our Upload Script
Lastly, we create a script that will save our uploaded images and name it as upload.php
.
- <?php
- include
(
'conn.php'
)
;
- if
(
!
empty
(
$_FILES
[
"image"
]
[
"tmp_name"
]
)
)
{
- $fileinfo
=
PATHINFO
(
$_FILES
[
"image"
]
[
"name"
]
)
;
- $newFilename
=
$fileinfo
[
'filename'
]
.
"_"
.
time
(
)
.
"."
.
$fileinfo
[
'extension'
]
;
- move_uploaded_file
(
$_FILES
[
"image"
]
[
"tmp_name"
]
,
"upload/"
.
$newFilename
)
;
- $location
=
"upload/"
.
$newFilename
;
- mysqli_query
(
$con
,
"insert into image_tb (img_location) values ('$location
')"
)
;
- header
(
'location:index.php'
)
;
- }
else
{
- echo
"<script>alert('No Image selected.');location.replace('./index.php');</script>"
;
- }
- ?>
DEMO
That's it! Now test your work if it is working as it is. If not, try to repeat the tutorial from the start or you may download the working source code that I uploaded with this tutorial. Feel free to download, test, and differentiate it with your work so you will know which part you have missed.
That's the end of this tutorial. I hope this tutorial helps you with what you are looking for and I hope this helps you to learn something useful for your future projects.
Happy Coding :)
Download
You must upgrade your account or reply in the thread to view the hidden content.