omaruwk0797
Junior Member
LEVEL 1
200 XP
TUTORIAL NO 15
In this tutorial you will learn:
1. Playing sound in JAVA
2. Adding points in java
3. Adding custom Mario FONTS
4. Timer class
5. Animations using timer
6. Side Scroller game
7. Game Programming
8. Changing screens in the game
9. Swing Animations
10. Event handling
11. JAVA awt
12. JAVA swing
13. Adapters
In this tutorial I will continue coding my previous tutorial. I will continue adding more functions in GamePanel class. If you haven’t read the previous tutorial please go to the previous tutorial using this link
Basic step:
Go through previous tutorial
1.IMPORT STATEMENTS
First of all write these import statements in your .java file
Here we added three new imports one for random function , java.io and sun.audio for playing sound
2. ADDING MORE VARIABLES IN OUR GAMEPANEL CLASS
First of all we need to add two new images one is the point .png and other once is empty.png from our razmazio folder. Point.png is simply for spreading points and empty.png is an empty image just to remove the points when they are collected by our character.
After that we need to add 5 points at a time to some location in our screen so we need x and y variable for all those points. We simply create an array for that and store the coordinates of 20 points. Then we need to create a Boolean to check how many points have been taken. Then a random function to randomize the y coordinate for some difficulty. After that we will create a 2D array for the points each set of points will contain 5 point.png images so we set 5 columns and 20 rows. Then we simply declare a reference of audioStream and string variable for points and lives.
3. Adding in constructor
In the constructor we will simply call this function to set the points so that points get set to locations whenever the object of this class is created. We will define it later.
4. Writing point functions:
After the constructor we will define the functions for points. In the first function we will set the points by storing in a 2D array. After that we will set it on our background by randomizing the x and y coordinates. In the second function we will draw the points according to their x and y coordinates set by the previous function. In this function we use a counter next so that we can place 5 points side by side. We run a loop from 0 to 5 (because we want to display 5points set) then draw the point and increment the temporary counter which is used to change the x coordinate of the next point and it is reset after a set is placed.
5.Writing some functions in PaintComponent:
In the paint component we will add these functions . First the setText which will set the custom font. Then drawPoints function which will place the points and finally the detectPointsCollision function which will detect whether the character hit the point or not (We will pass a rectangle of the size of point to it as a parameter to detect collision).
6.Writing the detectCollision Function:
In this function we will draw invisible rectangles on all the points in our game. We will draw the rectangle using the same technique we used to draw the coins. By making a counter and drawing 5 rectangles at a time but here we don’t call any draw function with g2d because we don’t want to make the rectangle visible. We will firs check that the character intersects the point or not and whether the point is already taken or not. We will simply call the sound function coins and set the empty image at that location then add 10 points in the points string.
7. Sound Function
In this function we will simply read the sound file using input stream and play it with default java audio player
.
8. WRITING THE SETFONT CLASS:
In this function we simply read the font file from the folder and create that font with 40px size . After creating the font we simply register the font to the graphics environment of our application and set the font using g2d reference.
9. WRITING THE SETTEXT FUNCTION
This is the function that we are calling in our paint component. It simply calls the setFont function in it, set the text color and draw the point,lives string at certain location on our screen. So that’s all for this tutorial this was just a basic layout of the game you can use it to make a proper game.
OUTPUT:
Download
In this tutorial you will learn:
1. Playing sound in JAVA
2. Adding points in java
3. Adding custom Mario FONTS
4. Timer class
5. Animations using timer
6. Side Scroller game
7. Game Programming
8. Changing screens in the game
9. Swing Animations
10. Event handling
11. JAVA awt
12. JAVA swing
13. Adapters
In this tutorial I will continue coding my previous tutorial. I will continue adding more functions in GamePanel class. If you haven’t read the previous tutorial please go to the previous tutorial using this link
Loading…
www.sourcecodester.com
Basic step:
Go through previous tutorial
1.IMPORT STATEMENTS
First of all write these import statements in your .java file
- import
java.awt.*
;
- import
javax.swing.*
;
- import
javax.swing.Timer
;
- import
java.awt.event.*
;
- import
java.util.*
;
- import
java.io.*
;
- import
sun.audio.*
;
Here we added three new imports one for random function , java.io and sun.audio for playing sound
2. ADDING MORE VARIABLES IN OUR GAMEPANEL CLASS
- protected
Image
point =
new
ImageIcon
(
"razmazio\\
point.png"
)
.getImage
(
)
;
- protected
Image
empty =
new
ImageIcon
(
"razmazio\\
empty.png"
)
.getImage
(
)
;
First of all we need to add two new images one is the point .png and other once is empty.png from our razmazio folder. Point.png is simply for spreading points and empty.png is an empty image just to remove the points when they are collected by our character.
- int
point_x[
]
=
new
int
[
20
]
, point_y[
]
=
new
int
[
20
]
;
// Point coordinates
- boolean
pointTaken[
]
[
]
=
new
boolean
[
20
]
[
5
]
;
// For removing points
- Random
rand =
new
Random
(
)
;
//for randomising the components
- protected
Image
points[
]
[
]
=
new
Image
[
20
]
[
5
]
;
- AudioStream rza;
// For sounds
- String
poin =
"0"
;
- String
lives=
"3"
;
After that we need to add 5 points at a time to some location in our screen so we need x and y variable for all those points. We simply create an array for that and store the coordinates of 20 points. Then we need to create a Boolean to check how many points have been taken. Then a random function to randomize the y coordinate for some difficulty. After that we will create a 2D array for the points each set of points will contain 5 point.png images so we set 5 columns and 20 rows. Then we simply declare a reference of audioStream and string variable for points and lives.
3. Adding in constructor
- GamePanel{
- setPoints(
)
;
- }
In the constructor we will simply call this function to set the points so that points get set to locations whenever the object of this class is created. We will define it later.
4. Writing point functions:
- void
setPoints(
)
{
- for
(
int
i =
0
;
i <
20
;
i++
)
- for
(
int
j =
0
;
j<
5
;
j++
)
- points[
i]
[
j]
=
point;
// Initializing points
- for
(
int
i =
0
;
i <
20
;
i++
)
- {
- point_x[
i]
=
rand.nextInt
(
i+
1
)
+
(
i+
1
)
*
1000
;
//randomizing xcoord of points
- point_y[
i]
=
rand.nextInt
(
120
)
+
480
;
// randomizing ycoord
- }
- }
//end setpoints
- void
drawPoints(
Graphics
g2d)
{
- int
next =
0
;
// for next point in series
- for
(
int
i =
0
;
i <
20
;
i++
)
- {
- next =
0
;
//resetting next for next set of points
- for
(
int
j =
0
;
j <
5
;
j++
)
{
- g2d.drawImage
(
points[
i]
[
j]
, (
point_x[
i]
+
next)
-
bk_x, point_y[
i]
, null
)
;
- next +=
50
;
//one point width is 40px
- }
- }
- }
After the constructor we will define the functions for points. In the first function we will set the points by storing in a 2D array. After that we will set it on our background by randomizing the x and y coordinates. In the second function we will draw the points according to their x and y coordinates set by the previous function. In this function we use a counter next so that we can place 5 points side by side. We run a loop from 0 to 5 (because we want to display 5points set) then draw the point and increment the temporary counter which is used to change the x coordinate of the next point and it is reset after a set is placed.
5.Writing some functions in PaintComponent:
- setText(
g2d)
;
- drawPoints(
g2d)
;
- detectPointsCollision(
new
Rectangle
(
rz_x, rz_y, 40
, 60
)
)
;
In the paint component we will add these functions . First the setText which will set the custom font. Then drawPoints function which will place the points and finally the detectPointsCollision function which will detect whether the character hit the point or not (We will pass a rectangle of the size of point to it as a parameter to detect collision).
6.Writing the detectCollision Function:
- void
detectPointsCollision(
Rectangle
rz)
throws
ArrayIndexOutOfBoundsException
- {
- Rectangle
p[
]
[
]
=
new
Rectangle
[
20
]
[
5
]
;
- for
(
int
i =
0
, next;
i <
20
;
i++
)
- {
- next =
0
;
//resetting for next set of points
- for
(
int
j =
0
;
j <
5
;
j++
)
- {
- p[
i]
[
j]
=
new
Rectangle
(
(
point_x[
i]
+
next)
-
bk_x, point_y[
i]
, 50
, 50
)
;
//drawing rectangles on points
- if
(
rz.intersects
(
p[
i]
[
j]
)
&
pointTaken[
i]
[
j]
==
false
)
- {
- coins(
)
;
- pointTaken[
i]
[
j]
=
true
;
- points[
i]
[
j]
=
empty;
// removing point
- poin =
Integer
.toString
(
Integer
.parseInt
(
poin)
+
10
)
;
- }
- next+=
50
;
// for next point in series
- }
//end columns for
- }
//end rows for
- }
//end detectPointsCollision
In this function we will draw invisible rectangles on all the points in our game. We will draw the rectangle using the same technique we used to draw the coins. By making a counter and drawing 5 rectangles at a time but here we don’t call any draw function with g2d because we don’t want to make the rectangle visible. We will firs check that the character intersects the point or not and whether the point is already taken or not. We will simply call the sound function coins and set the empty image at that location then add 10 points in the points string.
7. Sound Function
- void
coins(
)
{
- try
{
- InputStream
test =
new
FileInputStream
(
"sounds\\
smb_coin.wav"
)
;
- rza =
new
AudioStream(
test)
;
- AudioPlayer.player
.start
(
rza)
;
- }
- catch
(
Exception
e)
{
}
- }
//end music
In this function we will simply read the sound file using input stream and play it with default java audio player
.
8. WRITING THE SETFONT CLASS:
- static
void
setFont(
Graphics
g2d)
- {
- Font
rzFont =
null
;
- File
rzfontfile =
new
File
(
"fonts\\
SuperMario256.ttf"
)
;
- try
- {
- rzFont =
Font
.createFont
(
Font
.TRUETYPE_FONT
,rzfontfile)
.deriveFont
(
Font
.PLAIN
, 40f)
;
- }
catch
(
FontFormatException
e)
{
}
catch
(
IOException
e)
{
}
- GraphicsEnvironment
ge =
GraphicsEnvironment
.getLocalGraphicsEnvironment
(
)
;
- ge.registerFont
(
rzFont)
;
- g2d.setFont
(
rzFont)
;
- }
//end setFont
In this function we simply read the font file from the folder and create that font with 40px size . After creating the font we simply register the font to the graphics environment of our application and set the font using g2d reference.
9. WRITING THE SETTEXT FUNCTION
- void
setText(
Graphics
g2d)
//Arranging points and lives labels at proper positions on the top
- {
- setFont(
g2d)
;
- g2d.setColor
(
Color
.RED
)
;
- g2d.drawString
(
"POINTS: "
,getX(
)
,50
)
;
- g2d.drawString
(
poin ,180
,50
)
;
- g2d.setColor
(
Color
.YELLOW
)
;
- g2d.drawString
(
"LIVES: "
, 600
, 50
)
;
- g2d.drawString
(
lives, 780
, 50
)
;
- g2d.setColor
(
Color
.BLUE
)
;
- }
This is the function that we are calling in our paint component. It simply calls the setFont function in it, set the text color and draw the point,lives string at certain location on our screen. So that’s all for this tutorial this was just a basic layout of the game you can use it to make a proper game.
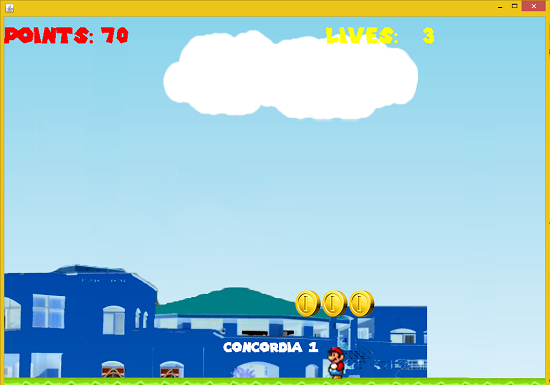
OUTPUT:
Download
You must upgrade your account or reply in the thread to view hidden text.